- Capabilities
- Getting started
- Architecture center
- Platform updates
Announcements
REMINDER: Sign up for the Foundry Newsletter to receive a summary of new products, features, and improvements across the platform directly to your inbox. For more information on how to subscribe, see the Foundry Newsletter and Product Feedback channels announcement.
Share your thoughts about these announcements in our Developer Community Forum ↗.
Foundry Worker data ingest and export, media ingest, and Iceberg extract operations are available without compute costs
Date published: 2026-10-16
Foundry Worker is the recommended method for accessing external systems and replaces the legacy Agent Worker.
From August 2026 on, Foundry Worker no longer incurs compute costs for data ingest and export, media ingest, and Iceberg extract operations. This is intended to facilitate migration from Agent Worker to Foundry Worker.
What's included
The following operations on Foundry Worker are now free of compute charges:
- Data ingest
- Data export
- Media ingest
- Iceberg extract
Previously, these operations were charged as standard transforms. Customers can expect to see a noticeable reduction in compute costs when running these workloads on Foundry Worker.
Note that no credits will be issued for prior compute charges on these operations.
What's not included
Streaming ingests will continue to be billed. The pricing model for streaming operations will be available soon.
Next step: Migrate your connectors
If you are currently using Agent Worker for data ingestion or export, we recommend migrating as soon as possible. Learn about the benefits and migration steps in the Foundry Worker vs. Agent Worker guide.
Your feedback matters
We want to hear about your experiences using Foundry Worker in the Palantir platform and welcome your feedback. Share your thoughts with Palantir Support channels or on our Developer Community ↗ using the data-connection tag ↗.
GLM-5.3 now available in AIP through Amazon Bedrock
Date published: 2026-10-15
Z.ai’s GLM-5.3 is available as an experimental model in AIP through Amazon Bedrock for non-georestricted and US-georestricted commercial enrollments.
GLM-5.3 is an open-weight reasoning model designed for complex software engineering and multi-step agent tasks. It supports tool calling, structured outputs, and streaming responses. Learn more in the Amazon Bedrock model documentation ↗.
Getting started
To use this model:
- Confirm that your enrollment administrator has enabled the Z.ai model family for Amazon Bedrock and experimental models in AIP Settings.
- Review token costs and pricing.
- See the complete list of models available in AIP.
Your feedback matters
We want to hear about your experiences using language models in the Palantir platform and welcome your feedback. Share your thoughts with Palantir Support channels or on our Developer Community ↗ using the language-model-service tag ↗.
Claude Haiku 5.5 now available in AIP
Date published: 2026-10-15
Anthropic’s Claude Haiku 5.5 is now available in AIP for eligible commercial enrollments and US government enrollments at IL2 and IL4.
Model overview
Claude Haiku 5.5 is designed for fast responses and high-volume workloads, including summarization, classification, and focused coding tasks. For more information, review Anthropic’s model announcement ↗.
Availability
Claude Haiku 5.5 is available for eligible commercial enrollments that enable Claude through:
- Anthropic direct
- Google Vertex AI
- AWS Bedrock
- Microsoft Azure
Claude models are also available in IL2 and IL4 U.S. Government enrollments where access to Claude models via Google Vertex AI is enabled.
Getting started
To use this model:
- Confirm that your enrollment administrator has enabled the relevant model family.
- Review token costs and pricing.
- See the complete list of models available in AIP.
Your feedback matters
We want to hear about your experiences using language models in the Palantir platform and welcome your feedback. Share your thoughts with Palantir Support channels or on our Developer Community ↗ using the language-model-service tag ↗.
GPT-6.1 Sol now available in AIP
Date published: 2026-10-15
OpenAI’s GPT-6.1 Sol is now available in AIP through Direct OpenAI, Azure OpenAI, and Amazon Bedrock for eligible commercial enrollments.
For more information about the model, see OpenAI’s model documentation ↗.
Availability
The following table describes availability by provider:
| Provider | Supported commercial enrollments |
|---|---|
| Direct OpenAI | Non-georestricted and US-georestricted |
| Azure OpenAI | Non-georestricted |
| Amazon Bedrock | Non-georestricted and US-georestricted |
Getting started
To use this model:
- Confirm that your enrollment administrator has enabled the relevant model family.
- Review token costs and pricing.
- See the complete list of models available in AIP.
Your feedback matters
We want to hear about your experiences using language models in the Palantir platform and welcome your feedback. Share your thoughts with Palantir Support channels or on our Developer Community ↗ using the language-model-service tag ↗.
Gemini 4 Argon from Google Vertex AI now available in AIP
Date published: 2026-10-15
Gemini 4 Argon from Google Vertex AI is now available as an experimental model in AIP.
Model overview
Gemini 4 Argon ↗ is Google's latest model, great for complex reasoning and coding tasks.
Availability
Gemini 4 Argon is available through Google Vertex AI on the following enrollments:
- Commercial: Non-georestricted, US georestricted, and EU georestricted enrollments.
- US Government: IL2, IL4, and IL5 enrollments.
Getting started
To use this model:
- Confirm that your enrollment administrator has enabled the relevant model family.
- Review token costs and pricing.
- See the complete list of models available in AIP.
Your feedback matters
We want to hear about your experiences using language models in the Palantir platform and welcome your feedback. Share your thoughts with Palantir Support channels or on our Developer Community ↗ using the language-model-service tag ↗.
View state break causes directly in Pipeline Builder
Date published: 2026-10-15
Pipeline Builder's deploy menu now shows exactly which changes caused a state break for streaming and incremental pipelines, taking the guesswork out of understanding what’s blocking your deployment.
Previously, the Errors tab in the deploy menu only indicated that breaking changes existed. Now, the deploy menu surfaces the reasons for unacknowledged state breaks, giving you the context you need to decide what to do next.
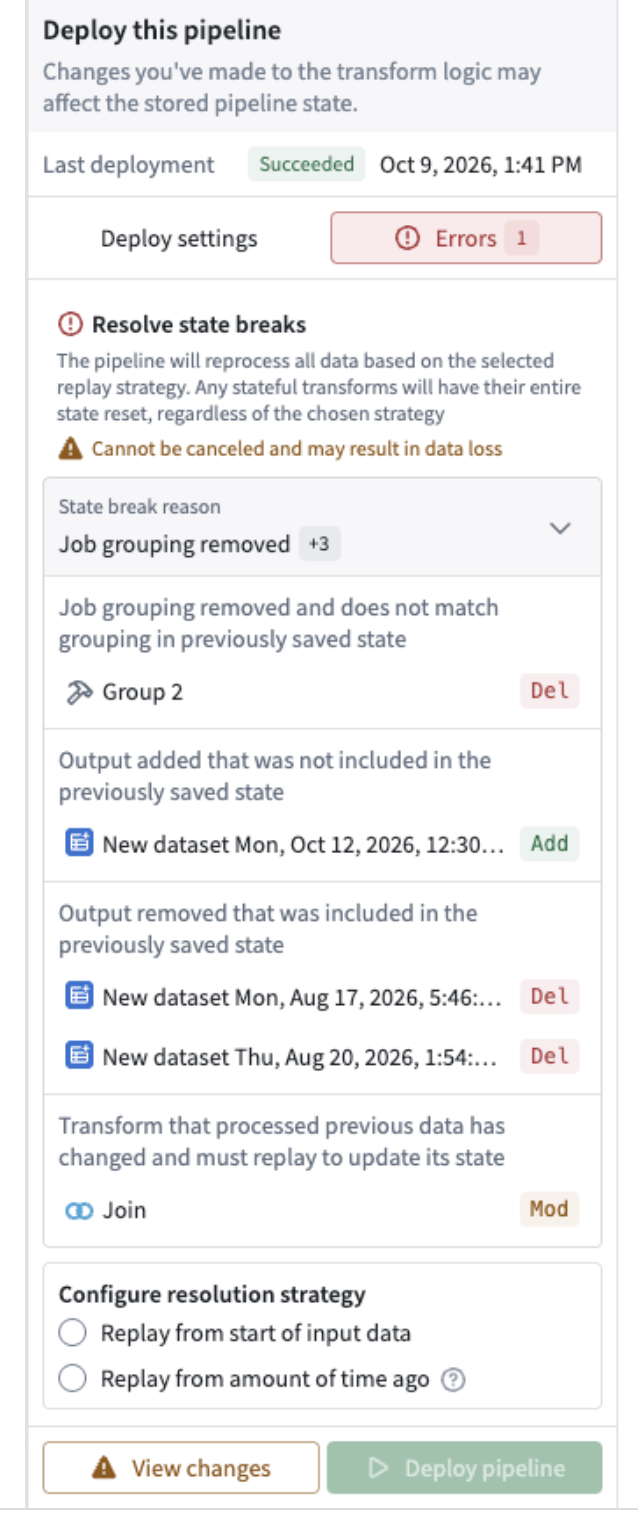
Updated deploy menu that shows state break reasons for a streaming pipeline.
What’s new
- Understand the state break cause: Users can now see a detailed breakdown of what changed in their pipeline that caused a state break. When collapsed, the panel shows the main reason and a count of any other reasons. When expanded, it groups the state breaks by reason and lists the affected entities, each with its change type.
- Direct Navigation to Offending Change: From each row, locate the change on the pipeline graph, open it for editing, or view its changes. You can move directly from the explanation to the relevant part of your pipeline without searching through the graph.
- In-Place Edit & Revert Capability: Edit or revert the problematic change without leaving the context, reducing friction in the debugging workflow
- Available for both streaming and incremental datasets: This update makes it easier to understand state breaks that block deployment for both streaming and incremental pipelines and allows users to take action with the relevant changes in view.
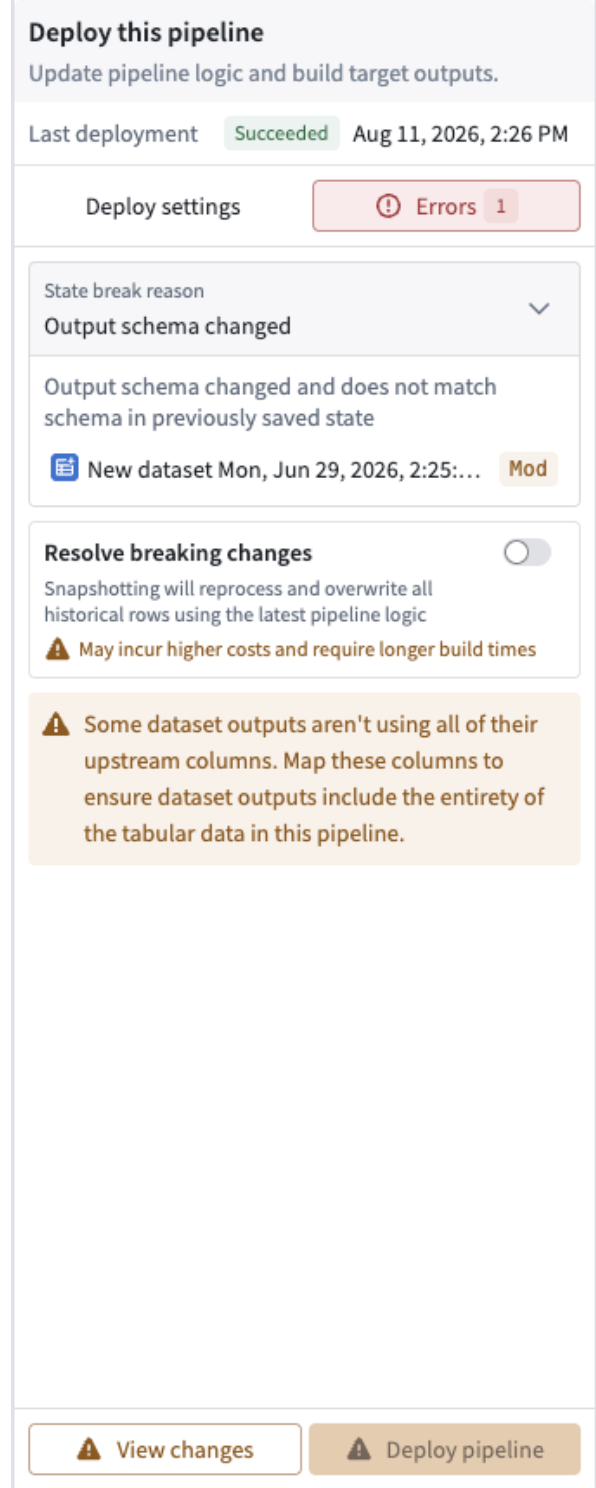
Updated deploy menu that shows state break reason for a streaming pipeline.
Developer Console now supports Global Branching
Date published: 2026-10-15
Developer Console now supports Global Branching. You can develop, test, and review Ontology SDK (OSDK) React application changes alongside Ontology changes on the same global branch, validating them together before merging into main.
What you can do on a global branch
- Generate branched SDKs: Add or remove SDK resources and generate a TypeScript SDK from the Ontology definitions on your branch.
- Test with branch data: Read data and run actions on the branch from a local development server or a Foundry-hosted VS Code workspace. An existing compatible SDK can read branch data without generating a new version.
- Share previews for review: Share a pull request preview so reviewers can test your application with its branched Ontology resources before merging.
- Review and rebase SDK resources: Review SDK resource additions and removals in a proposal's Changes tab, and resolve differences when the application's SDK resources change on
main.
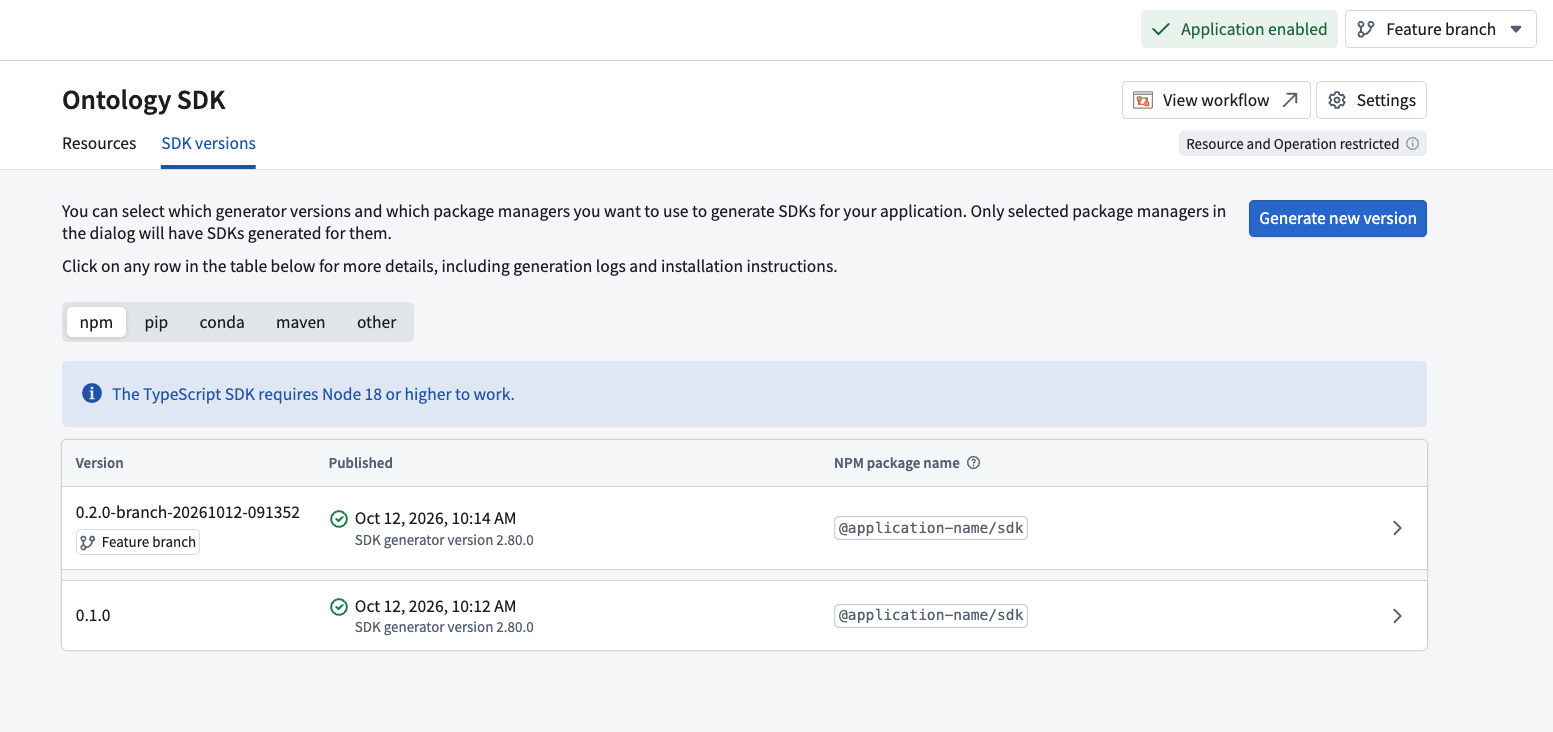
The SDK versions tab in Developer Console showing an SDK version generated on a global branch named “Feature branch”.
Get started
Review the prerequisites. For a new application, bootstrap a code repository from Developer Console using the React application template. For an existing application, follow the repository migration instructions first.
Use the same global branch for your Developer Console application, source code, and Ontology changes. The branch must use the same Ontology as your application. If you change Ontology definitions or the resources included in your SDK, make sure to generate a new SDK version on the branch. Review the branching integration guide for setup instructions.
Test in a Foundry-hosted VS Code workspace or local development environment once indexing completes for the object types your application uses. Create a proposal to open a source code pull request. After the application publish check succeeds, select Preview and share the preview with reviewers.
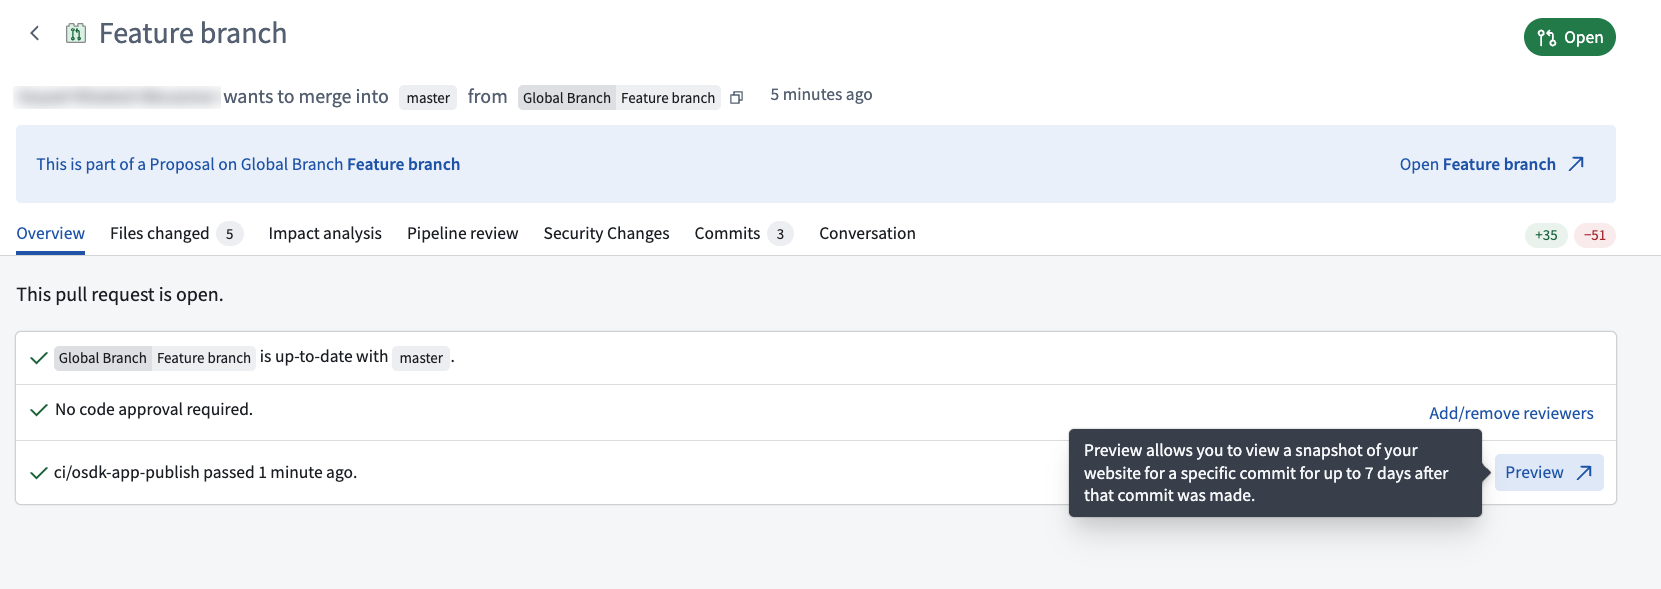
The Preview option on a global branch pull request after the application publish check succeeds.
Supported configurations and limitations
- Support is limited to TypeScript SDKs installed with npm.
- OAuth restrictions are shared across all branches. Changes also affect the application on
main. - Release tagging and production website publishing are disabled on global branches. Use pull request previews to share changes before merging.
Your feedback matters
Share your feedback through Palantir Support or the Developer Community ↗.
TypeScript v2 and Python functions now support Global Branching
Date published: 2026-10-13
Global branching is now generally available for TypeScript v2 and Python functions. Import branched Ontology entities into your code and test your code changes on branched data with live preview within the repository. Releasing on a branch publishes Functions that are isolated to the branch, which can be tested in downstream Workshop modules, Action Types, and more.
Get started in VS Code Workspaces or Code Repositories by migrating your repository to a local Ontology SDK.
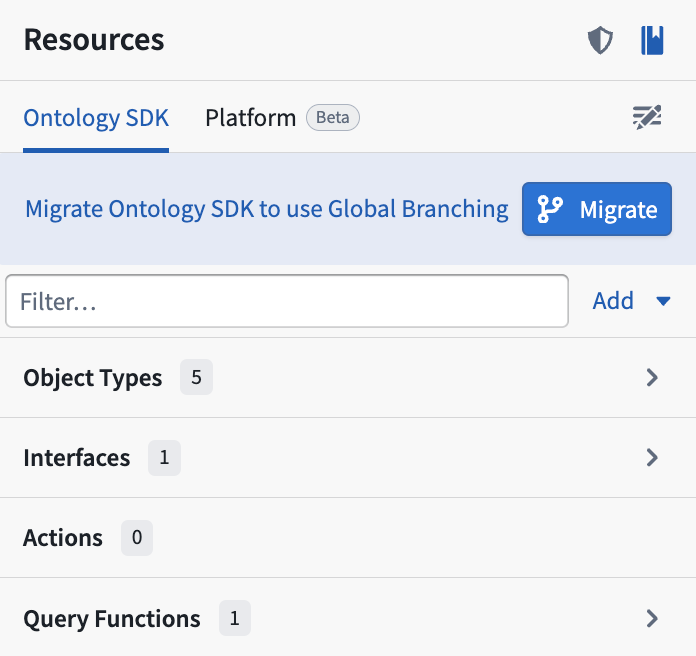
Use VS Code Workspaces or Code Repositories to migrate your repository to a local Ontology SDK.
Highlights
You can now develop, publish, and consume functions on a global branch:
- Add a TypeScript v2 or Python repository to a global branch.
- Develop a function that depends on changes made to resources on your global branch, such as newly created or modified ontology entities.
- Live preview in VS Code or Code Repositories.
- Tag and release a branched pre-release version to use in Workshop, AIP Logic, and function-backed actions.

- Use AI FDE to develop and test branched TypeScript v2 or Python functions.
Your feedback matters
We want to understand how branching for TypeScript v2 and Python functions improves your workflow and where we should focus our improvement efforts. Share your thoughts through Palantir Support channels and our Developer Community ↗.
Control LLM data access with markings in AIP
Date published: 2026-10-12
Administrators can now control LLM data access by configuring an allowlist of approved markings in Control Panel. AIP will block any LLM request from a Foundry session with access to a mandatory marking outside of that allowlist. This applies to all AIP usage, including agents such as AI FDE. Users whose access goes beyond the allowlist can still use AIP by choosing a scoped session that fits the model's policy, if available.
What's new
In Control Panel > AIP settings > Data access, administrators can choose between the following options:
- Allow any data: No restriction based on markings (the current behavior).
- Allow only the following markings: Restrict data based on an allowlist of approved mandatory markings, as well as unmarked data.
The policy applies to every Palantir-provided model family. Registered models are also supported and use the enrollment policy by default; you can also configure a model-specific policy that supersedes the enrollment policy.
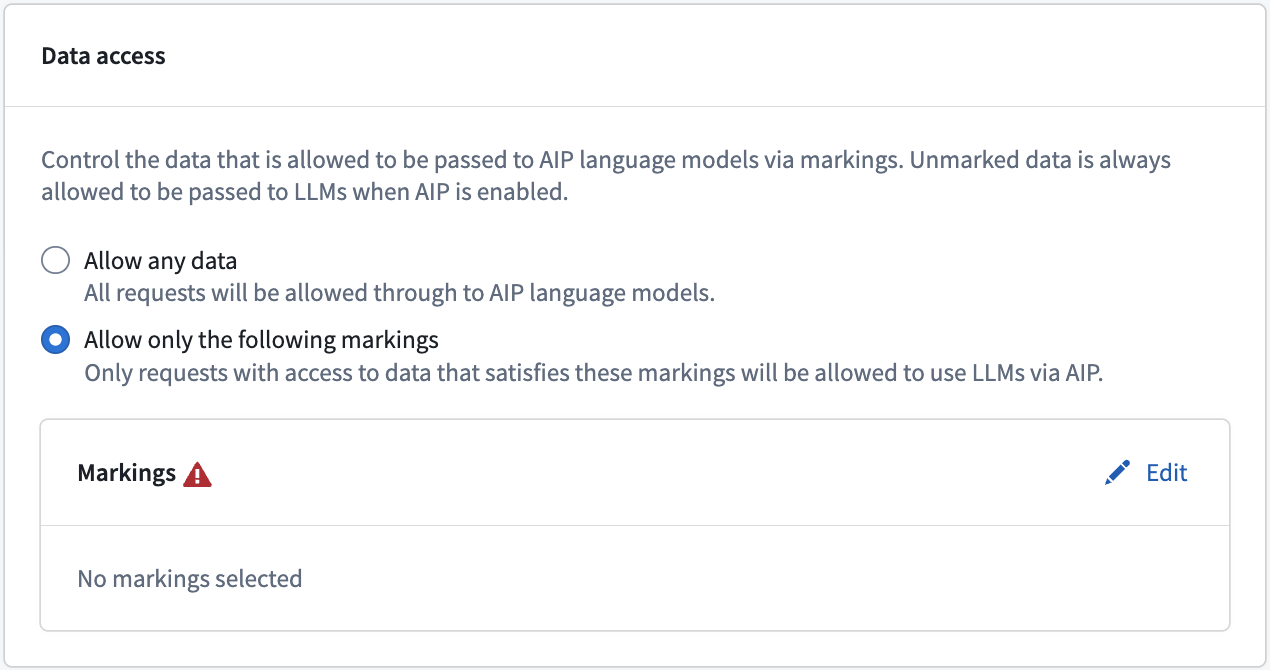
Configure the enrollment data access policy for AIP language models.
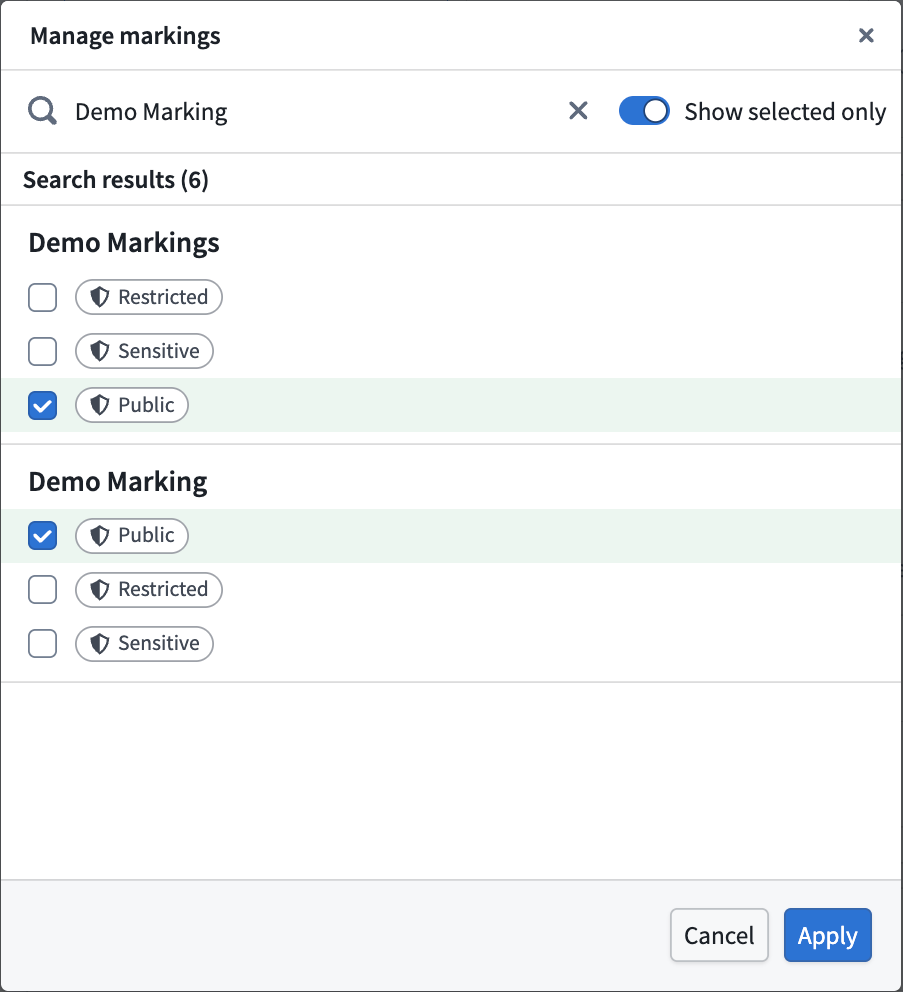
Select the mandatory markings to include in the allowlist.
How it works
AIP checks every mandatory marking available to the user's current session, not just the markings on the data sent to the model. A request will only pass the check if all of those markings are on the allowlist. The same check applies to agents such as AI FDE, which run under the user's own session. A session with no mandatory markings always passes.
For example, if the allowlist contains markings A and B, a user with access to A can use AIP and AI FDE as usual. A user with access to A and C is prevented from using AIP until they switch to a scoped session that excludes C.
Note that this is an allowlist, not a denylist. Learn more in the documentation on how to Control LLM data access with Markings.
Your feedback matters
We want to hear about your experiences managing language models in the Palantir platform and welcome your feedback. Share your thoughts with Palantir Support channels or on our Developer Community ↗ using the aip-control-panel tag ↗.
Claude Opus 5.5 and Claude Sonnet 5 now available in the UK
Date published: 2026-10-06
Anthropic’s Claude Opus 5.5 and Claude Sonnet 5 are now available in AIP for UK-georestricted enrollments with Claude via AWS Bedrock enabled.
Getting started
To use these models:
- Confirm that your enrollment administrator has enabled the relevant model family.
- Review token costs and pricing.
- See the complete list of models available in AIP.
Your feedback matters
We want to hear about your experiences using language models in the Palantir platform and welcome your feedback. Share your thoughts with Palantir Support channels or on our Developer Community ↗ using the language-model-service tag ↗.
Use ontology interfaces in Workshop
Date published: 2026-10-06
Support for ontology interfaces in Workshop is now generally available and enabled by default across enrollments. This enables you to build Workshop applications against interface properties and links shared by multiple object types without configuring the same workflow separately for every implementing object type.
Workflows enabled by interface support
In Workshop, you can now:
- Create object set variables from interfaces.
- Cast an object set variable as an interface or as its implementing object types.
- Filter object sets using interface properties and traverse interface links.
- Configure interface properties in most core widgets, such as the Object Table, Object List, Filter List, and Metric Card widgets.
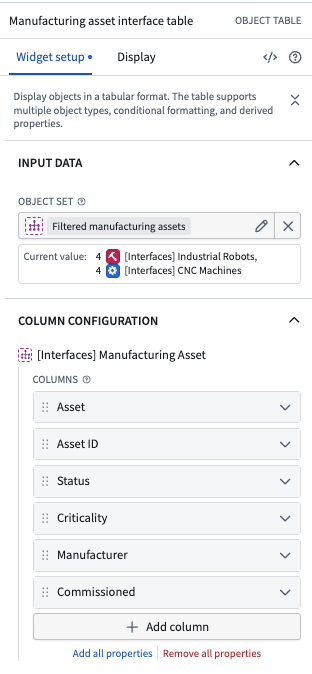
An object table widget configured with an interface object set composed of two object types implementing a manufacturing asset interface.
For example, you can define an Alert interface implemented by Maintenance Alert, Inspection Alert, and Safety Alert object types. Then, you can create one interface-based object set variable, filter it by shared properties, such as Event Date or Status, and display the results with a single widget configuration. When another object type implements the interface, that object type is included in the same interface-based workflow without the need to change the object set variable or reconfigure the module. Previously, you needed to create a unioned object set with more complex conditional application logic to achieve a similar result.
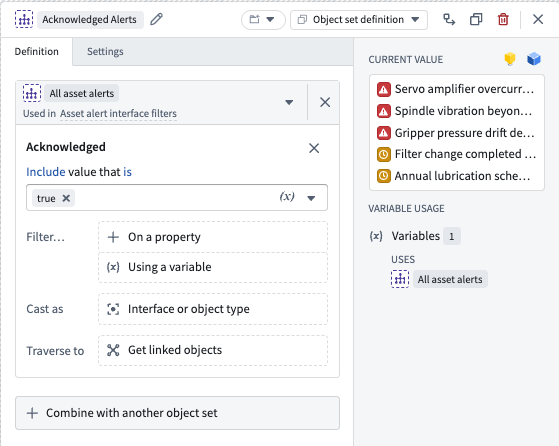
An interface-based object set composed of two object types filtered to include acknowledged asset alerts.
Unsupported widgets
Currently, not all widgets support ontology interfaces. When you pass an interface-based object set to an unsupported widget, Workshop displays an Interfaces not yet supported notification. The widget treats the input as an object type–based object set with property selection options derived from the implementing object types rather than the interface.
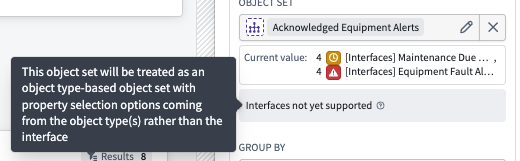
A widget configuration displays an Interfaces not yet supported notification and explains how the widget treats the object set.
Learn more about how to use ontology interfaces in Workshop.
What's next
Ontology interface support will be broadened to include other major widgets, including the Map, Pivot Table, and Gantt Chart widgets. To help prioritize support for additional widgets, share your thoughts with Palantir Support channels or on our Developer Community ↗ forum using the workshop tag ↗.
AIP Analyst adds organization defaults, group skills, model categories, and compact view
Date published: 2026-10-01
AIP Analyst now gives teams more ways to configure shared defaults and workflow guidance. New model categories simplify model selection, while compact view keeps conversations focused on your questions and the agent’s responses.
Configure organization defaults
Administrators can now set default search scopes and a default model category through the AIP Analyst extension in Control Panel. Users starting a new analysis directly in AIP Analyst inherit defaults from their primary organization for settings they have not configured. They can override these defaults in Settings.
Organizations can also require watermarks on PDF exports.
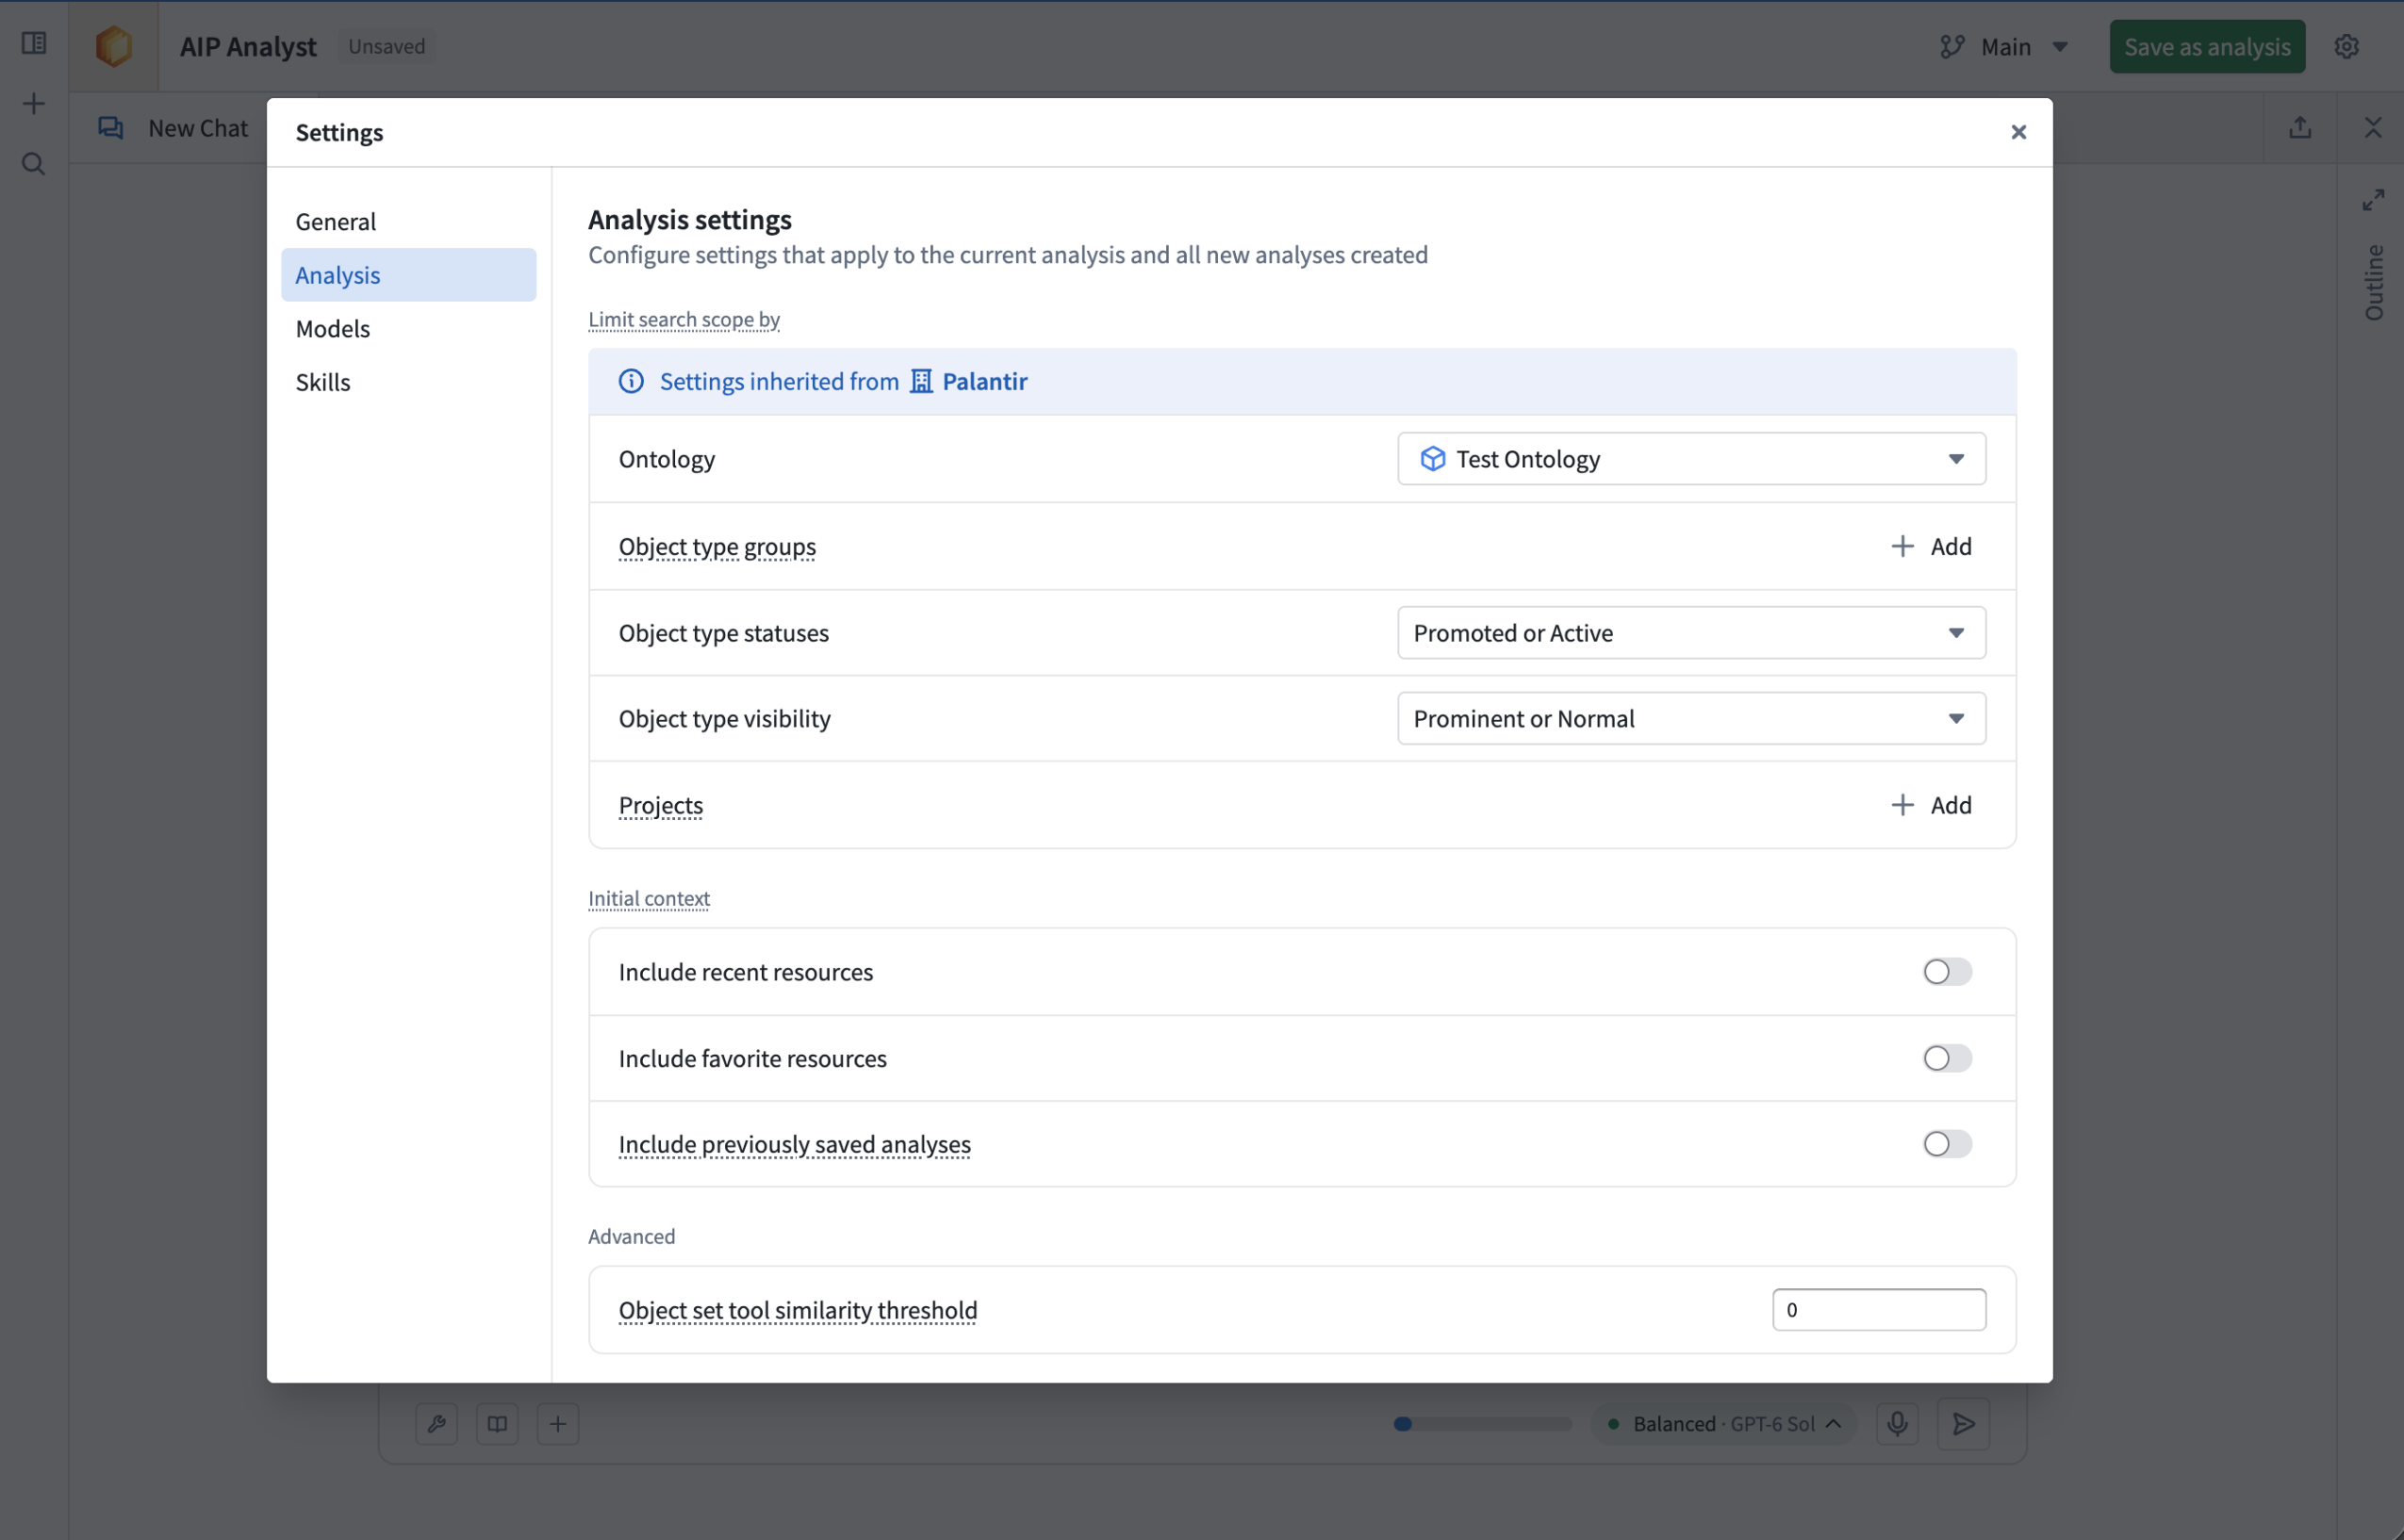
Users receive their primary organization's settings by default, user defaults can be updated in the settings dialog.
Share workflow guidance through group skills
Administrators can now assign AIP skills to user groups from Control Panel. Assigned skills automatically appear in members’ Skills settings, making shared guidance available without each user having to add it individually.
Use group skills to share instructions for common workflows, recommended object types and relationships, or guidance for interpreting results. Administrators choose which skills are enabled by default, and users can toggle inherited skills on or off. AIP Analyst loads an enabled skill’s full instructions when relevant to a question.
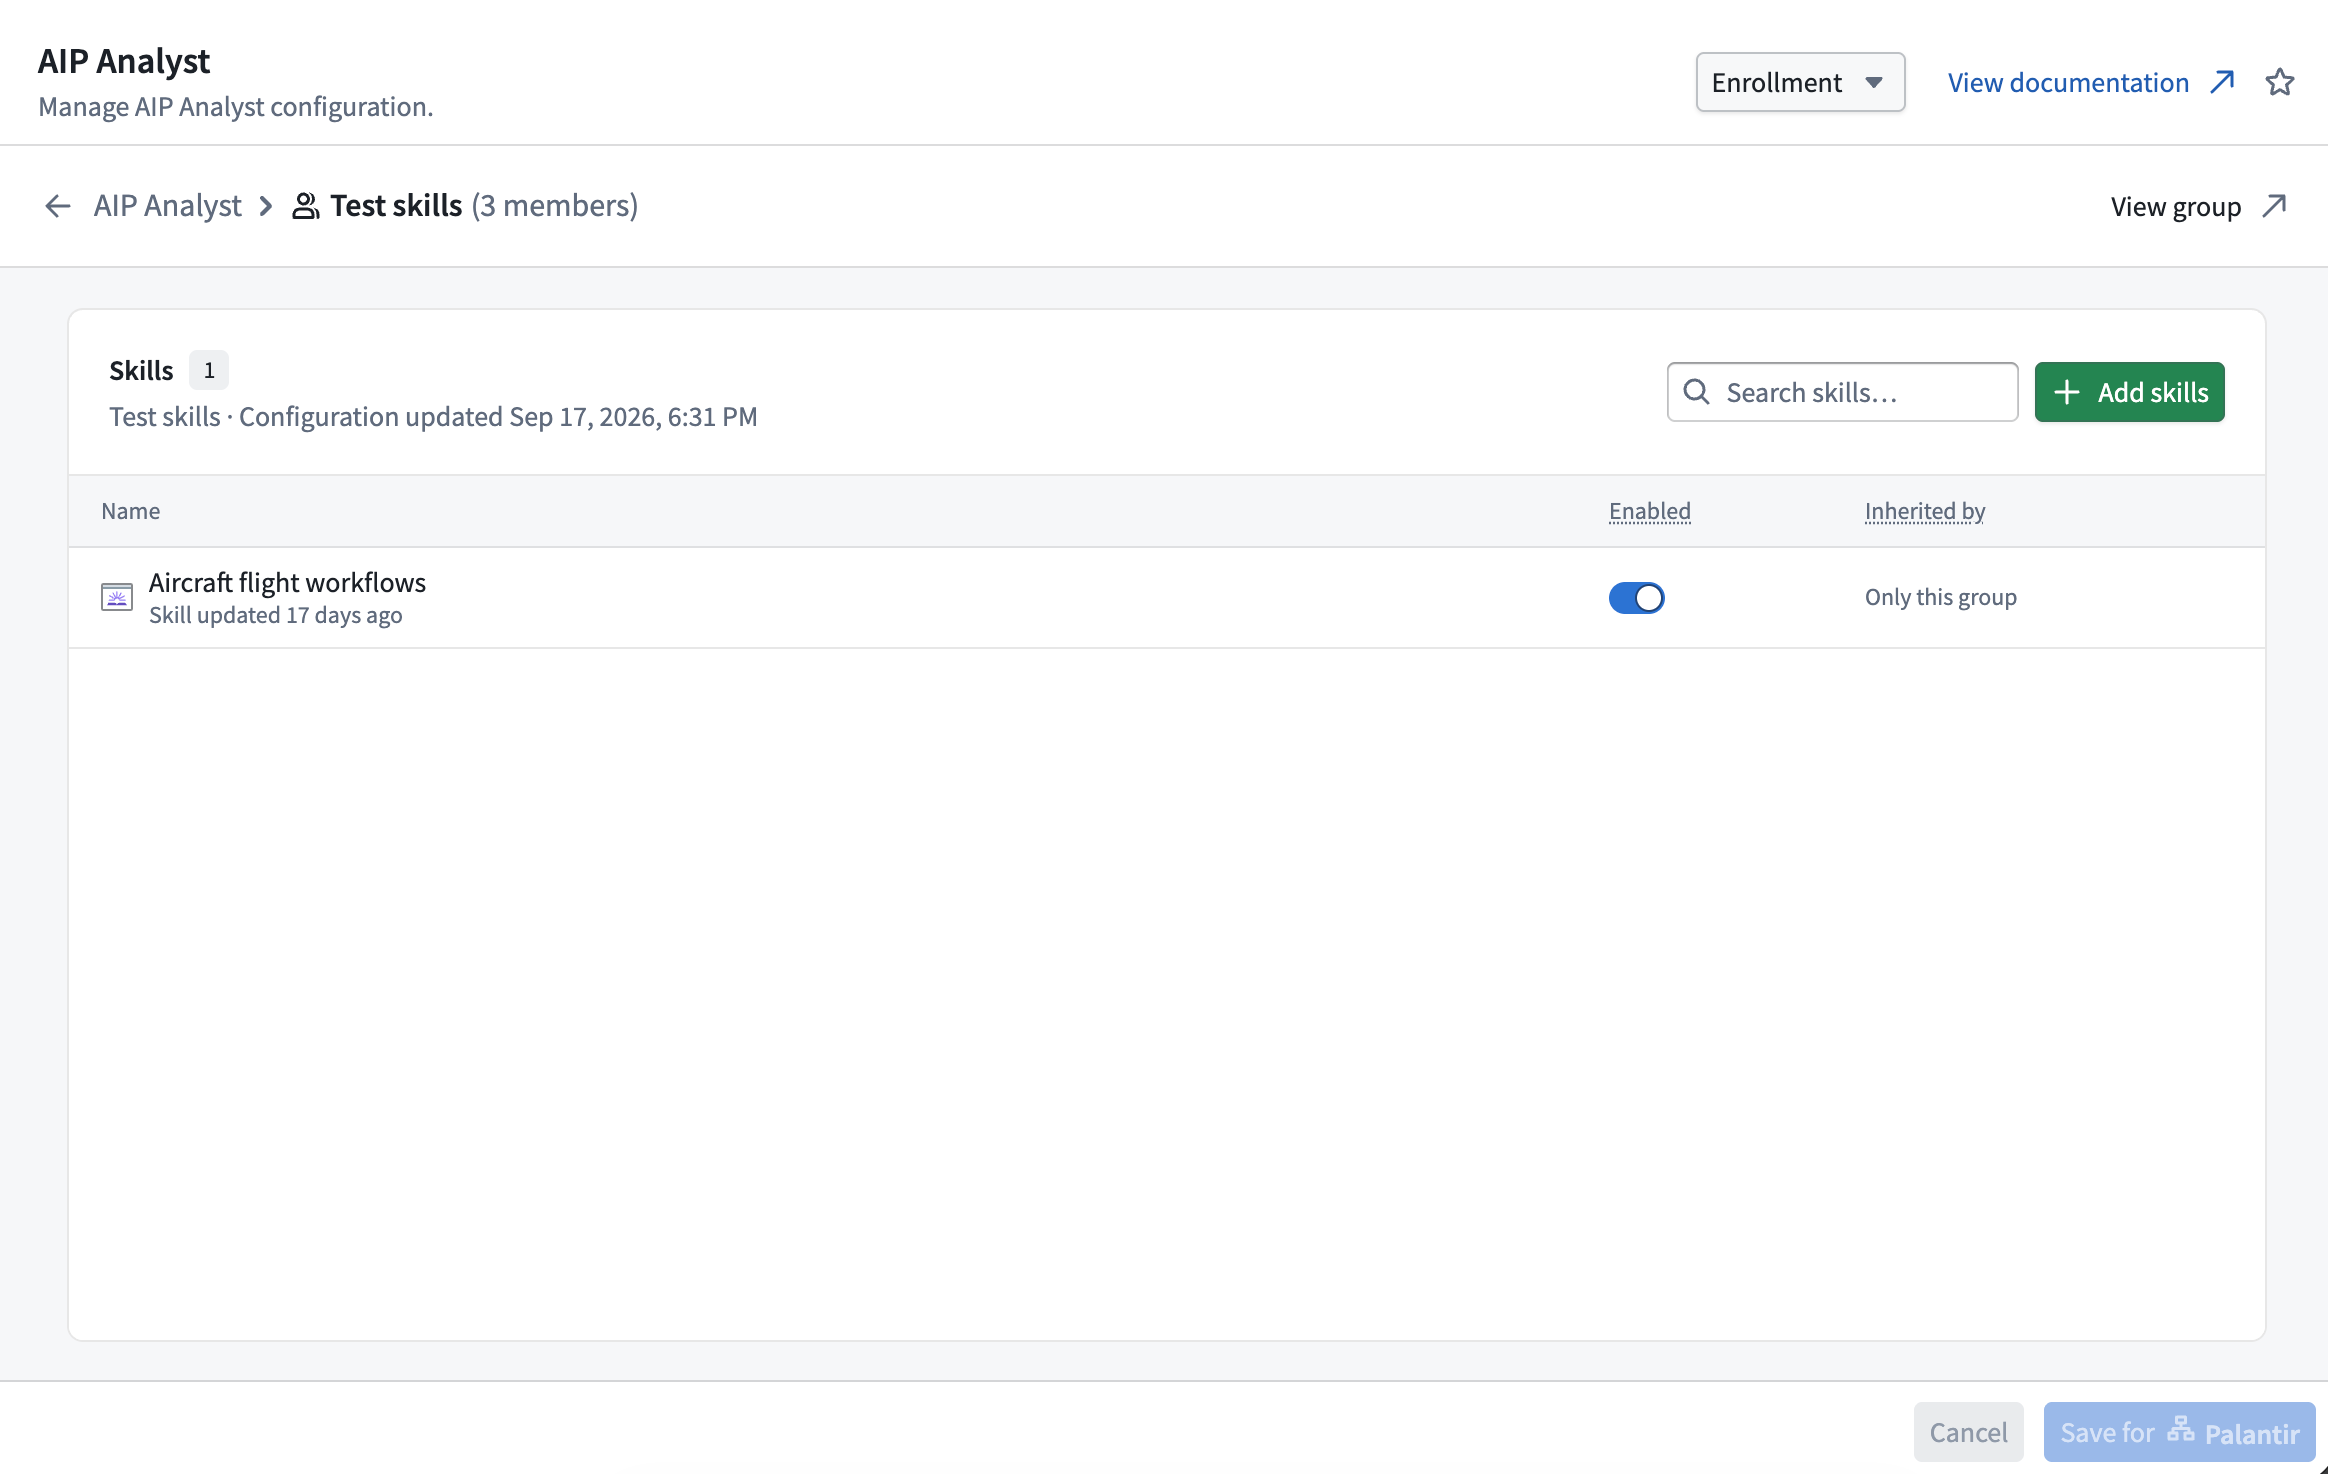
Configure skills for a group in the Control Panel app.
Choose between Fast, Balanced, and Smart
AIP Analyst now offers three model categories: Fast, Balanced, and Smart. The models behind these categories are updated as newer, more capable models become available.
Choose your preferred default category in Settings > Models, or switch categories from the chat. You can also configure a specific model for each category. Custom overrides do not receive automatic model updates, so you may miss newer models until you restore the category’s default.
Workshop builders can also configure the models used for each category and choose the default category for their widget.
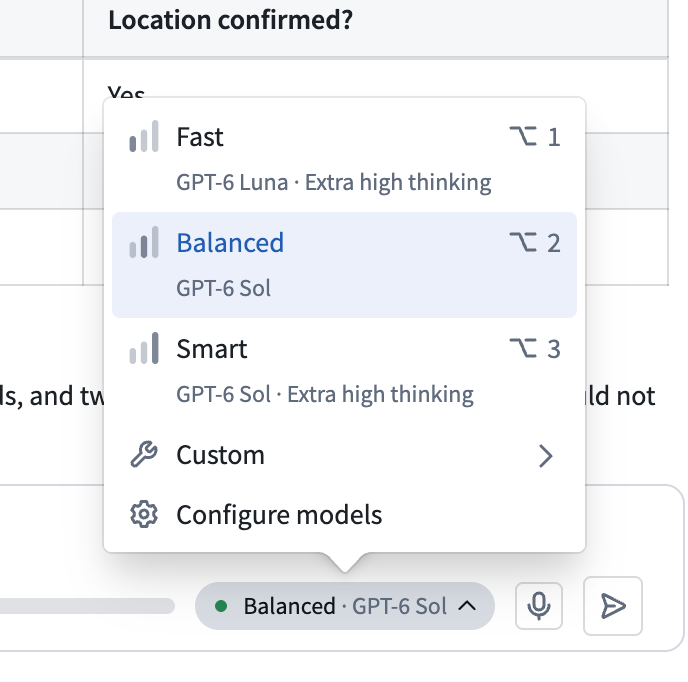
Select a Fast, Balanced, or Smart model depending on the task.
Keep conversations focused with compact view
Enable Compact view in Settings > General to collapse tool activity under concise status labels that update as AIP Analyst works. Your questions and the agent’s text responses remain visible. Expand the activity summaries whenever you want to inspect tool results.
You can also enable Hide thinking details to hide the model’s thinking content. Workshop builders can configure both options through Compact tool views and Hide thinking details.
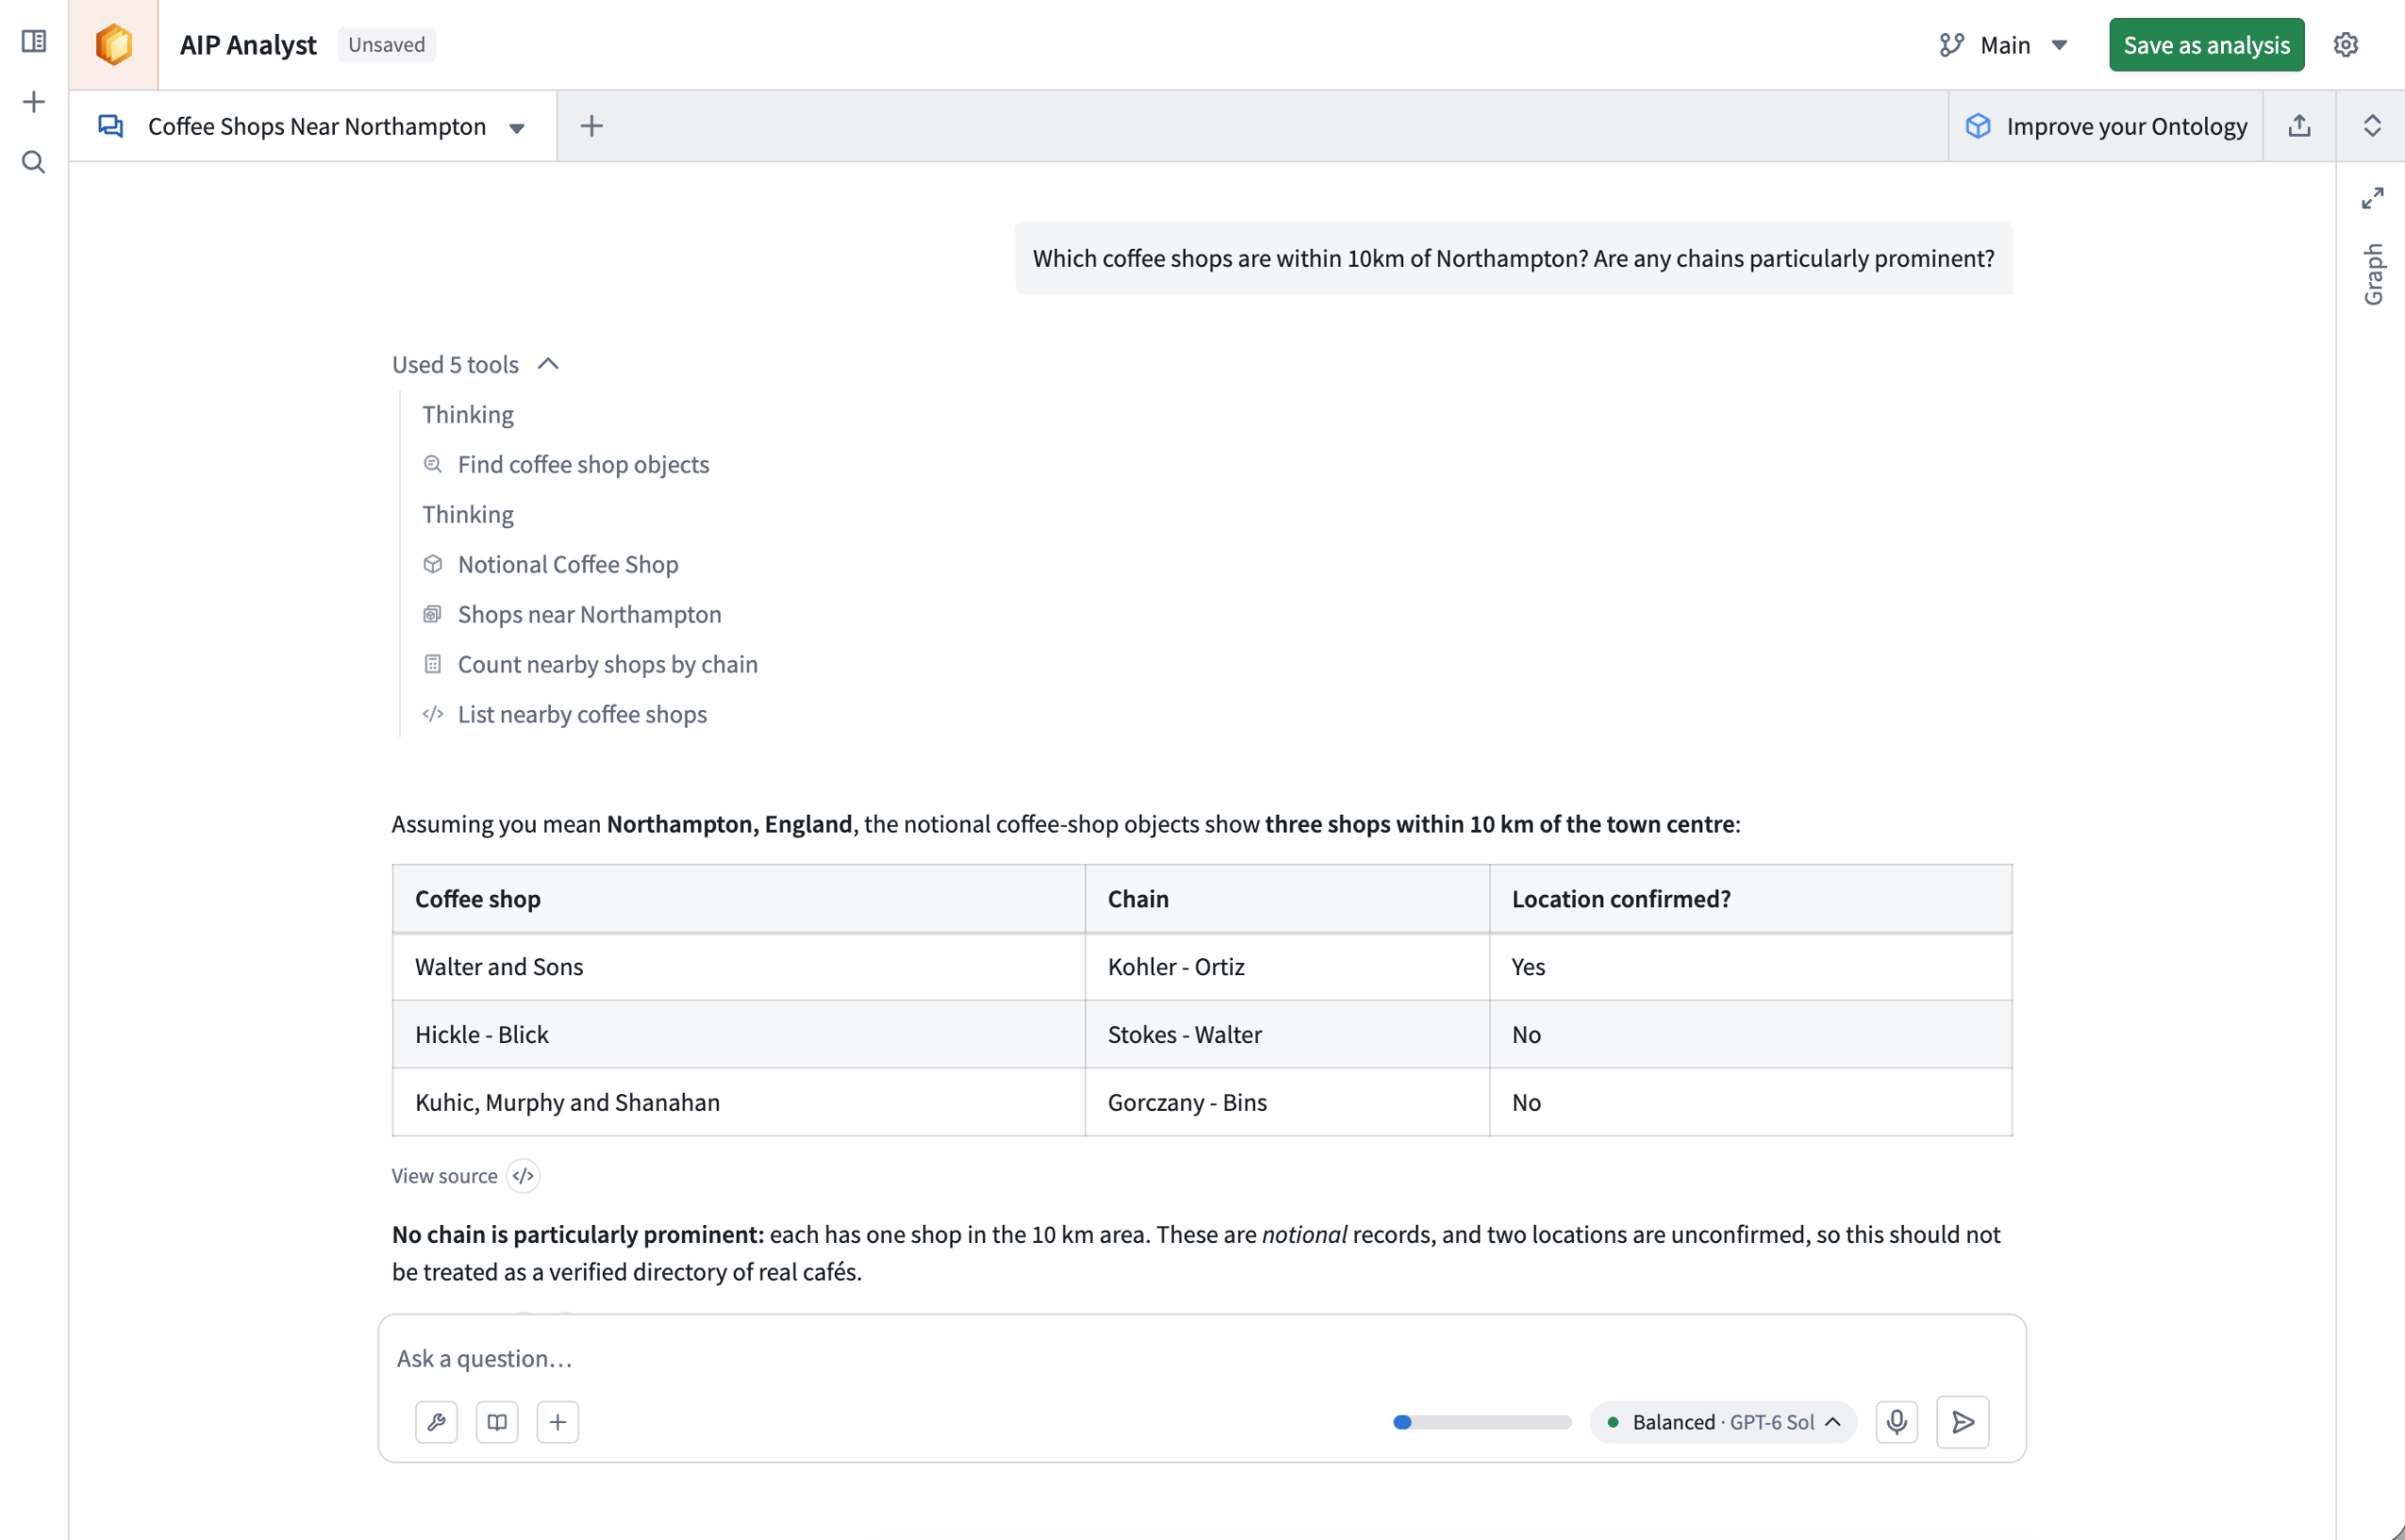
Compact mode minimizes tool views, keeping focus on the summaries.
Your feedback matters
We want to hear about your experiences using AIP Analyst in the Palantir platform and welcome your feedback. Share your thoughts with Palantir Support channels or on our Developer Community ↗ using the aip-analyst tag ↗.
Fireworks models now available for US georestricted commercial enrollments
Date published: 2026-10-01
The following models are now available in AIP through Fireworks for US georestricted commercial enrollments:
- Moonshot AI — Kimi K3 ↗
- Z.ai — GLM-5.3 ↗
- Z.ai — GLM-5.3 Flash ↗
- DeepSeek — DeepSeek V4.1 Flash ↗
Existing availability for non-georestricted (GLOBAL) commercial enrollments continues.
Getting started
To use these models:
- Confirm that your enrollment administrator has enabled the relevant model family.
- Review token costs and pricing.
- See the complete list of models available in AIP.
Your feedback matters
We want to hear about your experiences using language models in the Palantir platform and welcome your feedback. Share your thoughts with Palantir Support channels or on our Developer Community ↗ using the language-model-service tag ↗.
Faster pipelines in Pipeline Builder now support Iceberg tables
Date published: 2026-10-01
We're excited to announce support for reading and writing Foundry Iceberg tables directly in Pipeline Builder's Faster pipelines. You can use Iceberg tables as inputs, perform custom logic and transforms, and output Iceberg tables. This new capability provides greater flexibility and performance when building data transformation pipelines.
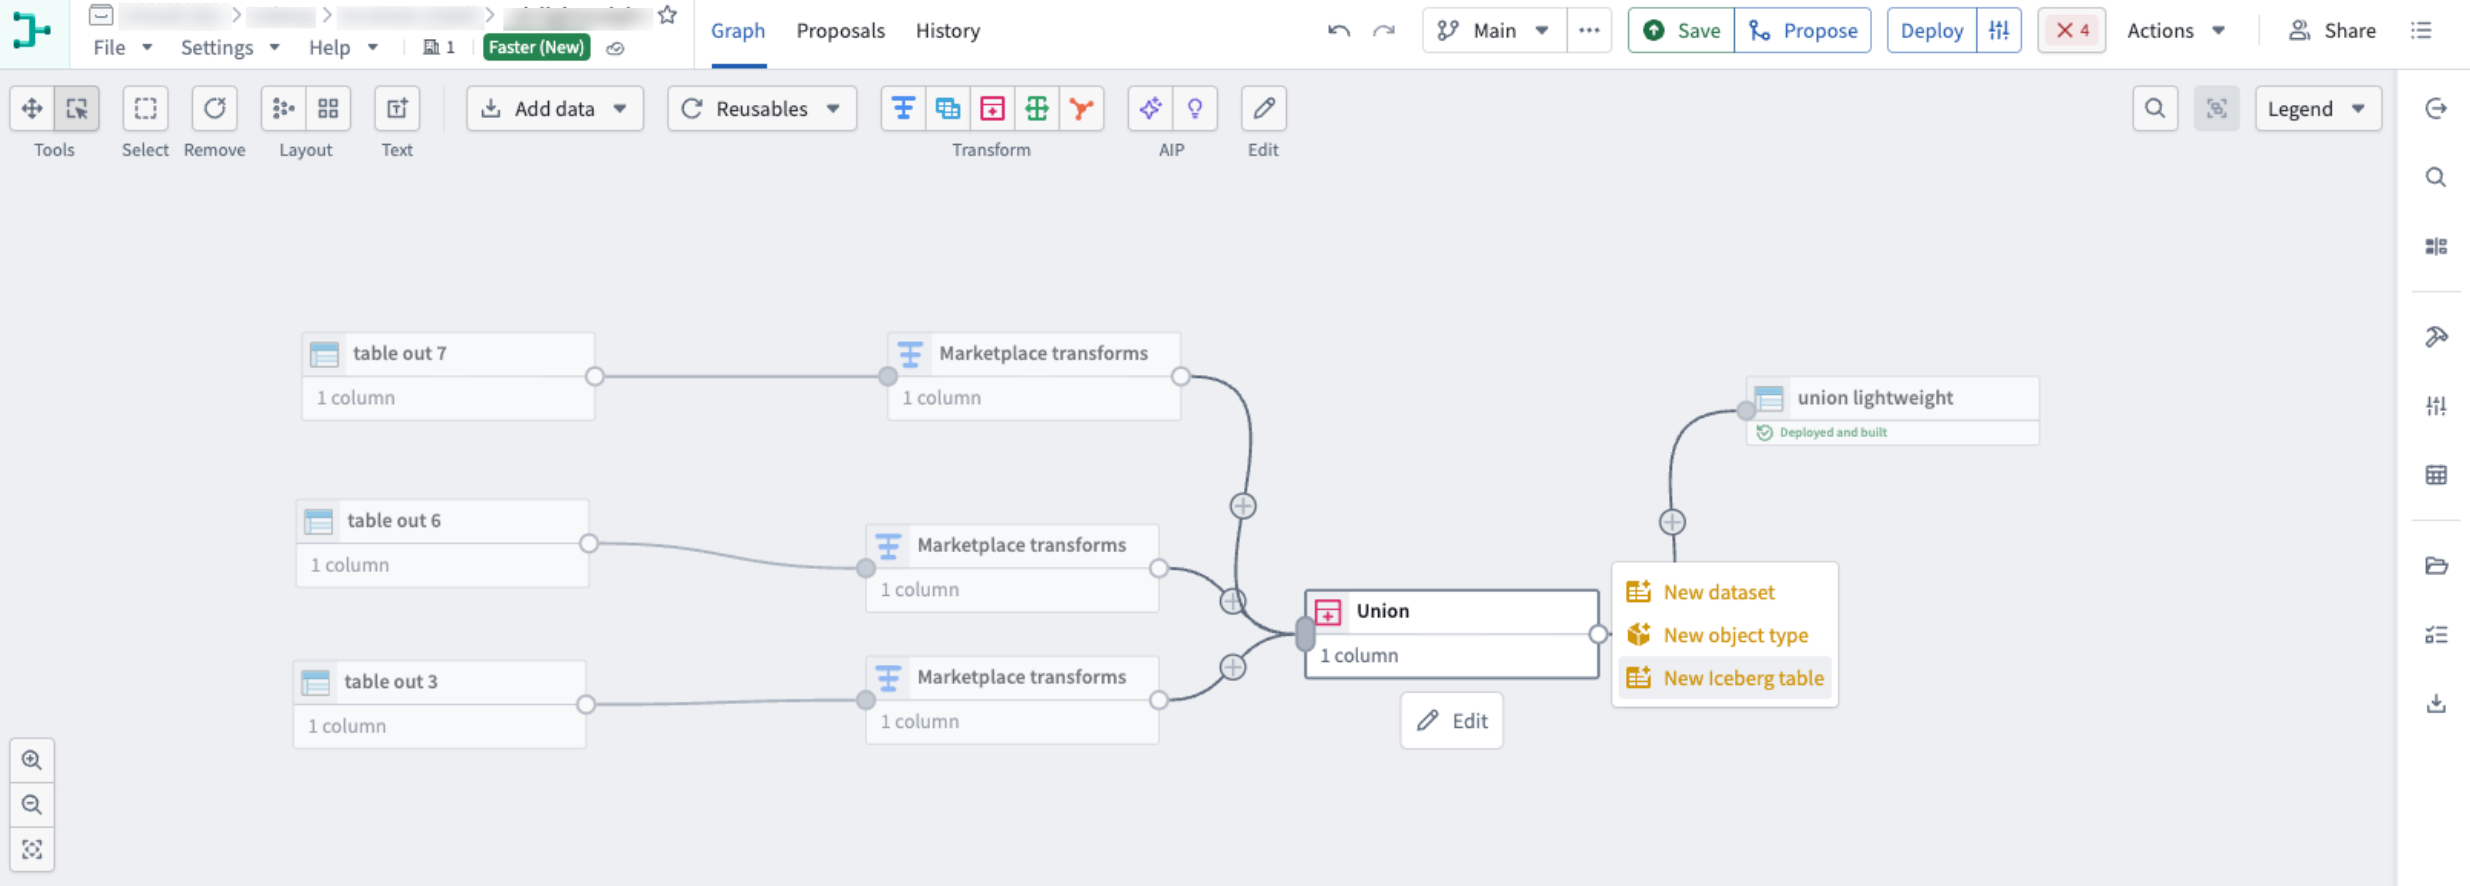
A Faster pipeline with Iceberg inputs and an Iceberg output
What's new
Use Iceberg alongside existing Foundry datasets in Faster Pipelines. You can read datasets and write Iceberg outputs, or use Iceberg tables as inputs to downstream transformations.
Key Features
- Encrypted Iceberg table support: Read and write both encrypted and unencrypted Iceberg tables in both Spark and Faster pipelines.
- Overwrite or append to Iceberg outputs: Rebuild the table’s contents in a snapshot run, or append new results from an incremental run. Note that reading from incremental Iceberg inputs in Faster pipelines is not yet supported.
- Data quality expectation support: Apply data quality expectations to Iceberg outputs with checks that can fail the build before publishing invalid results, ensuring data integrity.
Iceberg support in Pipeline Builder can help improve performance and provide additional flexibility when optimizing existing workflows or building new ones.
Your feedback matters
We want to hear about your experiences using Iceberg in the Palantir platform and welcome your feedback. Share your thoughts with Palantir Support channels or on our Developer Community ↗ using the iceberg ↗ tag.