- Capabilities
- Getting started
- Architecture center
- Platform updates
Functions
Register functions
If running in function execution mode, you must register the functions in your compute module to make them callable from elsewhere in Foundry. This page explains two different methods for manually registering a compute module function.
The compute modules SDK makes it easier to register functions by automatically inferring the schema of your function(s). If you are using the compute modules SDK, review the automatic function schema inference section below.
Register a function from the Compute Modules application
You can manually register a function for a compute module from the Functions page. Select Add function to open the Create function panel:

- Function name: The name of the function to be invoked. Typically, this should match the name of the function in your compute module.
- Inputs: The input parameter(s) to be passed as arguments to your compute module function.
Compute module function inputs are packaged into a JSON object; each input that you add corresponds to a property on the input object passed into your function. In the example below, function inputs are on the left, and the JSON object passed to the corresponding function is on the right.
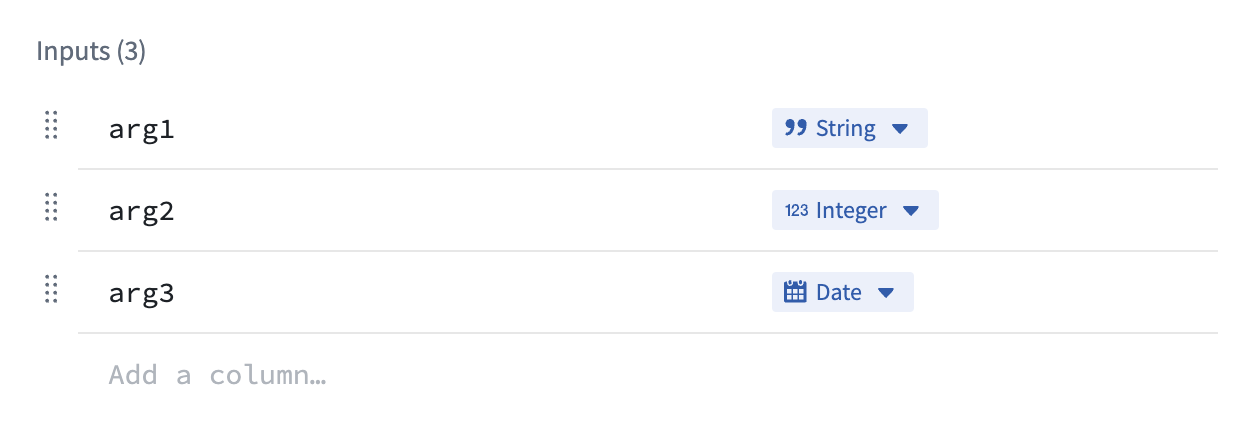
example_function_payload.json
Copied!1 2 3 4 5{ "arg1": "hello", "arg2": 2, "arg3": "1969-07-20" }
- Output: The return type of your function.
- API name: The API name is the function locator that allows you call your function from other code in Foundry, such as through a TypeScript function.
The compute module API format follows the structure
com.<namespace>.computemodules.<MyApiName>and must comply to the following naming rules:
- namespace: Must be all lowercase and contain no special characters.
- MyApiName: Must be in camel case and contain no special characters.
Changing the API name will break the consumer code. Only the latest published version of the query is supported.
Once you define a function, you can switch to the Test tab to try invoking the function, and/or select Save to save the function and make it callable from Foundry.
Compute module functions are always registered with version 0.0.0. If you update the function, the function's version will be overwritten by your changes.
Register a function using JSON
You can also manually define your function schema by sending an HTTP POST request from within your compute module. Typically, you will only need to do this if you are creating your own client. For information on the HTTP request, review our POST function schema documentation.
This endpoint accepts a JSON array as the payload, where each element in the array corresponds to the specification of a function in your compute module. Our Python SDK ↗ provides a good reference on how to assemble this JSON payload.
Function type reference
Below is a table showing the mapping between function input/output types and how those types are serialized over HTTP to a compute module:
| Foundry type | Serialized over HTTP as | Notes |
|---|---|---|
| Integer | int | |
| Byte | string | |
| Boolean | boolean | |
| Binary | string | |
| Date | string | |
| Timestamp | int | Milliseconds since epoch |
| Decimal | string | |
| Float | float | |
| Array | array (non-streaming), stream of JSON (streaming) | |
| Map | JSON | Key-value store (for example, Python dict, Java Map) |
| Struct | JSON | Custom object type |
Automatic function schema inference
Compute modules offer a streamlined way to define and register functions, enabling automatic schema inference and integration with Foundry's Compute Module application. This section provides an in-depth look at the automatic registration of functions and advanced usage scenarios, ensuring a smoother development experience.
The imported function schemas will only appear in the Compute Modules interface once your compute module is running and responsive. This means that you must deploy and run your compute module for the functions to be visible and accessible in Foundry. Review our documentation on debugging using replica status for more details.
In your compute module, you can define the schema of a function using a JSON structure directly within your code. This approach offers several benefits:
- Centralized schema definition
- Easy maintenance and updates
- Automatic integration with Foundry
By making a simple POST call when your compute module starts up, the module automatically infers the schema from the endpoint call and makes it available as a function in the Computes Modules application. This allows developers to define endpoint schemas once and easily import them into Foundry.
Example: Add function schema
Consider a simple add function, where inputs are x and y (two integers) and the output is a string. The example below shows how to define the JSON schema for this function:
schemas.json
Copied!1 2 3 4 5 6 7 8 9 10 11 12 13 14 15 16 17 18 19 20 21 22 23 24 25 26 27 28 29 30 31 32{ "functionName": "add", "inputs": [ { "name": "x", "dataType": { "integer": {}, "type": "integer" }, "required": true, "constraints": [] }, { "name": "y", "dataType": { "integer": {}, "type": "integer" }, "required": true, "constraints": [] } ], "output": { "single": { "dataType": { "string": {}, "type": "string" } }, "type": "single" } }
Once you have defined your JSON schema, send an HTTP POST request in your app.py file to register it with Foundry:
if __name__ == "__main__":
    certPath = os.environ['DEFAULT_CA_PATH']
    postSchemaUri = os.environ["POST_SCHEMA_URI"]

    with open('schemas.json', 'r') as file:
        SCHEMAS = json.load(file)

    requests.post(
        postSchemaUri,
        json=SCHEMAS,
        headers={"Module-Auth-Token": moduleAuthToken, "Content-Type": "application/json"},
        verify=certPath
    )
Make sure to handle exceptions and implement proper error logging in a production environment.
Notice that the function adheres to the following constraints:
- The schema definition function must declare the types of all of its inputs and the type of its output, using the supported Python type (see table below).
- The schema definition of each function must declare a
functionNamethat matches the Python function name.
| Python type | Foundry type | Serialized over HTTP as | Notes |
|---|---|---|---|
| int | Integer | int | |
| str | Byte | string | |
| bool | Boolean | boolean | |
| bytes | Binary | string | |
| datetime.datetime | Date | string | |
| datetime.datetime | Timestamp | int | Milliseconds since epoch |
| decimal.Decimal | Decimal | string | |
| float | Float | float | |
| list | Array | array (non-streaming), stream of JSON (streaming) | |
| set | Array | array (non-streaming), stream of JSON (streaming) | |
| dict | Map | JSON | Key-value store (for example, Python dict, Java Map) |
| class/TypedDict | Struct | JSON | Custom object type |
| Iterable | Array | array (non-streaming), stream of JSON (streaming) |
Automatic function discovery with the compute module SDK
The compute module SDK includes functionality for automatic function discovery. It inspects the defined functions and their input/output types, then converts them into FunctionSpecs that can be imported as Foundry Functions without modification.
To ensure this feature works seamlessly, you should understand how type inference works within the SDK and how to correctly define input and output types. Review the following considerations:
- The input class must be a complex type. Foundry Function specifications require the input type of a Function to be a complex type. If your function takes only a single primitive type as input, make sure to wrap that parameter in a complex type to properly infer your function schema.
- Input type definition
✅ TypedDict as input type
Copied!1 2 3 4 5 6 7 8 9 10# app.py from typing import TypedDict from compute_modules.annotations import function class HelloInput(TypedDict): planet: str @function def hello(context, event: HelloInput) -> str: return "Hello " + event["planet"] + "!"
✅ dataclass as input type
Copied!1 2 3 4 5 6 7 8 9 10 11 12 13 14 15 16 17 18 19 20 21 22# app.py from compute_modules.annotations import function from dataclasses import dataclass import datetime import decimal @dataclass class TypedInput: bytes_value: bytes bool_value: bool date_value: datetime.date decimal_value: decimal.Decimal float_value: float int_value: int str_value: str datetime_value: datetime.datetime other_date_value: datetime.datetime @function def typed_function(context, event: TypedInput) -> str: diff = event.other_date_value - event.datetime_value return f"The difference between the provided dates is {diff}"
✅ Regular class with both class AND constructor type hints
Copied!1 2 3 4 5 6 7 8 9 10 11 12 13 14# app.py from compute_modules.annotations import function class GoodExample: some_flag: bool some_value: int def __init__(self, some_flag: bool, some_value: int) -> None: self.some_flag = some_flag self.some_value = some_value @function def typed_function(context, event: GoodExample) -> int: return event.some_value
❌ AVOID Python class with no class type hints
Copied!1 2 3 4 5# app.py # This will raise an exception class BadClassNoTypeHints: def __init__(self, arg1: str, arg2: int): ...
❌ AVOID Python class with Args in constructor
Copied!1 2 3 4 5 6 7 8# app.py # This will raise an exception class BadClassArgsInit: arg1: str arg2: int def __init__(self, arg1: str, arg2: int, *args): ...
❌ AVOID Python class with Kwargs in constructor
Copied!1 2 3 4 5 6 7 8# app.py # This will raise an exception class BadClassKwargsInit: arg1: str arg2: int def __init__(self, arg1: str, arg2: int, **kwargs): ...
- Streaming output: The compute module python SDK includes support for streaming output if it is any
Iterabletype (exceptdict). To enable result streaming, change@functionto@function(streaming=True). You can review more details in our SDK documentation ↗. To make sure your streaming function is registered correctly, use anyIterabletype as the return type. Then the output will be registered as FoundryArray.
If you do not set streaming=True, the result will be posted as a single JSON blob of the whole iterable. It may throw if your iterable is not able to be serialized in JSON. If you set streaming=True, the result will be posted as a stream of JSON blobs serialized from each element. Review more in our SDK documentation ↗.
✅ Regular Iterable as output type
Copied!1 2 3 4 5 6 7 8 9 10 11# app.py # The outputs will be registered as Foundry Array from compute_modules.annotations import function @function(streaming=True) def get_string_list(context, event) -> list[str]: return [f'string {i}' for i in range(10)] @function(streaming=True) def get_string_set(context, event) -> set[str]: return {'string 1', 'string 2', 'string 3'}
✅ Generator as output type
Copied!1 2 3 4 5 6 7 8 9# app.py # Generator is Iterable. The output will be registered as Foundry Array from compute_modules.annotations import function import typing @function(streaming=True) def string_generator(context, event) -> typing.Iterable[str]: for i in range(10): yield f'string {i}'
⚠️ Regular Iterable as output type but streaming not enabled
Copied!1 2 3 4 5 6 7# app.py # This is valid. The output will be registered as Foundry Array, but the result will not be streamed from compute_modules.annotations import function @function def get_string_list(context, event) -> list[str]: return [f'string {i}' for i in range(10)]
❌ Generator as output type but streaming not enabled
Copied!1 2 3 4 5 6 7 8 9 10# app.py # Generator is not JSON serializable as a whole object. Cannot be used in a non-streaming function since it serializes the whole object # The output type will be registered as Foundry Array, but it will throw when executed from compute_modules.annotations import function import typing @function def string_generator(context, event) -> typing.Iterable[str]: for i in range(10): yield f'string {i}'
Register the function
Follow the steps below to register your function:
- Ensure your compute module is running.
- Navigate to the Functions tab in the Compute Module application.
- You should be able to view your function in the list of detected functions.

- Select the function you want to register to open a pop-up window.
- In the window, select Import.

Integrate a server
Integrating a server in compute modules is in the experimental phase of development and may not be available on your enrollment. Functionality may change during active development.
Typically, compute modules use a client which pulls jobs from the compute modules API. However, you can also use an HTTP server in compute modules without any need for a client, adapter, or SDK.
OpenAPI Specification
The OpenAPI Specification (OAS) ↗ is an open-source framework for enumerating HTTP APIs. You will first need to provide an OpenAPI specification for your server. There are many ways to create an OpenAPI specification for your server; you can do so manually or with an LLM assistant by following the OpenAPI documentation, using a generic OpenAPI generator, or using language-specific libraries.
To work with compute modules, your OpenAPI specification must adhere to all of the following constraints:
- Use OpenAPI Specification version 3.0.0 or higher.
- Include a single server with a URL of the form
http://localhost:port. - Include an
operationIdon each operation, which will be the name of the function in Foundry. - Only use
GET,PUT,POST, andDELETEverbs. - Include the
schemafield on all parameters, and not use any parameters withcookielocations. - Must not use
anyOf,oneOf, orallOfschemas, or schemas with multiple types. - Only include a single response code on all endpoints (since functions in Foundry only support a single output schema), which must be of
application/jsoncontent type.
The following is an example of a Python server using Flask, and its accompanying OpenAPI specification:
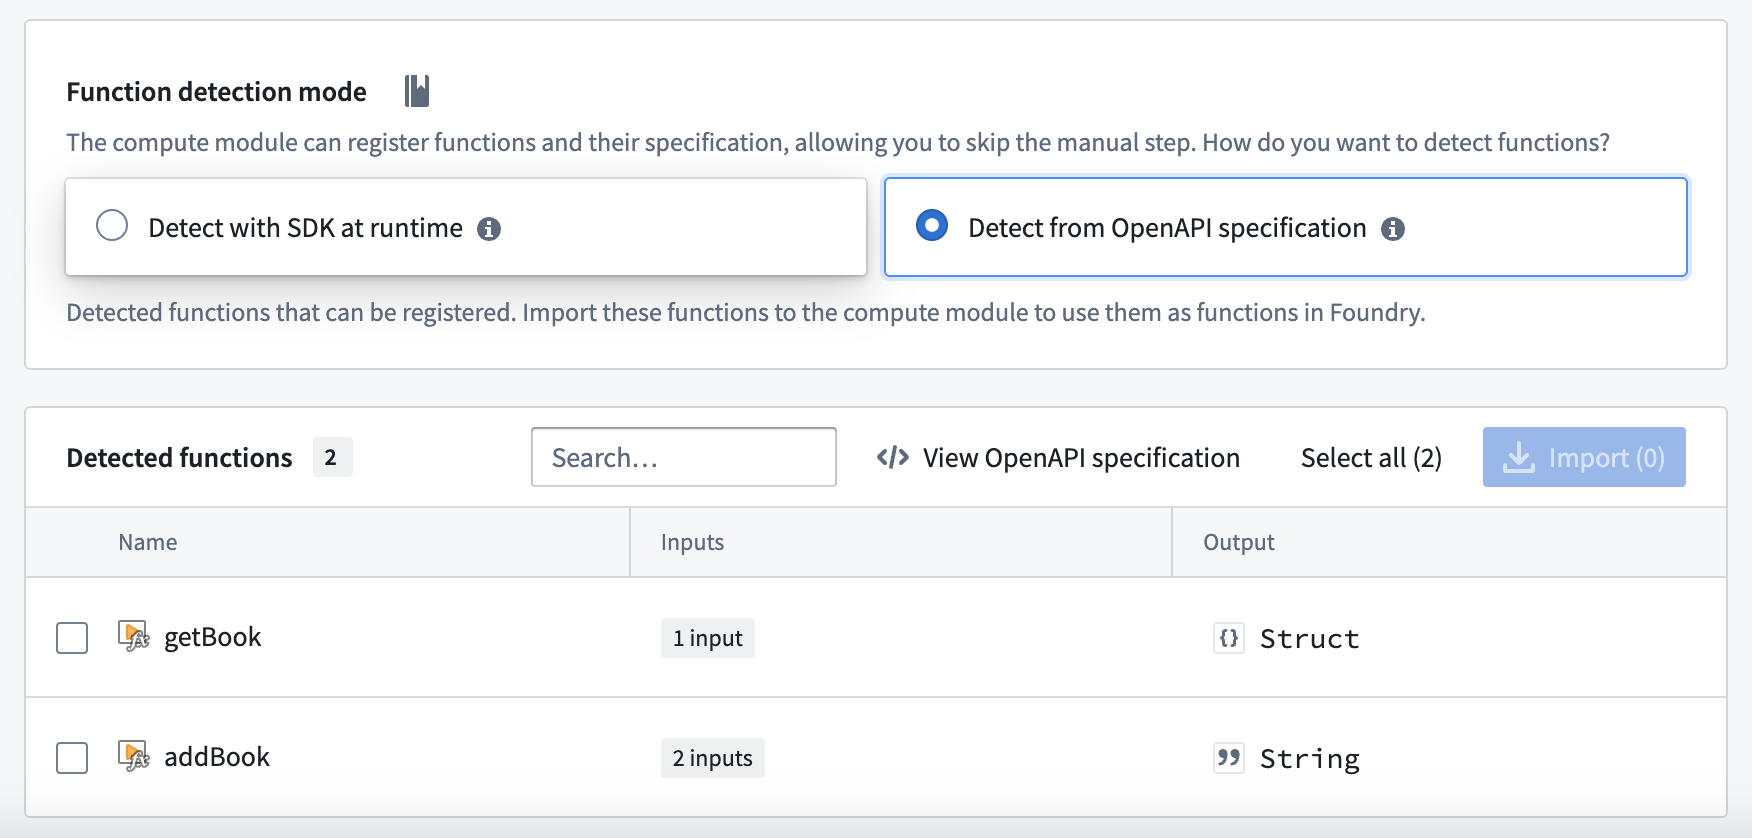
Copied!1 2 3 4 5 6 7 8 9 10 11 12 13 14 15 16 17 18 19 20 21 22 23 24 25 26 27 28 29 30 31 32 33 34 35from flask import Flask, request, jsonify import uuid app = Flask(__name__) books = {} @app.route('/books', methods=['POST']) def add_book(): data = request.json user_id = request.headers.get('User-ID') title = data.get('title') author = data.get('author') published_year = int(data.get('published_year')) book_id = str(uuid.uuid4()) books[book_id] = { 'title': title, 'author': author, 'published_year': published_year, 'added_by': user_id } return jsonify(book_id), 200 @app.route('/books/<book_id>', methods=['GET']) def get_book(book_id): return jsonify(books.get(book_id)), 200 if __name__ == '__main__': app.run(port=8000)
Copied!1 2 3 4 5 6 7 8 9 10 11 12 13 14 15 16 17 18 19 20 21 22 23 24 25 26 27 28 29 30 31 32 33 34 35 36 37 38 39 40 41 42 43 44 45 46 47 48 49 50 51 52 53 54 55 56 57 58 59 60 61 62 63 64 65 66 67 68 69 70 71 72 73 74 75 76 77 78 79 80 81 82 83 84 85 86 87 88 89 90 91 92 93 94{ "openapi": "3.0.0", "servers": [ { "url": "http://localhost:8000" } ], "paths": { "/books": { "post": { "operationId": "addBook", "requestBody": { "content": { "application/json": { "schema": { "type": "object", "properties": { "title": { "type": "string" }, "author": { "type": "string" }, "published_year": { "type": "integer" } } } } } }, "parameters": [ { "name": "User-ID", "in": "header", "schema": { "type": "string" } } ], "responses": { "200": { "content": { "application/json": { "schema": { "type": "string" } } } } } } }, "/books/{book_id}": { "get": { "operationId": "getBook", "parameters": [ { "name": "book_id", "in": "path", "schema": { "type": "string" } } ], "responses": { "200": { "content": { "application/json": { "schema": { "type": "object", "properties": { "title": { "type": "string" }, "author": { "type": "string" }, "published_year": { "type": "integer" }, "added_by": { "type": "string" } } } } } } } } } } }
Using your server
When building your Docker image, use the server.openapi image label with the value as your OpenAPI specification. The following is a Dockerfile for the example above with the server's specification attached:
Copied!1 2 3 4 5 6 7 8 9 10 11 12FROM python:3.12 EXPOSE 8000 RUN pip install flask COPY src . USER 5000 LABEL server.openapi='{"openapi":"3.0.0","servers":[{"url":"http://localhost:8000"}],"paths":{"/books":{"post":{"operationId":"addBook","requestBody":{"content":{"application/json":{"schema":{"type":"object","properties":{"title":{"type":"string"},"author":{"type":"string"},"published_year":{"type":"integer"}}}}}},"parameters":[{"name":"User-ID","in":"header","schema":{"type":"string"}}],"responses":{"200":{"content":{"application/json":{"schema":{"type":"string"}}}}}}},"/books/{book_id}":{"get":{"operationId":"getBook","parameters":[{"name":"book_id","in":"path","schema":{"type":"string"}}],"responses":{"200":{"content":{"application/json":{"schema":{"type":"object","properties":{"title":{"type":"string"},"author":{"type":"string"},"published_year":{"type":"integer"},"added_by":{"type":"string"}}}}}}}}}}}' CMD ["python", "app.py"]
Build, publish, select your image, and save your compute module configuration as normal. Then, navigate to the Functions tab and select Detect from OpenAPI specification. You can then import your functions and view the OpenAPI specification from which they were generated. These functions can be used throughout the Foundry platform.
Do not manually modify your function definitions - they must be kept in line with the OpenAPI specification attached to your image.
Functions CLI
The Functions CLI is a standalone tool that helps you publish compute module artifacts. It has two core responsibilities:
- Running static inference against your source code to generate function specifications.
- Building and publishing Docker images with the metadata labels required by Foundry.
You can use the Functions CLI in local development workflows or integrate it into CI/CD pipelines to automate the build and publish process for your compute modules.
Access the Functions CLI
To get started with the Functions CLI:
- Download the latest binary for your platform.
- Ensure the binary is executable:
Copied!1chmod +x functions-cli
You can then invoke the CLI directly from your terminal.
Inference
The Functions CLI can perform static inference against your source code to automatically generate function specifications. This is useful when you want to inspect or verify the function schemas that will be registered in Foundry.
Use the --opt functions flag to run function spec inference. For Python compute modules using the SDK, specify the --plugin python_cm flag.
The following example runs inference against Python source code in the ./src directory:
Copied!1functions-cli infer --opt functions --plugin python_cm --dir ./src
You can also use a plan file to configure inference:
Copied!1functions-cli infer --planfile ./infer_plan.yml --dir ./src
The output is a JSON array of function specifications. Each specification includes the function name, input parameters with their data types, and the output type.
File plugin
If you prefer to define function schemas manually rather than relying on automatic inference, you can use the file plugin. This approach lets you specify function schemas in a JSON file with explicit type definitions.
The following example shows a function schema file with a custom type and a function that uses it:
Copied!1 2 3 4 5 6 7 8 9 10 11 12 13 14 15 16 17 18 19 20 21 22 23 24{ "types": { "Person": { "type": "object", "fields": { "name": { "dataType": "string" }, "age": { "dataType": "integer" } } } }, "functions": [ { "functionName": "example_function", "inputs": [ { "name": "text", "dataType": "string", "required": true }, { "name": "items", "dataType": "list<Person>", "required": true }, { "name": "metadata", "dataType": "optional<dict<string, string>>", "required": false } ], "outputs": [ { "dataType": "dict<string, set<Person>>" } ] } ] }
The file plugin supports the following data types:
| Data type | Description |
|---|---|
string | Text value |
integer | Whole number |
boolean | True or false |
float | Floating-point number |
binary | Binary data |
date | Date value |
decimal | Arbitrary-precision decimal |
timestamp | Point in time |
list<T> | Ordered collection of type T |
set<T> | Unordered collection of unique values of type T |
dict<K, V> | Key-value mapping from type K to type V |
optional<T> | Value of type T that may be absent |
You can nest these types to create complex structures, such as dict<string, set<Person>> or optional<list<integer>>.
Build
The Functions CLI can build and publish Docker images for your compute module. You configure the build using a plan file in YAML or JSON format.
The following example shows a build plan:
Copied!1 2 3 4 5 6 7 8 9 10name: my-compute-module-image tag: $(IMAGE_TAG) registry: url: stack-container-registry.palantirfoundry.com username: ri.artifacts.main.repository.example-artifact-repo-rid-abc123 auth: client_id: $(CLIENT_ID) client_secret: $(CLIENT_SECRET) host: stack.palantirfoundry.com kind: python_cm
Run the build with:
Copied!1functions-cli build -p ./build_plan.yml -d ./src
The auth section of the build plan supports two authentication methods:
- OAuth client: Uses
client_id,client_secret, andhostfields. - Token: Uses a
tokenfield with a Foundry API token.
Tag increment
You can use the -t flag to automatically increment the image tag version instead of specifying a tag manually:
| Flag | Increment |
|---|---|
-t | Patch version |
-tt | Minor version |
-ttt | Major version |
Engine options
By default, the Functions CLI uses Docker to build images. If you do not have a Docker daemon available, you can use the GoCR engine instead.
The following example shows a build plan using the GoCR engine:
Copied!1 2 3 4 5 6 7 8 9 10 11 12 13 14 15name: my-compute-module-image tag: 0.0.1 registry: url: stack-container-registry.palantirfoundry.com username: ri.artifacts.main.repository.example-artifact-repo-rid-abc123 auth: token: $(FOUNDRY_TOKEN) engine: gocr: base_image: python:3.12 copy_paths: - source: ./src dest: /app/client entrypoint: ["python", "app.py"] kind: python_cm
The GoCR engine does not require a Docker daemon, which makes it suitable for CI/CD environments where Docker-in-Docker is unavailable or restricted.
Logging
You can increase the verbosity of CLI output for debugging purposes:
| Flag | Level |
|---|---|
-v | Info |
-vv | Debug |
Use compute module functions in TypeScript functions
Prerequisites:
- You must register your function in the Compute Module application with an API name.
- You must have the compute module running for live preview to work.
- You must initialize a TypeScript code repository.
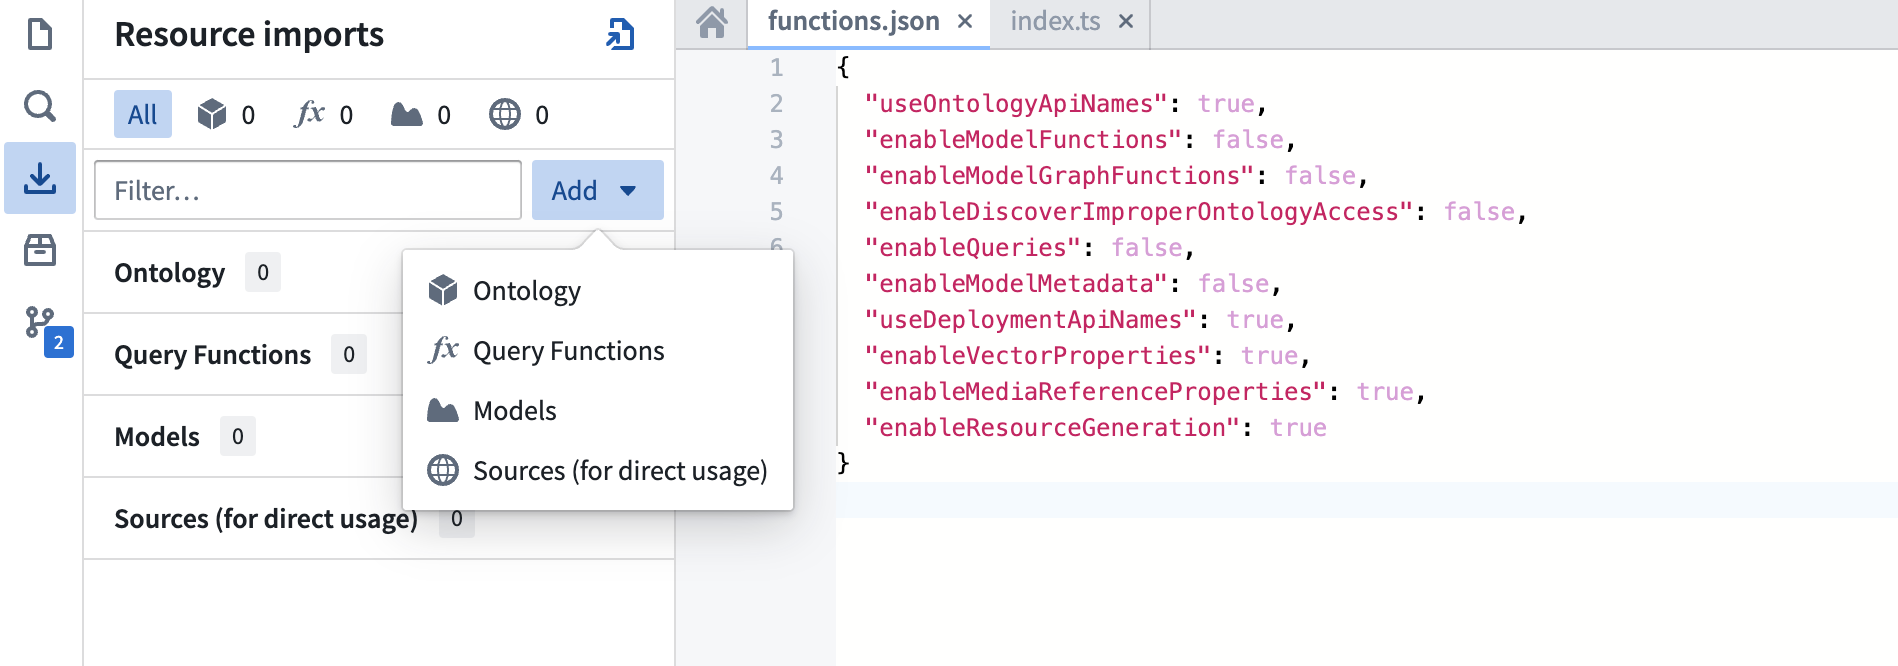
Enable resource generation
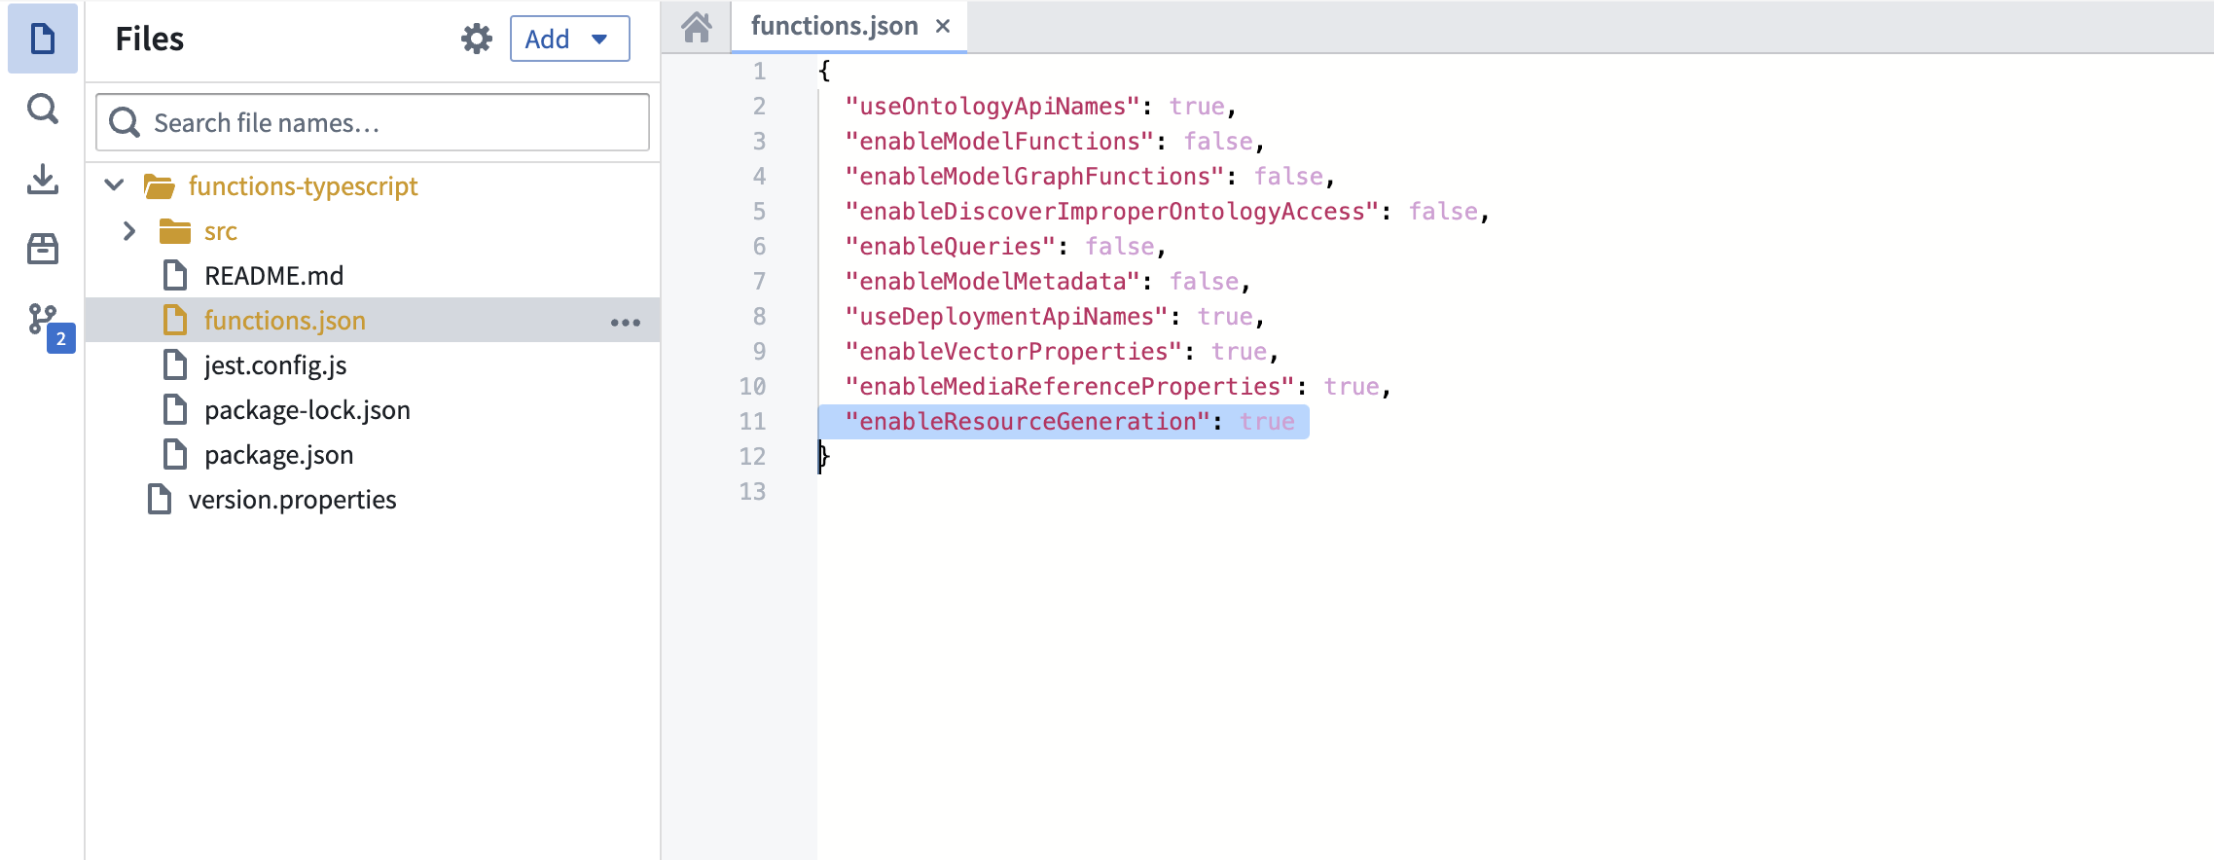
Before you begin, ensure that resource generation is enabled in your Typescript code repository:
- Open your
functions.jsonfile. - Set the
enableResourceGenerationproperty totrue.
Import your compute module function
To import a compute module function in TypeScript, follow the steps below:
- From the left panel of the TypeScript code repository, find and select the Resource imports tab.
- Select Add, then select Query Functions to display a pop-up window to select an Ontology.
- Although compute modules are not tied to a specific Ontology, you must select one for the import process. Choose any Ontology that suits your use case.
- Search for your compute module function's API name.
- Select the function.
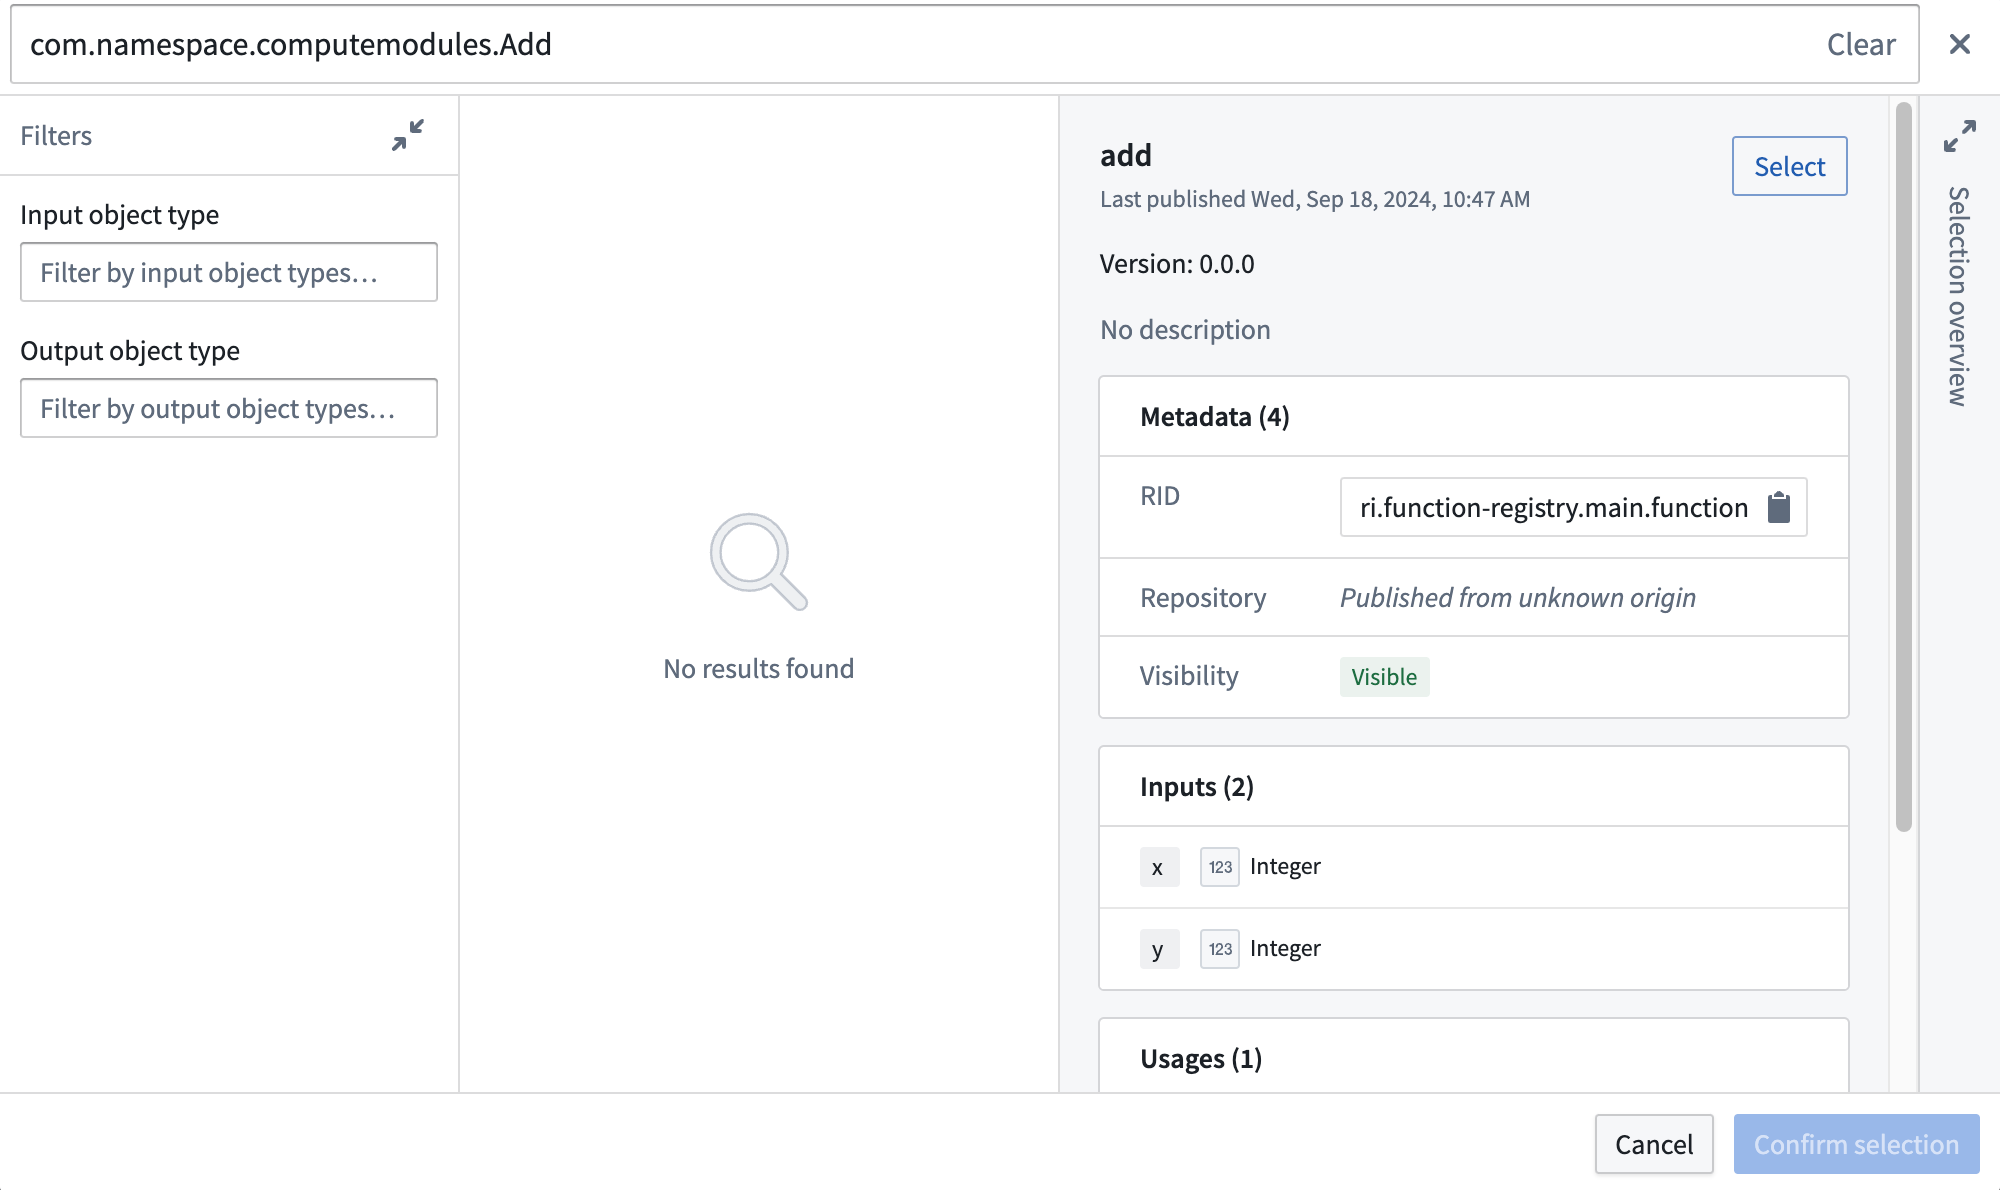
- Choose Confirm selection.
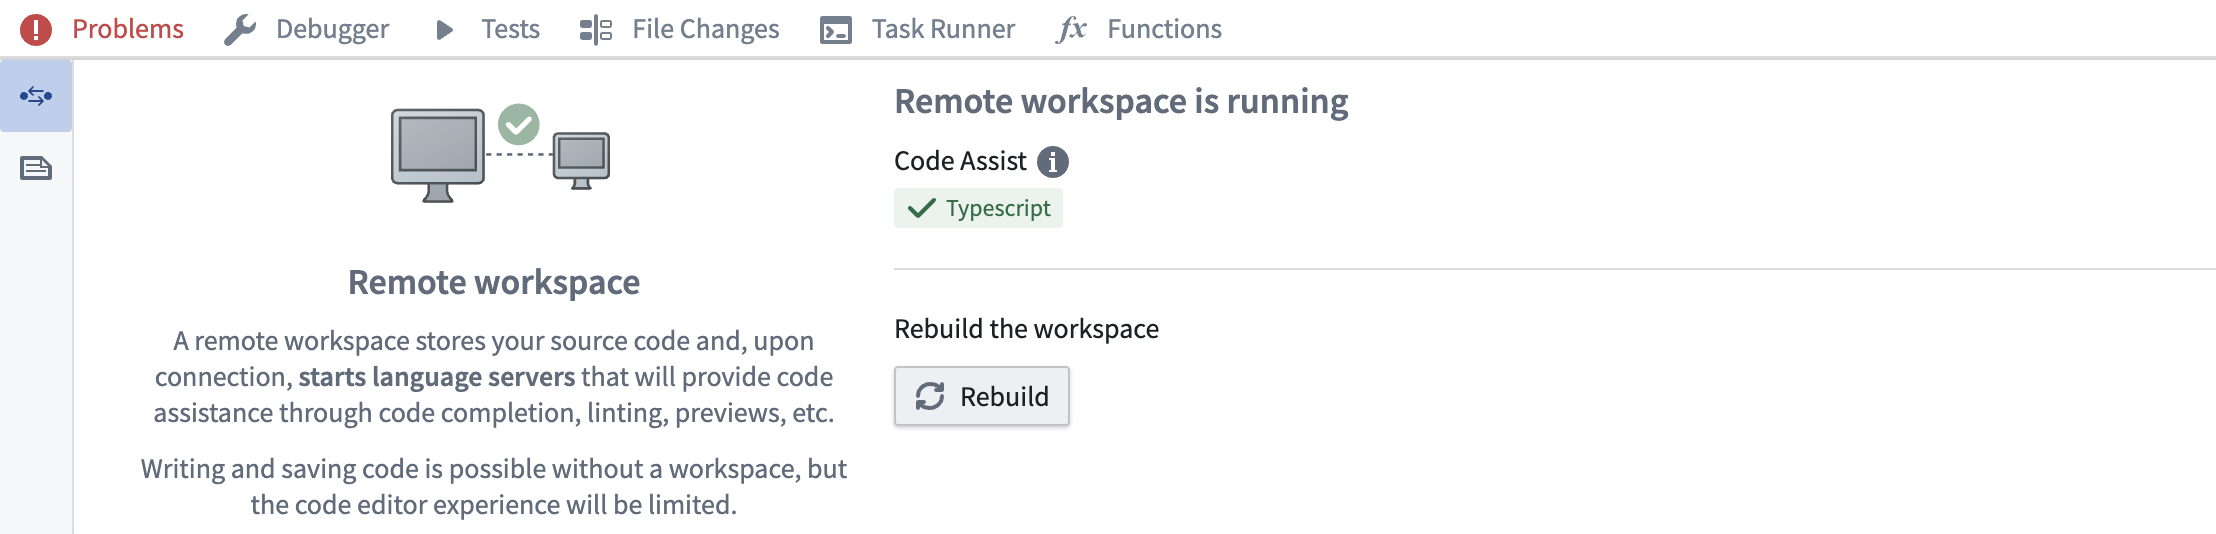
Rebuild your code workspace
Import and use the function
The example below shows how to import and use a compute module function:
// index.ts
import { Function } from "@foundry/functions-api";

// API Name: com.mycustomnamespace.computemodules.Add
import { add } from "@mycustomnamespace/computemodules";

export class MyFunctions {
    @Function()
    public async myFunction(): Promise<string> {
        return await add({ x: 50, y: 50 });
    }
}
Important considerations
- Project location: Ensure the compute module is in the same Project as your TypeScript code for live preview to work correctly.
- Type consistency: TypeScript enforces strict type checking. Ensure the declared return type matches the actual return type of your compute module function. For example, if you declare a
stringreturn type, your registered compute module function must return astring, not astructtype. - Asynchronous operations: Compute module functions are typically asynchronous. Use
async/awaitsyntax for proper handling.
Since TypeScript functions go through the function-executor, only compute module functions that take less than five minutes will succeed. If the function takes longer than five minutes, it will time out.