- Capabilities
- Getting started
- Architecture center
- Platform updates
Announcements
REMINDER: Sign up for the Foundry Newsletter to receive a summary of new products, features, and improvements across the platform directly to your inbox. For more information on how to subscribe, see the Foundry Newsletter and Product Feedback channels announcement.
Share your thoughts about these announcements in our Developer Community Forum ↗.
Foundry Branching available the week of May 12, 2025
Date published: 2025-04-29
Foundry Branching provides a unified experience to make changes across multiple applications on a single branch, test those changes end-to-end without disrupting production workflows, and merge those changes with a single click. Foundry Branching will be available in a beta state on all enrollments starting the week of May 12, 2025. You will need to enable Foundry Branching for use as it will be turned off by default.
Foundry Branching can be enabled in Control Panel by platform administrators and configured for a specific subset of users or groups. If your environment already supports Foundry Branching, there will be no change to you.
Consult the Foundry Branching documentation to learn more about this feature.
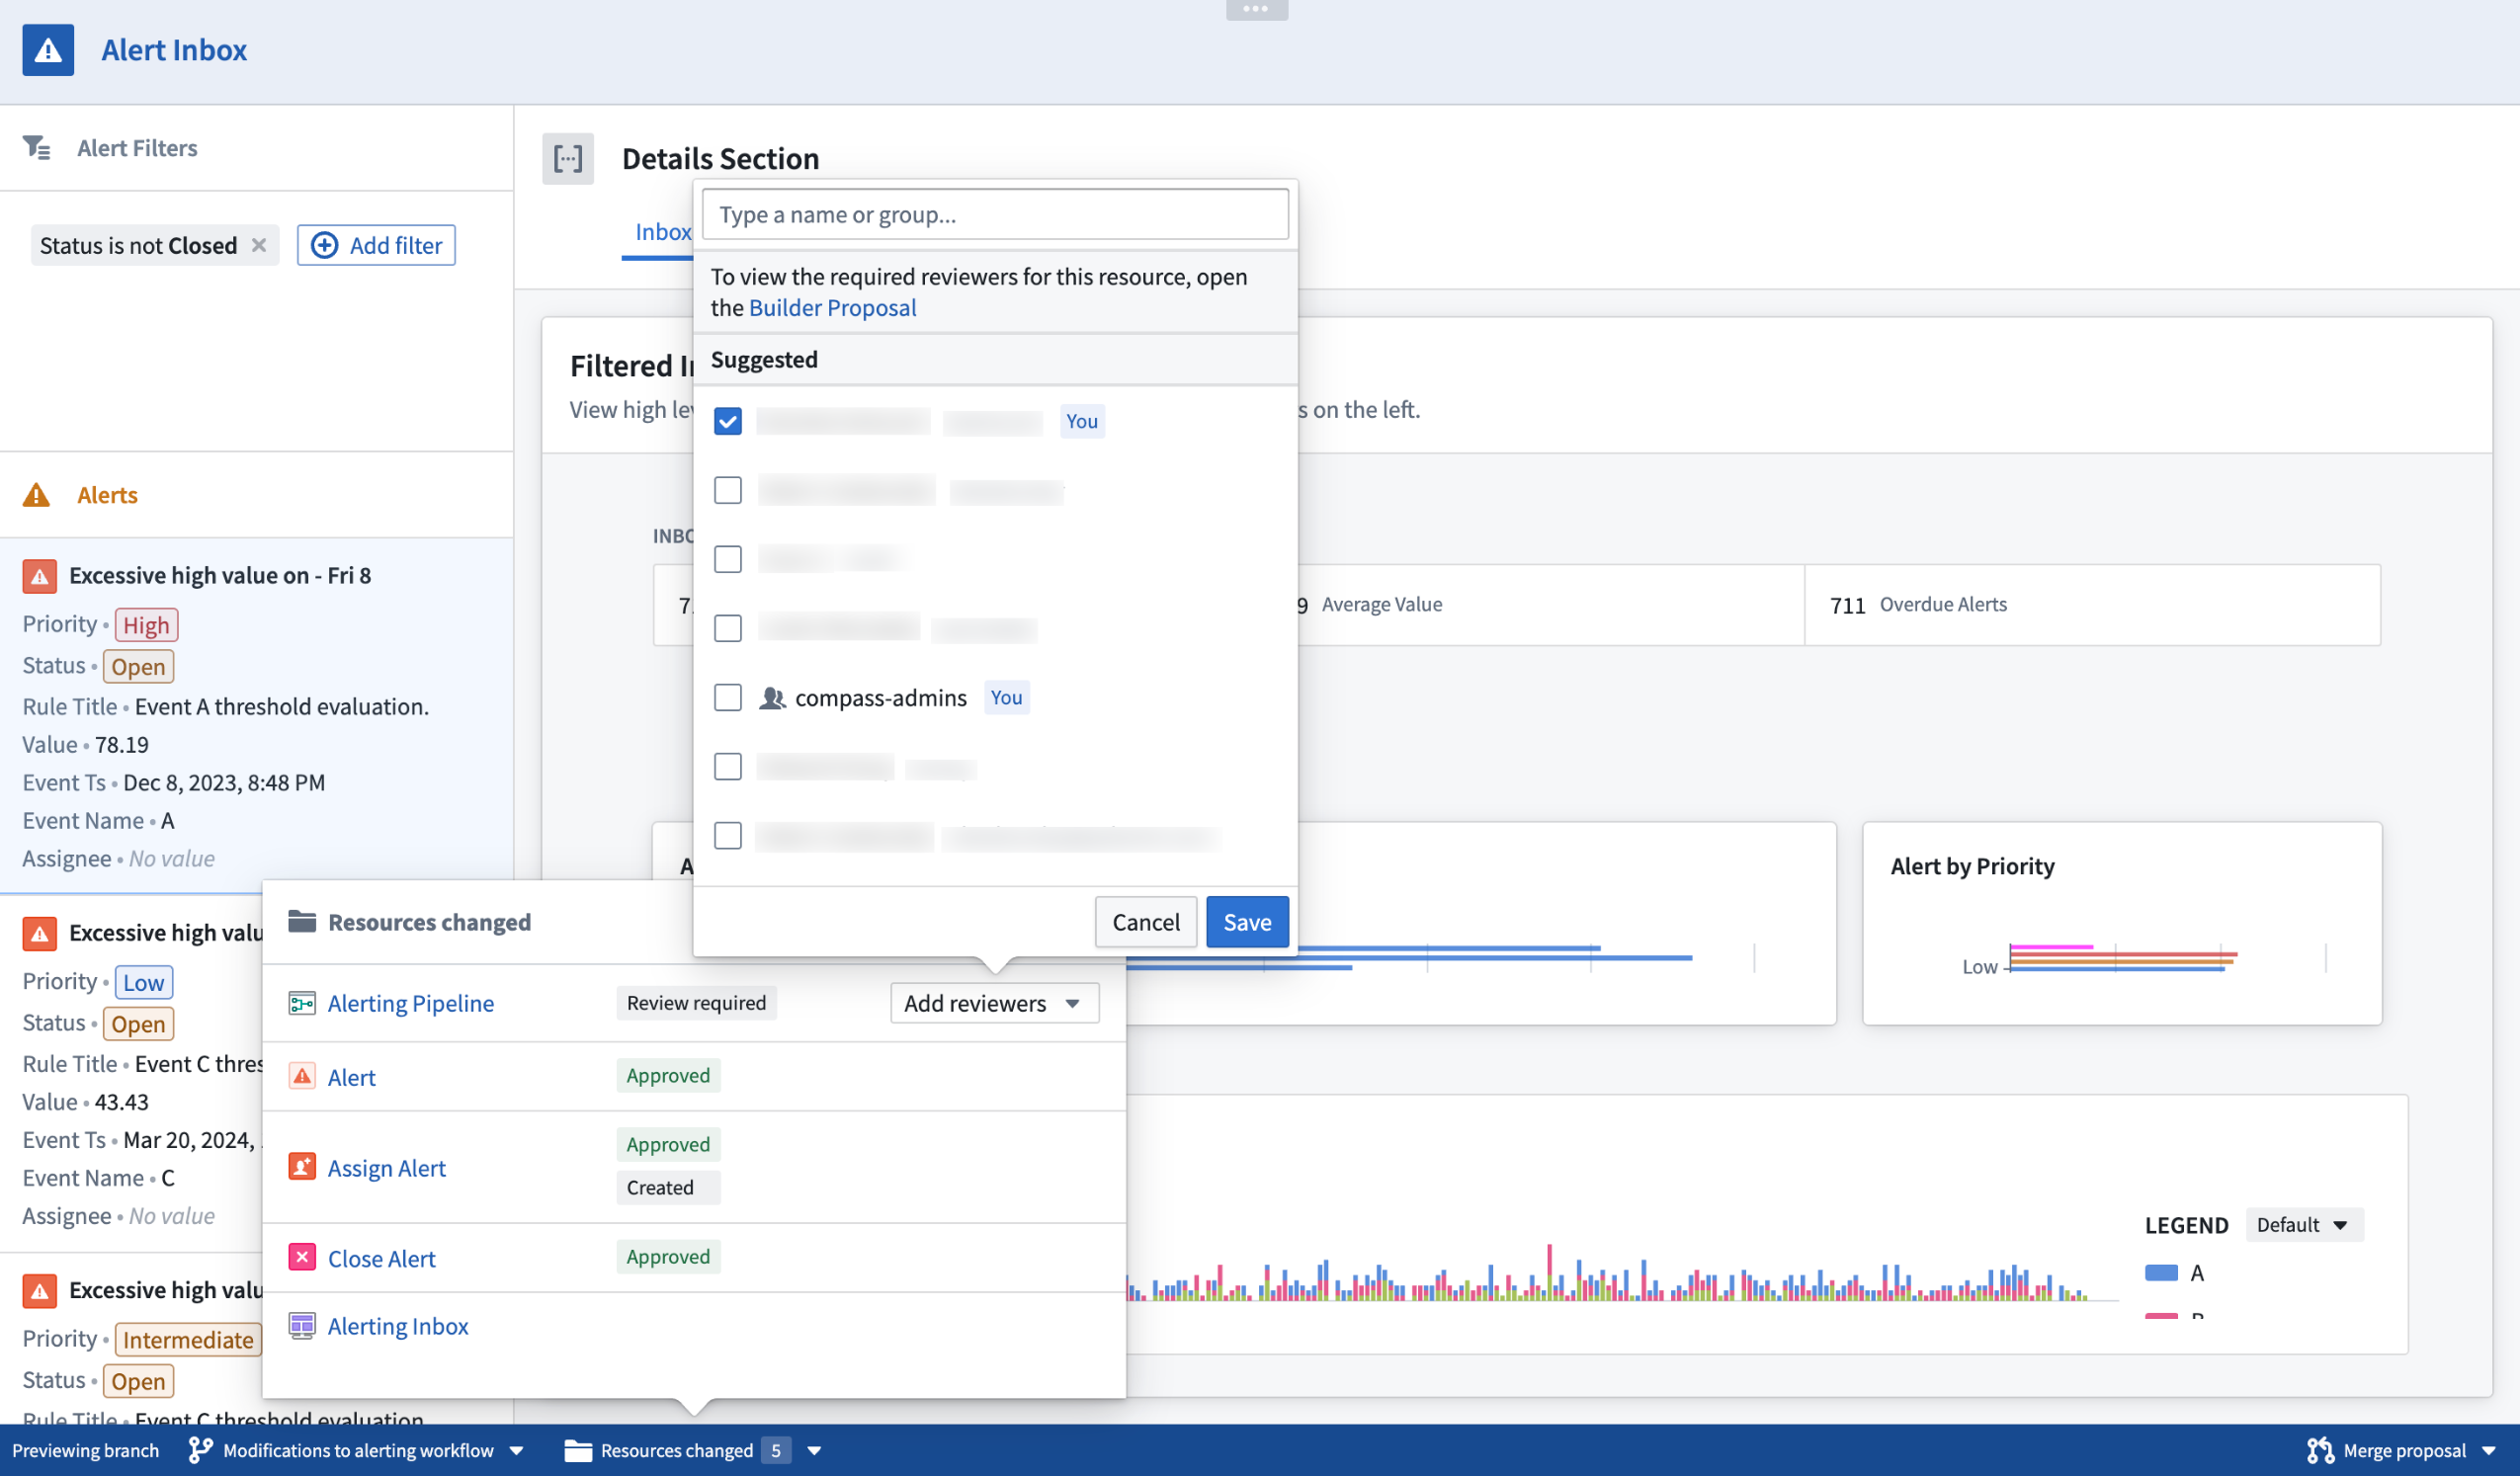
Assign reviewers to review change proposals by using the Add reviewers popover selector.
We recommend trying Foundry Branching with a restricted set of users first before opening it up for broader use.
Features of Foundry Branching
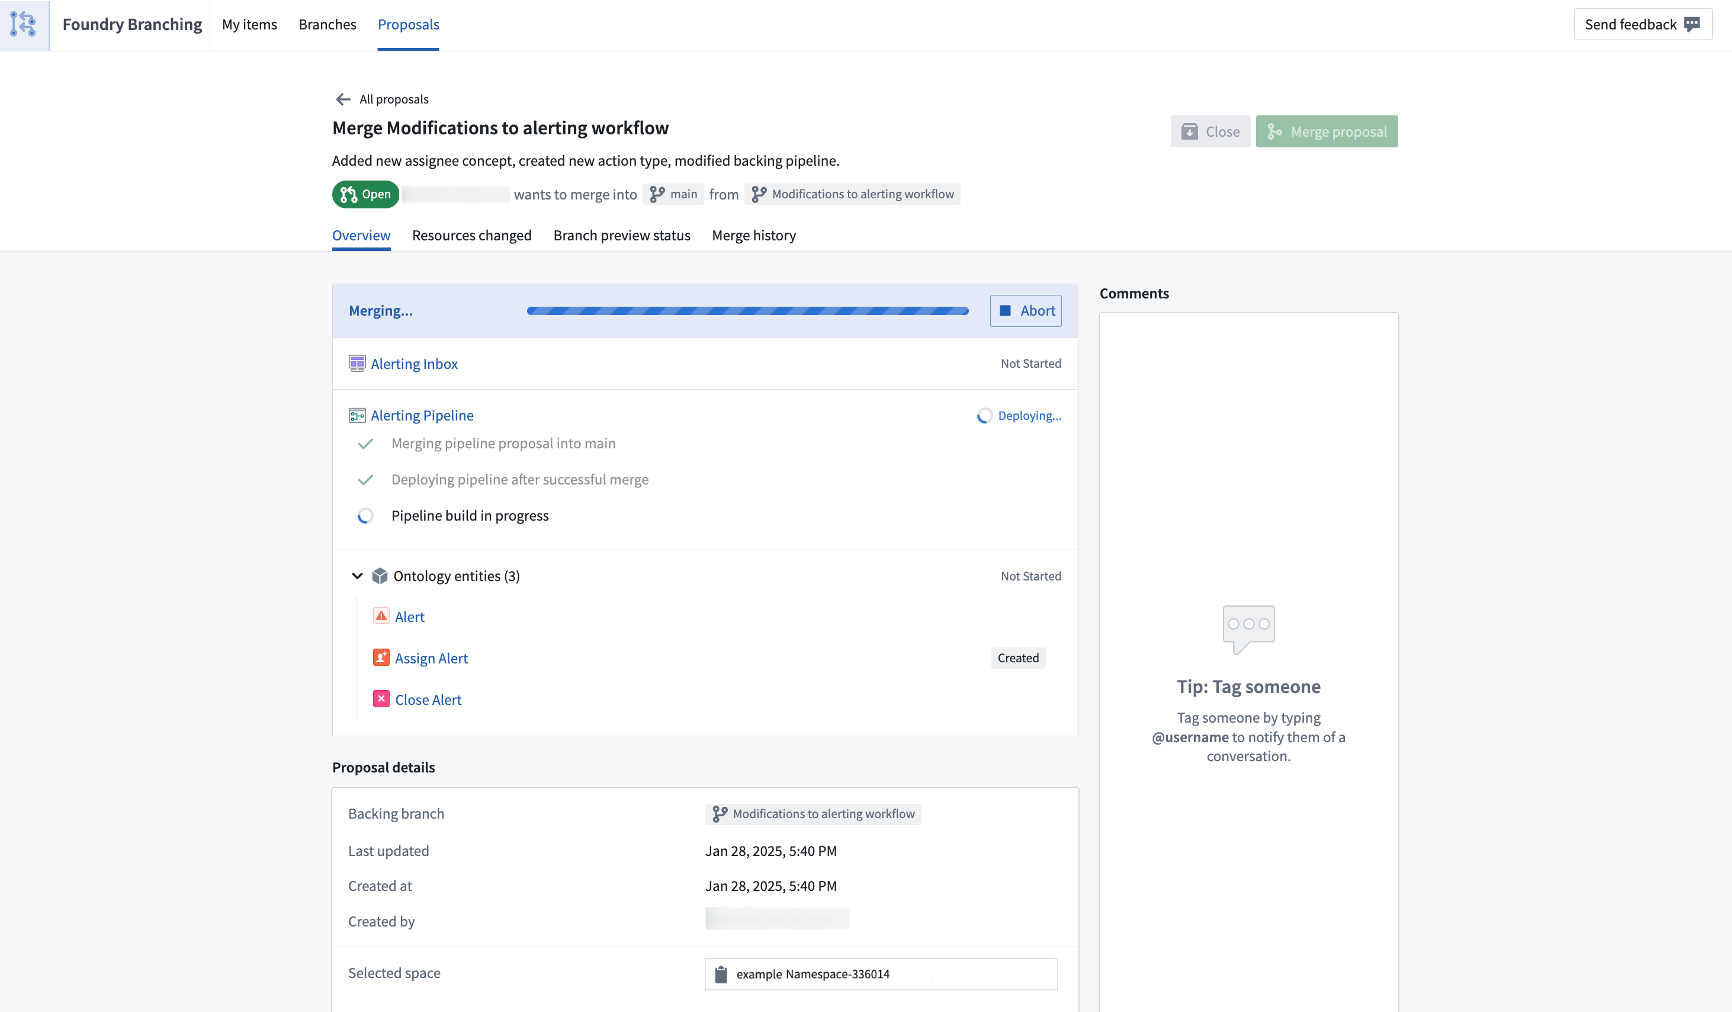
Review a branch easily in one view, encompassing the entire proposal. Then, merge when ready.
Experience a variety of developer benefits when using Foundry Branching:
- Run Actions on branches without writing back those edits to the
Mainbranch. - Branch creation and branch selector: Create a branch in transform code repositories, Pipeline Builder, Ontology Manager, or Workshop, and access the branch in all supported applications.
- Branch taskbar: When on a branch, a taskbar will appear at the bottom of your screen. This taskbar allows you to manage your entire workflows:
- View resources modified on the branch and debug errors.
- Create a proposal (equivalent to a pull request in GitHub) and assign reviewers. Reviewers can use the taskbar to manage their approvals.
- Merge your proposal.
- Manage your branches and proposals in the Foundry Branching Application. The Foundry Branching app also supports the same workflows as the taskbar.
Considerations
Foundry Branching is available in a beta state for a limited scope of features. Before using Foundry Branching, be sure to familiarize yourself with the full scope of functionalities and known limitations.
The following functionalities will be released in the first half of 2025:
- Restricted views: Restricted views do not currently build on a branch. If your workflow includes restricted views, we recommend only using Foundry Branching for changes downstream of the Ontology.
- Edit-only workflows: Users can run Actions on branches, but it is not currently possible to load edits from the
Mainbranch onto a Foundry branch.
Aside from Workshop, applications that consume the Ontology cannot yet be modified on a branch. For instance, if your Workshop module contains non-Workshop elements such as Quiver dashboards, these dashboards will load information from the Main branch and will not be modifiable on a branch.
Your feedback matters
We want to understand how Foundry Branching improves your workflow and how we can focus our improvement efforts. Let us know your thoughts through Palantir Support channels and our Developer Community using the global-branching tag ↗.
Try the new Marketplace products sidebar in Workflow Lineage
Date published: 2025-04-29
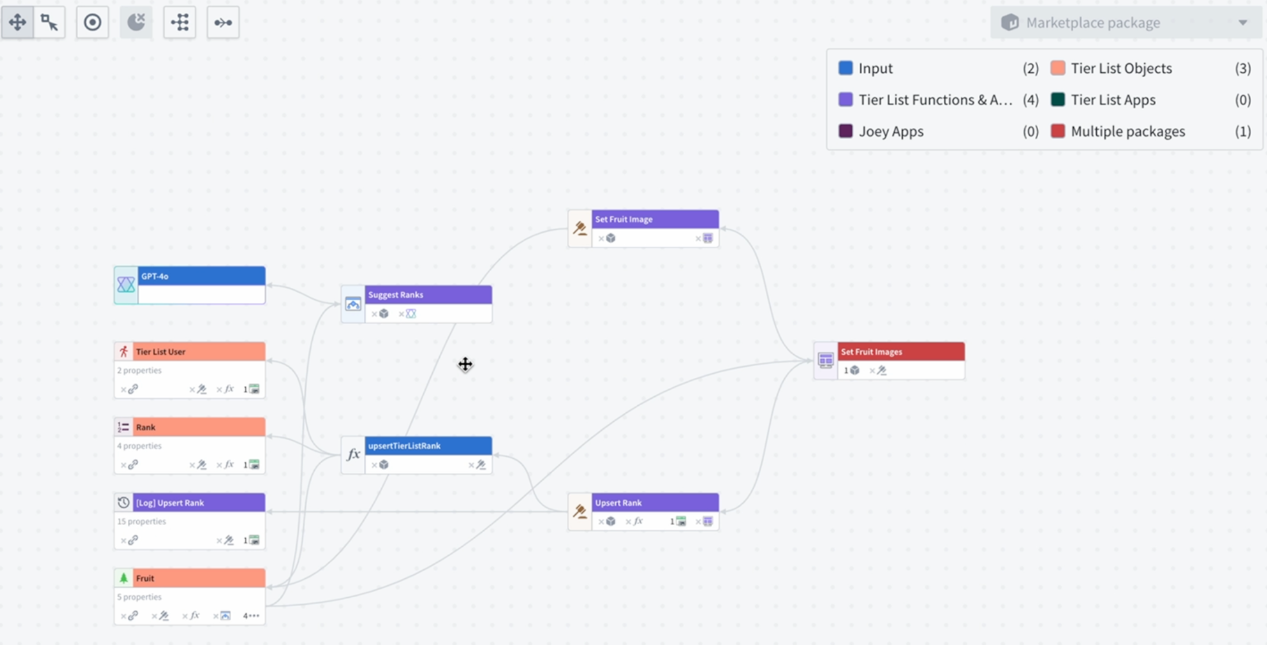
The new Marketplace products sidebar in Workflow Lineage is a powerful tool designed to help with the management and inspection of your Marketplace products. With the sidebar, you can check that your products have the correct inputs and resources and that your nodes are organized into their expected packages.
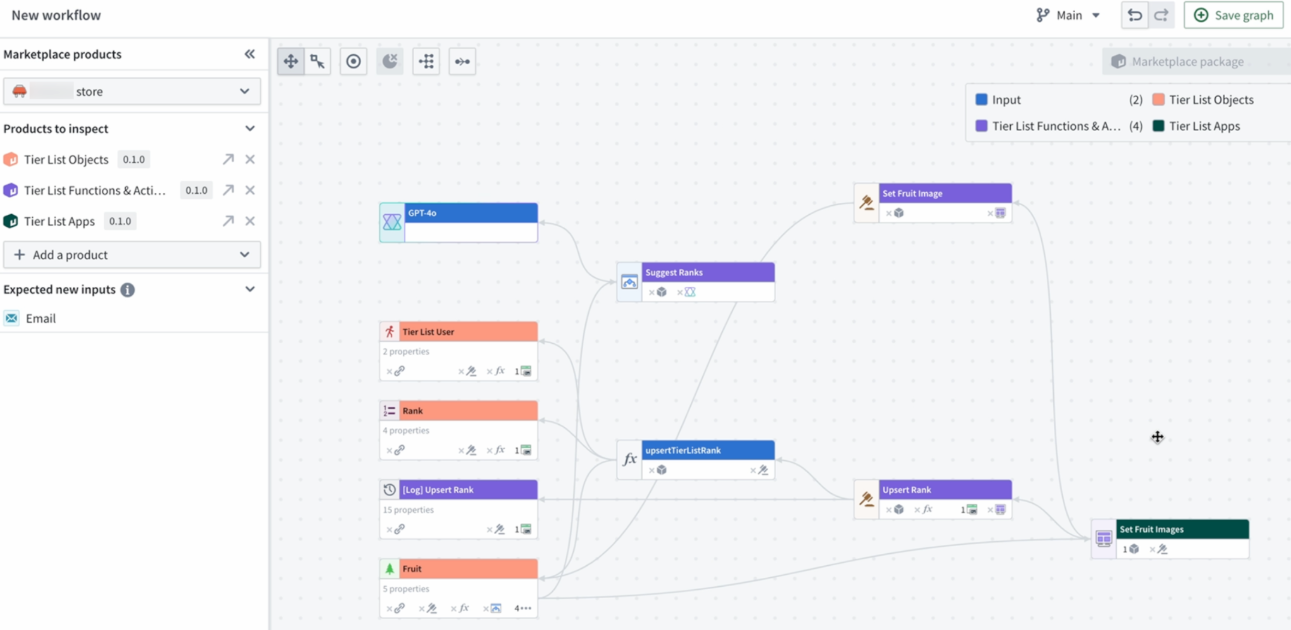
Manage and inspect your Marketplace products from the new Marketplace products sidebar.
Benefit from transparency into resource packaging
Review your resource packaging with clear insight and color-coding visualization.
-
Resource packaging transparency: The Marketplace products sidebar helps identify any discrepancies in your resources concerning the packages they belong to. For instance, if you notice that one of your functions is mistakenly highlighted as an input but should actually belong to a package since it is used in an action within that package, you can identify this mistake using the color legend and correct it accordingly.
-
Package organization: Easily detect misplaced items, such as when resources are identified and colored under one package when they should be a part of a different package. This feature helps ensures that each component is correctly categorized.
-
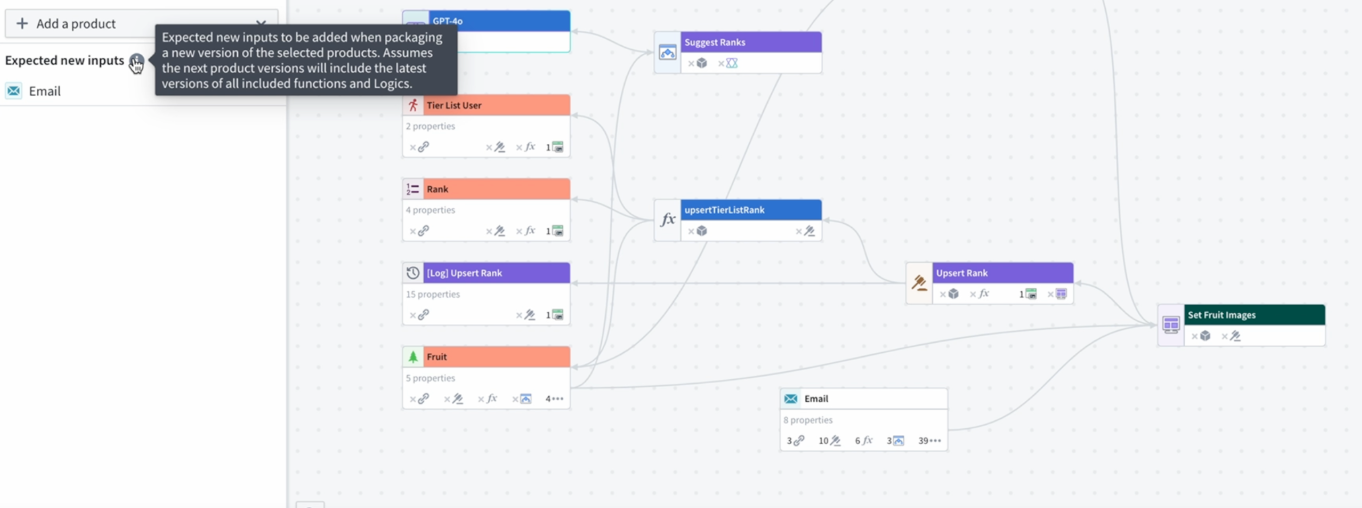
Input expectations: Stay informed about new inputs required for your packages. For example, if an object is used in a packaged Workshop application, the sidebar will notify you to include it in future packages.
-
Package overlap detection: Use the color-coded graph to identify and resolve package overlaps.
Detect package overlap using color-coded graphs.
With the Marketplace products sidebar, managing your Marketplace products becomes easier and more efficient. Ensure your packages are complete, correctly structured, and ready for publication. Learn more about the Marketplace products sidebar.
Getting started with the sidebar
Navigate to Workflow Lineage and open the Marketplace products sidebar.
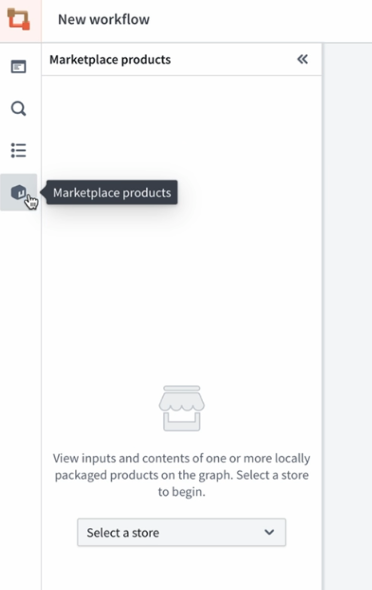
Locate the Marketplace products option in the sidebar.
Select your store, add your products, and then Add all nodes to graph. This will populate a color-coded Workflow Lineage graph, helping you visualize package structures and dependencies.
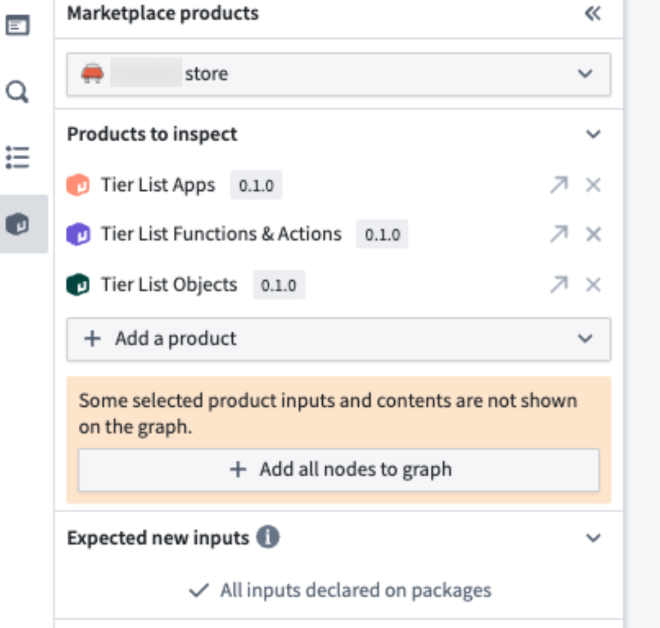
Review your products directly in the Marketplace products sidebar after choosing the store.
Your feedback matters
Your insights are crucial in helping us understand how we can improve Workflow Lineage. Share your feedback through Palantir Support channels and our Developer Community ↗.
Deploy OSDK applications with Marketplace
Date published: 2025-04-29
Developers building applications with the Ontology SDK (OSDK) need a streamlined way to package, deploy, and manage their applications across different Foundry environments. Until now, deploying OSDK applications required manual configuration steps for each environment, making the development-to-production workflow overly complex.
We are excited to announce that Developer Console now integrates with Marketplace to enable seamless packaging and deployment of OSDK applications. This integration allows developers to package their OSDK applications, including website assets, and deploy them across multiple stacks without any manual build steps.
The Developer Console to Marketplace integration provides packaging and deployment capabilities that include the following:
-
Developer Console resources: Data resources and resource access scopes
-
OAuth client specification: Type of the client, enabled grant types, and redirection URLs
-
Associated website: Deployed assets and content security policies
-
Automatic configuration: Critical environment-specific values like OAuth client IDs and Foundry URLs are automatically configured and replaced during installation
Key benefits of the integration
You can benefit from the new integration in the following ways:
-
Complete developer to test to production workflow: Develop locally or in your development environment, then package and deploy to test and production environments without manual configuration or build steps.
-
Distribute OSDK applications: Deploy the same application to multiple production enrollments with environment-specific configuration, handled automatically.
-
Simplified updates: Create new versions of your Marketplace products with the latest website assets and deploy them with a single click.
A packaged Developer Console product upgraded successfully.
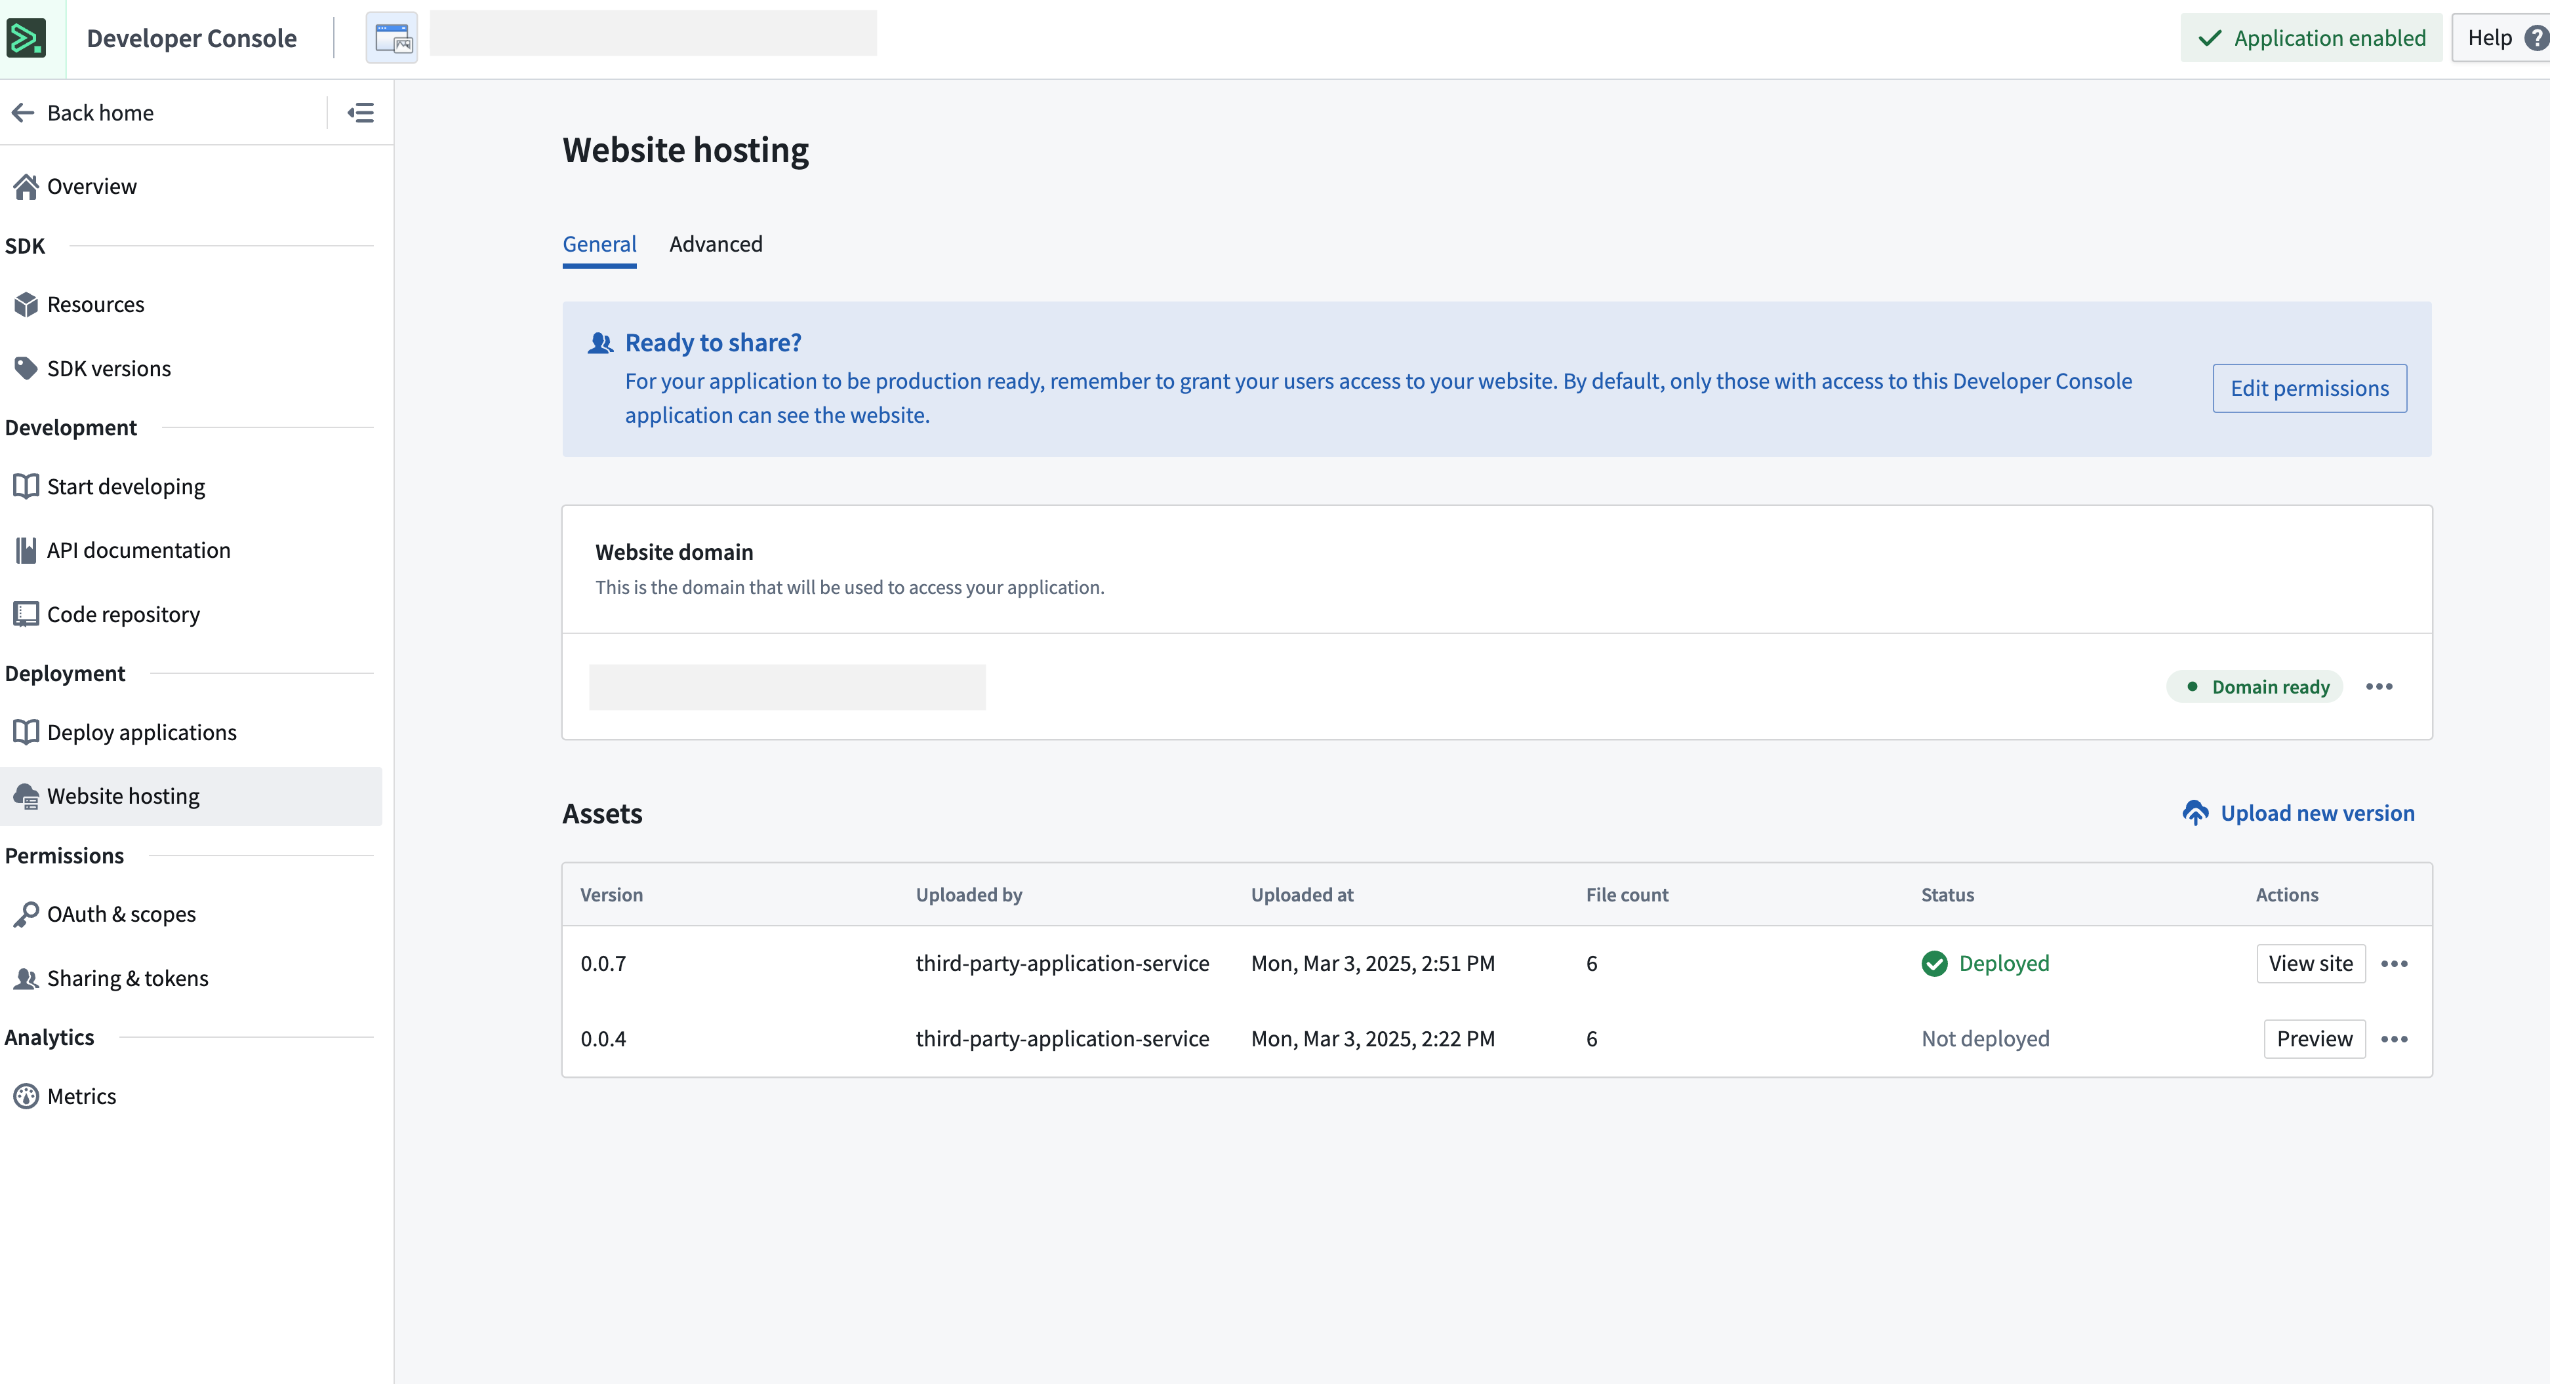
An upgraded Developer Console receiving the latest website assets.
Get started
To get started, follow the applicable case for your workflow below:
-
Create new applications
- In-platform development: When bootstrapping a new application in a VS Code workspace, the application will be compatible with Marketplace deployment out of the box.
- Local development: Use the
@osdk/create-appCLI v2.1.3 ↗ or later to bootstrap a new application locally.
-
Update existing applications
- To make an existing OSDK application deployable through Marketplace, follow the Marketplace installation guide that outlines the required configuration.
-
Package a Developer Console application
-
If you are packaging a Developer Console application for the first time, review our DevOps documentation and on how to create a new product.
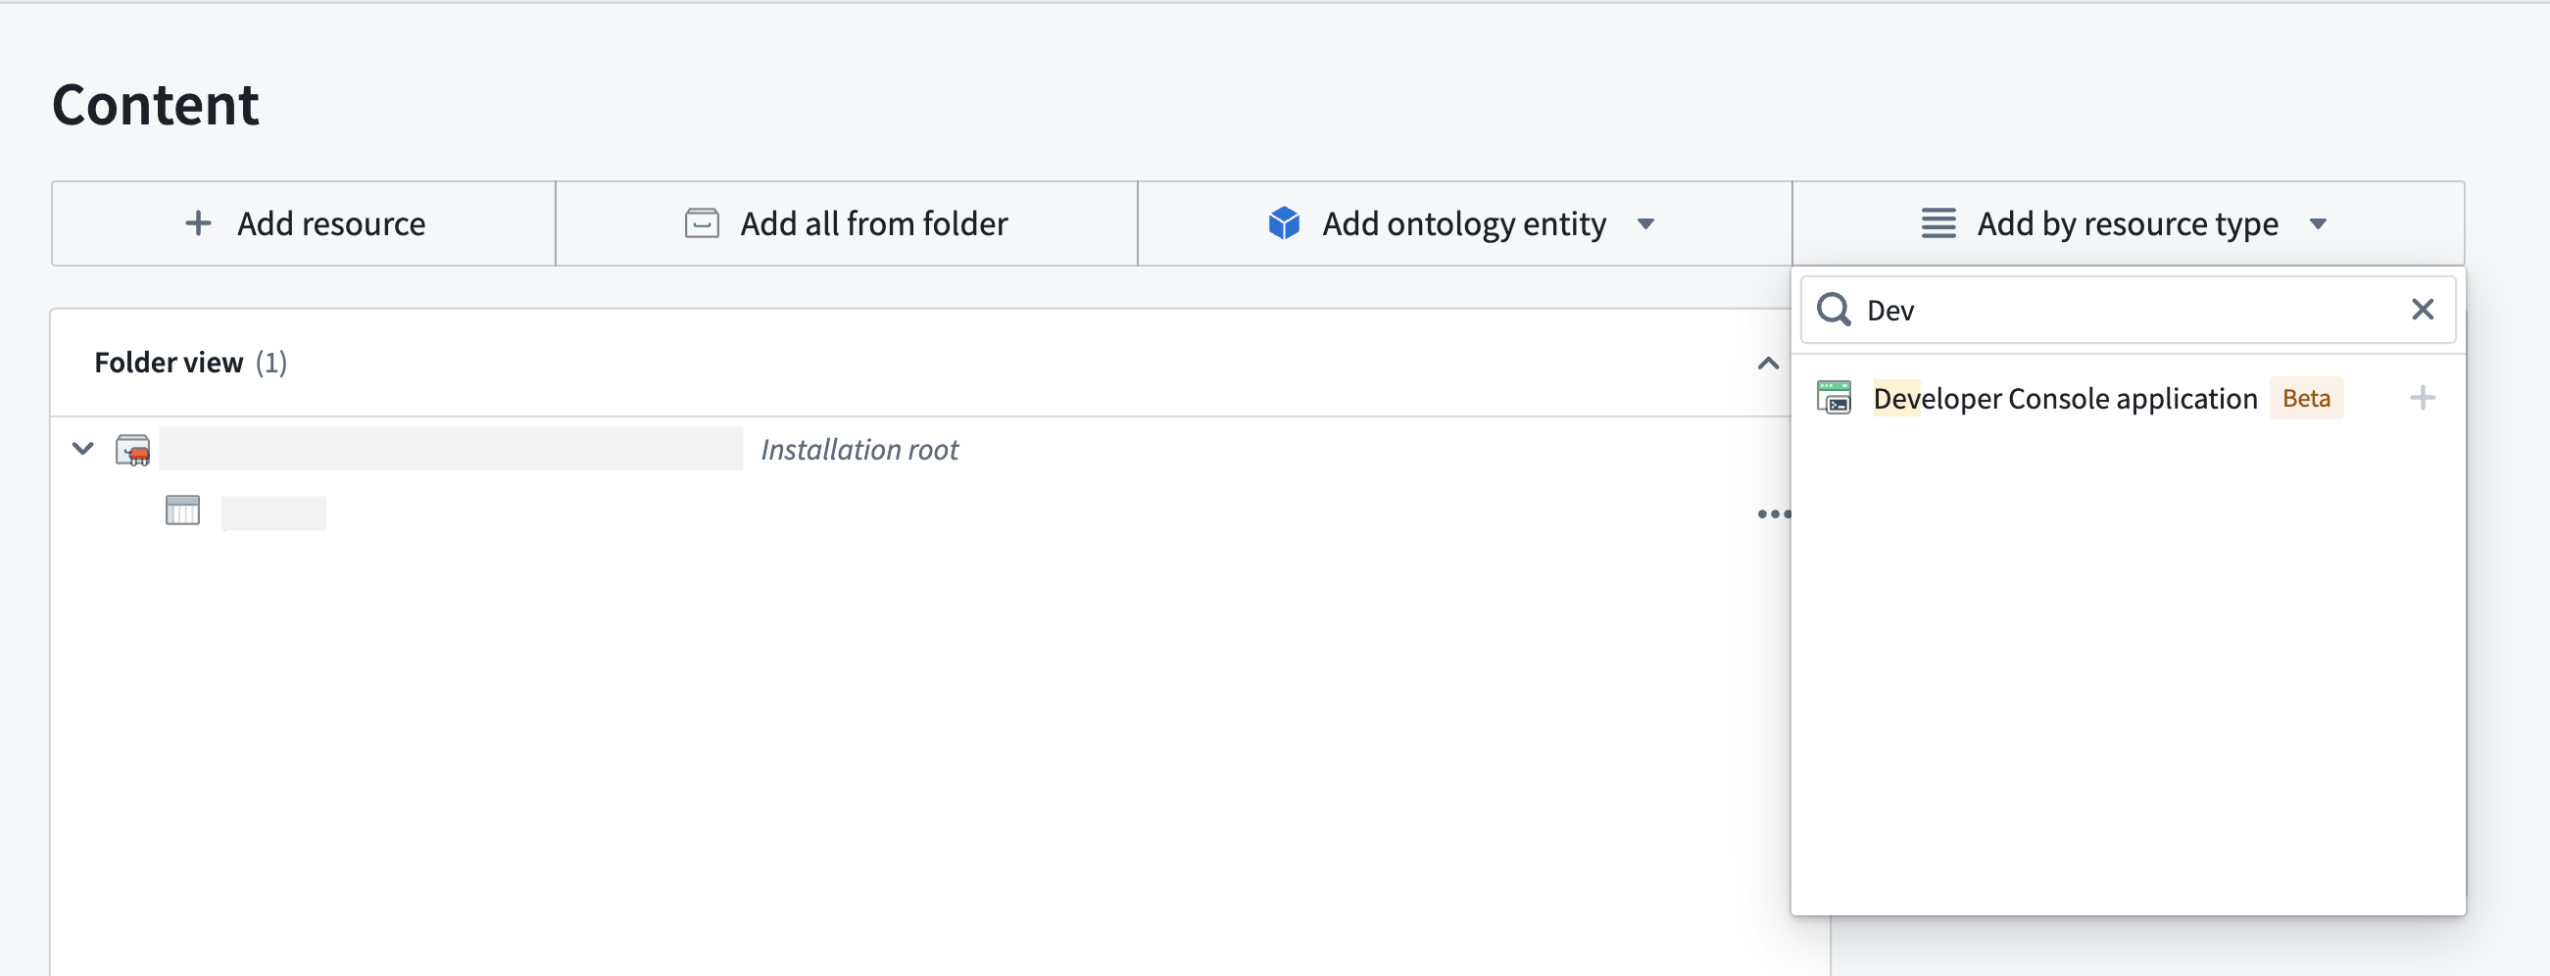
Choose Developer Console application under Add by resource type to package Developer Console applications.
-
Installing a packaged Developer Console application
In Marketplace, you can install the packaged application. If you packaged an application with website assets, you will be required to provide a website hosting domain during installation.

A website hosting domain parameter displayed during installation.
After the first installation, you will be prompted to either self-approve or ask an Information Security Officer to approve the requested website hosting domain.
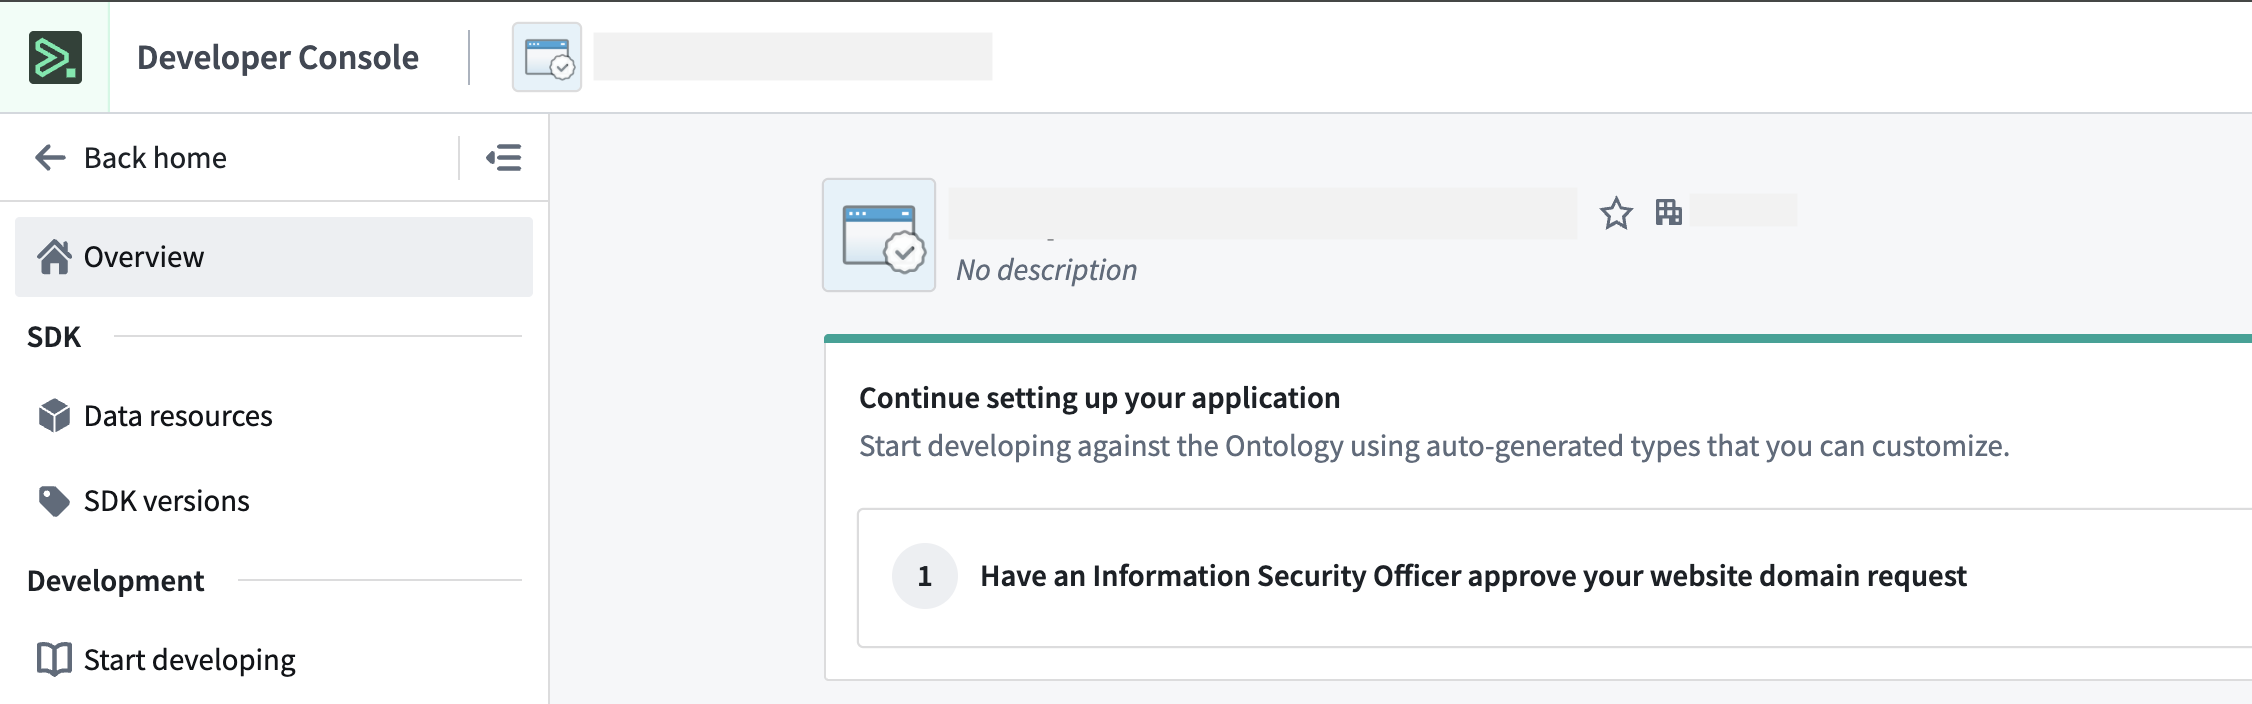
Post-installation guidance to approve a website domain request.
Once the domain is approved, the website is ready to use without any further configuration.
API name consistency between environments
When deploying OSDK applications across environments, it is important to understand how API names affect your application's functionality. The shipped website assets reference entities in your Ontology using their API names, which creates a dependency that requires attention during deployment. Consider the following important points before use:
- API name consistency: When deploying to a target environment, ensure that the entities in the target ontology have the same API names as in the source environment.
- Potential challenges: API names will change between environments if an entity with the same API name already exists in the target environment. This will cause your application to fail to reference the required entities.
We recognize that managing API name consistency is a significant challenge for cross-environment deployments. Our team is actively working on a solution that will automatically handle API name mapping between source and target environments.
Learn more
- Marketplace installation guide
- Developer Console website hosting documentation
- Marketplace release management
We want to hear from you
Your insights are crucial in helping us understand how we can improve OSDK application deployment. Share your feedback through Palantir Support channels and our Developer Community ↗ using the ontology-sdk tag ↗ or marketplace tag ↗.
Introducing mandatory control properties for securing data in objects
Date published: 2025-04-29
We are excited to announce that mandatory control properties are now generally available across all enrollments. This feature introduces first-class support for using markings, classifications, and organizations to enforce granular access control over Ontology data.
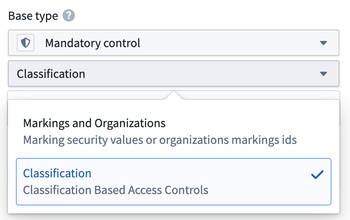
A mandatory control property is a marking or classification where a value on an object is used to restrict access to the other property values on that object within the same datasource. For more information on how mandatory control properties work, review the documentation.
Configuring a mandatory control property in the property sidebar in Ontology Manager.
Note that classification-based mandatory control properties are only configurable on enabled enrollments.
New control properties
- Constraints on mandatory control property values: Restricting the list of allowed markings on a property and setting a maximum classification that can be selected for this property on any object of this object type.
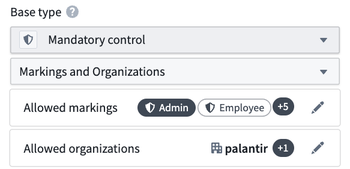
Selecting allowed markings for a mandatory control property.
- Marking exported datasets: Automatically mark exported datasets with the allowed markings or maximum classification set on the object type.
- New action type parameters: Actions now include markings and classification pickers as parameters directly on the action form.
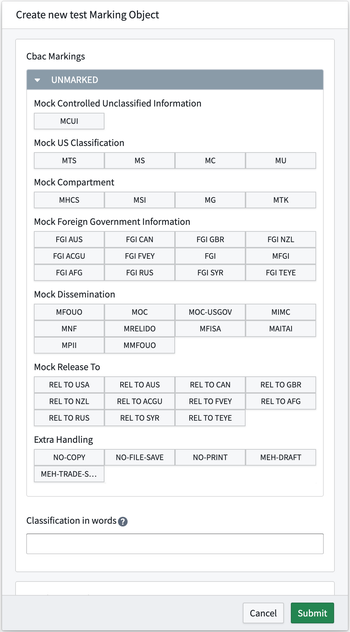
A classification picker on the action form.
When to use mandatory control properties
Mandatory control properties are perfect for users managing highly sensitive data indexed in the ontology, where applying a single marking or classification level to the entire backing dataset may be too restrictive or too permissive for specific rows. With mandatory control properties, you can apply markings to individual objects within an object type or secure only a subset of properties on the object. This is achieved by organizing the properties that need to be secured together into a new datasource with their mandatory control property.
Share your feedback
We want to hear what you think about our updates to the platform. Send your feedback to our Palantir Support teams, or share in our Developer Community ↗.
Introducing incremental transforms preview in the Palantir extension for Visual Studio Code
Date published: 2025-04-29
We are excited to announce that you can now accurately preview incremental transforms directly in your code environment with the Palantir extension for Visual Studio Code. The preview feature uses the same incremental resolution logic used in builds, ensuring consistency and accuracy throughout your developer experience.
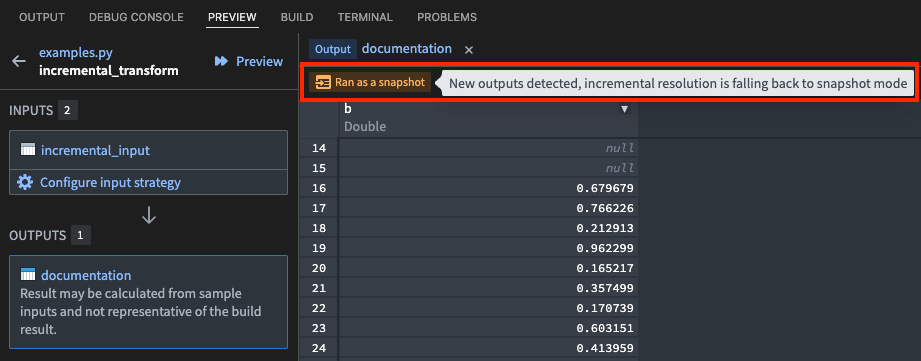
Along with preview availability, you can take advantage of the new element in the Preview panel that provides insights into the success or failure of your incremental transform builds.

The new feature to preview incremental transforms using the Palantir extension for Visual Studio Code.
This feature mirrors the behavior you would experience when running a non-incremental build on your Python transform.
The preview feature in use while running a snapshot Python transform build.
Both Spark and lightweight transforms are supported in VS Code workspaces and local development environments, including file transforms and reading from outputs. The preview functionality supports all options and flags that are available during a build, including semantic versioning, retention, and more.
Your feedback matters
What want to know your thoughts about our work on the Palantir extension for Visual Studio Code. Share your feedback with Palantir Support, or contribute to our Developer Community ↗ using the vscode tag ↗.
Introducing AIP Agent Studio
Date published: 2025-04-22
We are excited to announce that AIP Agent Studio will be generally available the week of May 5. AIP Agent Studio is a powerful application designed for building interactive AI assistants called AIP Agents, which can be equipped with enterprise-specific information and tools to execute tasks. AIP Agents can be deployed internally on the Palantir platform and externally through the Ontology SDK and platform APIs.
Agents built in AIP Agent Studio are powered by large language models, the Ontology, documents, and custom tools. AIP Agents can be integrated into applications to facilitate dynamic, context-aware read and write workflows that enable you to automate tasks and reduce manual application interactions.

AIP Agent configuration in AIP Agent Studio.
Key features of AIP Agent Studio include the following:
- Enterprise-specific context: Build agents that use enterprise-specific information, ensuring they deliver relevant and accurate responses tailored to your organization's needs.
- Natural language interface: Interact with your agents using natural language, making it easier to operationalize workflows and automate tasks.
- Secure and controlled access: Built on the rigorous security model of the Palantir platform, AIP Agent Studio ensures that LLMs only have access to necessary information.
- Flexible deployment: Deploy AIP Agents internally on the Palantir platform or externally through the Ontology SDK and platform APIs, providing versatility in usage and integration.
To get started with AIP Agents and create increasingly complex, automated workflows, we recommend using the agent tier framework.

The agent tier framework, where every tier increases in complexity and automation.
-
Tier 1: Ad-hoc analysis: Use AIP Threads for ad-hoc document analysis and productivity improvements. Start by navigating to AIP Threads.
-
Tier 2: Task-specific agent: Create agents that can use Ontology, document, or custom function-backed context, allowing for more targeted and specific interactions. Start by upgrading your thread configuration to an AIP Agent or creating an AIP Agent in AIP Agent Studio.
-
Tier 3: Agentic application: Incorporate AIP Agents into Workshop or third-party applications that allow agents to read from and update application state. Start by adding application state to your agent and deploying it in Workshop using the AIP Agent Widget.
-
Tier 4: Automated agent: Automate and delegate tasks to your agent, enabling agents to handle complex workflows autonomously. Start by publishing your agent as a function and pulling it into automations.
Tell us what you think
As we continue to develop AIP Agent Studio, we want to hear about your experiences and welcome your feedback. Share your thoughts with Palantir Support channels or our Developer Community ↗ using the aip-agent-studio tag ↗.
Learn more about getting started with AIP Agent Studio and its core concepts.
Note: AIP feature availability is subject to change and may differ between customers.
Allow users to switch platform version from the Account menu
Date published: 2025-04-17
Platform administrators can now enable users to switch platform versions using the Account menu located in the workspace navigation sidebar. Once enabled by an administrator, users can use the platform switcher to select between three available platform versions:
- Stable: The current stable release
- Beta: The future stable release
- Prior: The previous stable release
Note that changing the platform version only affects features in the user interface; saved changes in the platform will persist, regardless of whether the current version renders it.

The platform version switcher is located in Account > Platform version dropdown menu.
To set up platform version switching, platform administrators can navigate to the Platform experience page in Control Panel. Here, administrators can also configure groups of users to view the Beta version by default.
Platform version switching is in the beta phase of development and is opt-in for everyone by default. Administrators can opt in to the feature as it is released.

The Platform version configuration tab in Control Panel, located on the Platform experience page.
For more information on this feature, review the documentation on configuring the platform experience.
Share your feedback
We want to hear what you think about our updates to the platform. Send your feedback to our Palantir Support teams, or share in our Developer Community ↗.
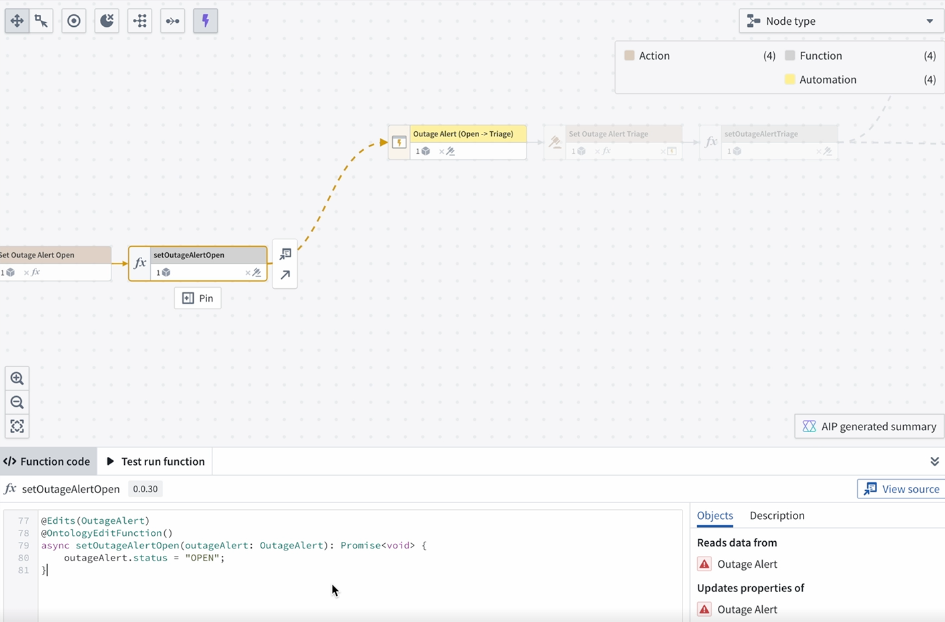
Explore automation insights in Workflow Lineage
Date published: 2025-04-17
We are excited to introduce features to improve Automate insights in Workflow Lineage. These enhancements will make it much easier to debug what triggered your automation, what exact properties were used, and what dependencies these automations have.
You can now explore the following automation details:
- Property usages and dependencies: Review the Selection details sidebar to view property usages and dependencies. The Condition ontology dependencies section provides a detailed breakdown of the specific object properties the automation condition relies on. Hover over the number displayed on the right to view the exact property.
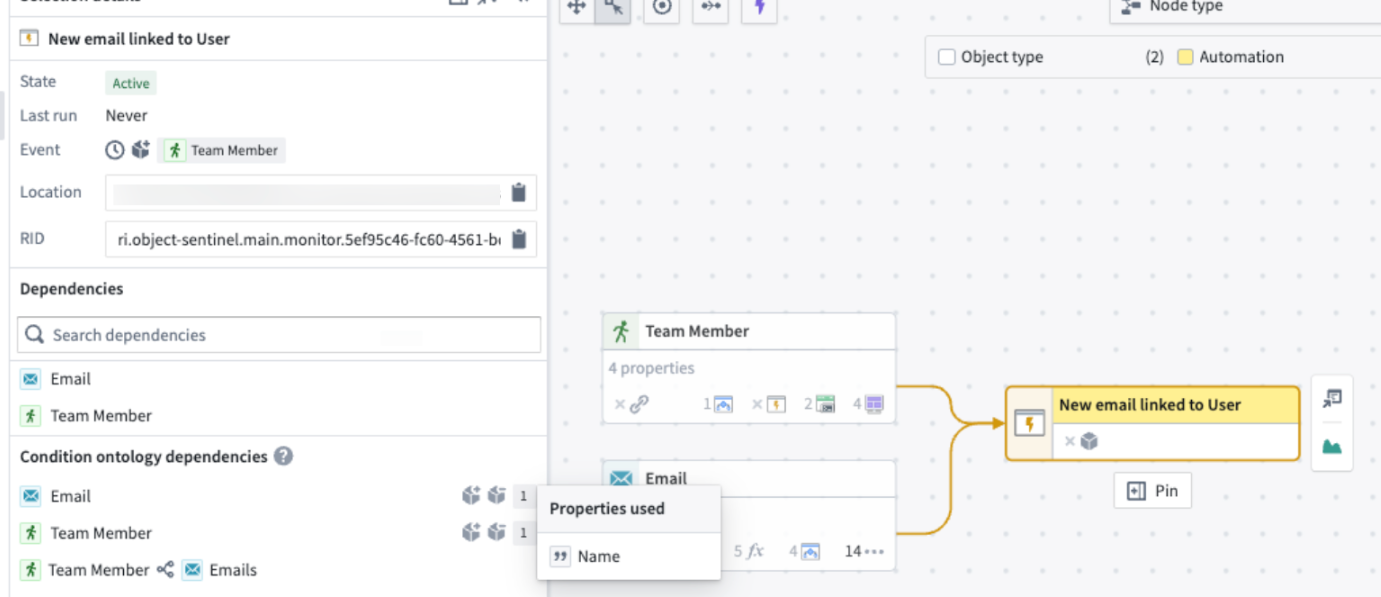
- Action and function triggers: Toggle on the purple lightning bolt icon located at the top left of the graph to discover which actions and functions trigger the automation.
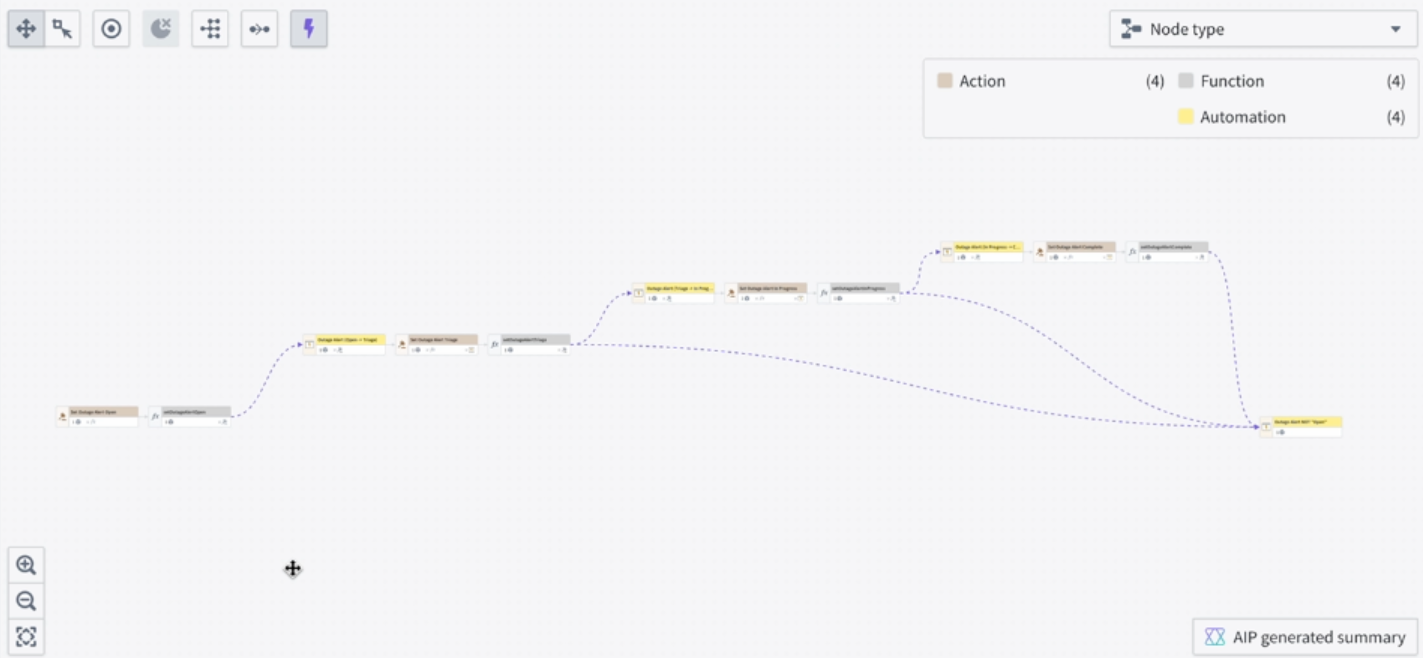
For automations that activate when a property reaches a specific value, Workflow Lineage identifies and links the actions or functions that modify the property to that value.
Learn more about how Workflow Lineage can help with automation insights and debugging.
Your feedback matters
Your insights are crucial in helping us understand how we can improve Workflow Lineage. Share your feedback through Palantir Support channels and our Developer Community ↗.
Foundry Branching now supports transforms code repositories
Date published: 2025-04-17
Starting the week of April 16, Foundry Branching supports transforms code repositories across all enrollments. Foundry Branching, in beta, provides a unified experience to make changes across multiple applications on a single branch, test those changes end-to-end without disrupting production workflows, and merge the changes with a single click. To enable this feature on your enrollment and participate in beta testing, contact Palantir Support. We recommend trying Foundry Branching with a restricted set of users first before broadening usage.
With the new support for transforms code repositories, Foundry Branching adds to its additional support for Pipeline Builder, the Ontology, and Workshop. Through Foundry Branching, you can now modify your data pipeline in Code Repositories, edit Ontology definitions, and build on those changes in your Workshop modules from one branch.
Note that support for TypeScript function repositories is currently under development.

Modifying a code repository on a branch.
When merging a branch that contains code repository changes, the Foundry Branching merge dialog will show all datasets that are about to be built. If your proposal's datasets are reliant on other datasets that were not modified on your branch, an option to build all the necessary datasets during the merge process will appear.
The merge proposal dialog provides two options:
- Build all affected resources: All resources affected by changes on your branch will be built, so that data in upstream changes flow downstream as required.
- Build modified resources only: Only resources directly changed on this branch will be built. You may need to build resources manually if they depend on upstream changes to this branch.

Building all affected resources in the merge dialog.

Building modified and affected datasets in the merge process.
For more information, review the Foundry Branching documentation.
Your feedback matters
We want to hear about your experiences with Foundry Branching and welcome your feedback. Share your thoughts with Palantir Support channels or on our Developer Community ↗ using the global-branching tag ↗.
Announcing Bring-Your-Own-Model in AIP
Date published: 2025-04-10
Bring-your-own-model (BYOM), also known as "registered models" in the Palantir platform, is a capability that provides first-class support for customers who want to connect their own LLMs or accounts to use in AIP with all Palantir developer products. These products include AIP Logic, Pipeline Builder, Agent Studio, Workshop, and more.

Once you have registered your LLM, you can select it from the model dropdown menu in AIP Logic.
When to use
Based on LLM support and viability, we generally recommend using Palantir-provided models from model providers (for example: OpenAI, Azure OpenAI, AWS Bedrock, xAI, GCP Vertex), or self-hosted open-source models by Palantir (such as Llama models).
However, you may prefer to bring your own models to AIP. We recommend using these registered models only when you cannot use Palantir-provided models for legal and compliance reasons, or when you have your own fine-tuned or otherwise unique LLM that you would like to leverage in AIP.
Learn more
To get started with registering your own model, review the following documentation:
- Bring your own model to AIP, including which AIP capabilities are currently supported.
- Register an LLM with BYOM and how to use a registered model in AIP Logic and Pipeline Builder.
Let us know how we are doing
As we continue to develop on registered models, we want to hear about your experiences and welcome your feedback. Share your thoughts with Palantir Support channels or our Developer Community ↗.
View LLM token and request usage with the new AIP usage views tool
Date published: 2025-04-10
Introducing the new AIP usage views tool in Resource Management, which provides visibility into LLM token and request usage of all Palantir-provided models for all projects and resources in your enrollment. With this new tool, administrators can gain full visibility in managing LLM capacity and handling rate limits.
You can access this tool in Resource Management by navigating to the AIP usage and limits page, then select the View usage tab.

Unlock comprehensive insights with the new AIP usage views tool, created to enhance your understanding of LLM capacity and rate limits and help you identify opportunities for optimization across all your projects and resources.
This tool is primarily built to help with the capacity management and rate limits problem. A few key highlights include the following:
- Track token and request usage per minute, given that LLM capacity is managed at the token per minute (TPM) and request per minute (RPM) level.
- Drill down to a single model at a time, as capacity is managed for each model separately.
- View the enrollment usage overview and zoom in to project-level usage, given that LLM capacity has both an enrollment-level limit and a project-level limit for each project, as explained above.
- View the rate limits threshold; the toggle in the upper right visualizes when project or enrollment limits are hit by displaying a dashed line. The limits vary by model and by project. Two rate limit lines are displayed: the enrollment/project limit, and the “batch limit” which is capped to 80% of the total capacity for the specific project and for the entire enrollment. Read more about prioritizing interactive requests below.
- Filter down to a certain time range to view two weeks of data, down to the minute. Users can drill down to a specific time range either by using the date range filter on the left sidebar, or by using a drag-and-drop time range filter over the chart itself. When the time range is shorter than six hours, the chart will include segmentation to projects (at the enrollment level) or to resources (at the project level).
- View a usage overview in a table. Below the chart, the table includes the aggregate of tokens and requests per project (or per resource when filtered to a single project). The table is affected by all filters (time range, model, and project filter if applied).
Share your feedback
We want to hear what you think about these updates. Send your feedback to our Palantir Support teams, or share in our Developer Community ↗ using the language-model-service tag ↗.
Introducing the split transform in Pipeline Builder
Date published: 2025-04-09
The new split transform feature in Pipeline Builder allows you to partition your data input into two outputs, based on custom conditions. For example, you could use the split transform to divide a dataset of customer orders into subsets for further analysis.

The new split transform feature is accessible from the right-click menu by selecting Split.
What is the split transform?
The split transform evaluates each row of your input data against a specified condition before directing the rows into two distinct outputs based on whether the row meets the condition. That is, whether the condition evaluates as True or False.
Rows where the condition is true will be sent to the first output (the True output), and rows where the condition is false will be sent to the second output (the False output).
This enables efficient categorization of your data and facilitates further processing tailored to each category. Additionally, this feature enhances the clarity of your pipeline, making it easier to understand at a glance.
Example use case
Imagine you have a dataset of customer orders and wish to categorize them into high-value and low-value orders. By defining the condition order_value > 1000, the split transform will direct orders exceeding $1000 to the True output, while all other orders will be channeled to the False output.

This notional example splits orders between the true and false output channels depending on whether the order value is over 1000.
This allows for targeted analysis and processing of high-value orders.
Learn more about the split transform and experience streamlined, condition-based data partitioning today.
Tell us what you think
As we continue to develop Pipeline Builder, we want to hear about your experiences and welcome your feedback. Share your thoughts with Palantir Support channels or our Developer Community ↗ and use the pipeline builder ↗ tag.
Introducing source-based Python transforms and functions in Code Repositories, and transforms in VS Code Workspaces
Date published: 2025-04-09
External Python transforms can now be created as source-based external transforms, supporting all the features of egress-based external transforms and more. Source-based external connections are now also supported for functions.
Key advantages of source-based external transforms include support for the following:
- An improved developer experience when working with external connections
- Connecting to systems not accessible from the Internet through agent proxies
- Rotating or updating credentials without requiring code changes
- Sharing connection configuration across multiple repositories
- Improved and simplified governance workflows
- Simplified governance for egress, exportable markings, and credentials
Configure a source
Configure a source to allow code-based connections by enabling exports to the source and code imports. Allowing exports provides the ability to egress to the source, while allowing code imports allows access to properties of the source, including secret values.
Navigate to Connection settings > Export Configuration, and toggle on Enable exports to this source. Then, navigate to the Code important configuration page and toggle on Allow this source to be imported into code repositories.

Toggle Enable exports to this source within the source connection settings.

Toggle Allow this source to be imported into code repositories within the source connection settings.
External Python transforms
Source-based external transforms are the recommended way to create external transforms. Users should note that the egress-based approach will soon be considered in the legacy phase of development.
Start from the code repository or VS Code Workspace sidebar, and select the External systems tab. Follow the provided prompts to install the transforms-external-systems library, add the source to the repository, and view the example usage provided by the source.
Use VS Code Workspaces to get the most up-to-date development experience for source-based external transforms.

Select the External systems tab, import a source, and use the example provided by the source.
External functions
Start from the code repository sidebar and select the Resource imports tab. Add the source to the repository, and view the example usage provided by the source.

Create an external TypeScript function using the @ExternalSystems decorator.
Learn more
If you would like to learn more about the topics above, consider reviewing the following resources:
Your feedback matters
Your insights are crucial in helping us understand how we can improve data connections. Share your feedback through Palantir Support channels and our Developer Community ↗ using the data-connection tag ↗.
Introducing new PDF Viewer widget capabilities and configurations
Date published: 2025-04-03
We are excited to share that various new configuration options have been added to the PDF Viewer widget enabling new capabilities such as inline actions on existing annotations, automatic scrolling to annotation objects, events on new selections, and more:

Inline Edit Annotation action on hover of an existing text annotation.
-
Inline actions on existing annotations: Builders may now configure inline actions on existing annotations. Actions may be configured to show up within the tooltip popover on hover of an annotation. The hovered object may be referenced and passed in as an action input parameter using the hovered object variable.
-
Automatic scrolling to annotations: Builders may now set an object set variable containing a single annotation object within the annotation object set for the widget to scroll to.
-
Events on new selections: Builders may now additionally configure events to be triggered on new text and/or area selections. Previously, only actions could be configured to trigger on new selections.
-
Active page number: A numeric variable may now be used to either capture the page number a user is currently on and/or to change the current page being displayed by the widget.
-
New Output variables for user selections: Two new output variables have been added to the PDF Viewer widget allowing builders to capture and use a user’s selections within the PDF. Output user selected coordinates captures a user’s selection coordinates on the PDF within a string variable as an output. Output user selected page number captures the page number the user has made a selection on within a numeric variable as an output.
Review PDF Viewer widget documentation to learn more about the new configuration options.
We want to hear from you
As we continue to develop Workshop, we want to hear about your experiences and welcome your feedback. Share your thoughts with Palantir Support channels or our Developer Community ↗ and use the workshop ↗ tag.
Redefining application variables in AIP agents
Date published: 2025-04-01
To better integrate the AIP Agent Widget with other widgets in your Workshop modules, we have significantly improved the application variable system for AIP agents. Application variables within AIP agents can be used as deterministic outputs from tools and ontology context. The AIP Agent Widget also offers additional variables that can be used to create new sessions from external widgets and automatically send messages using Workshop events.
Access mode configuration replaced with new application variable update tool
The configuration for access mode previously allowed you to determine whether the agent could update a variable or if the value was "read-only." Internally, this involved using a tool to update application state, which required the agent to specify the variable UUID for updates. However, this method was potentially unreliable, as the agent sometimes failed to apply updates before returning the final response. To address these issues, we replaced this access mode with the Update application variable tool, featuring enhanced prompting. When creating a variable, you will now need to manually add the variable with this tool to align with the read/write access configuration.
Existing agents do not need to be updated, as we performed a migration in the backend.
This Update application variable tool enhances transparency by clearly revealing the underlying processes and allows users greater flexibility in configuring the system. Additionally, it enables the language model to specify updates by variable name rather than by ID, resulting in improved performance. Consequently, the variable ID is no longer included in the prompt.

The update application variable option in the Add tool dropdown menu.
Introducing value visibility for variables
The LLM does not need to know about every variable; for example, a variable you use as input to function RAG, ontology context RAG, and so on may have no purpose in the compiled prompt. Before this update, each variable was automatically included in the prompt (comprising the name, current value, and description). You can now choose to remove the variable's visibility from the compiled system prompt. We recommend only including variable visibility when necessary, as reducing the amount of context provided to the LLM can decrease confusion and improve accuracy.

New option to hide the variable value from an agent.
Deterministic updates for variables
The Update application variable tool introduces an additional step in the thought process that is not always necessary. We observed that users often anticipate variable updates following the ontology context RAG, functions, and the object query tool. To accommodate this, we are introducing the capability to configure a variable as a "deterministic" output for each of these scenarios. When using the tool, ensure that the variable type matches the output type of the respective tool or context.
Usually, we strongly recommend prioritizing deterministic updates whenever feasible, rather than relying on the Update application variable tool. For the Object query tool, you can designate an output object set variable for each configured object type. With the Call function tool, you can map functions that have either string or object set outputs to a corresponding variable of the same type. Regarding ontology RAG, you can select an output object type variable that will update with the K most relevant objects after each response.

Select an object set output variable to update with the K most relevant objects after each response.
Deterministic input for object query tool
The Object query tool can also be provided with a initial variable rather than having the agent specify the starting object set. This can be done by mapping the input variable for each object type in the tool configuration. This is useful if you want the object query tool to start from a pre-filtered object set without any additional prompting.

Where desired, provide an initial variable instead of having the agent specify the starting object set.
Ontology context citation object set variable
Selecting an ontology context citation in the agent response will link out to object views in a new tab. To keep users within the same module, we added a citation variable to the ontology context configuration. When a citation is selected, this variable will update with a static object set containing just the citation object. This is useful for showing a preview of the object in another widget alongside the Agent widget, and more.

Select a citation variable in the ontology context configuration to update with a static object set containing just the citation object.
AIP Agent Widget configuration updates
The AIP Agent Widget has an updated configuration panel to improve integration within your Workshop module. The new text box variable refers to the text in the user text box. As the user enters text, the variable automatically updates to match the value in the text box. If the variable is changed from outside the AIP Agent Widget, a new message with the current value of the variable is sent.
Additionally, to connect the active session to a string Workshop variable, we introduced an active session identifier variable which is always up-to-date with the current sessionRid. If you change this variable from outside the AIP Agent Widget, either a new session will be automatically created or an existing session will be switched to if the change contains a sessionRid.
We also added a Boolean toggle to hide session history by default. If this toggle is true, regardless of the width of the widget, session history will automatically be collapsed when the module loads.
Share your feedback
We want to hear what you think about these updates. Send your feedback to our Palantir Support teams, or share in our Developer Community ↗ using the aip-agents tag ↗.