- Capabilities
- Getting started
- Architecture center
- Platform updates
Log in to the platform
The Palantir platform supports SSO authentication and passwordless login using passkeys. If your organization uses SSO, proceed with the steps from your SSO provider. To learn more, refer to the authentication documentation. To log in to the platform with a passkey or manage your passkeys, review the sections below.
Set up and configure a passkey
A passkey replaces a password. You save it on your device, on your phone, or on a security key, and unlock it with your fingerprint, face, PIN, or screen lock. You do not need a separate authentication application. To learn more, review what passkeys are.
To configure and log in with a passkey, you must first receive an email from Palantir titled "Set up your Palantir account and log in". This email will contain a one-time password and a link to set up your account. You will be prompted to verify your phone number and create a passkey, which you can then use to log in. Follow the steps below for detailed instructions.
Your directory's security policy determines which authenticators you can use. Confirm the accepted types with your enrollment administrator before choosing a device or password manager. Directories using any Recommended or Government profiles require eligible hardware passkeys. For Government, review the hardware setup guide.
For security reasons, the platform blocks passkeys created on outdated operating systems or browsers. Before you start, confirm the following:
- Browser: Use an up-to-date version of Google Chrome or Microsoft Edge. On mobile devices, you can also use Apple Safari. Review the list of supported browsers.
- Operating system: Use an up-to-date operating system. On iOS, use the latest or previous major version. On Android, use Android 13 or later and set a screen lock ↗.
- Passkey storage: For device and synced passkeys that your directory permits, turn on the service where you plan to save your passkey, such as Google Password Manager, Samsung Pass, or Windows Hello. To use iCloud Keychain, turn on iCloud Keychain ↗ on your iPhone, iPad, or Mac.
Follow the instructions below to continue configuring your passkey:
- Navigate to the email from Palantir titled "Set up your account and log in", and select the Set up account option.

- Enter the email address that you used to register and the temporary password included in the email, then select Next.

- Enter your first and last name, then choose between verifying your account with SMS or with a phone call.

- Verify your phone number by entering the six digit authentication code provided by SMS or phone call. If you did not receive a verification code through SMS or phone call, select Resend code under the verification number input.

- If you were invited to an existing enrollment, agree to the terms and conditions to proceed. Otherwise, skip to step 6.

- Select Add passkey.
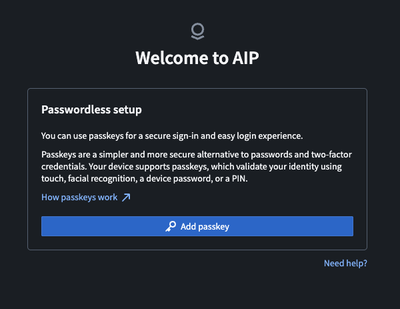
- Select a destination accepted by your directory's policy, then follow the on-screen instructions. Your device may suggest its default credential store, the service that saves your passkeys, such as iCloud Keychain, Google Password Manager, or Windows Hello. To choose a different option, select Save another way. You can save only one passkey for your account in each credential store.
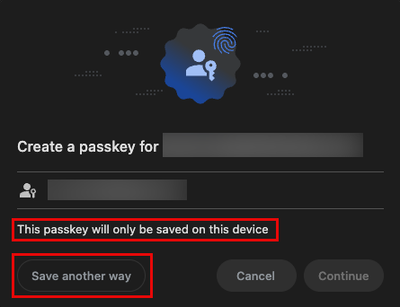
- Save your passkey to the device you are using: Select an accepted credential store, then verify your identity with a fingerprint, face scan, PIN, or screen lock. If your device warns that the passkey works only on this device, you cannot use it to log in from your other devices.
- Save your passkey to a security key: Select the security key option, such as Use a phone, tablet, or security key, then insert the security key. Enter your PIN, touch the security key's sensor, or both.
- Save your passkey to a mobile device: Turn on Bluetooth and connect to the Internet on both devices. Select the mobile device option, such as Use a phone, tablet, or security key or, on iOS, iPhone, iPad, or Android device. Then, scan the QR code with your mobile device and follow the instructions on it.

- Once your passkey has been successfully added, you will see the following screen:

Now that you have successfully configured a passkey, follow the instructions below to log in with your passkey.
Recommended passkey types and best practices
Where your organization's policy permits backup credentials, save at least two accepted passkeys in different credential stores. This way, you can still log in if you lose access to one. For example, save one passkey on your computer, such as in Windows Hello, and another on your phone. For a directory that requires hardware passkeys, use an approved spare hardware key. To save another passkey, follow the steps to add additional passkeys.
For device and synced passkeys that your directory permits, review the passkey documentation for Windows ↗, iPhone ↗, and Android ↗.
Log in with a passkey
To log in with a passkey, review the section below that applies to your situation. If you navigated away from the login page and do not remember the URL, check your registration email. After successful creation of a passkey, you will receive an email titled "Your Palantir account was successfully set up". Select the Log in option in this email to navigate to the platform login page.
Log in with a passkey stored on your device
If your passkey is stored on the same device that you are using to log in, follow the instructions below.
- On the Palantir login page, enter the email address that you registered with and select Next.
- Select Use passkey to log in to your account using the passkey stored on your device. Your device will automatically recognize that a passkey is configured for this URL and guide you to verify your identity.
- Follow the on-screen passkey instructions to unlock your device and select your passkey. This may involve facial recognition or a fingerprint scan to verify your identity. Once verified, you should have access to the platform.
Log in with a passkey stored on a mobile device
If your passkey is stored on a mobile device that is not the device you are using to log in, follow the instructions below.
- On the Palantir login page, enter the email address you registered with and select Next.
- Select Use passkey, then Use a phone, tablet, or security key. Select Continue.
- Turn on Bluetooth on both devices. Scan the QR code that appears on screen with the mobile device where your passkey is stored, then follow the instructions on your mobile device to verify your identity. After verification, you should have access to the platform.
Log in with a passkey stored on a security key
If your passkey is stored on a security key, follow the instructions below.
- On the Palantir login page, enter the email address you registered with and select Next.
- Select Use passkey, then Use a phone, tablet, or security key. Select Continue.
- A dialog will appear on screen instructing you to insert the security key and enter your PIN and/or touch the security key's sensor. After following the instructions, you should have access to the platform.
Add additional passkeys
We recommend that you add more than one passkey to your account as backup. You may add up to four passkeys per account, but you may only have one passkey per credential store. This means that you can only store one passkey in Windows Hello, iCloud Keychain, Samsung Pass, or other credential store. If you are attempting to create a new passkey, ensure that you do not already have a passkey stored with that credential store. For example, if you have already stored a passkey in your iCloud Keychain, attempting to store a second passkey in your iCloud Keychain will result in an error.
Before adding additional passkeys, make sure that existing passkeys have descriptive names to avoid confusion. A good naming convention for passkeys is the device it was created on plus the credential store, for example, "Work Laptop Chrome" or "Personal iPhone Keychain".
Passkey names are visible to your organization's administrators during account lockout recovery. Do not include personal or sensitive information in passkey names.
To add an additional passkey to your account, select Account at the bottom of the right toolbar, then select Settings. On the settings page, navigate to the User settings section on the top right and select Authentication. You can also access the authentication page using the following URL:
Copied!1<your-enrollment-URL>/workspace/settings/authentication

On the Authentication page:
- Select the Add a passkey option.
- You may be asked to re-authenticate before adding an additional passkey.
- Select a destination to save your passkey, then follow the on-screen instructions.
- To save your passkey on the device you are using, select your preferred credential store and follow the instructions to verify your identity.
- To save your passkey on a security key or mobile device, select Use a phone, tablet, or security key. You will then need to scan the QR code with your desired mobile device, or insert a security key and enter your PIN and/or touch the security key's sensor.
Remove a passkey
To remove a registered passkey, select Account at the bottom of the right toolbar, then select Settings. On the settings page, navigate to the User settings section on the top right and select Authentication. You can also access the authentication page using the following URL:
Copied!1<your-enrollment-URL>/workspace/settings/authentication
- Use the Actions dropdown menu next to the passkey you would like to remove.
- Select Delete, then Confirm you want to remove the passkey. Once removed, you will no longer be able to use this passkey to log in.
- After deleting a passkey from the platform, navigate to the credential store that the passkey is stored in and delete it there as well. If you do not delete the passkey from the credential store, you will not be able to register a new passkey with that credential store.
Reset your account
If you cannot access any of your passkeys, depending on your enrollment type, you can use the self-service passkey reset or contact an enrollment administrator. To avoid this scenario, we recommend registering at least two passkeys in case access to one passkey is lost. Make sure to add descriptive names for your passkeys for easy identification.
If you created your enrollment, use the Reset passkey option found on the login page below the login form and complete the verification steps. Depending on your enrollment, this passkey reset may be immediate, or it may be submitted for review.
If you were added as a user to an existing enrollment, contact your enrollment administrator to manage your passkeys.
Support
If you have trouble accessing your account, contact your enrollment administrator for your organization's recovery and support process. Developer Tier users can select Need help? under the login form and complete the AIP/Developer Tier support form.
Provide the following information to help identify the problem:
- The browser you are using, for example, Google Chrome, Microsoft Edge, or Firefox.
- The kind of device you are using; this could be a MacBook, Windows PC, iPhone, or Android device.
- The device you are saving the passkey to; this could be the device you are using, a separate mobile device, or a security key.
- The credential store you are using, such as Windows Hello, Samsung Pass, or iCloud keychain.
Troubleshooting
Lost access to passkeys
If you cannot access any of your passkeys, your account needs to be reset. This process may vary depending on whether you created your own enrollment, or if you were added to an existing enrollment. For detailed instructions, refer to the account reset section.
My one-time password is expired
If your one-time password (OTP) expired before you were able to configure your account, you must request a new one. If you were added to an existing enrollment, contact your enrollment administrator for a new OTP.
If you created your own enrollment, navigate to the email from Palantir titled “Set up your Palantir account and log in”. Select the Set up account option to open the Welcome to AIP page. Here, you can select the Need help? link under the sign in form and fill out the support form to request a new OTP.
Unable to create a passkey
Passkey registration can fail if verification times out, authentication fails, or your device cannot connect. Confirm that your directory accepts the authenticator and verify your identity within the time window. If you are using a permitted mobile passkey through a QR code, ensure that Bluetooth is enabled on both devices.
If you are still having issues, ensure that you do not already have a passkey for this account in the credential store you are trying to use. For example, if you delete an existing Windows Hello passkey from the platform, then attempt to register a new Windows Hello passkey before deleting the old one from your device, you will get an error. You must first delete existing passkeys from a given credential store (for example, iCloud Keychain, Windows Hello, or Google Password Manager) before you can store a new passkey in that credential store.
Confirm that your device meets the passkey requirements, then try again.
Passkey not working on mobile
Some passkeys are device-specific and will only work when you use the device on which they are stored. These device-specific passkeys will alert you during creation that they can only be used on one device. Other passkeys may be accessible on multiple devices, such as passkeys stored in password managers. To ensure that you are able to use passkeys across devices, make sure that you have enabled autofill for the credential store provider on your device(s).
For example, if you wish to use Google Password Manager passkeys on multiple devices, Google Password Manager must be enabled as the autofill provider in your device settings. For more information on using Google Password Manager passkeys across devices, visit the official Google Password Manager documentation ↗.
Forgotten username
Your username is the email account you used to register for a Palantir account. The first email you will receive from Palantir is titled “Set up your Palantir account and log in”. Search your email account(s) for this email to verify that you have the right account.
Client-side passkey issues
To check whether an issue is with your device or the platform, try registering a passkey and logging in on webauthn.io ↗. If the test fails, the issue is likely with your device or browser. A successful test does not confirm that your directory accepts that authenticator. For help, follow the support instructions for your enrollment.
My organization does not support passkeys
Self-service Palantir accounts, including AIP Developer Tier accounts, require a passkey to log in. Some organizations block passkeys, security keys, or Bluetooth on managed computers. If your organization's policies allow it, save your passkey to a security key or a mobile device, or use a different computer. For instructions, review the passkey setup steps.
If none of these options are available, ask your IT administrator whether passkeys can be enabled. If you are attending a Palantir event, contact the event organizer to check whether compatible hardware is available.
Phone number is unavailable
During account creation, you will be asked for a phone number. If you get the error message Phone number is unavailable, you will need to enter a different number. Phone numbers can only be used once per enrollment.
Email domain restrictions
Your enrollment may restrict which email domains can be used to register or log in. If your email domain is not permitted, you may encounter an error during sign-up indicating that your domain is restricted or that your invitation is no longer valid. During login, domain restrictions may result in a general login failure without additional details.
This can occur when an enrollment administrator updates domain restrictions after an invitation was sent or after your account was created. If you previously had access or received an invitation link that is no longer working, contact your enrollment administrator to verify which email domains are currently permitted and to request a new invitation if needed.
The authenticator used to register the passkey is not allowed
If you are using an outdated operating system or browser, you may receive the following error when trying to use a passkey:
The authenticator used to register the passkey is not allowed or its details could not be read.
Please confirm you are using a supported browser before trying again.
Passkeys from outdated operating systems or browsers are blocked for security reasons. To resolve this issue, update your operating system or browser, or use a device with up-to-date software. Ensure that you are using a supported browser to avoid issues.
Passkey does not meet security requirements
Some enrollments enforce security policies that restrict which types of passkeys can be used. If your passkey does not satisfy these requirements, you will encounter an error when attempting to log in or register a new passkey indicating that the passkey does not meet the enrollment's security requirements. If a policy was changed after you registered your passkey, the error may indicate that it no longer meets the requirements.
This typically means your enrollment requires specific authenticators, such as hardware security keys, rather than built-in device passkeys. If you have multiple passkeys registered, try using a different one. Contact your enrollment administrator to confirm which passkey types are approved for your enrollment.
Administrators can review passkey profile troubleshooting to investigate policy failures. If your directory uses the Government profile, follow the hardware setup guide to confirm that your authenticator and configuration meet your enrollment's requirements.