- Capabilities
- Getting started
- Architecture center
- Platform updates
Create a link type
We recommend creating and configuring a new link type with the guided helper outlined below. However, if you exit the helper before completing the object creation process, you can manually complete the process by specifying the link type, keys, and API names for the new link type.
Access the link type creation helper
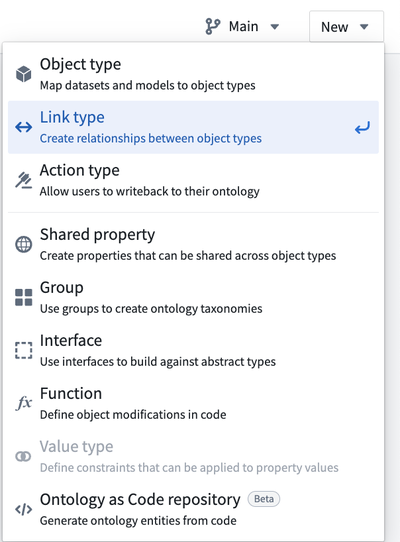
Navigate to Ontology Manager. To access the link type creation helper, choose one of the following methods:
-
Select New from the top right corner, then select Link type.
-
In the left sidebar, select Link types under Resources. Then, select New link type in the top right corner of the Link types page.
-
Navigate to an object type you want to link, then select Create new link type from within the link type graph on the object type’s Overview page.

Configure a new link type
The new link type helper will guide you through the following steps:
- Choose the relationship type
- Define link resources
- Define link type names
- Save location
- Save change to ontology
Choose the relationship type
-
In the first step of the Create a new link type dialog, select the relationship type for the link.
-
Choose the relationship type for defining links between your two objects:
- Object type foreign keys: Supports "one-to-one" and "many-to-one" cardinality link types. This option allows you to select properties that represent the foreign key and corresponding primary key for the desired objects. See below for details in defining link resources with a foreign key.
- Join table dataset: For "many-to-many" cardinality link types. This option allows you to use a join table dataset to back the link. See below for details in defining link resources with a dataset.
- Backing object type: Object-backed link types expand on many-to-one cardinality link types, providing first class support for object types as a link type storage solution. See below for details on defining link resources backed by an object. For additional information, refer to the object-backed links section.
In the examples below, assume that there are two object types that are related to each other through a cardinality: an Aircraft object type and a Flight object type. Cardinality types include:
- One-to-one cardinality: This indicates that one
Aircraftshould be linked to a singleFlight. The one-to-one cardinality serves as an indicator of the intended relationship, but the one-to-one cardinality is not enforced. - One-to-many cardinality: This indicates that one
Aircraftcan be linked to manyFlights. - Many-to-one cardinality: This indicates that many
Aircraftcan be linked to oneFlight. - Many-to-many cardinality: This indicates that one
Aircraftcan be linked to manyFlights, and oneFlightcan be linked to manyAircraft.
- Select Next to proceed to the next step.

Define link resources
Foreign key relationship type
In a one-to-one or many-to-one cardinality link type, you will define the foreign key property and primary key properties for the link. The foreign key property of one object type must refer to the primary key property of the other object type.
For example, the Tail Number property is the primary key on the Aircraft object type. The Flight Tail Number property on the Flight object type is the foreign key. Links will be created between Aircraft and Flight object types when the Tail Number of the Aircraft matches a Flight Tail Number of a Flight.
-
In the Link resources step, choose the object types for your link.
-
Select the primary key object type from the dropdown menu on the right (
Aircraftin our example). -
Select the foreign key object type from the dropdown menu on the left (
Flightin our example). The creation dialog will detect and automatically select a foreign key if the following conditions are met:- The foreign key matches the primary key of the linked object type.
- The property types of both objects match.
-
Choose the properties that will form the link:
- For the foreign key object type, select the property that will be used as the foreign key for the source object type (
Flight Tail Numberfor theFlightobject types). - The primary key of the object type is auto-selected since there is only one primary key for each object type (
Tail Numberfor theAircraftobject type).
- For the foreign key object type, select the property that will be used as the foreign key for the source object type (
-
Select Next to continue.

Join table dataset relationship type
In a many-to-many cardinality, select a datasource that includes all combinations of links between the primary key of the first object type (Aircraft in our example) and the second object type (Flight in our example).
A many-to-many cardinality, which requires a backing datasource, is required to enable users to edit or write back to the link type.
- In the Link resources step, choose the object types for your link.
- Select the first object type from the dropdown menu on the left (
Flight). - Select the second object type from the dropdown menu on the right (
Aircraft). - Choose the join table dataset. Select a dataset that contains columns matching the primary keys for both selected object types. A column can only be mapped to one primary key.
- It is now possible to automatically generate a join table for new link types. The Generate join table option will create a dataset with the correct schema based on the primary keys of the two object types you have selected. This means that you can get started faster if you have user edit-backed data, or if you want to provide production data later on.
- Select which columns in the link type’s backing datasource map to the primary keys of each of the linked object types.
- Select Next to continue.

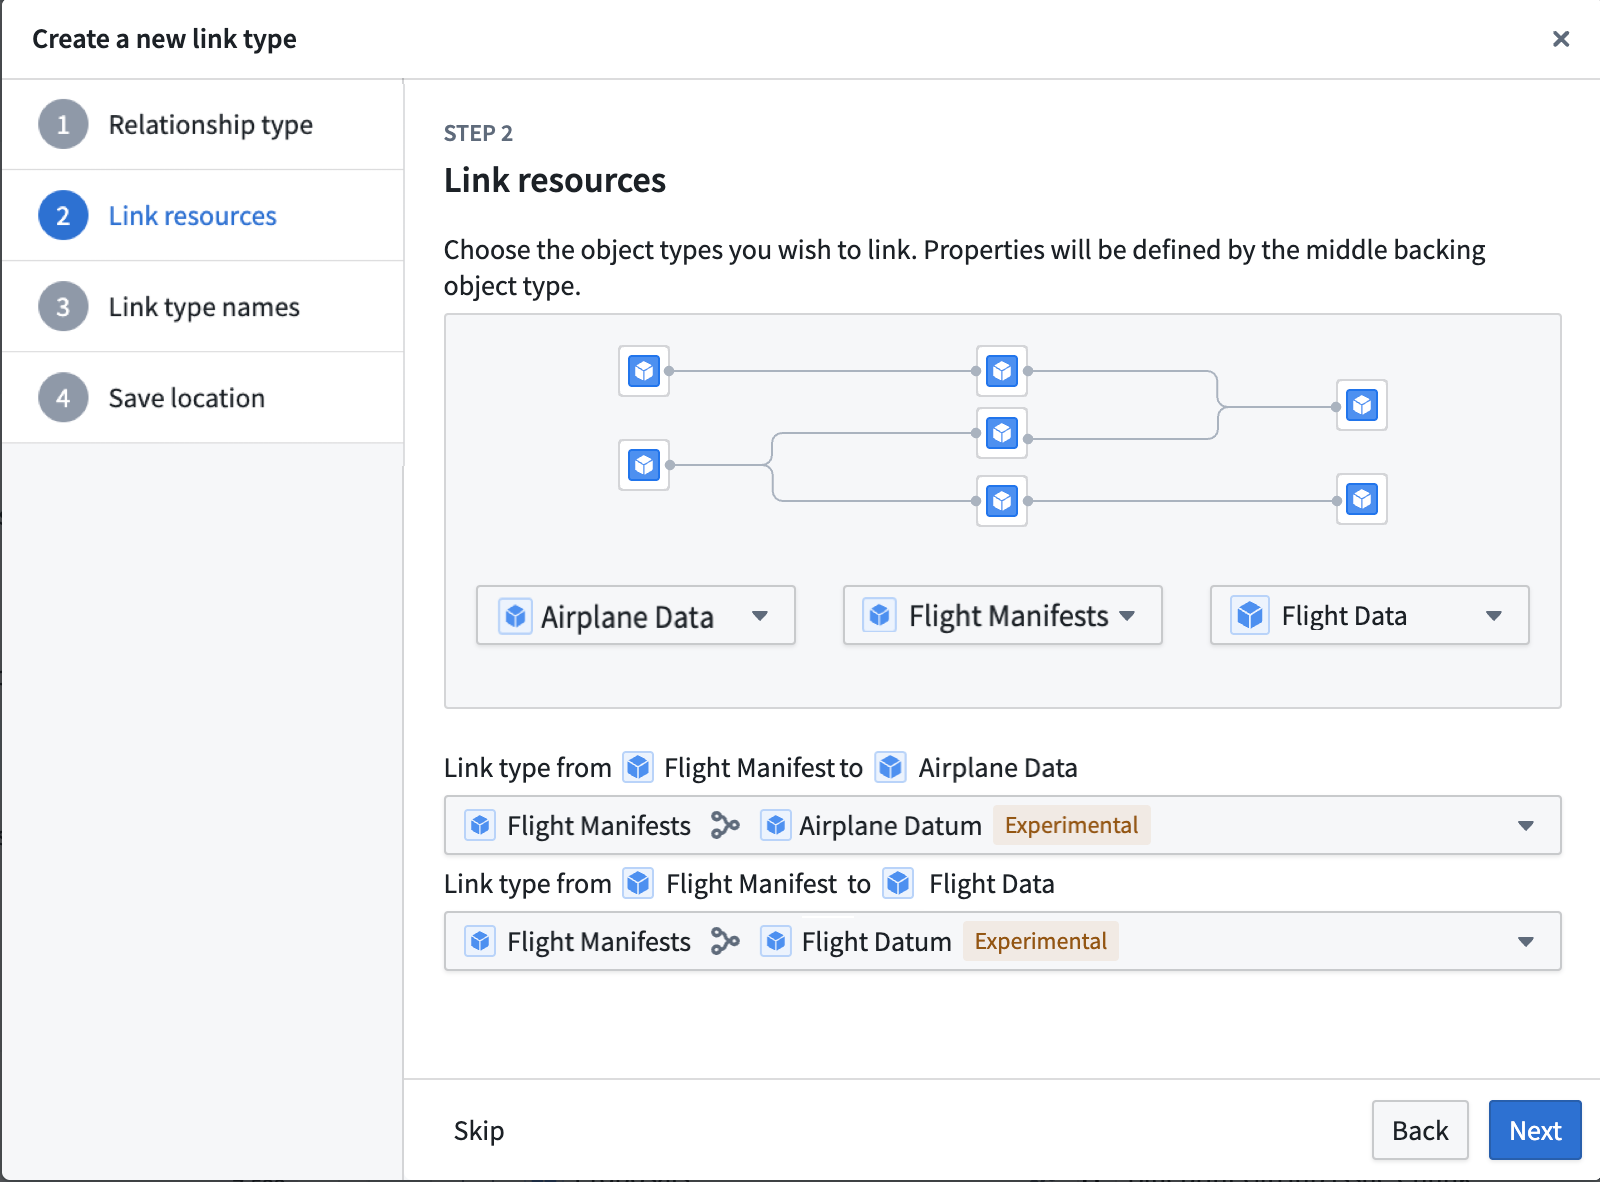
Backing object relationship type
Before creating the object-backed link, ensure that the prerequisite object and links have been created.
- Select the object types created in the prerequisites to represent your desired link type. The objects on the left and right represent the two entities that will be linked together. The object in the middle serves as the intermediary and provides additional metadata about the connection between the two entities, and backs the link.
- If there are multiple links between the objects on the left and right and the intermediary object in the middle, use the dropdown menus to select the desired links between the left and right objects and the intermediary object.
Define link type names
- In the Link type names step, provide the display and API names for your new link type.
- Enter a display name for each side of the link type. A side of the link type represents the link to that object type. In our example, the display name for the
Aircraftobject type describes the link fromFlighttoAircraft. You could choose the display nameAssigned Aircraftsince oneFlighthas oneAssigned Aircraft. - The API name will be automatically generated based on the display name, but you can modify it if needed.
- The API name field is used when referring to a link type programmatically in code. The API name on a side of a link type can be used to return objects of that type. For example, if the API name on the
Aircraftside of the link type isassignedAircraft, then callingFlight.assignedAircraft.get()will return theAircraftobjects linked to thoseFlightobjects. - Link type API names must adhere to the following:
- Begin with a lowercase character and consist of only alphanumeric characters.
- Be unique across all link types associated with the same object type.
- Be between 1 and 100 characters long.
- Be NFKC normalized.
- Not be a reserved keyword.
- Learn more about API names.
- The API name field is used when referring to a link type programmatically in code. The API name on a side of a link type can be used to return objects of that type. For example, if the API name on the
- Select Next to proceed.

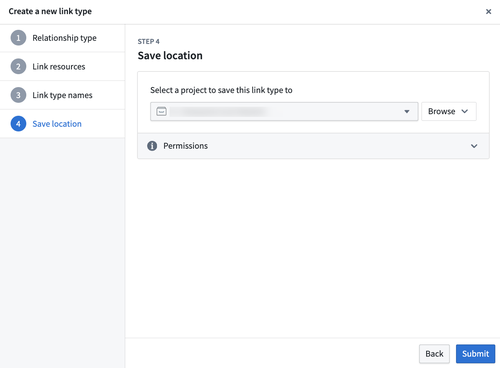
Save location
In the final step, choose a project to save this link type to. Then, Submit. After completing these steps, your new link type will be created, but not yet saved.
Save change to ontology
Back in Ontology Manager, select Save in the upper right corner to make the change to your ontology.
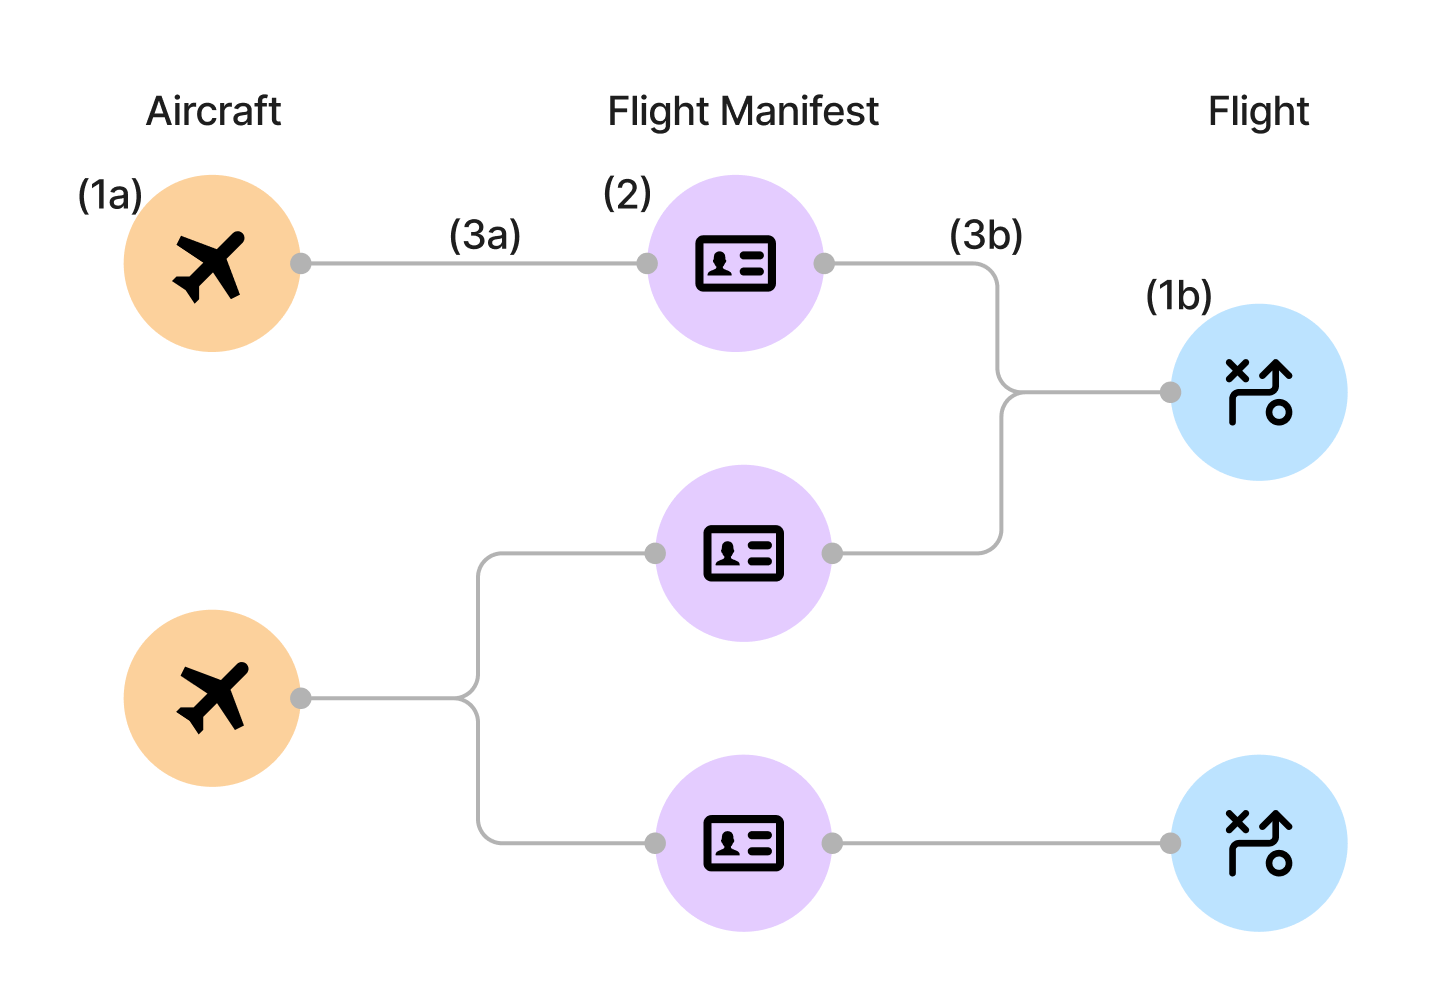
Object-backed links
Object-backed link types expand on many-to-one cardinality link types, providing first class support for object types as a link type storage solution. Object-backed link types allow for the inclusion of additional metadata on the link and support restricted views.
For object-backed links, in addition to the Aircraft and Flight objects, assume an additional object type for the Flight Manifest. With an object-backed link, you can have the Flight Manifest object type that links the Aircraft and Flight objects. Unlike a foreign key or data-set backed link, this Flight Manifest object can contain additional properties such as Pilot and First Mate to provide additional metadata on the link.
Prerequisites for creating an object-backed link type
Before you can create an object-backed link type, you must first do the following:
- Create the object types on either side of the link type. See create an object type for additional details.
- Create the backing object type that links the two object types together.
- Create the many-to-one link types between each side of the link type to the backing object type. See configure a new link type for additional details.
For the Aircraft, Flight, and Flight Manifest example from above, you need to create the following resources:
- Create the object types on either side of the link type.
Aircraftobject typeFlightobject type
- Create the backing object type that links the two object types together.
Flight Manifestobject type
- Create the many-to-one link type between each side of the link type to the backing object type.
- Link between the
Aircraftobject type and theFlight Manifestobject type - Link between the
Flightobject type and theFlight Manifestobject type
- Link between the
Once these have been created, you can create the object-backed link type.
Convert existing links to object-backed link types
Existing links can be converted to object-backed link types. Before modifying existing links, the prerequisites for object-backed link types must be fulfilled.
To modify the link type of an existing link:
- Open the link in Ontology Manager.
- In the Configuration section, update the join method and select Object type.
- Select the backing object type in the Update link type to object-backed link type dialog.
- Select the link type from the link edges to the backing object in the Update link type to object-backed link type dialog.
- Select the Update to object-backed.
Use object-backed link types
Currently, object-backed link types can be viewed in Object Explorer, Vertex, and Workshop. Select a link to view the link's backing object properties. Note that in Vertex, the link title will display the link's backing object title instead.
Troubleshooting
Error: Phonograph2:DatasetAndBranchAlreadyRegistered
If you receive the error Phonograph2:DatasetAndBranchAlreadyRegistered, the datasource backing the link type you are trying to save is already backing a different link type in the Ontology and cannot be used again.