- Capabilities
- Getting started
- Architecture center
- Platform updates
Create Ontology objects from Gaia
Similar to how you can add data from the Ontology to a Gaia map, you can also create Ontology objects from a shape you draw, a point you drop, or a tactical graphic you configure on a map by tagging the object with an object type which implements the Creatable Geoshape, Creatable Geopoint, or the MILSTD 2525C Symbol interface.
The Creatable Geoshape, Creatable Geopoint, and MILSTD 2525 Symbol interfaces supersede the Gaia Geoshape Creatable, Gaia Geopoint Creatable, and Gaia Milsym Creatable interfaces, respectively. The Gaia Geoshape Creatable and Gaia Geopoint Creatable are in the planned deprecation phase of development and will be deprecated by November 2026. The Gaia Milsym Creatable interface has been deprecated. You should implement the superseding interfaces in place of those in planned deprecation; the object type and action type configuration instructions below are applicable to either interface. However, only the Creatable Geoshape, Creatable Geopoint, and MILSTD 2525C Symbol interfaces support interface action type constraints. Instead of using interface action type constraints, the Gaia Geoshape Creatable and Gaia Geopoint Creatable interfaces require you to register their implementing object types and supporting actions in Gaia's admin application or Control Panel extension.
Contact Palantir Support with questions about the availability of the Creatable Geoshape, Creatable Geopoint, or MILSTD 2525 Symbol interfaces on your enrollment.

The sections below outline the end-to-end process to integrate Gaia shapes, points, and tactical graphics with the Ontology:
To create Ontology objects from a Gaia map, your enrollment must use both Foundry and Gotham.
- Install all necessary Marketplace products.
- Implement the
Gaia Geoshape Creatableinterface on a supported object type backed by a restricted view. - Implement the
Gaia Geopoint Creatableinterface on a supported object type backed by a restricted view. - Implement the
MILSTD 2525C Symbolinterface on a supported object type backed by a restricted view. - Fulfill the interface action type constraint on your object types.
- Register your ontology and search for your object types in Gaia.
- Understand the entry points for creating objects.
- Draw a new shape on your map and tag it within your object type.
- Drop a new point on your map and tag it within your object type.
- Configure a tactical graphic from a shape drawn on your map and tag it within your object type.
Install prerequisite Marketplace products
You must only complete the instructions in this section when using the Gaia Geoshape Creatable or Gaia Geopoint Creatable interfaces. There are no installation prerequisites in Marketplace when using the latest Creatable Geoshape or Creatable Geopoint interfaces.
Marketplace is Foundry's storefront for published data products or collections of platform resources made available for user installation. You can access Marketplace through the Search... bar or the Applications portal on your home screen.
Once you launch Marketplace, install the following products:
- Core Property Types from the Core Ontology Store, which contains core shared property types, such as an object's classification and geoshape, that can be used on multiple object types in your ontology.
Gaia Geoshape Creatableinterface from the Gaia App Store, which describes the shape of a geospatial object type to enable consistent modeling of and interaction with other object types of the same shape.Gaia Geopoint Creatableinterface from the Gaia App Store, which describes the position of a single point object type.
Core Property Types from the Core Ontology Store
Contact Palantir Support to install the Core Ontology on your Foundry enrollment as a Foundry product if the Core Ontology Store, which contains the Core Property Types product, is not available in Marketplace.
Gaia Geoshape Creatable interface from the Gaia App Store
In Foundry, interfaces exist within your ontology to describe an object type's shape as well as its capabilities, enabling consistent modeling and interaction between object types of a common shape. You can implement an interface on multiple object types, and interfaces may extend any number of other interfaces. Once implemented on an object type, the Gaia Geoshape Creatable interface enables you to create objects in your ontology from shapes drawn on a Gaia map.
The Gaia Geoshape Creatable interface supersedes the deprecated Gaia Geocreatable interface. Contact Palantir Support if you are unable to access the Gaia Geoshape Creatable interface in Marketplace.
To install the Gaia Geoshape Creatable interface from Marketplace:
- Navigate back to Marketplace and search for the
Gaia App Storein Search stores.... - Choose the
Gaia Geoshape Creatableproduct. - Select the blue Install button on the right side of your screen to launch a draft installation. You can optionally add a descriptive suffix to your installation.
- Identify a Namespace where your installation will save. Marketplace will automatically create a new Project within the chosen Namespace.
- Configure the product's classification and access controls under Permissions. The classification you select under Classification based access control (CBAC) defines the maximum classification for the installation.
- Select Next to launch the installation window's Inputs page.
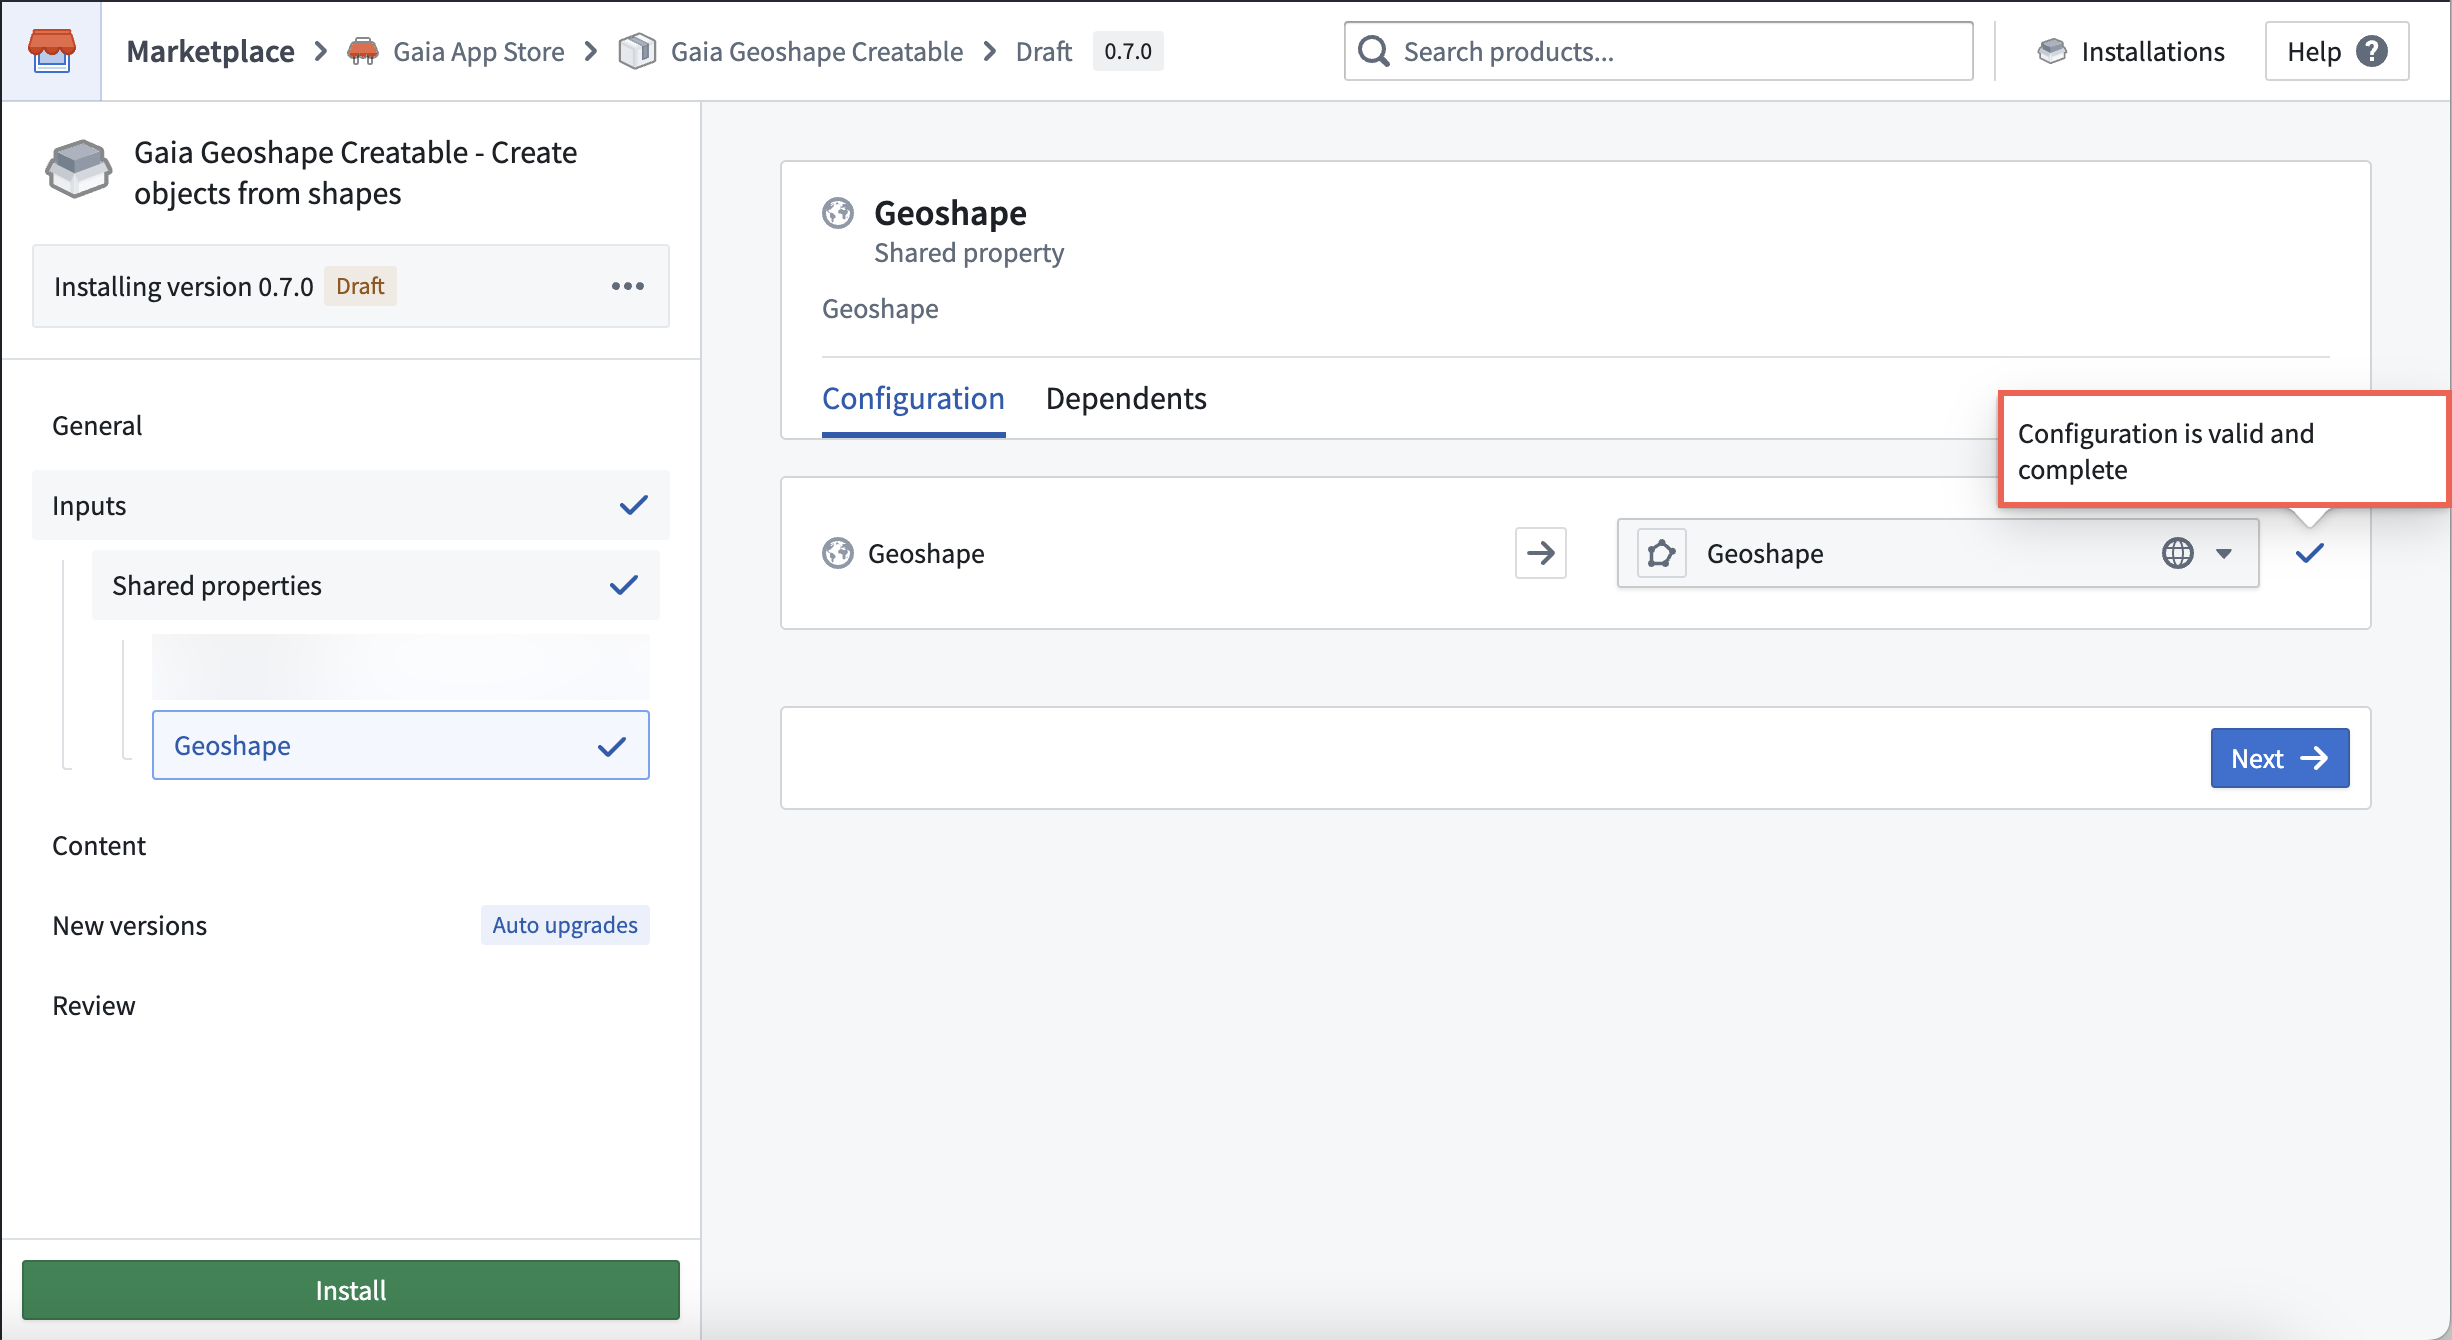
- Select the Shared properties tab under Inputs in the left panel to map the
Geoshapeshared property from your ontology to your new interface. - Select Next to launch the installation window's Content page.
- Optionally toggle on Prefix Ontology entities and insert a valid prefix, which may not contain certain special characters, such as parentheses or brackets.
- Choose which Ontology schema migrations to enable on the right side of your screen. You can reference additional schema management information within the existing object edits and materializations documentation.
- Update the automatic configurations in New versions as necessary for your use case before you select Next. Marketplace pre-configures certain products to upgrade automatically.
- Review your interface's configurations and select Install.
Gaia Geopoint Creatable interface from the Gaia App Store
To install the Gaia Geopoint Creatable interface from Marketplace's Gaia App Store, select the Gaia Geopoint Creatable product from the store menu. Marketplace's interface installation workflows are common across different interfaces, so you can follow the same steps outlined in the Geoshape Creatable interface installation instructions above with the following distinctions:
- In the Shared properties section of the Inputs window, map the
Geopointshared property from your ontology to theGaia Geopoint Creatableinterface.
Create an object type that implements the Gaia Geoshape Creatable interface
Gaia can discover object types backed by a dataset or restricted view in your ontology after they implement the Gaia Geoshape Creatable interface. In the following sections, you will:
- Create an object type-backing dataset or restricted view.
- Create an object type and ensure it integrates with Gotham.
- Configure an action type to enable object creation in Gaia.
- Implement the
Gaia Geoshape Creatableinterface.
Create an object type-backing dataset or restricted view
You should create a restricted view if you plan to secure objects based on a user's classification or by applying markings to control file access. If your use case does not require the additional object security provided by classification-based access or markings, then you should create a dataset to back your object type.
To create an object type that can integrate with Gaia, you will first need to create a dataset or restricted view that contains, at a minimum, the following columns:
Geoshape, which you will set as astringfor Gaia to automatically populate with your drawn object's shape.Object ID, which you will set as astringfor Foundry to automatically populate with a unique ID for each Gaia shape you create as an object. This will serve as your object type's primary key.Classification, which you will set as anarrayto capture your object's classification. AClassificationcolumn is only required if a restricted view backs your object type.
You can configure additional columns in your dataset or restricted view based on your specific use case, such as Name, Category, or Notes columns set as strings to capture user-entered descriptive information about the object.
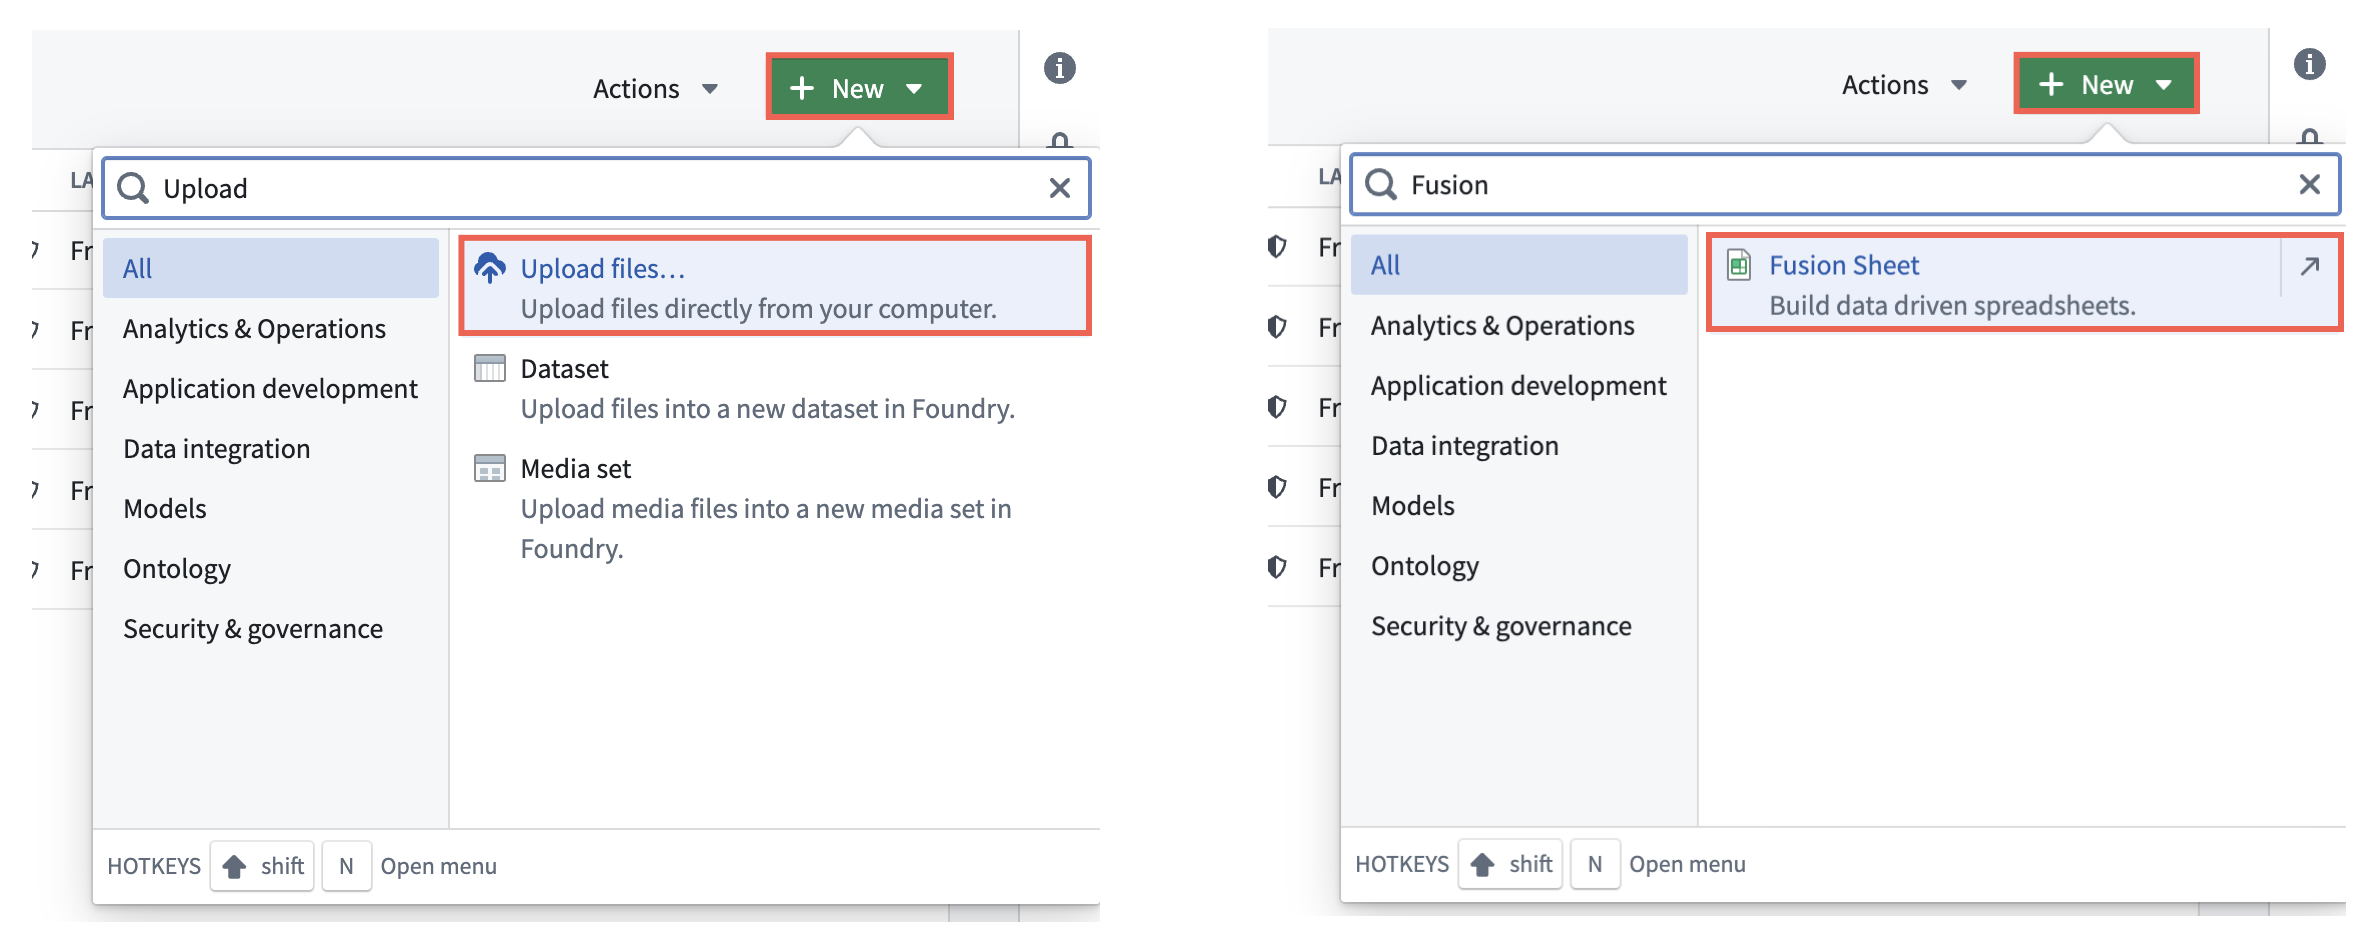
Select the New button in your Project to upload an existing file, such as a .csv, or use Fusion to create a standalone dataset or a dataset that backs your restricted view. If you use a dataset to back your object type, you can skip the restricted view creation instructions below and proceed to create your object type.
You can reference additional restricted view creation instructions in Foundry's security and object permissions documentation.
Your restricted view should contain a granular policy that restricts user access to the data contained in the view based on their classification access. Compose the granular policy as the first step in the Create '{restricted view}' window.
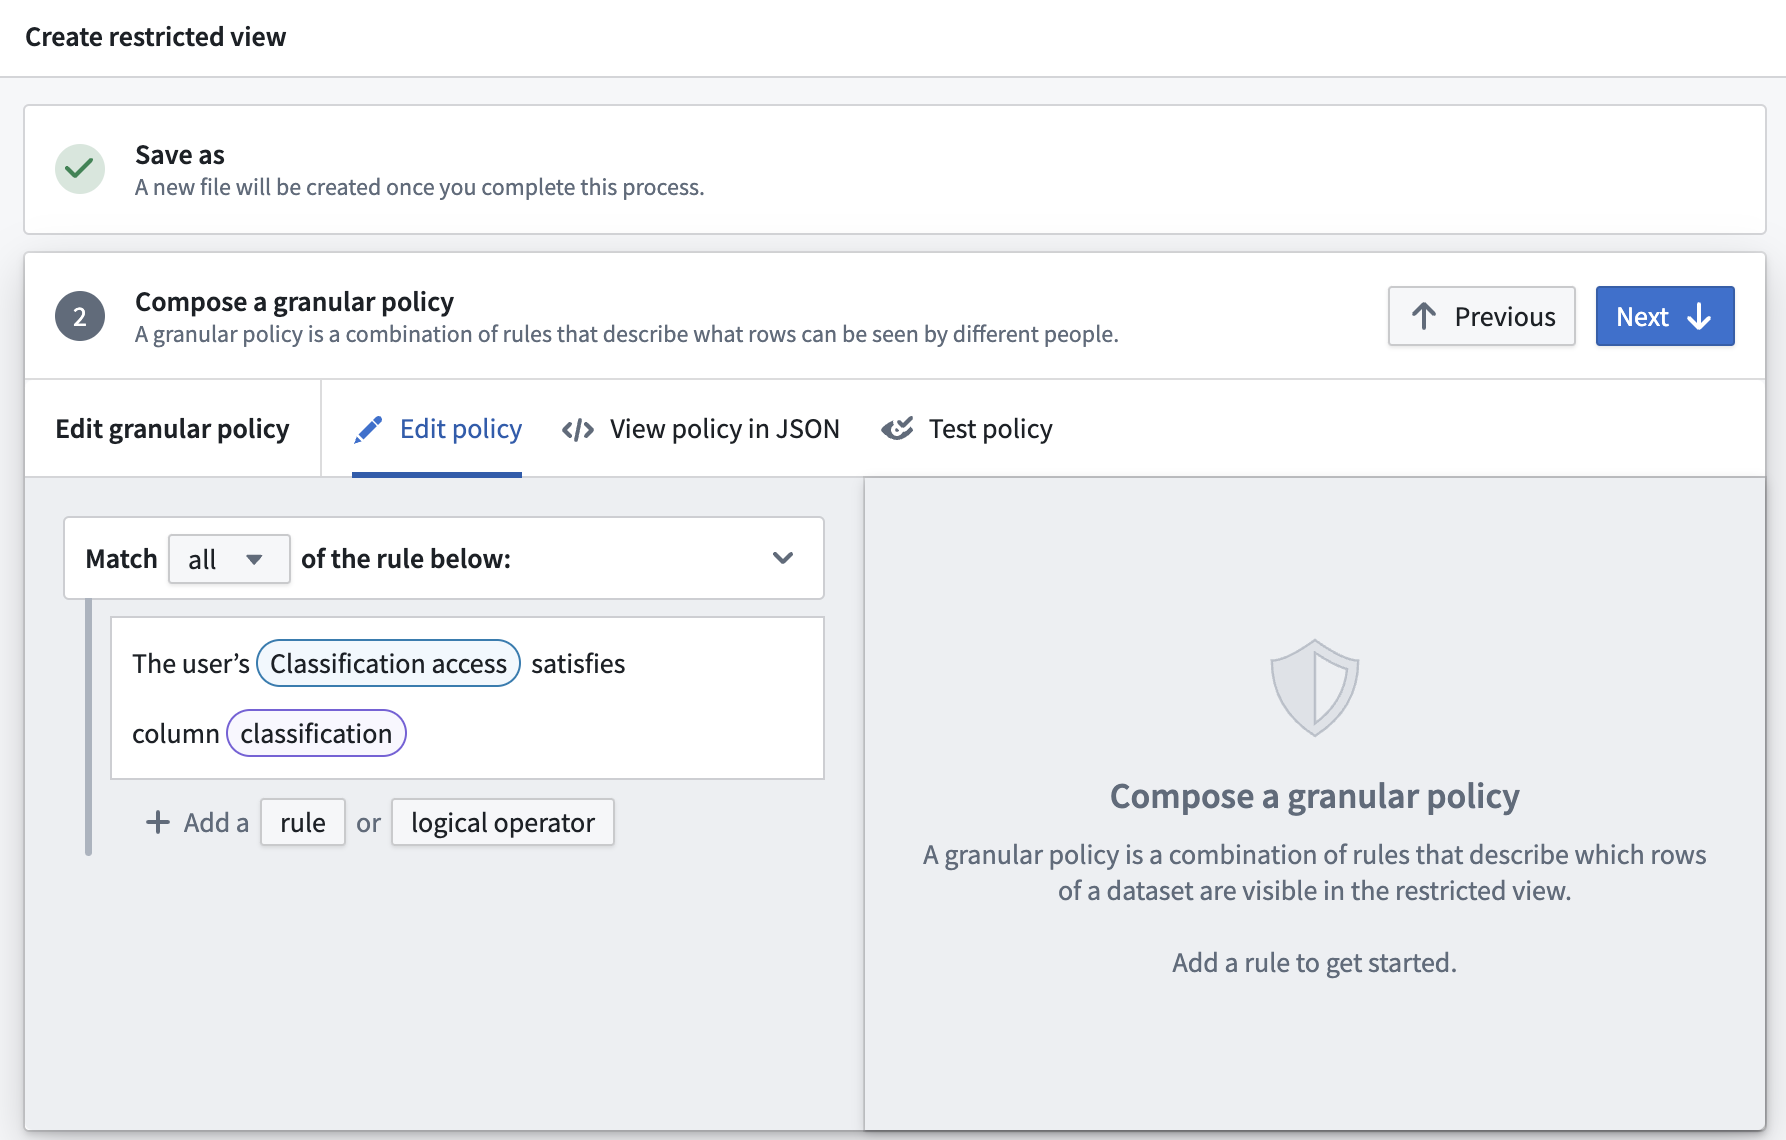
If an object contains a CBAC or mandatory marking property to restrict its access, then Foundry creates objects using the CBAC or mandatory markings it inherits from the Gaia map and will not apply group restrictions defined in the map's security and sharing settings.
You can reference an example policy in JSON below.
Copied!1 2 3 4 5 6 7 8 9 10 11 12 13 14 15 16 17 18 19 20 21 22 23 24 25 26 27 28 29 30{ "condition": { "and": { "conditions": [ { "markings": { "value": { "field": { "fieldName": "classification" }, "type": "field" }, "filters": [ { "markingTypes": { "markingTypes": [ "CBAC" ] }, "type": "markingTypes" } ] }, "type": "markings" } ] }, "type": "and" } }
Create an object type and ensure it integrates with Gotham
Once you configure your restricted view, launch Ontology Manager and follow the steps below to create your object type:
- Select New > Object type from the top right of your screen.
- Select Use existing datasource and choose Select datasource to locate and Select your restricted view before choosing Next.
- Name your object type and optionally enter a Description.
- Set
Object IDas the Primary Key andNameas the Title. - Ensure
Classification's Property is an array of strings andGeoshape's Property is geoshape. You will only need to validate the former if a restricted view backs your object type.

- Select Create, as you will generate and configure action types after object type creation.
With your draft object type viewable in Ontology Manager, you will next select the Classification and Geoshape properties as shared property types in your ontology. Select the Properties panel beneath Overview and follow the steps below to complete the shared property type selection process:
If you are using a dataset to back your object type that does not contain a Classification property, then you should complete steps 1 and 4 below for your Geoshape property.
- Select
Classificationfrom your list of properties to launch the Property editor window on the right side of your screen. - Update the Base type dropdown menus to contain
Mandatory controlandCBAC Marking, respectively. - Configure the property's Max Classification.
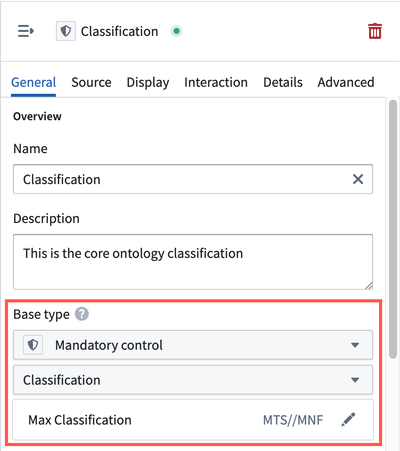
Contact Palantir Support if you are unable to select Mandatory control as the base type for Classification, as Mandatory control markings are not generally available across all Foundry enrollments.
- Scroll to the bottom of the window to the Shared property section and use the dropdown menu to assign
Classificationas a shared property.
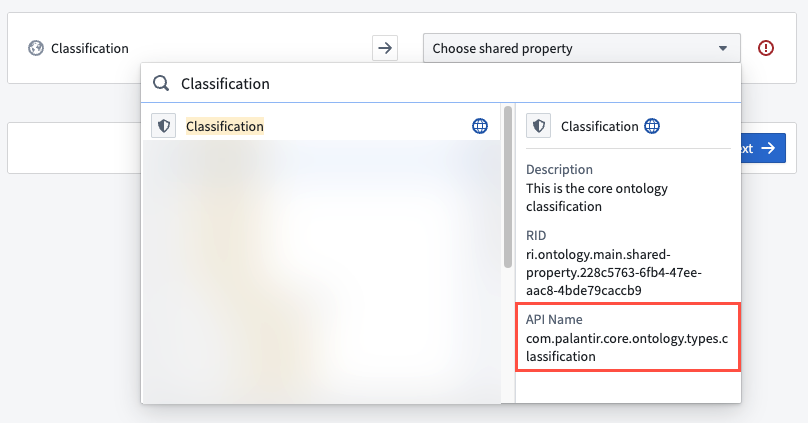
Repeat steps 1 and 4 above for your Geoshape property, as you will not need to configure its mandatory control markings or classification.
Select the green Save button at the top of the screen to publish incremental changes to your ontology before proceeding.
If your Foundry enrollment contains Map Rendering Service (MRS), then object types in your ontology with a geospatial property type automatically integrate with Gotham, and you can proceed to create an action type to enable object creation in Gaia. Follow the steps in the Gotham integration documentation to check if your enrollment contains MRS. If your enrollment does not contain MRS, then follow the instructions to integrate data in your ontology with Gotham.
Create and configure an action type to enable object creation in Gaia
Once you create your object type and ensure it integrates with Gotham, navigate back to the Overview window in Ontology Manager. Here, create an action type that enables users to create and edit objects from shapes and configure their properties, such as Name and Category, from Gaia.
Your Foundry enrollment must contain MRS to edit Ontology objects in Gaia, as this capability does not extend to objects added to Gaia through type mapping. Contact Palantir Support with questions about MRS installation or functionality.
Follow the steps below to configure your action type:
- Select New from the Action types section of your object type's Overview window to launch the Create a new action type pop-up window.
If you are unable to select the New button in Action types, then you can toggle on Allow edits on your object type in the Datasources window.
-
Select Modify or create object under Object actions before choosing Next.
-
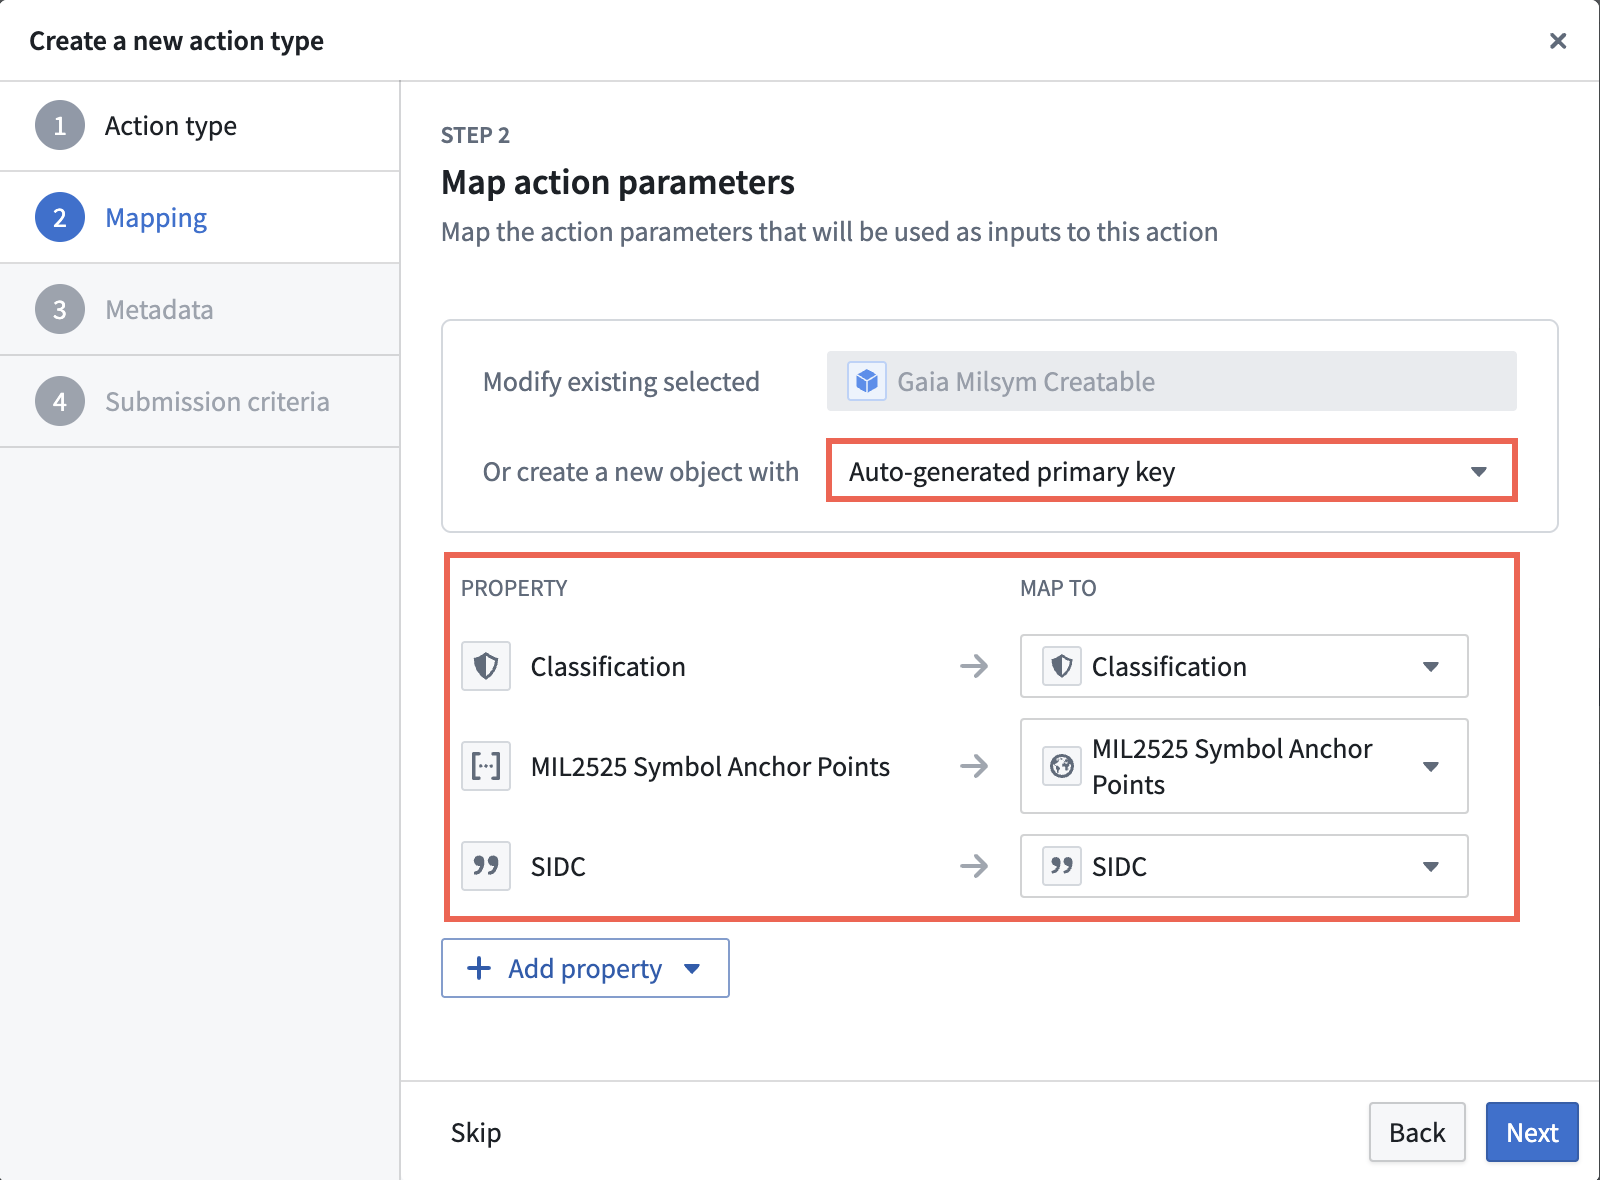
Select Auto-generated primary key from the Or create a new object with dropdown menu.
-
Select Add property to add all your existing properties to the action type, then choose Next to configure your action type's metadata.
You will only need to map a
Classificationproperty if a restricted view backs your object type.
-
Name your action type, and optionally enter a description and update its default icon.
-
Select an Organization, Group, or User who may execute the action, then select Create.
Select the green Save button at the top of the screen to publish incremental changes to your ontology before proceeding.
Next, you will configure your action type's Rules and Parameters by following the steps below:
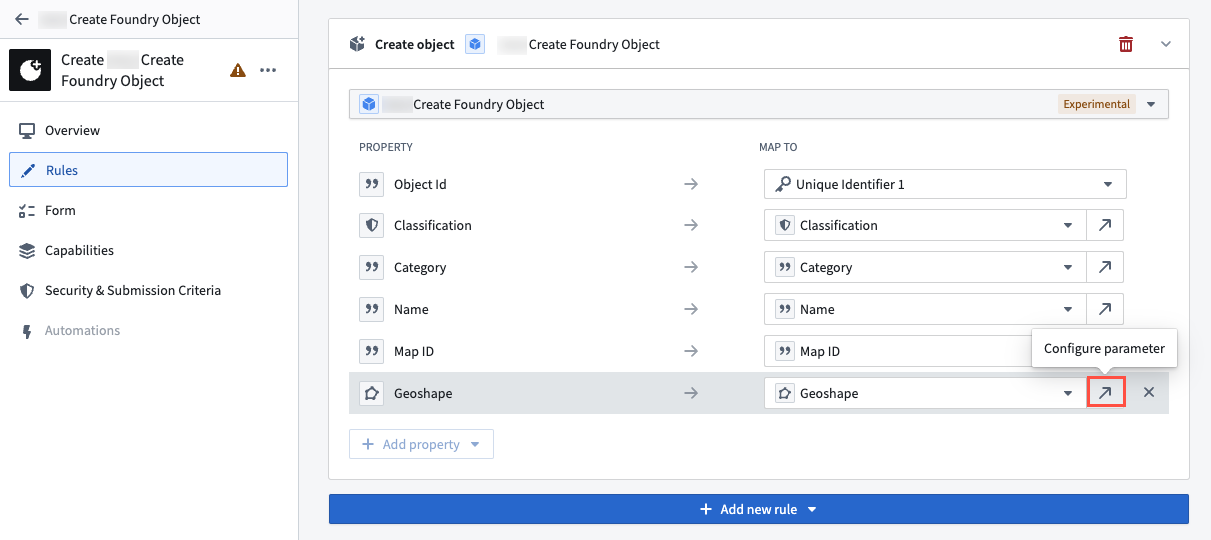
- Select Rules from the left side of the screen.
- Validate the
Geoshapeproperty's configurations by selecting the arrow icon next to Configure parameter.- Ensure the
Geoshapeproperty's type is eitherGeoshapeorStringfrom the Type dropdown menu on the right side of the screen. - Ensure the Disabled option is selected in the General panel so a user cannot manually configure the location of a
Geoshape.
- Ensure the
- Select your
Classificationproperty from the Form content panel on the left side of your screen and verify that its Type isMandatory control. You will only need to configure aClassificationproperty if a restricted view backs your object type. - Select Back to Form and remove
Object Idfrom Form content by selecting the X icon on the far right side of the Object Id panel. Foundry will automatically generate a unique ID for each object created from Gaia. - Select the green Save button at the top of your screen to save your action type's configurations to the Ontology.
Implement the Gaia Geoshape Creatable interface
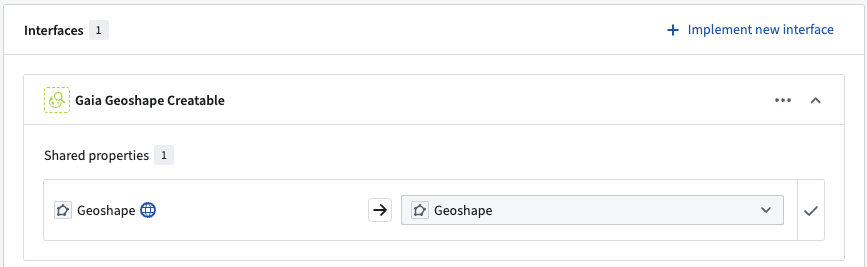
The final step in creating and configuring your object type in Ontology Manager is to implement the Gaia Geoshape Creatable interface that you previously installed from Marketplace. Navigate back to your object type's Overview page and follow the steps below to implement the interface before saving changes to your ontology:
- Navigate to the Interfaces window beneath Object Views on the left side of your screen.
- Select Implement new interface and search for
Gaia Geoshape Creatablebefore choosing Next. If the supersedingCreatable Geoshapeinterface is available on your enrollment, search for it instead. - Select Choose an option > Replace existing to map your ontology's
Geoshapeshared property type to the object type implementing the interface. - Select Confirm to close the Implement an interface window and Save the newly configured interface to your ontology.
Create an object type that implements the Gaia Geopoint Creatable interface
To create an object type that implements the Gaia Geopoint Creatable interface, you can follow the same steps outlined in the object type creation instructions for the Gaia Geoshape Creatable interface above with the following distinctions in each section:
- Create an object type-backing restricted view.
- Create a
Geopointinstead ofGeoshapecolumn.
- Create a
- Create an object type and ensure it integrates with Gotham.
- In the object type creation window, ensure
Geopoint's Property is geopoint.
- In the object type creation window, ensure
- Configure an action type to enable object creation in Gaia.
- Ensure your
Geopointproperty's Type isGeopointin your action type's Parameters window.
- Ensure your
- Implement the
Gaia Geoshape Creatableinterface.- Search for the
Gaia Geopoint Creatableinstead of theGaia Geoshape Creatableinterface, or the supersedingCreatable Geopointinterface if it is available on your enrollment. - When mapping your ontology's shared property types, select Replace existing for the
Geopointinstead of theGeoshapeproperty.
- Search for the
Create an object type that implements the MILSTD 2525C Symbol interface
Unlike the Gaia Geoshape Creatable and Gaia Geopoint Creatable interfaces, you must use a restricted view to back an object type that implements the MILSTD 2525C Symbol interface.
To create an object type that implements the MILSTD 2525C Symbol interface, you can follow the same steps outlined in the object type creation instructions for the Gaia Geoshape Creatable interface above with the following distinctions in each section:
- Create an object type-backing restricted view.
- You will only need to create
Object ID,Classification, andTitlecolumns.
- You will only need to create
- Create an object type and ensure it integrates with Gotham.
- In the object type creation window, set
Object IDas the Primary key andTitleas the Title.
- In the object type creation window, set
When configuring an action type to enable object creation, ensure you map at least the Symbol Anchor Points and SIDC properties in the Create a new action type window before you select Next. Mapping the Classification property is optional, but doing so lets you control how classification markings are applied to the objects a user creates from a Gaia map.
Select the green Save button at the top of the screen to publish incremental changes to your ontology before proceeding.
If you mapped the Classification property, configure your action type's Rules and Parameters by following the steps below:
- Select Rules from the left side of the screen.
- Select the arrow icon to the right of your
Classificationproperty to Configure parameter.

- If the
Classificationproperty on your object type is fulfilled by the shared property type, then you should toggle on Disabled in the General section to ensure the object created automatically inherits its classification markings from your Gaia map. If you want to manually set the classification markings on creation, then do not toggle on Disabled. - Select Add under Set a parameter max classification to ensure the action type's maximum classification matches the object type's maximum classification.

Select the green Save button at the top of the screen to publish the action type to your ontology.
Since the use of struct properties in actions is not currently supported, you will not be able to configure the Speed Modifier (Z) or Altitude/Depth Modifier (X) properties as action type parameters.
- Implement the
Gaia Geoshape Creatableinterface.- Search for the
MILSTD 2525C Symbolinstead of theGaia Geoshape Creatableinterface. - When mapping your ontology's shared property types, select Replace existing for your
Classificationproperty and Create edit-only property for the others.
- Search for the
Use interface action type constraints to enable automatic discovery of object types supporting object creation
You can use Create or Modify actions configured on object types that implement the Creatable Geoshape, Creatable Geopoint, or MILSTD 2525C Symbol interface to fulfill their optional Create or Modify interface action type constraint. Mapped interface action type constraints enable ontology object creation in Gaia without the need to register the object type and its action type in the Gaia admin application or Control Panel extension. You should fulfill interface action type constraints instead of registering object type and action type entries manually, as these constraints help eliminate the potential for manual registration errors.
The Gaia admin application and Control Panel extension will enter into planned deprecation in November 2026. From November 2026, the Foundry Object Creation Config (admin application) and Actions for Creating Objects From Gaia (Control Panel extension) sections will be read-only in favor of using interface action type constraints. Contact Palantir Support with questions about migrating object types you have already registered manually.
The superseded Gaia Geoshape Creatable, Gaia Geopoint Creatable, Gaia Geocreatable, and Gaia Milsym Creatable interfaces do not define interface action type constraints. An object type that implements only superseded interfaces cannot fulfill an interface action type constraint, so you must register the object type and its action type manually in the Gaia admin application or Control Panel extension.
Fulfill an interface action type constraint on your object type
Open your object type in Ontology Manager and validate the following prerequisites:
- The object type must implement an interface that supports interface action type constraints. If your object type implements more than one supported interface, review your action type configuration options before you fulfill its constraints.
- The object type must have a configured
Create or Modifyaction type, ensuring you can create new and modify existing objects from Gaia.
Next, follow the steps below to fulfill the interface action type constraint:
- Select Interfaces from the left panel of your object type before choosing the Actions tab.
- Map your
Create or Modifyaction type to the interface's action type constraint. - Select the Settings icon to map the constraint's parameters to your action type's parameters. For the
Creatable Geopointinterface, map theGeopointparameter. For theCreatable Geoshapeinterface, map theGeoshapeparameter. For theMILSTD 2525C Symbolinterface, map at least theSymbol Anchor PointsandSIDCparameters.
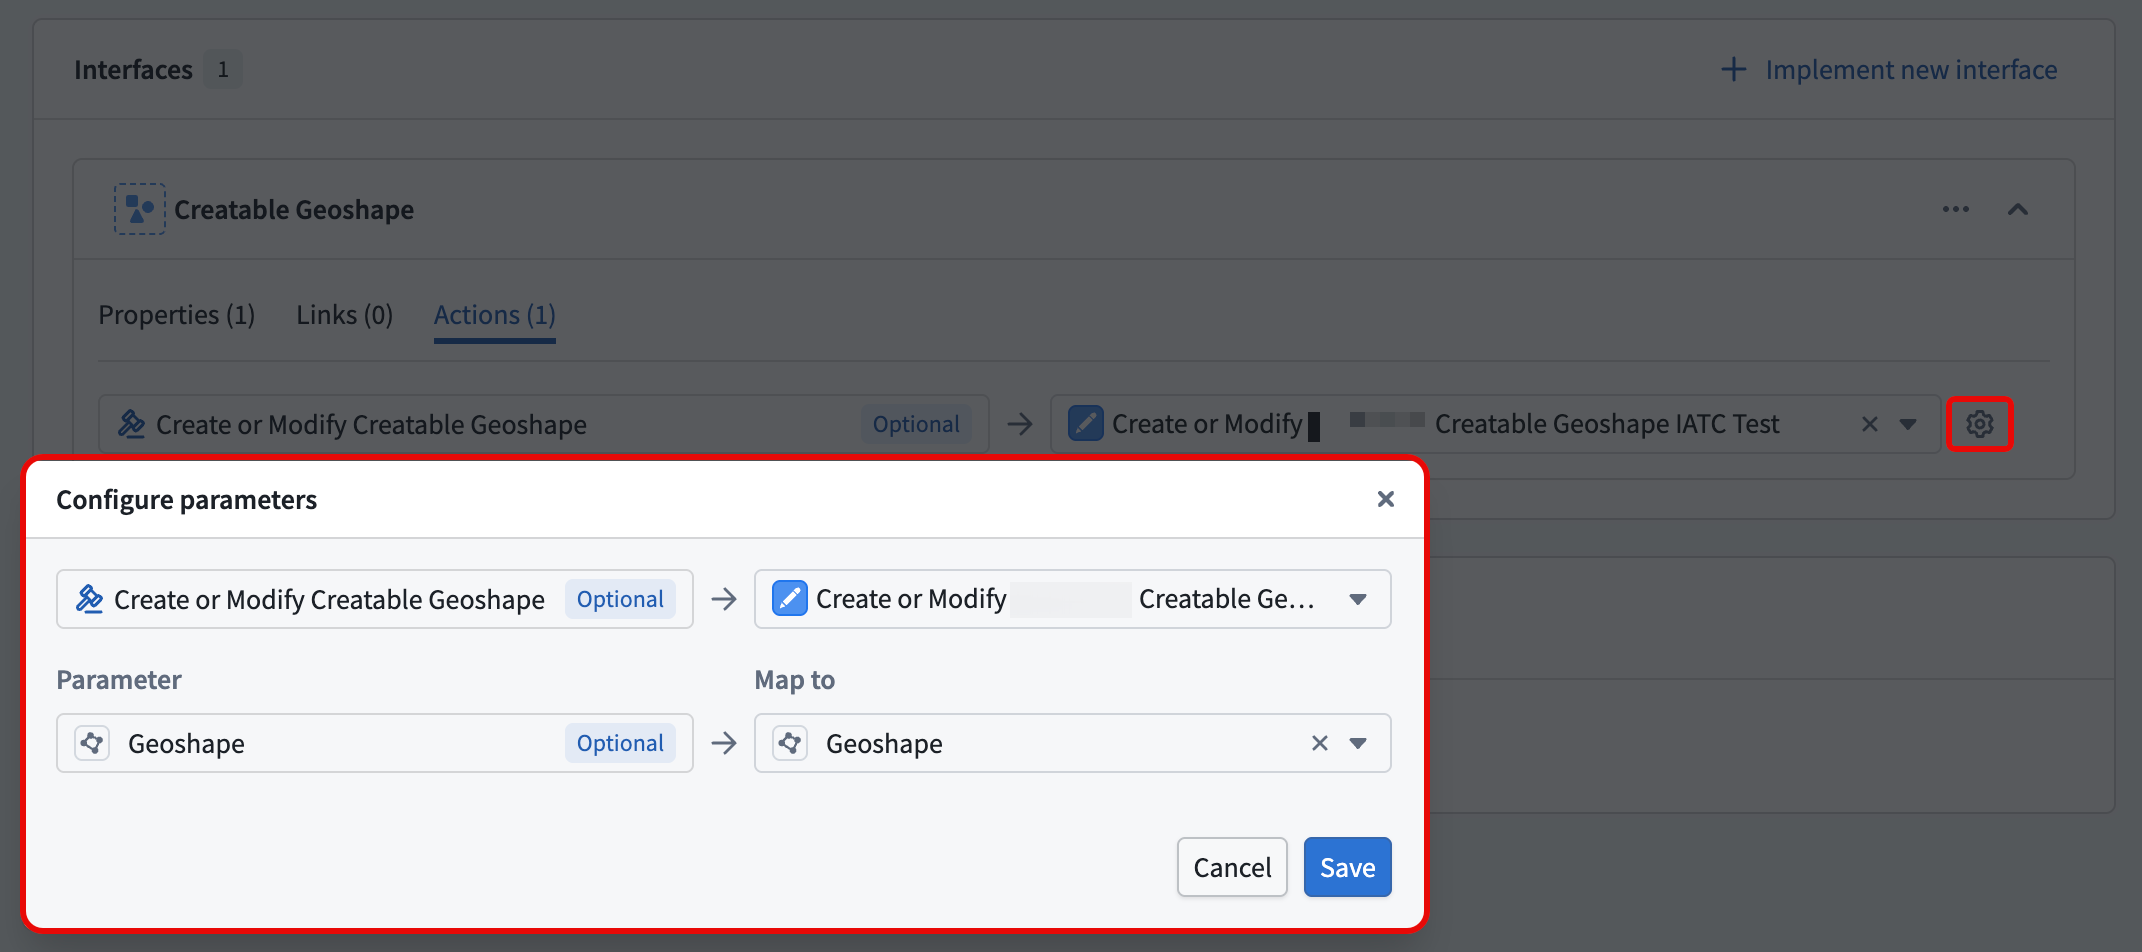
- Select the green Save button at the top of the screen to publish the changes to your ontology.
- If you previously registered this object type manually, locate its object type and action type RID entry in the Foundry Object Creation Config panel of the admin application or Control Panel extension, delete the entry, and save your changes.
- Reload Gaia and confirm that your object type appears in the Object type dropdown menu.
Choose your action type configuration
If your object type implements multiple supported interfaces, use a single or separate action type for each constraint:
-
Single action type (recommended): Map one
Create or Modifyaction type to the constraint on each interface your object type implements. This option requires the least configuration and is the most flexible. Because one action type covers every interface, its action form can contain optional parameters that may not be relevant to every creation workflow. -
Separate action type: Define one
Create or Modifyaction type for each interface your object type implements, and map each action type to the constraint on the corresponding interface. Each action form then contains only the parameters relevant to that interface, so users see fewer optional parameters. This option requires more configuration.
Register your ontology and its types
Now, you have object types that implement the Gaia Geoshape Creatable, Gaia Geopoint Creatable, and MILSTD 2525C Symbol interfaces and contain accompanying action types that enable a user to configure objects they create from shapes drawn, points dropped, and tactical graphics configured on a Gaia map. Next, you will register your ontology, object types, and action types either in Gaia's admin application or Control Panel extension, depending on your enrollment.
To access Gaia's admin application, you must be a platform administrator. To access Gaia's Control Panel extension, you must be granted the Organization administrator role.
Contact Palantir Support with questions about access to the admin application or Control Panel extension if you are unable to access either.
To register your ontology, object types, and action types, launch Gaia's admin application or Control Panel extension and follow the steps below:
- Locate the Ontology Config (admin application)/Ontology (Control Panel extension) panel and verify your ontology's configuration. If your ontology is not configured, select the toggle on the left side of the panel to set Ontology Config/Ontology to
overridden(admin application)/Override(Control Panel extension). - Enter your ontology's RID and API name into the Ontology RID and API Name text boxes. To locate and copy your ontology's RID and API name, navigate to Ontology Manager and choose Ontology configuration from the bottom of its left panel to launch the Ontology metadata window.
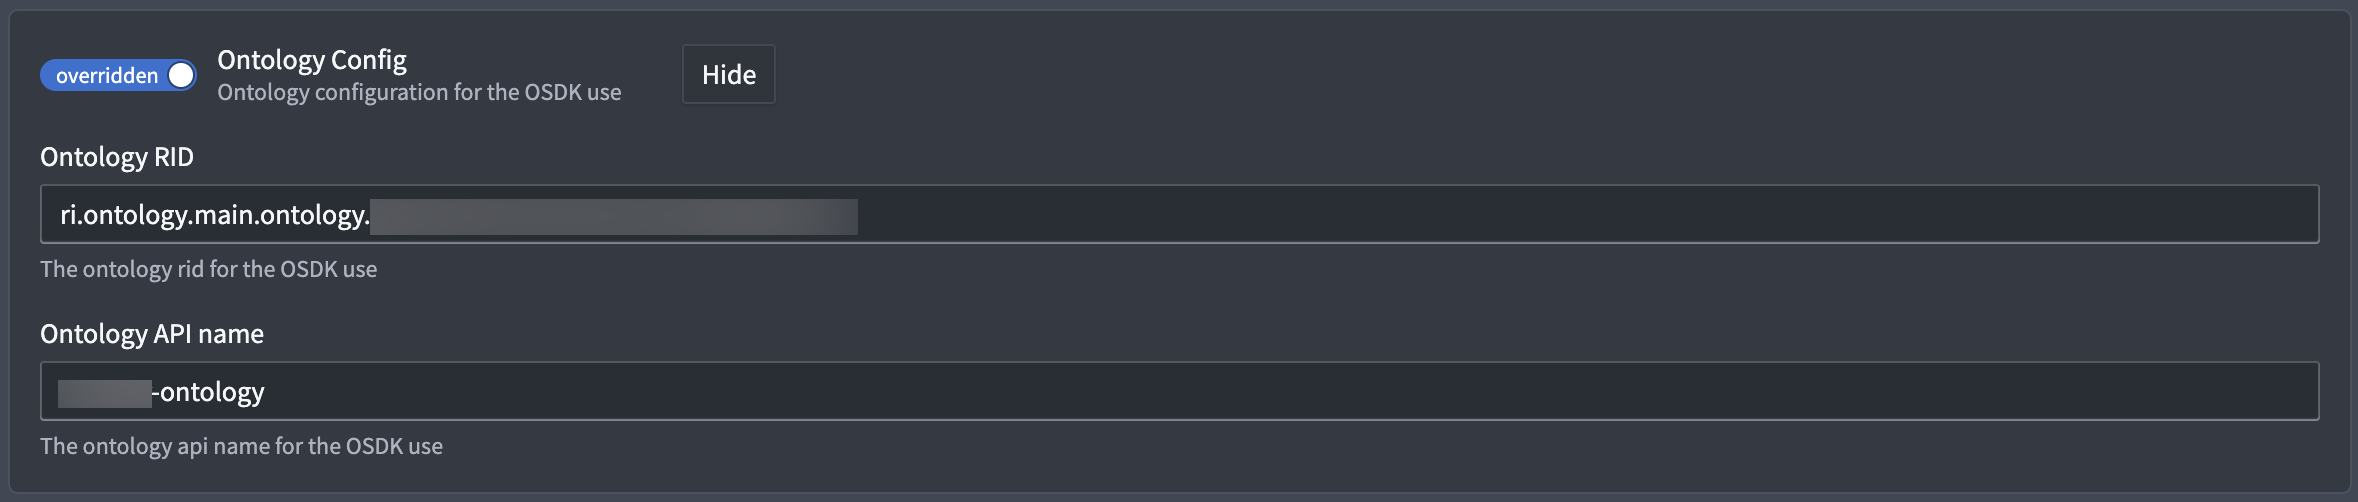
Skip the remaining steps below if your object type implements one of the Creatable Geoshape, Creatable Geopoint, or MILSTD 2525C Symbol interfaces. Gaia automatically makes these object types available for object creation through their fulfilled interface action type constraints without the need for manual entry in the Foundry Object Creation Config panel.
- Locate the Foundry Object Creation Config panel and select Show (admin application)/Override (Control Panel extension).
- Select Add at the bottom of your enrollment's existing object and action type list.
- Copy and paste the RIDs for all three object types and their supporting action types into three separate Object type rid and Action type rid text boxes, respectively.
- Select Preview and save in the top right ribbon (admin application)/Save for {Organization} in the bottom right corner (Control Panel extension).

You can access your object type's RID from the Overview window in Ontology Manager. Select the clipboard icon to copy the RID. Additionally, you can access your action type's RID by selecting Create {object type name} in the Action types section of the Overview window. The action type's RID can also be copied through the clipboard icon.

Next, you will launch Gotham's Gaia application to create objects from shapes you draw, points you drop, and tactical graphics you configure on a map using its Add to map menu.
Entry points to create objects on your Gaia map
Gaia provides two distinct entry points you can use to create one or multiple objects on your map which determine the list of available object types that render in the Object type dropdown menu.
- Select an object type first: Gaia's toolbar dropdown menu lists every object type that implements a supported interface. Supported interfaces include the
Creatable Geoshape,Creatable Geopoint,Gaia Geoshape Creatable,Gaia Geopoint Creatable, andMILSTD 2525C Symbolinterfaces. After you select an object type, Gaia filters the available drawing tools to only those compatible with the interfaces that the object type implements. For example, selecting an object type that implements theGaia Geoshape Creatableinterface displays only the shape drawing tools. When you then select a drawing tool, Gaia opens the left panel with your object type already populated in the Object type dropdown menu.
An object type can implement more than one interface. For example, if an object type implements both the Gaia Geopoint Creatable and Gaia Geoshape Creatable interfaces, then selecting it from the toolbar displays both the point symbol and all shape drawing tools while filtering out the symbol Search menu.
- Select a drawing tool first: When you select a drawing tool before selecting an object type, Gaia opens the left panel with no object type pre-selected. In this case, the Object type dropdown menu lists only the object types that implement the interface matching the tool you selected. For example, selecting the point symbol displays only object types that implement the
Gaia Geopoint Creatableinterface.
Draw a new shape on your Gaia map and tag it to an object type
While you can create map annotations that cross the 180th meridian, or antimeridian, on a Gaia map, you cannot draw shapes tagged as Foundry objects that do so.
Contact Palantir Support with questions about annotation creation, rendering, or Gaia's additional documentation present in Gotham.
Before you begin, review the entry points for creating objects to understand how the object type and drawing tool you select determine which object types are available to you.
With your Gaia map open, select the object icon from the menu in the top left region of your map to switch from Draw annotation to Create object mode.
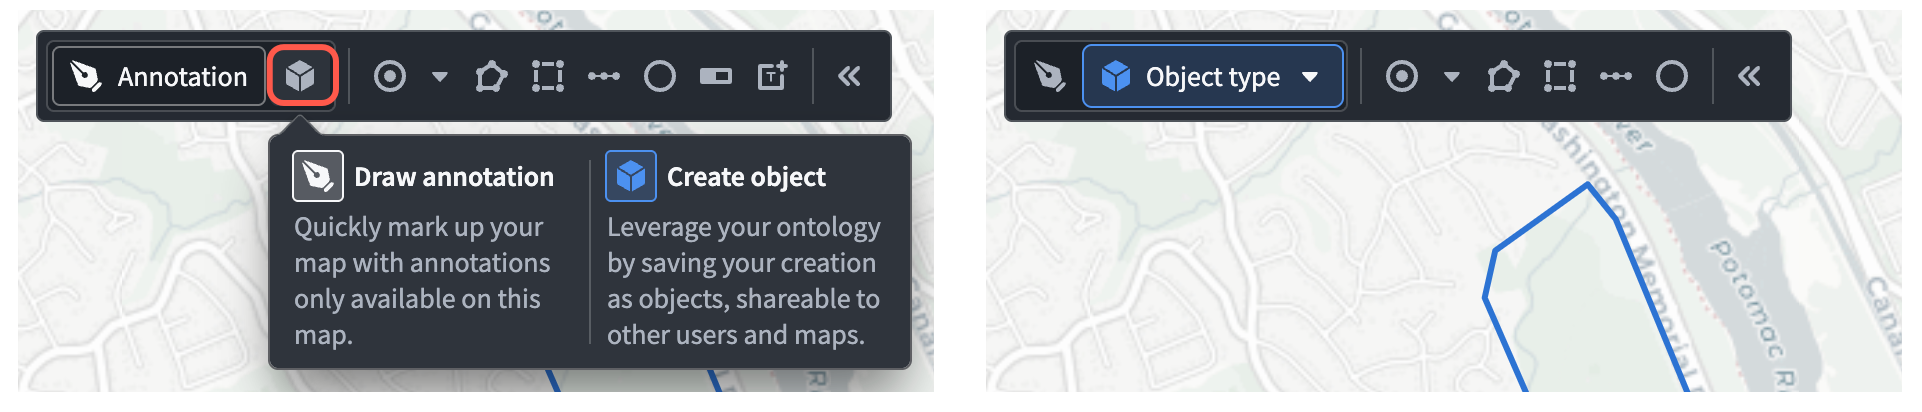
Next, select a shape to draw from the right side of the same menu. When you finish drawing your shape, the Create shape window will appear in Gaia's left panel. Follow the steps below to configure your shape and save it to your ontology as an object:
- Search for and select your object from the Object type dropdown menu. If you selected an object type from the tool bar's dropdown menu on your map canvas, then Gaia will automatically populate the Create shape's dropdown menu with that value.
- Complete the required fields in the action form, such as
CategoryandName, for your object before you select Finish.

Once you save your shape as an object, it will render as one of the Layers in Gaia's left panel. You can select the object's name to launch the Selection panel on the right side of your screen, where you can view its properties and customize its appearance.
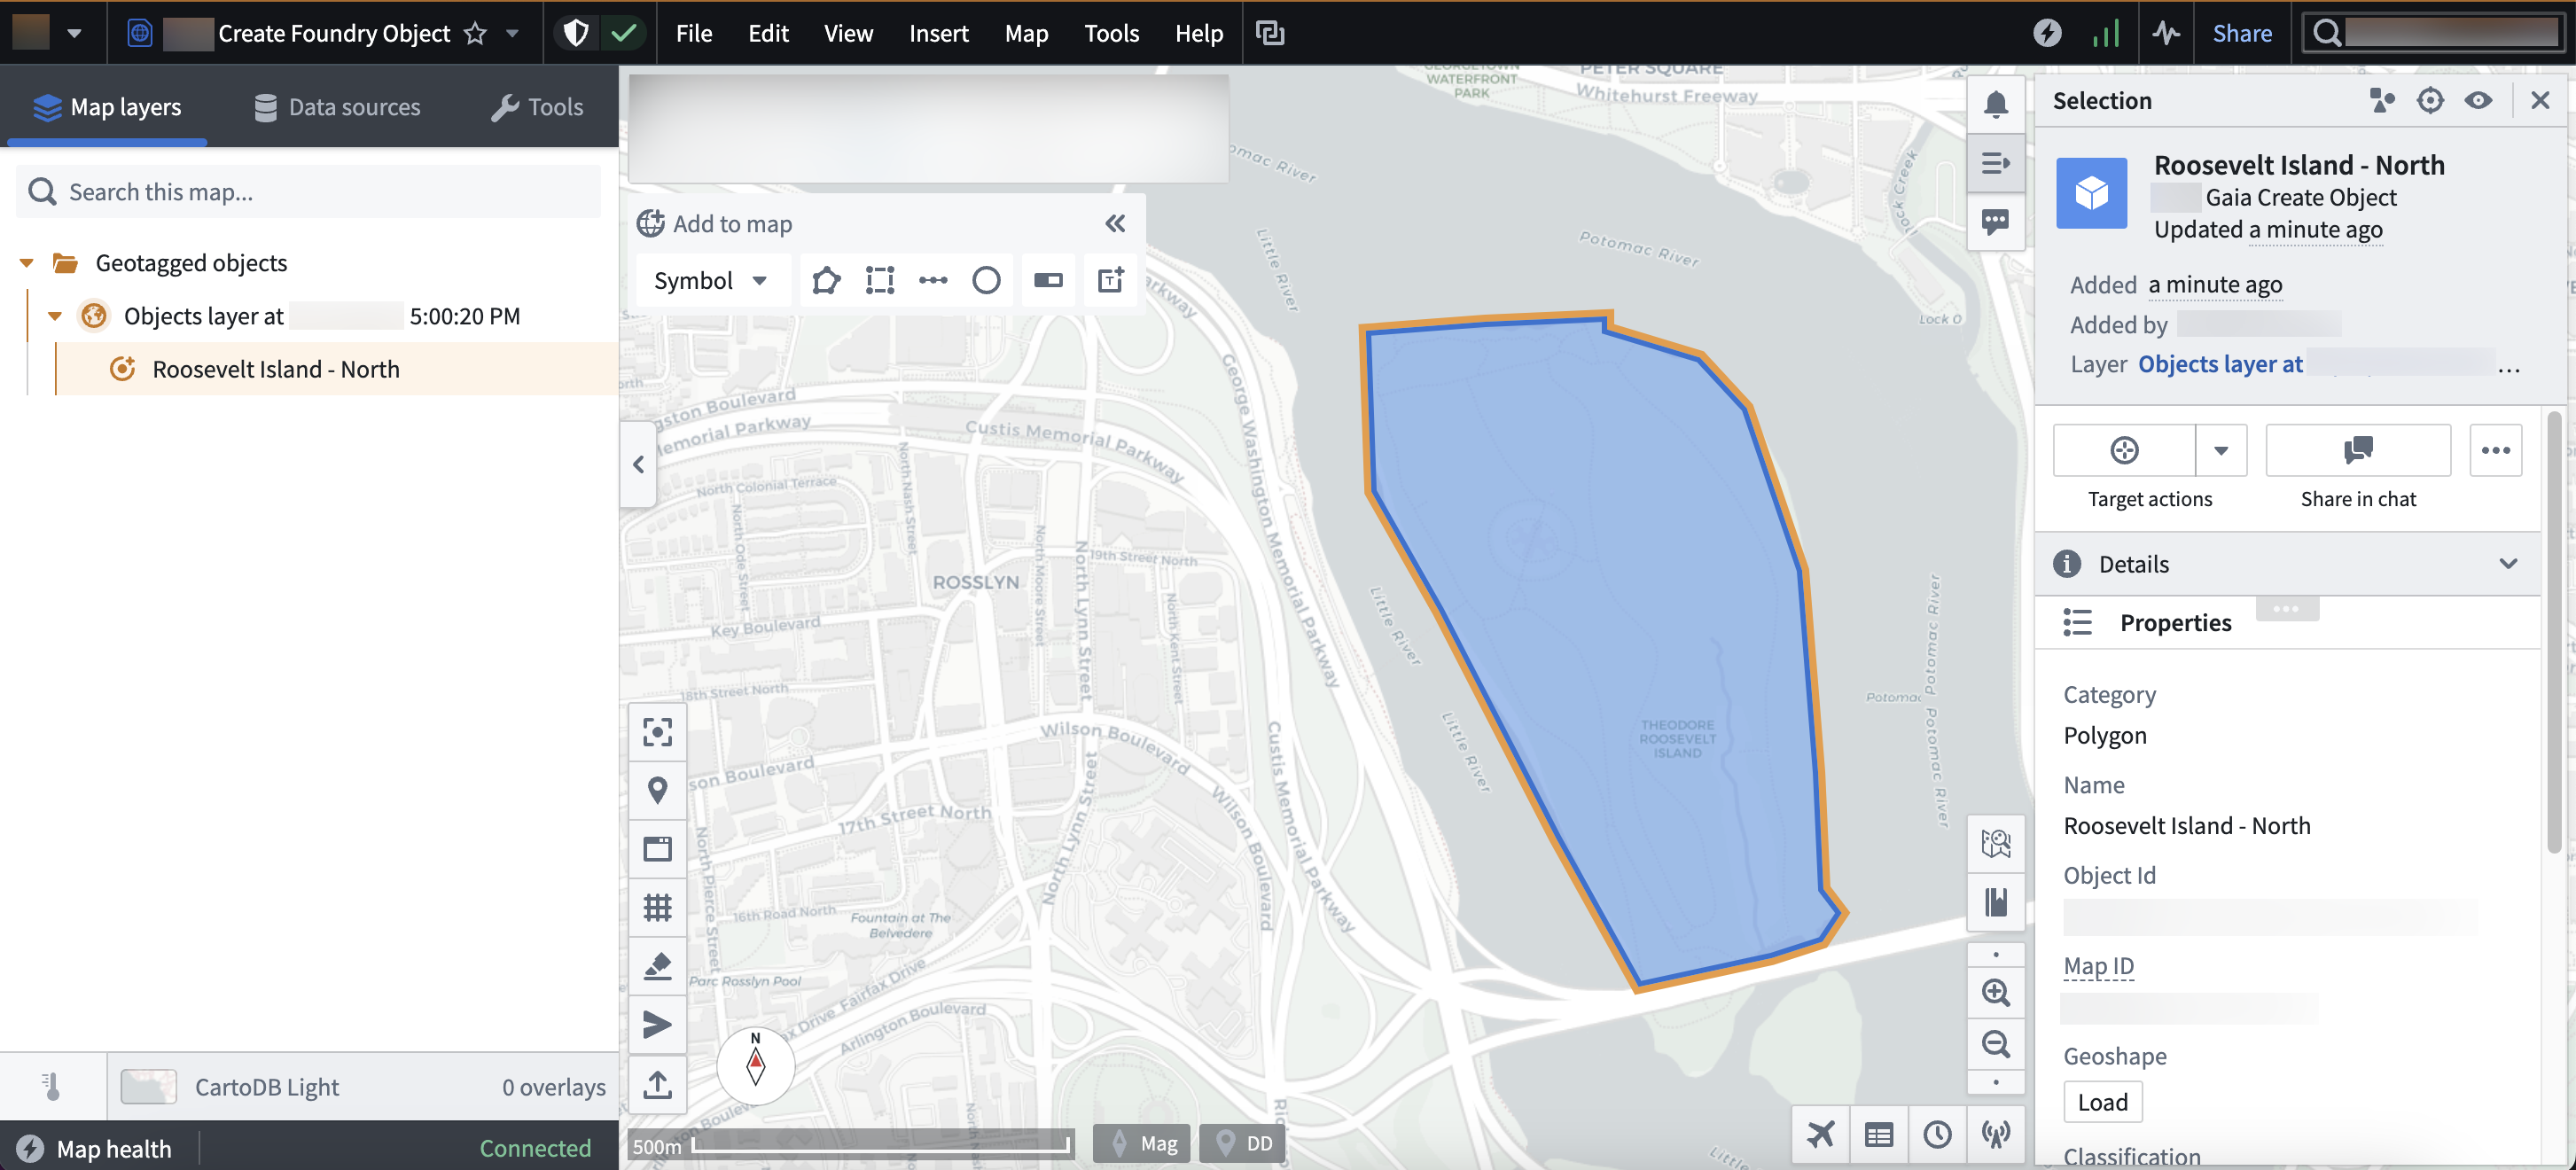
You can also view your object in Foundry's Object Explorer.

Edit an existing shape object
To edit an existing shape object, hover your cursor over the object in the left panel and choose Edit selection to launch the Edit shape window, which you can also access by double-clicking the object on your map.
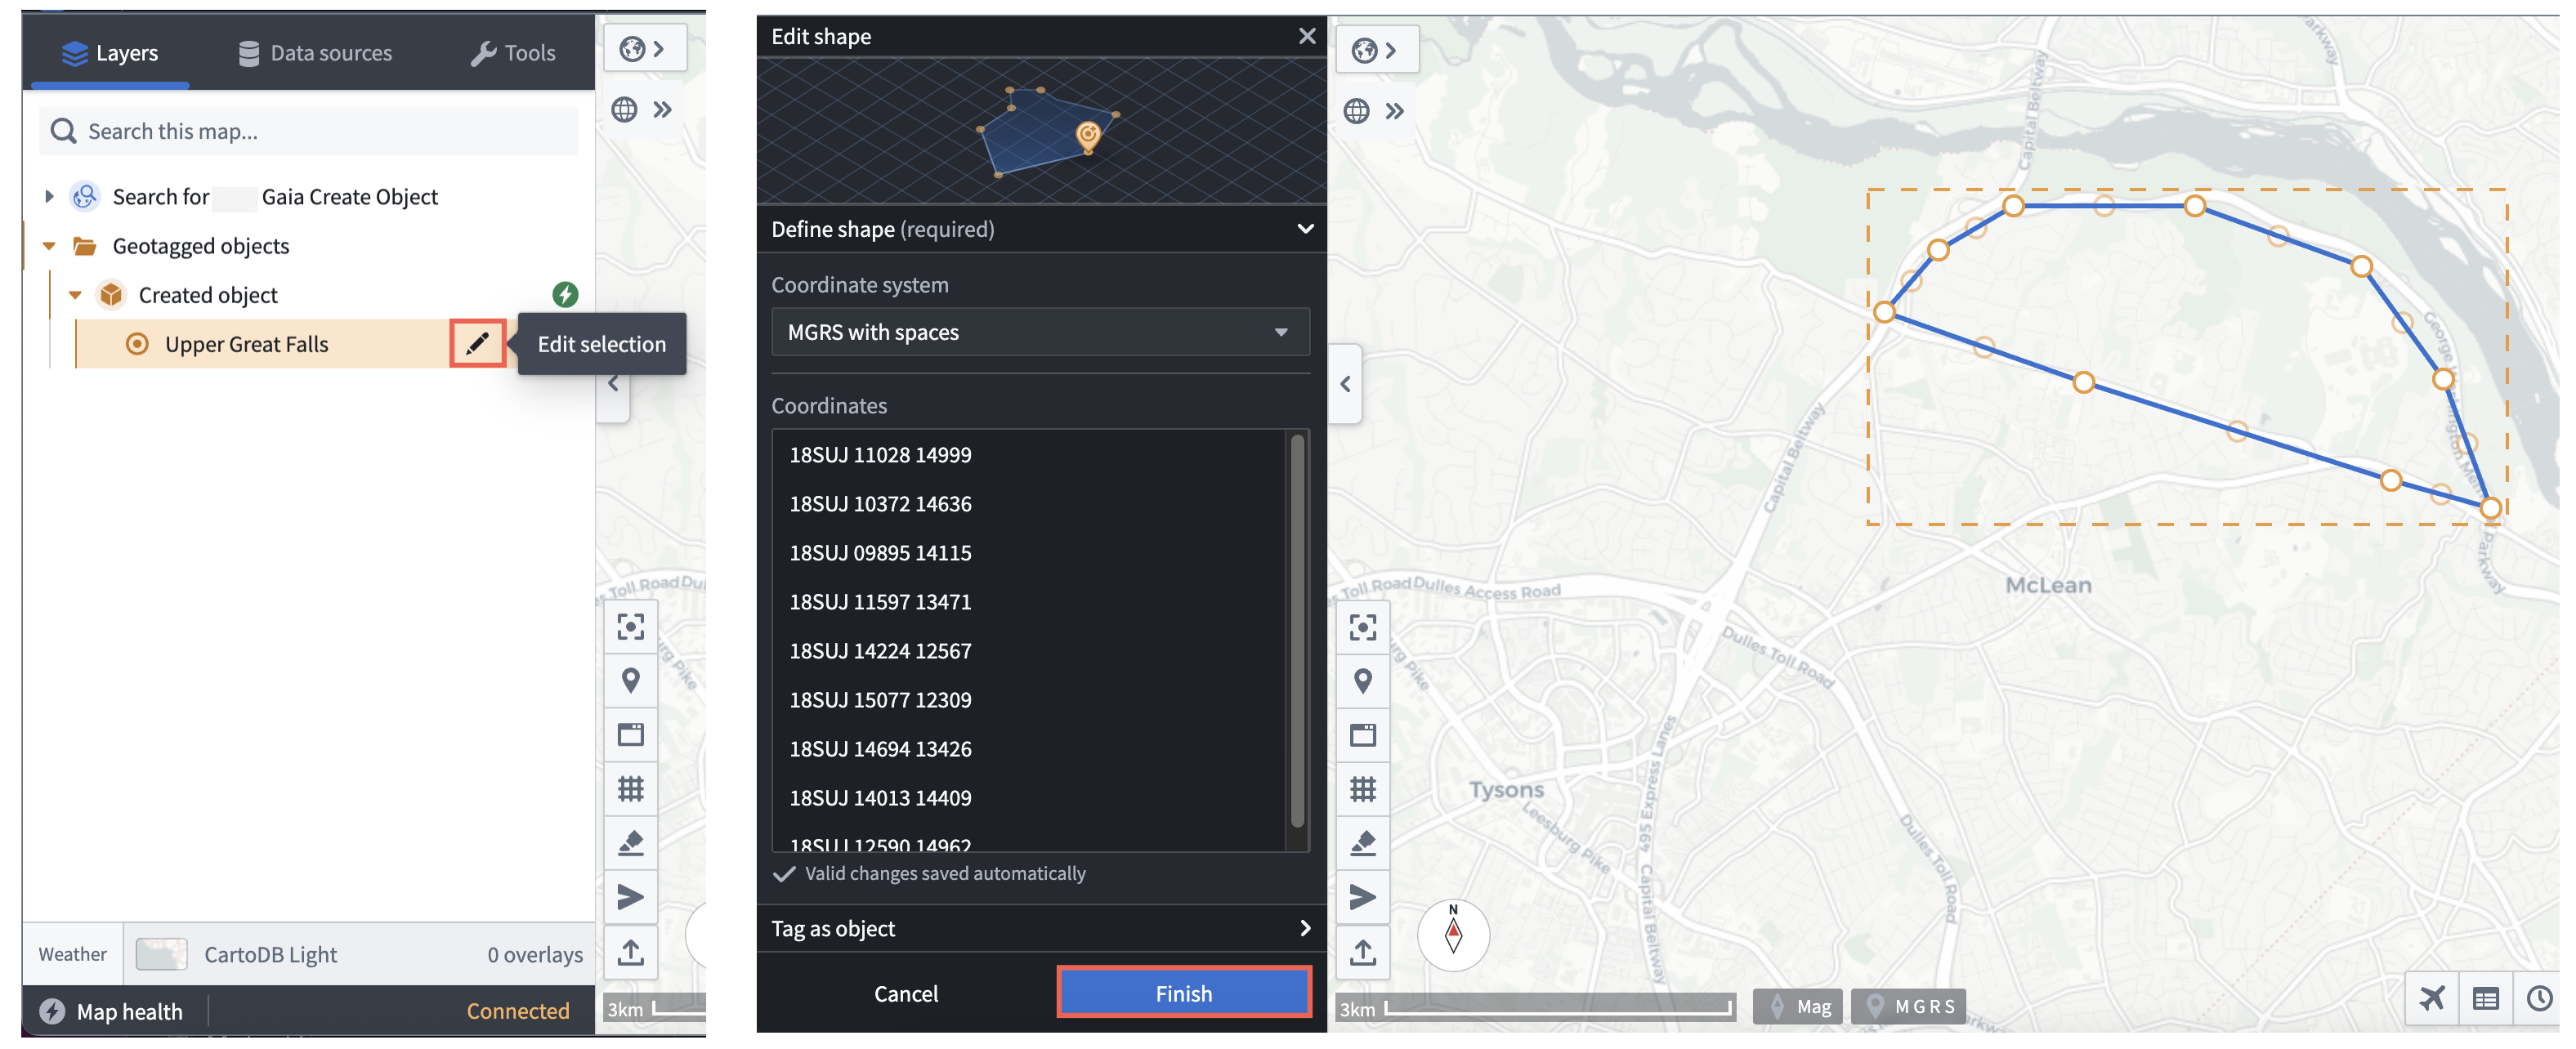
Select and drag any vertex to adjust the shape, or select a point within the shape's boundary to drag the shape to another location on your map. When you are finished making changes, choose Finish at the bottom of the Edit shape window.
Drop a new point on your Gaia map and tag it to an object type
Before you begin, review the entry points for creating objects to understand how the object type and drawing tool you select determine which object types are available to you.
With your Gaia map open, select the down arrow to render the symbol Search menu, where you can choose an available symbol to drop anywhere on your map. If you select one of the available Tactical Graphics symbols, then you will only be able to create an object within an object type that implements the MILSTD 2525C Symbol interface. Gaia will automatically populate the Coordinates input box based on your map's coordinate system preference.
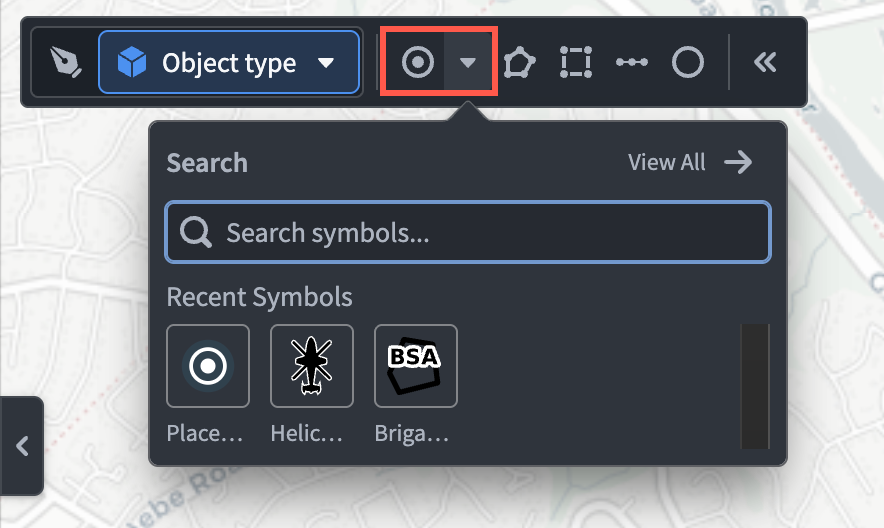
Select File > Preferences > Coordinate system from Gaia's top ribbon to update the default coordinate system.
The Create symbol window will appear in Gaia's left panel, where you can search for and select your object type that implements the Gaia Geopoint Creatable interface. Next, optionally adjust the Bearing (mag) of your geopoint before entering a Title for your object. Choose Finish to save the dropped symbol to your ontology as an object.
Once you save your geopoint as an object, you can interact with the new map layer and view the object in Foundry's Object Explorer in the same manner you can for a shape drawn on your map.
Edit an existing geopoint object
You can edit an existing geopoint object in the same manner you can for a shape drawn on your map.
Configure a tactical graphic on your Gaia map and tag it to an object type
Your Foundry enrollment must contain MRS to tag a tactical graphic to an object type. Contact Palantir Support with questions about MRS installation or functionality.
Before you begin, review the entry points for creating objects to understand how the object type and drawing tool you select determine which object types are available to you.
Similar to adding a new geopoint to tag as an object, select the down arrow to render the symbol Search menu, where you can choose an available tactical graphic to drop anywhere on your map. Type the name of your desired tactical graphic in the Search symbols... input box, such as Brigade Support Area.
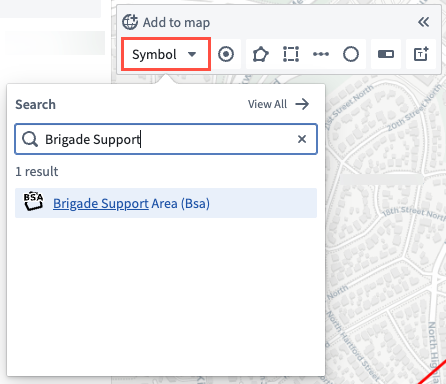
The Create symbol window will appear in Gaia's left panel, and you can follow the same shape creation instructions above to add your tactical graphic to the map and tag it to an object type.
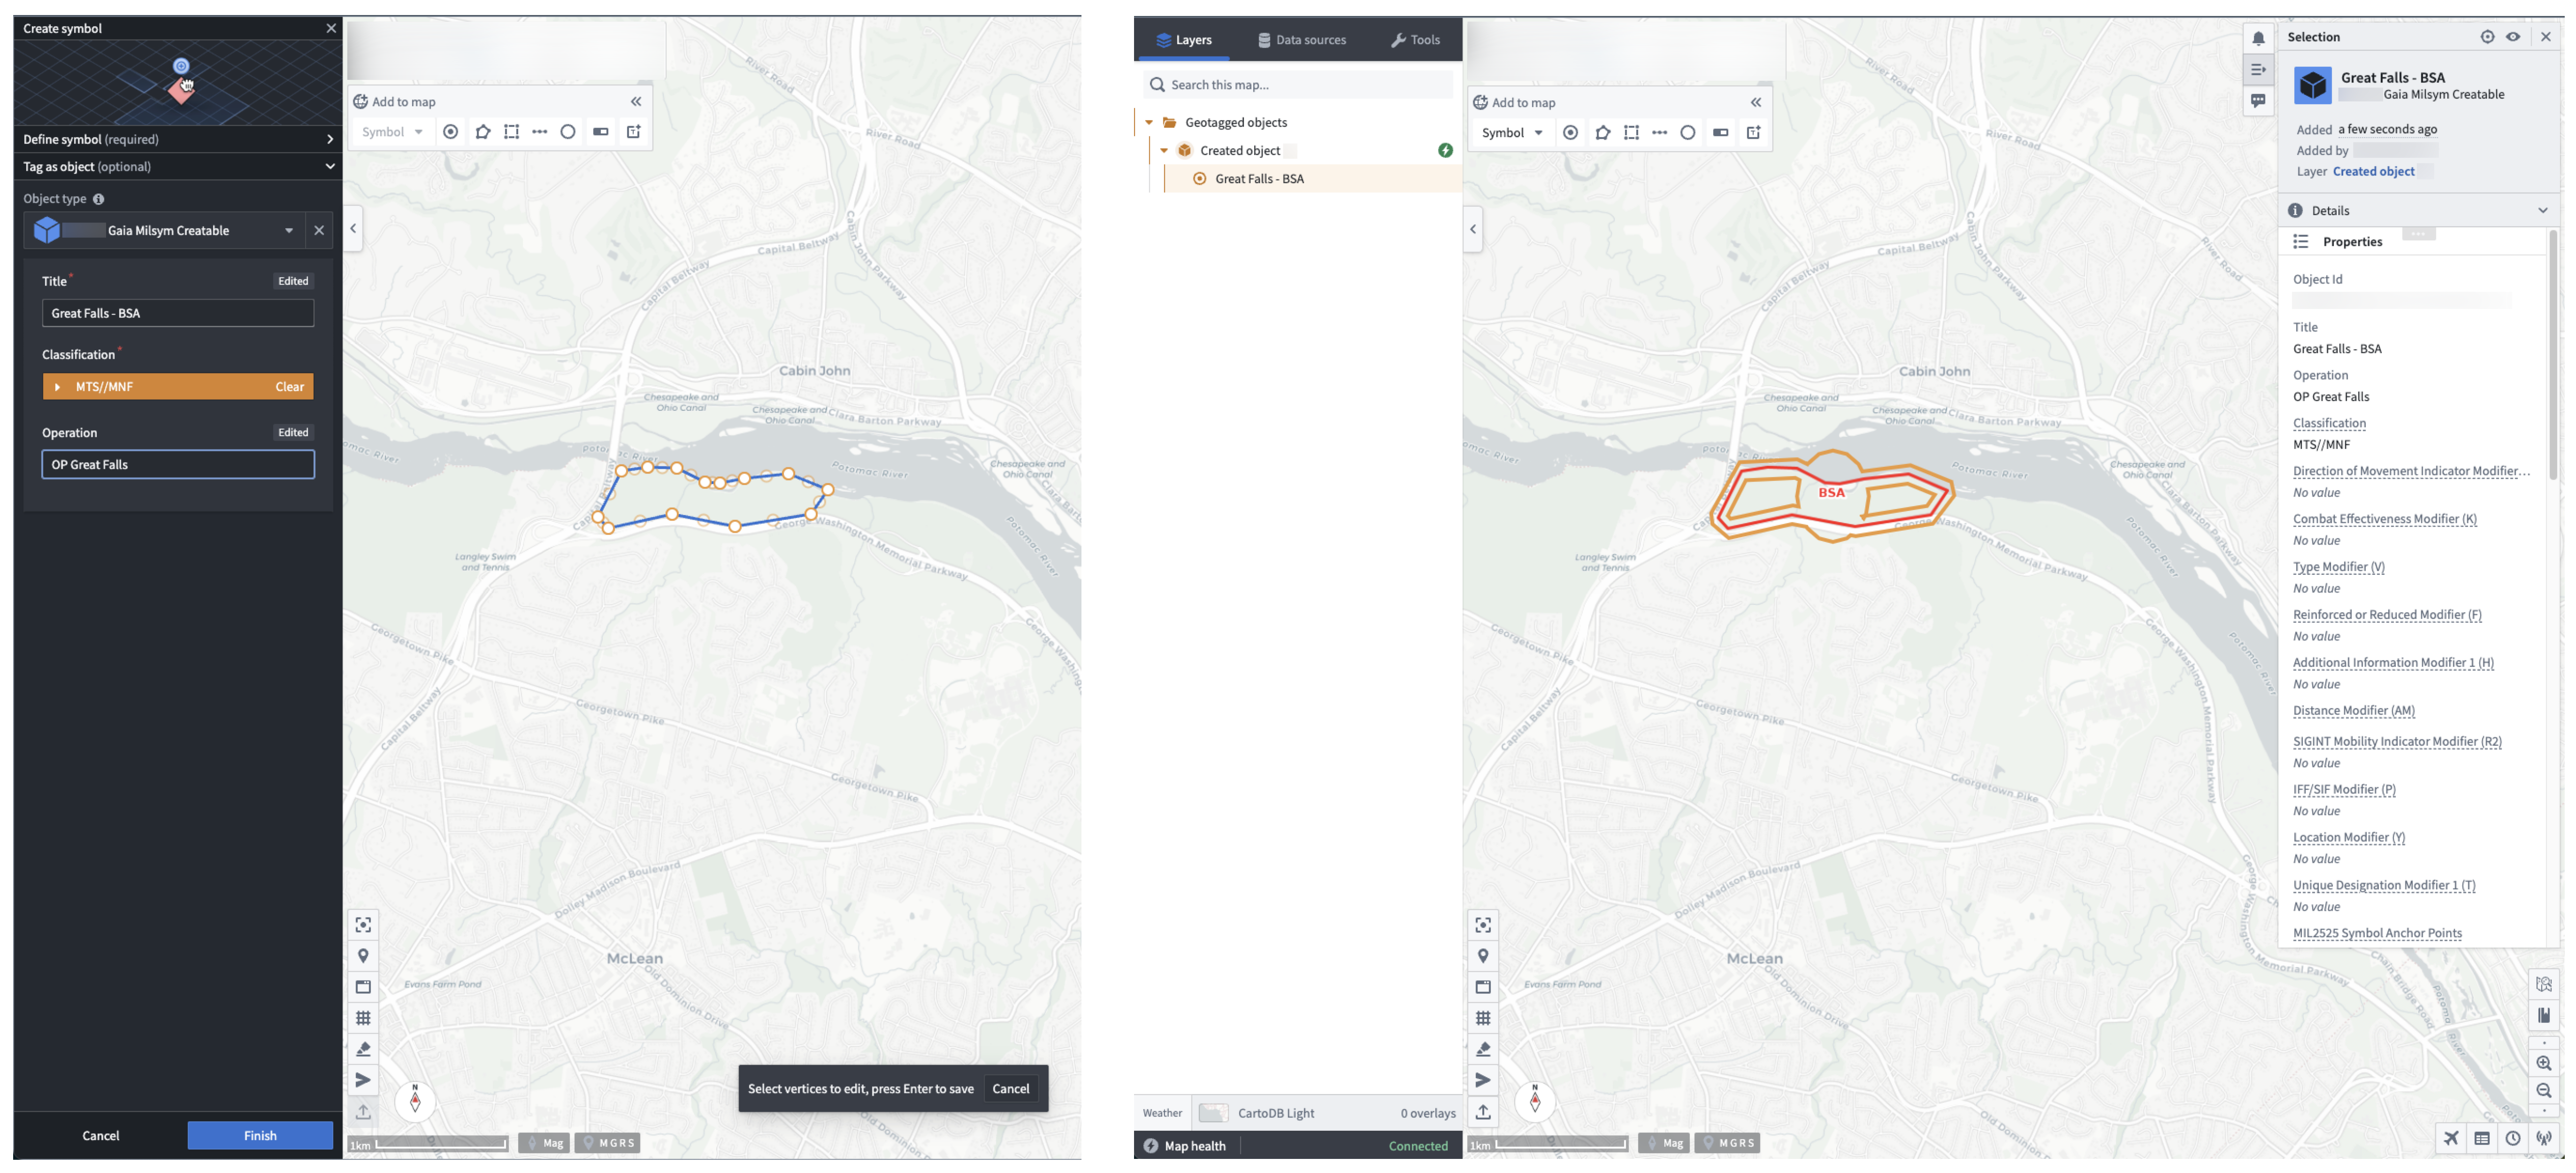
Edit an existing tactical graphic object
You can edit an existing tactical graphic object by following the shape object editing instructions above.
Create new objects in bulk
From the Create shape or Create symbol panel, select Bulk create in the bottom left to open the Bulk create objects table on your map.
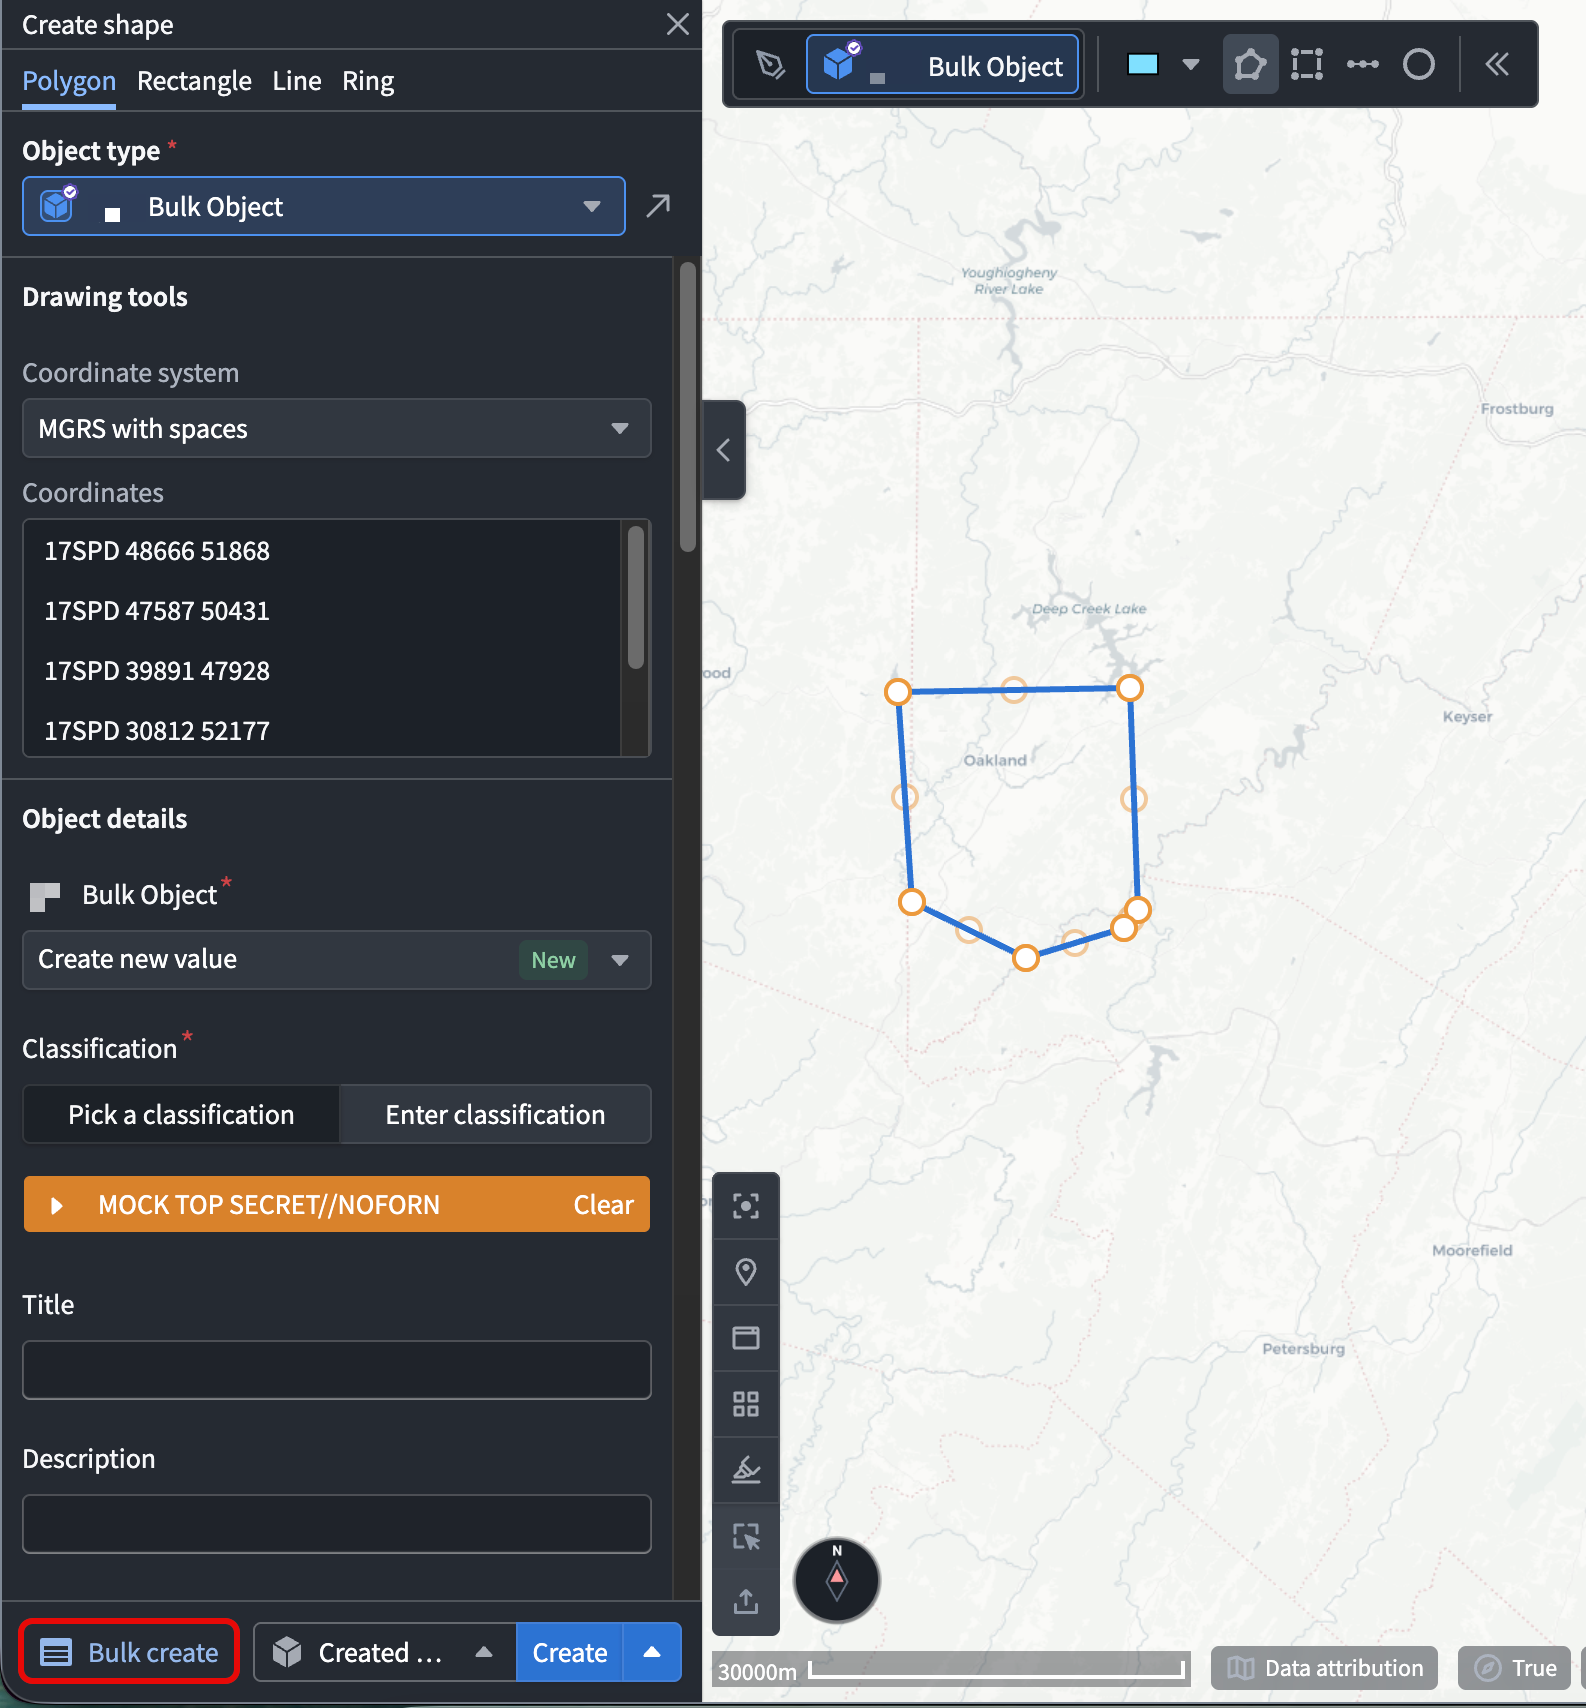
Each row represents a separate action submission that renders a single geometry as an object on your Gaia map, and each column represents an action parameter. You can create up to 5,000 objects from one table at a time.
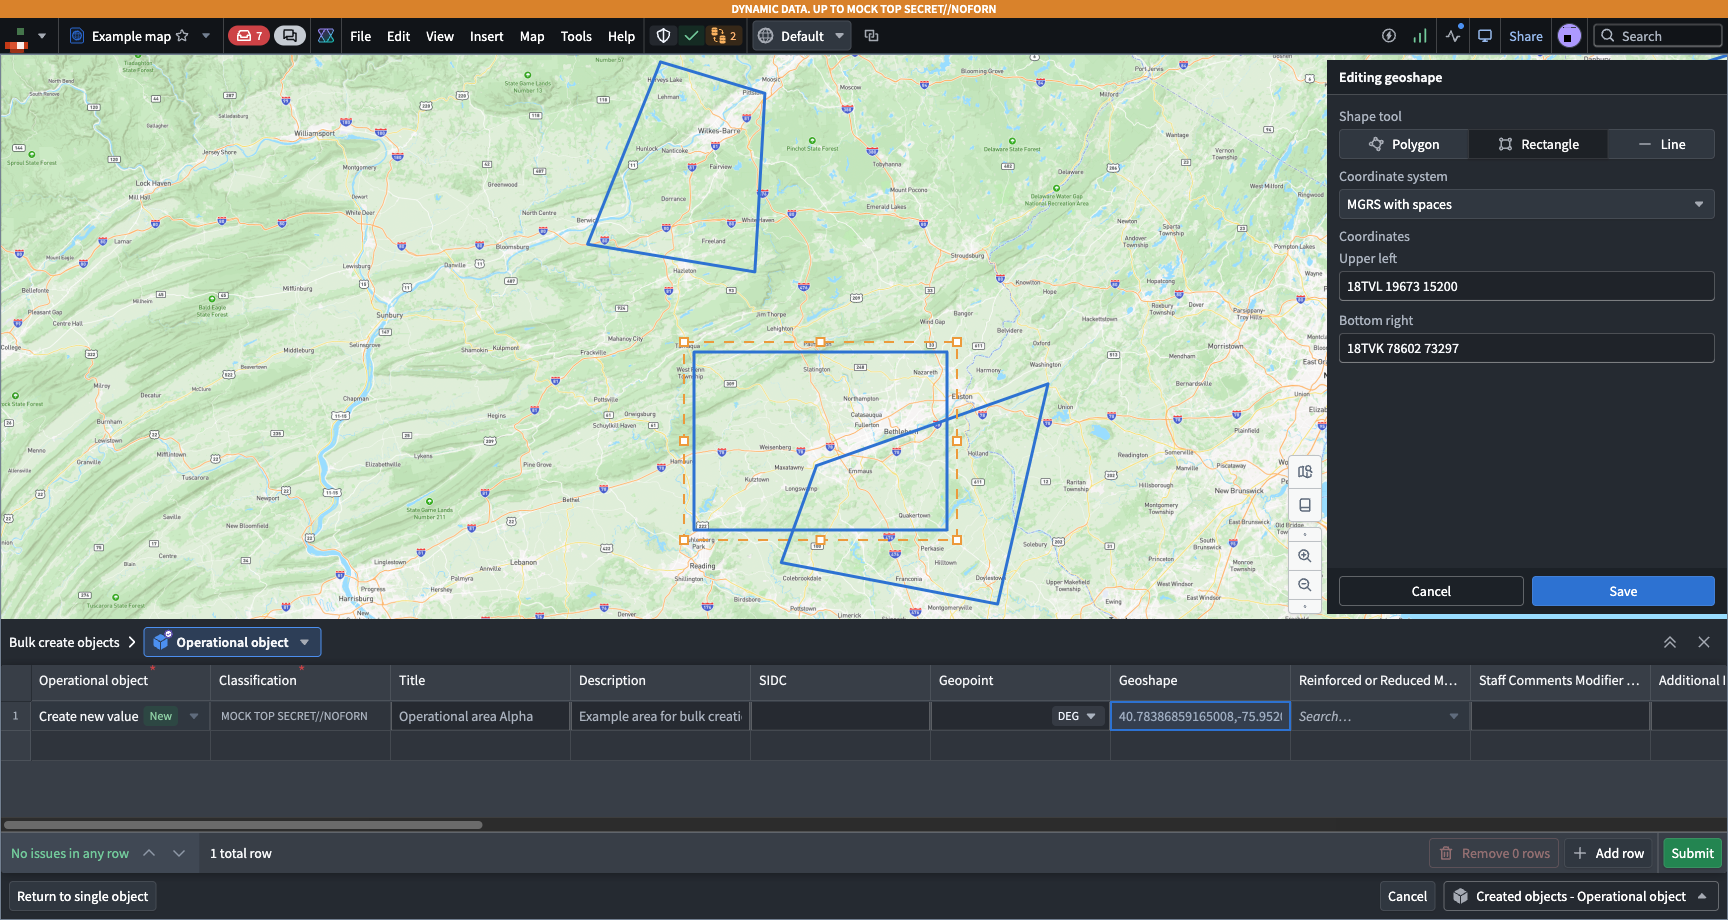
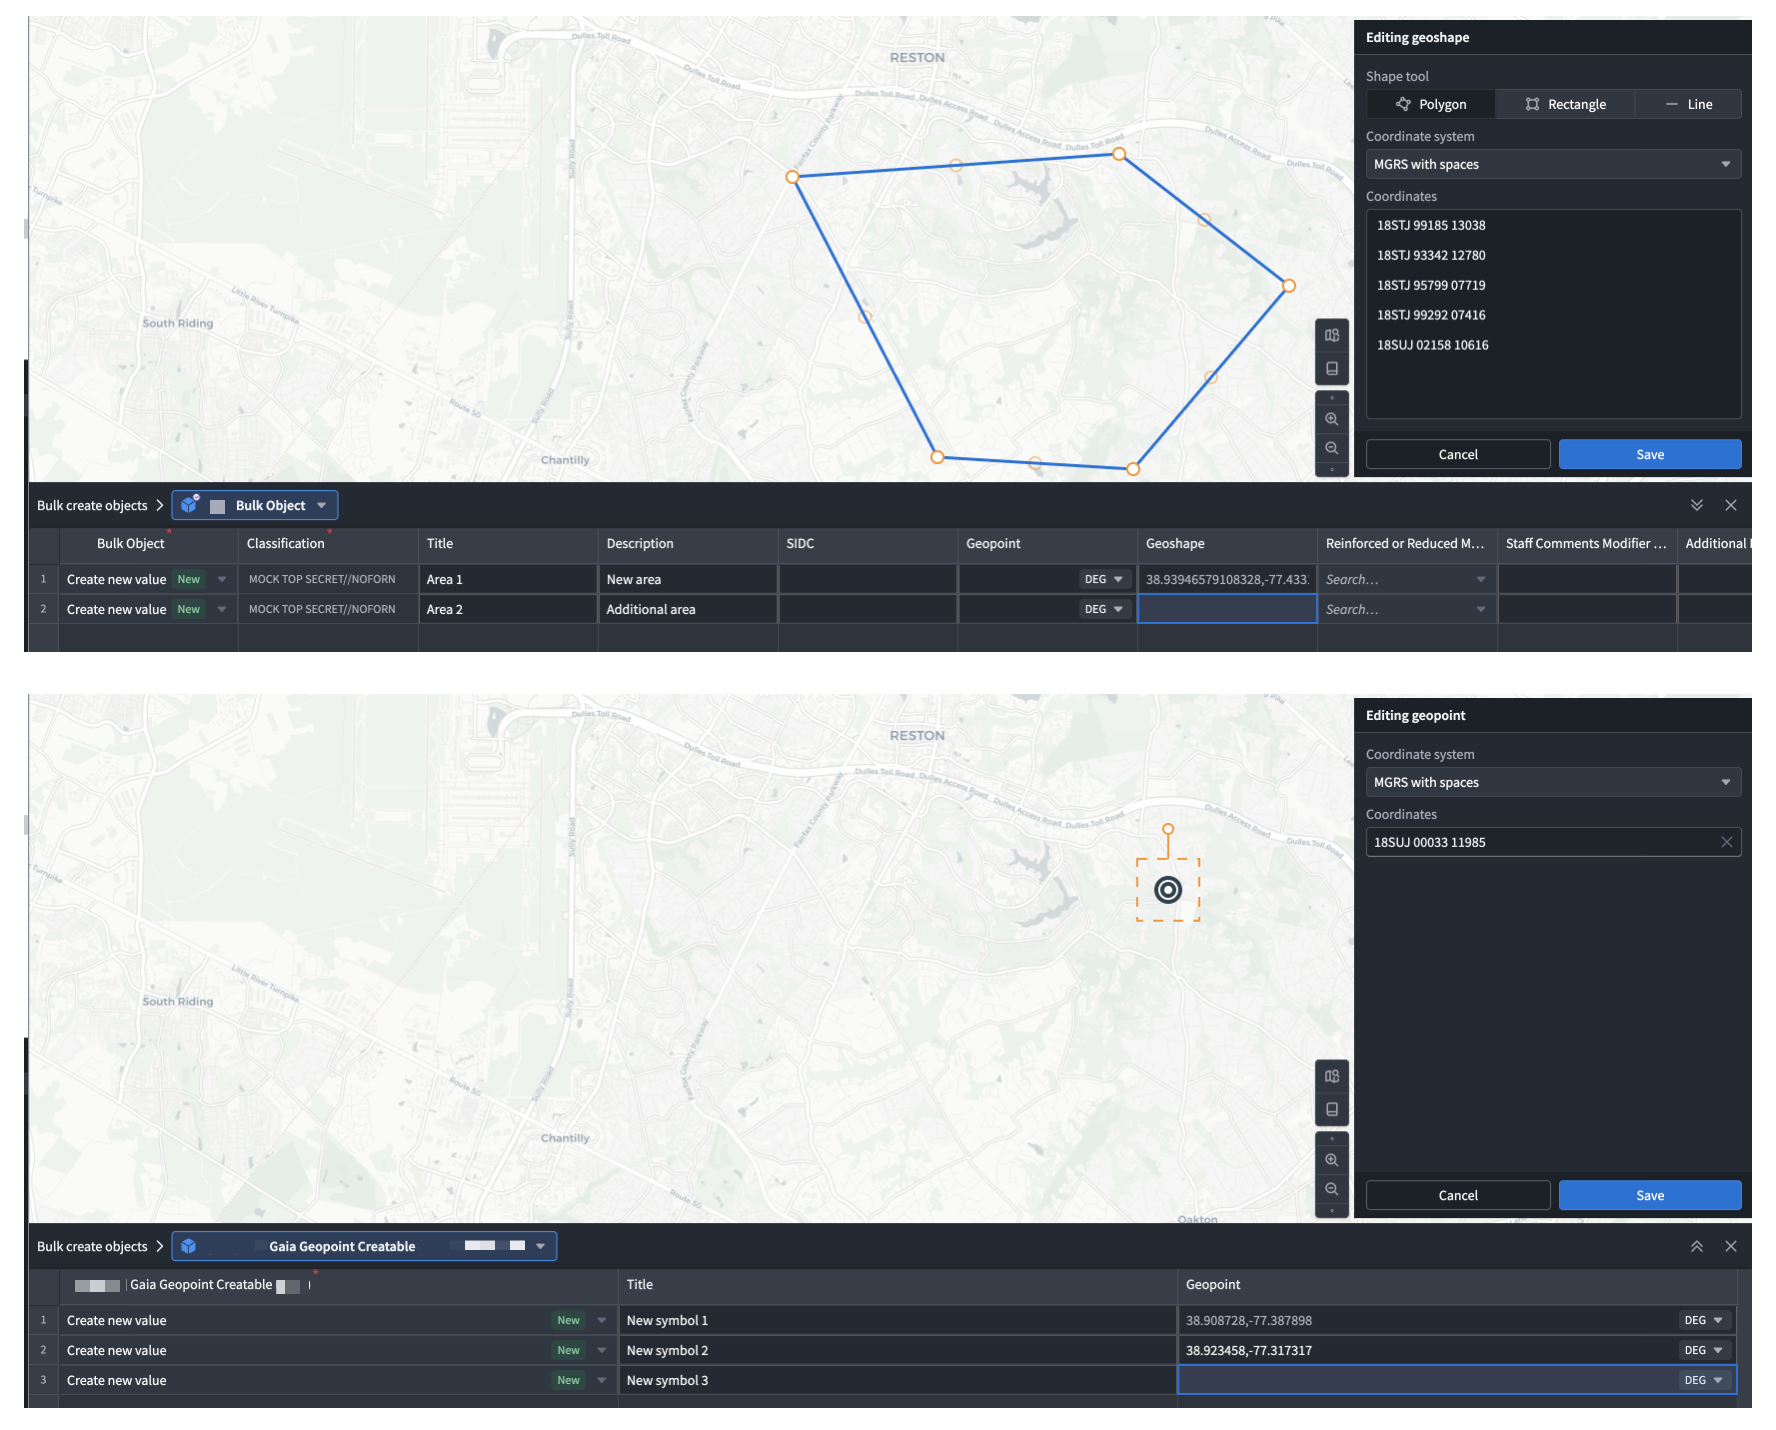
Gaia populates the first row of the table with the first shape drawn or symbol dropped on your map. To add another shape or symbol, select Add row. Alternatively, hover over and select an empty cell in an empty row at the bottom of the table. Select the object's geoshape or geopoint cell to open the corresponding Editing geoshape or Editing geopoint panel. Draw the new shape or drop a new symbol on your map, then choose Save.
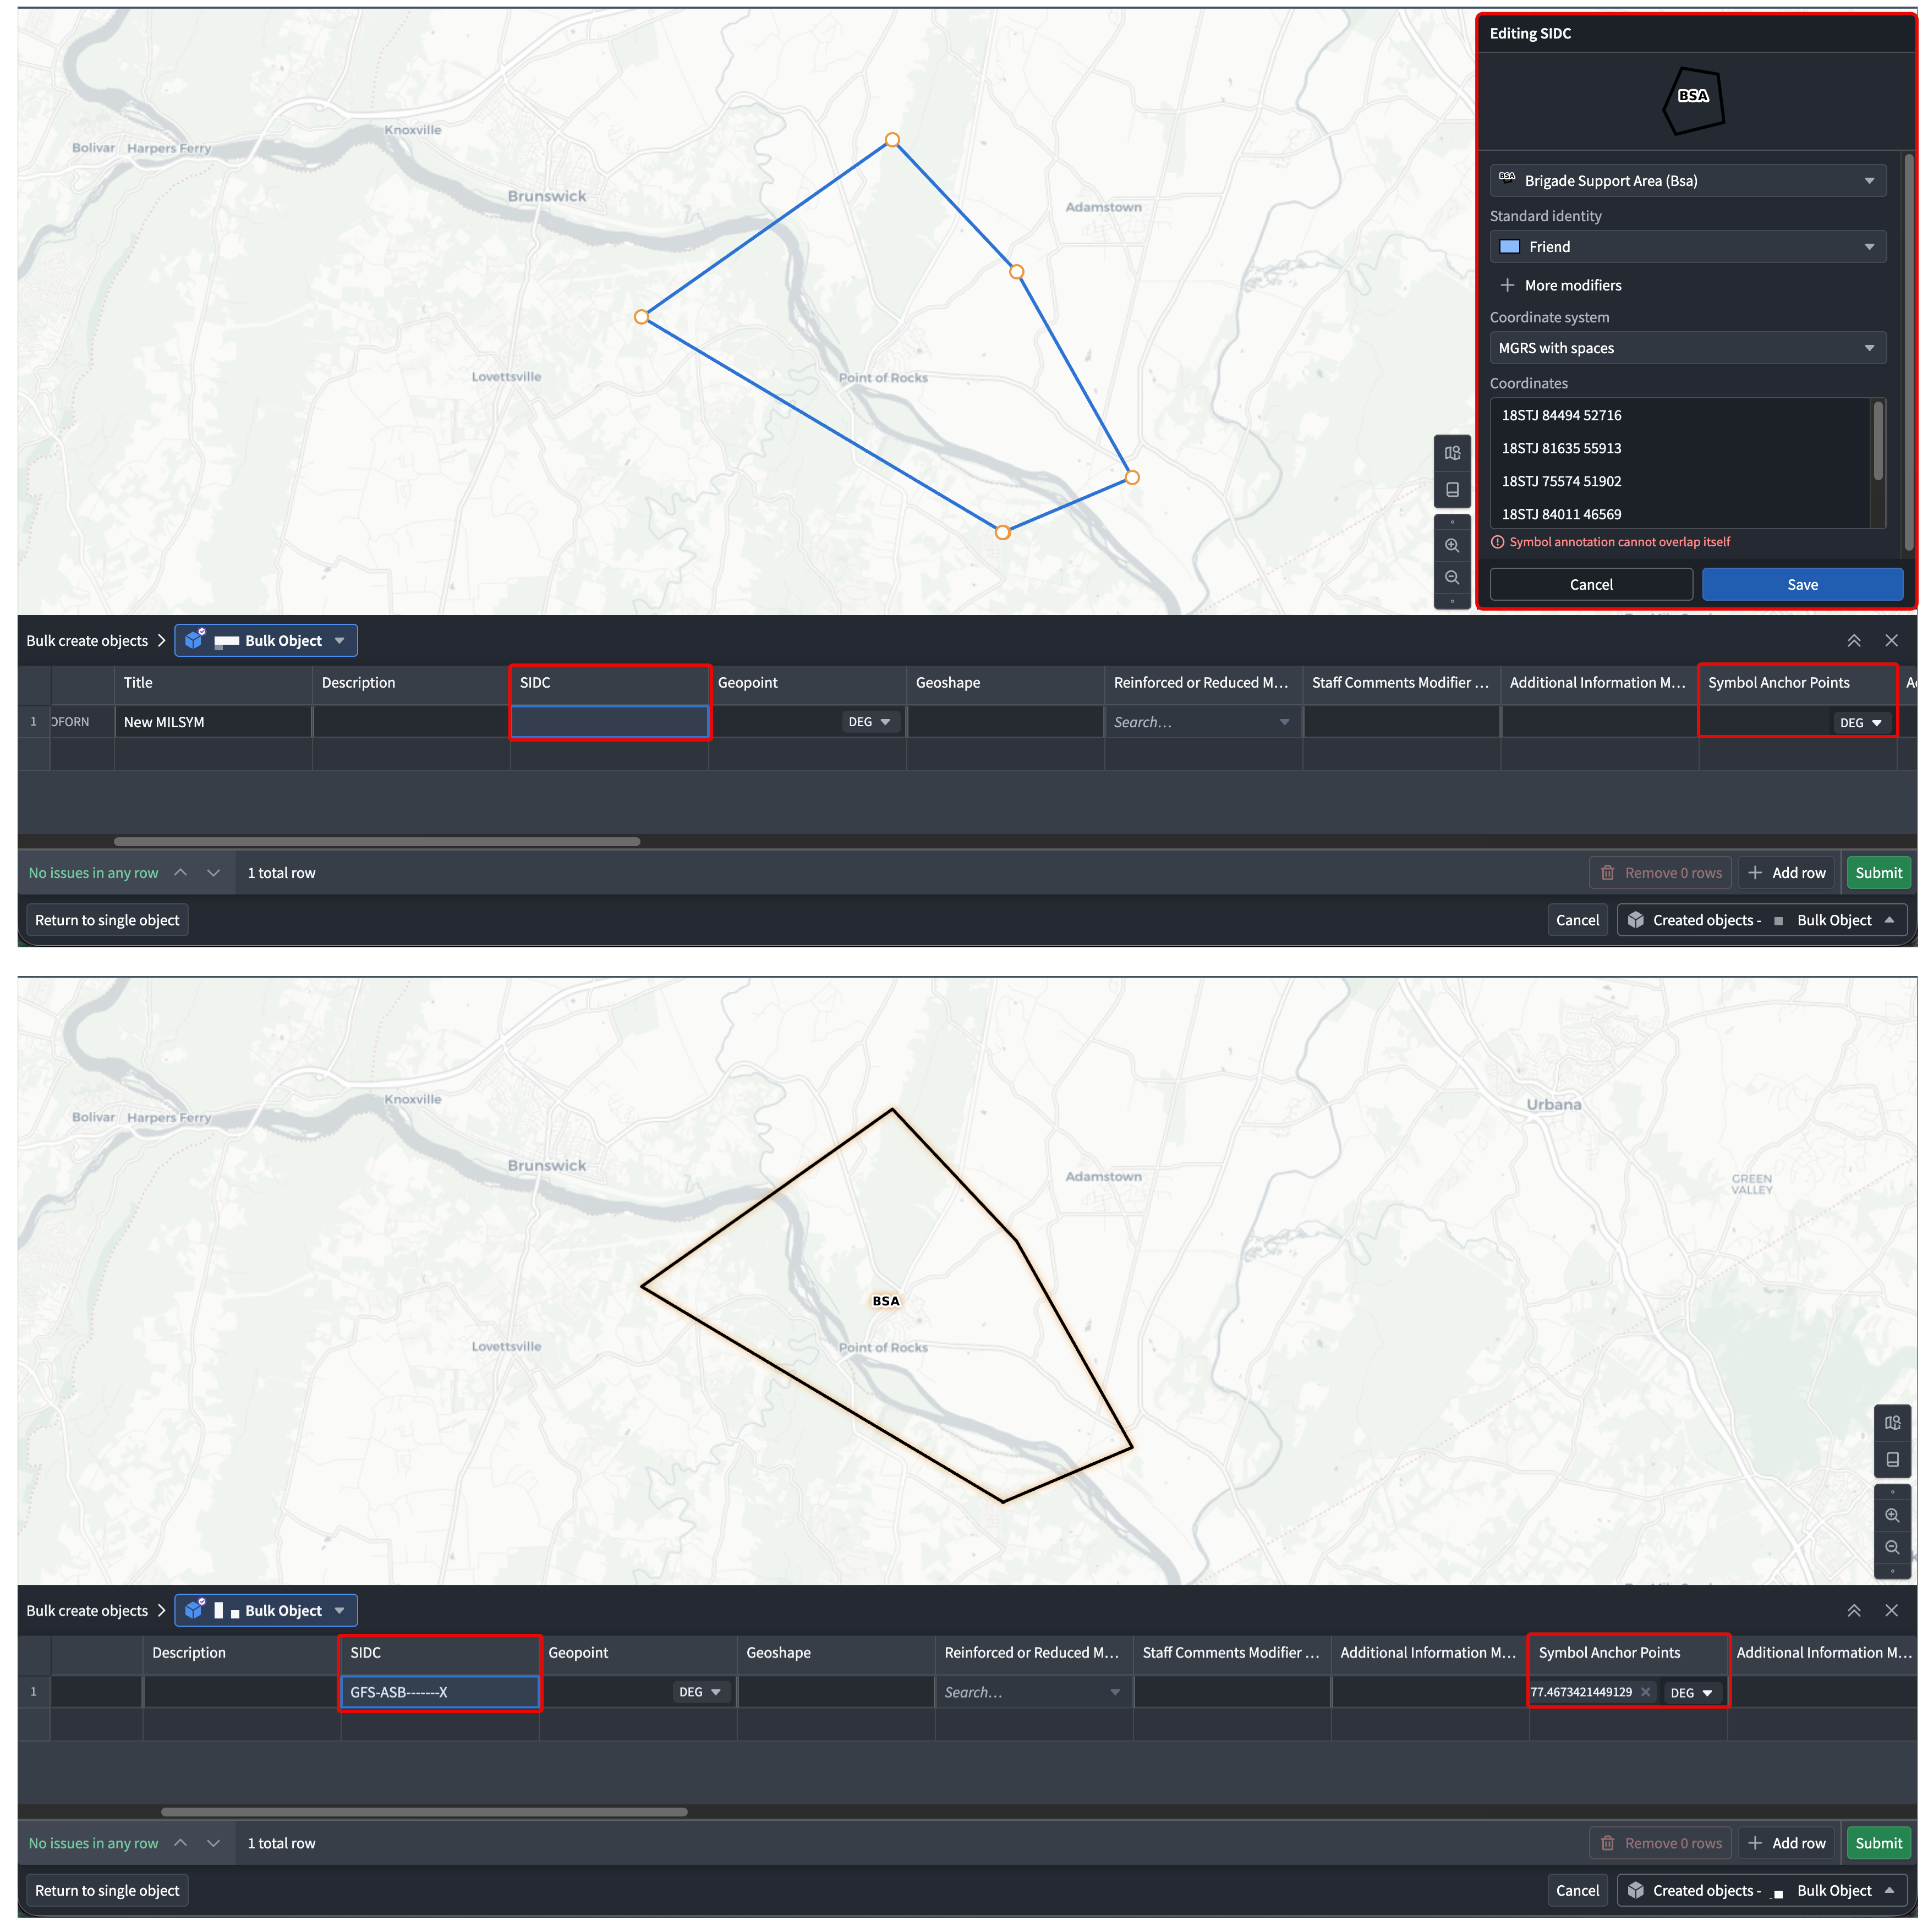
To create tactical graphics or military symbols through the MILSTD 2525C Symbol interface, configure the create action with SIDC and Symbol Anchor Points. You can optionally include additional scalar modifiers for Gaia to populate automatically. Select a tactical graphic or military symbol from the symbols selector. Gaia sets the object's SIDC value and opens the relevant coordinate editor. Draw a shape on your map to populate the Symbol Anchor Points property.
When you select a single-point tactical graphic, Gaia uses one symbol anchor point to populate the Symbol Anchor Points property as opposed to the array used when drawing a shape.
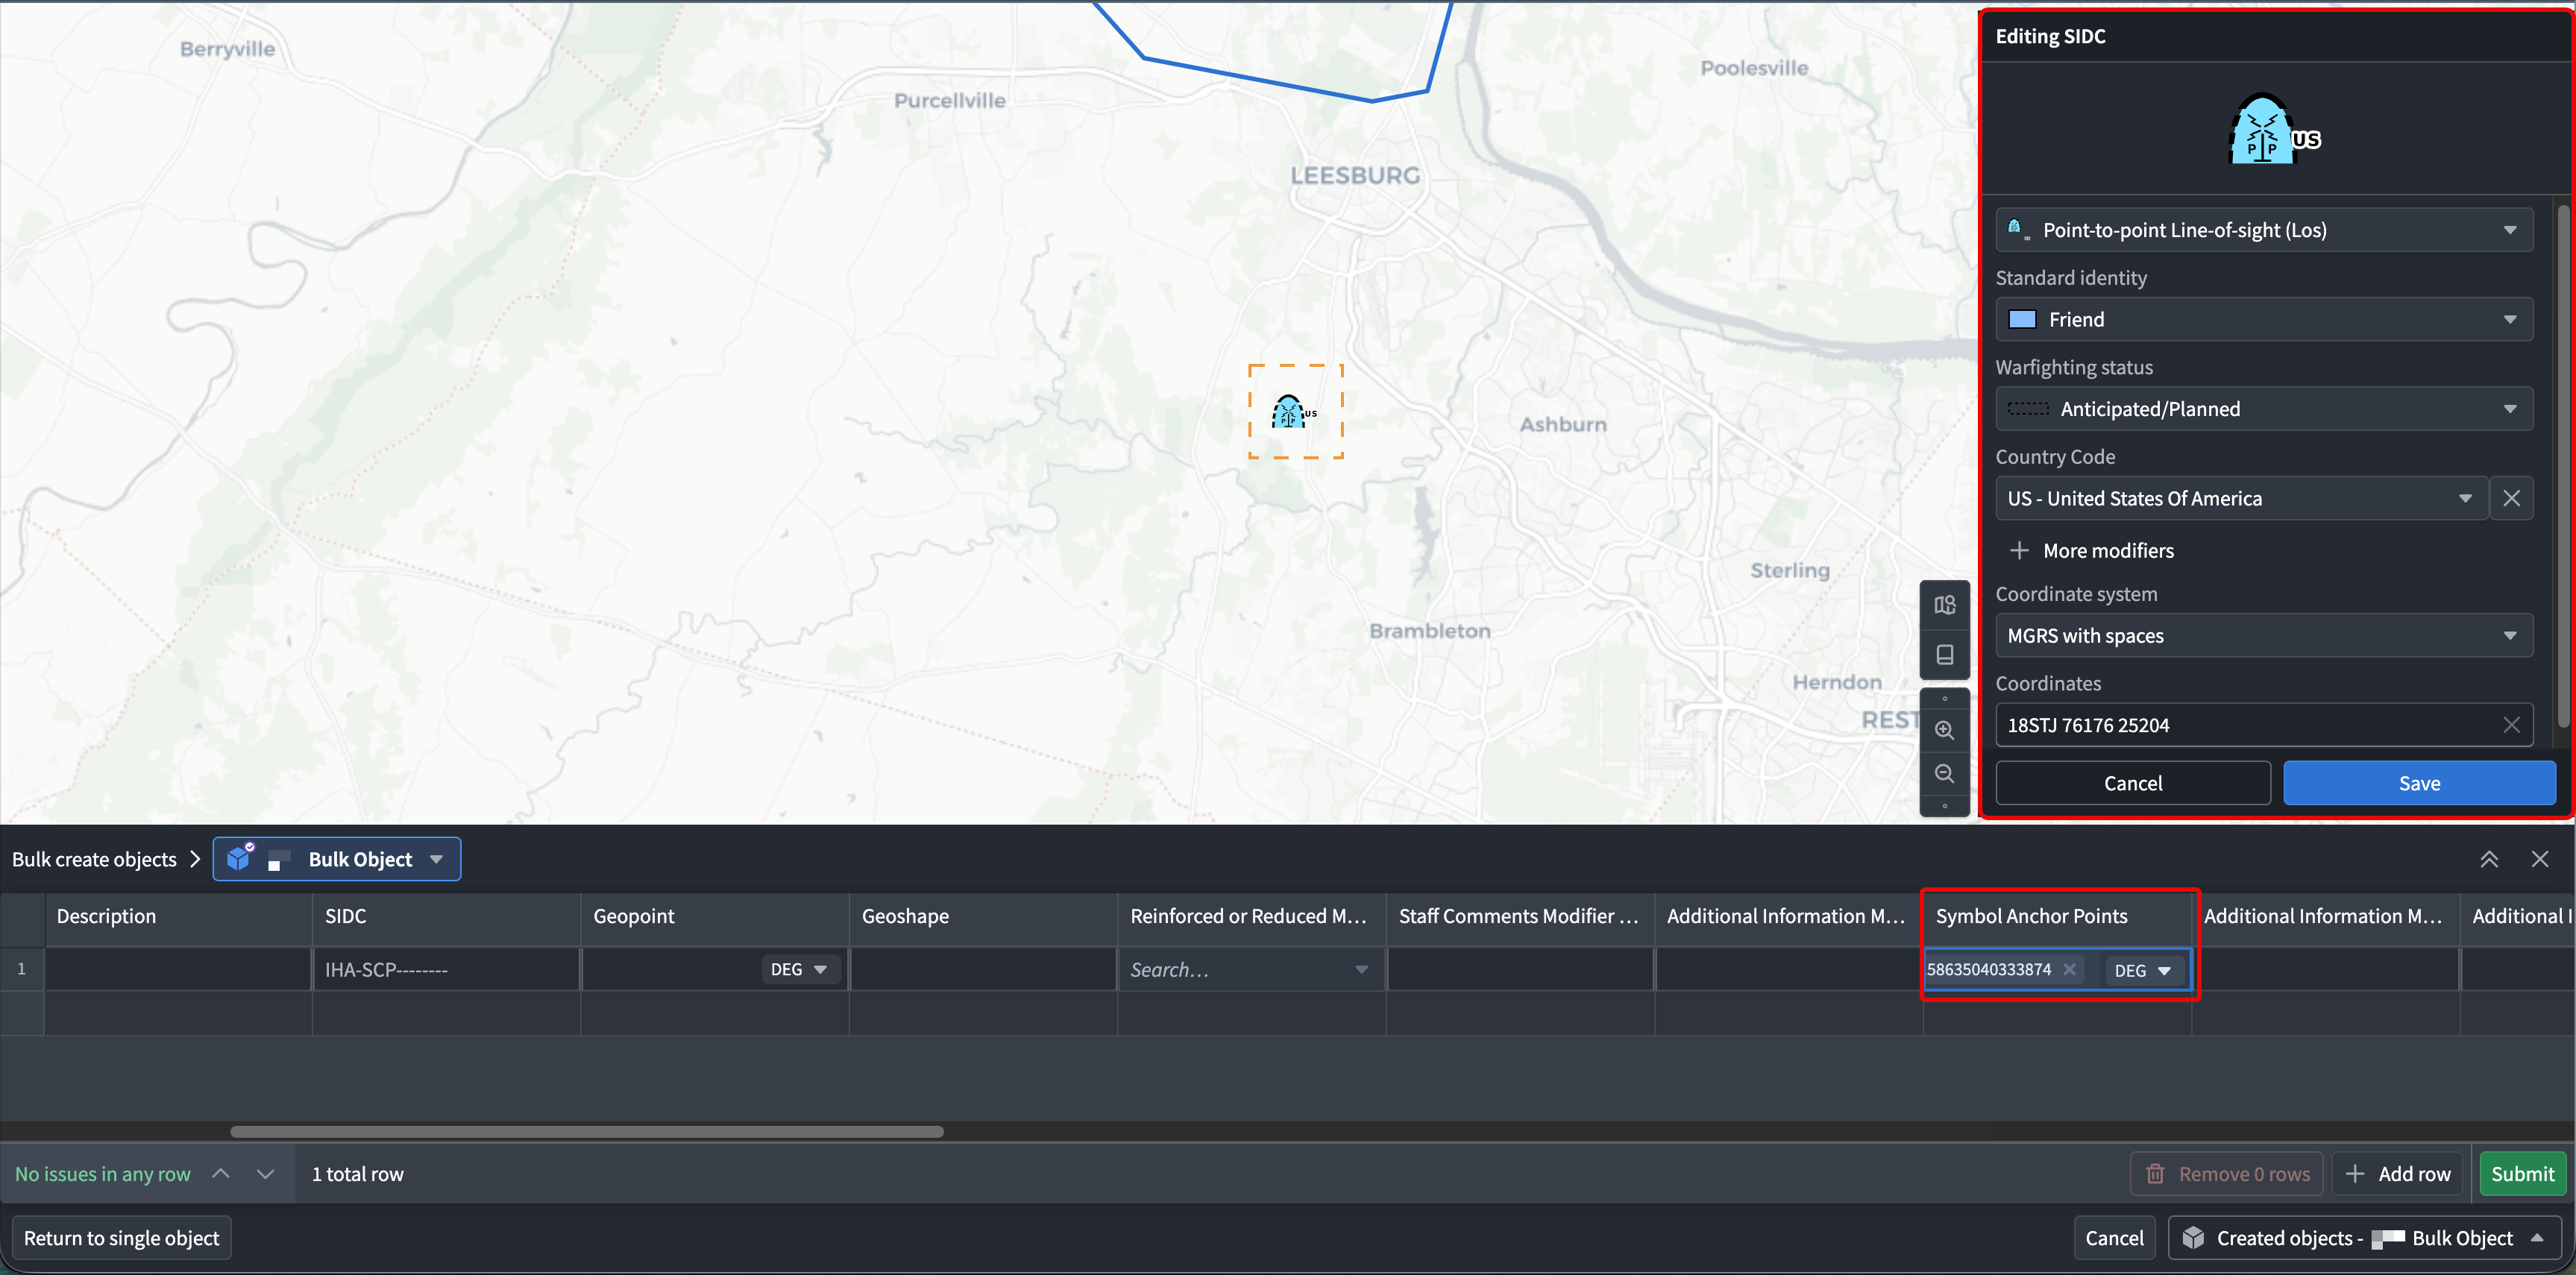
When you are finished, select Submit in the bottom right of the table to create your new objects. To exit the Bulk create objects table without saving, choose Return to single object at any time. To highlight multiple rows to remove, select the index number on the far left of the table. Then, press Cmd+Up/Cmd+Down (macOS) or Ctrl+Up/Ctrl+Down (Windows). Additionally, you can copy and paste entire rows or select values from one row to another by pressing Cmd+C(macOS)/Ctrl+C (Windows) over the values to copy before pressing Cmd+V (macOS)/Ctrl+V (Windows) to paste them in the relevant destination row.
Promote an annotation to an object
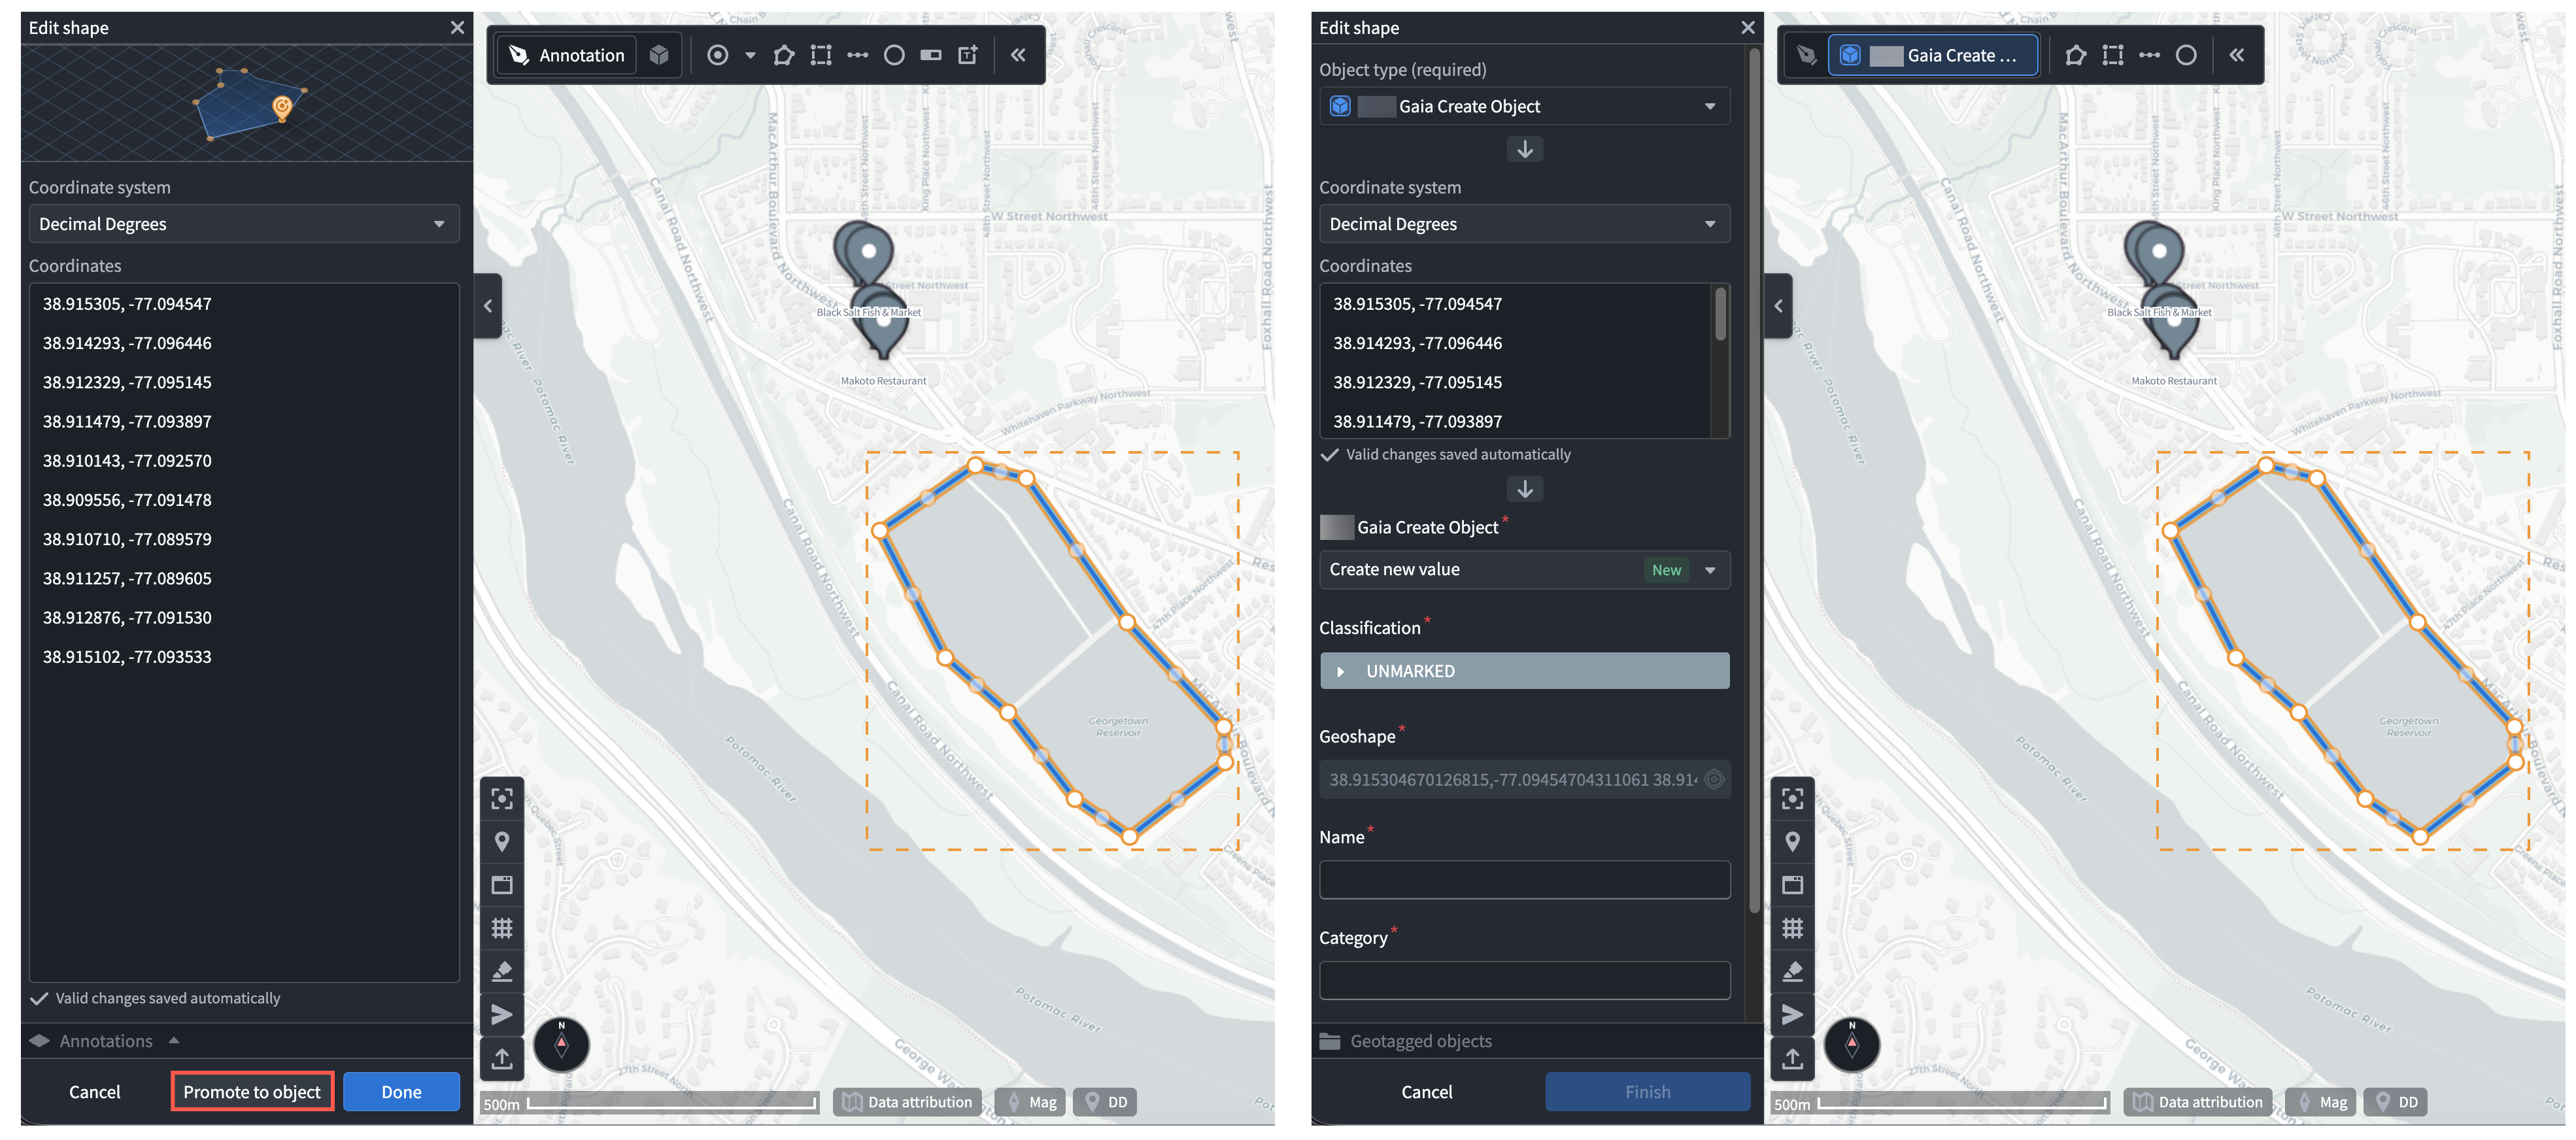
In Gaia, an annotation is a shape, point, or symbol that is local to your current map. You can promote annotations on your map to objects in your ontology for use on other maps created by other users who can access the object type. Promotion does not delete the annotation from your map. Instead, Gaia displays the newly created object in a separate layer while the original annotation and its source layer both remain on the map. After object creation, you can hide or remove the original annotation when it is no longer needed.
To tag an existing annotation as an object, double-click the annotation on your map or hover your cursor over the annotation's pencil icon in the Layers tab of the left panel to launch the shape, point, or symbol edit window. Next, select Promote to object, choose your object type from the Object type dropdown menu, and complete the action form in the shape, point, or symbol edit window.
To learn more about the various methods you can use to add data from your ontology to Gotham, review the existing geospatial data integration documentation.
Promote existing annotations in bulk
Gaia enables you to promote the following annotation types to objects in bulk:
- Points
- Shapes (including polygons, rectangles, lines, and range rings)
- Military symbols
- Single-point and multi-point tactical graphics
Follow the instructions below to promote multiple annotations on your map to objects in your ontology:
- Select at least two supported annotations on your map or in the Layers tab in the left panel.
- Choose Create objects from the Selection panel on the right side of your screen.
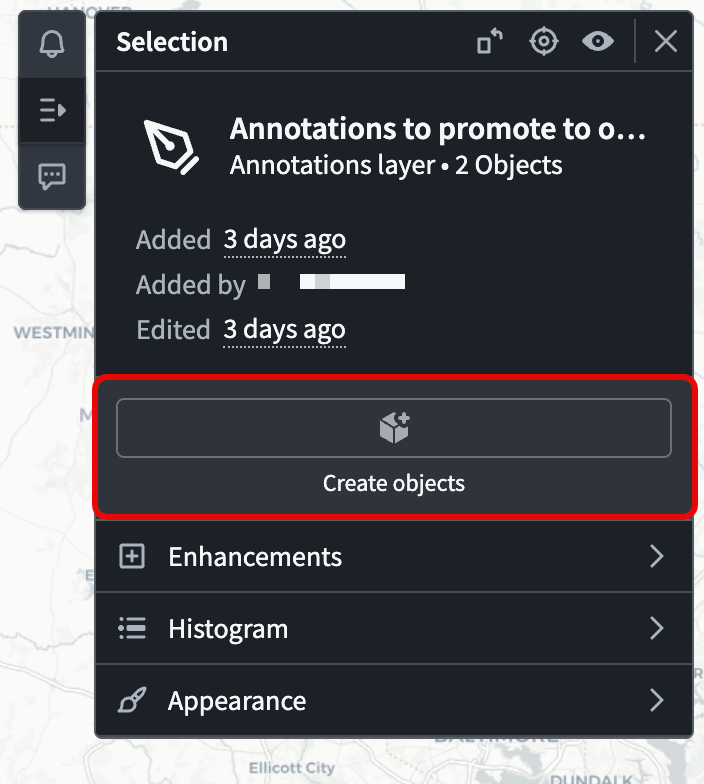
- Search for and select the relevant object type to launch the Bulk create objects table.
- Review the pre-filled rows in the action table, such as the annotations' position, shape, or anchor points.
- Complete any remaining required fields configured in the action form and select Submit.
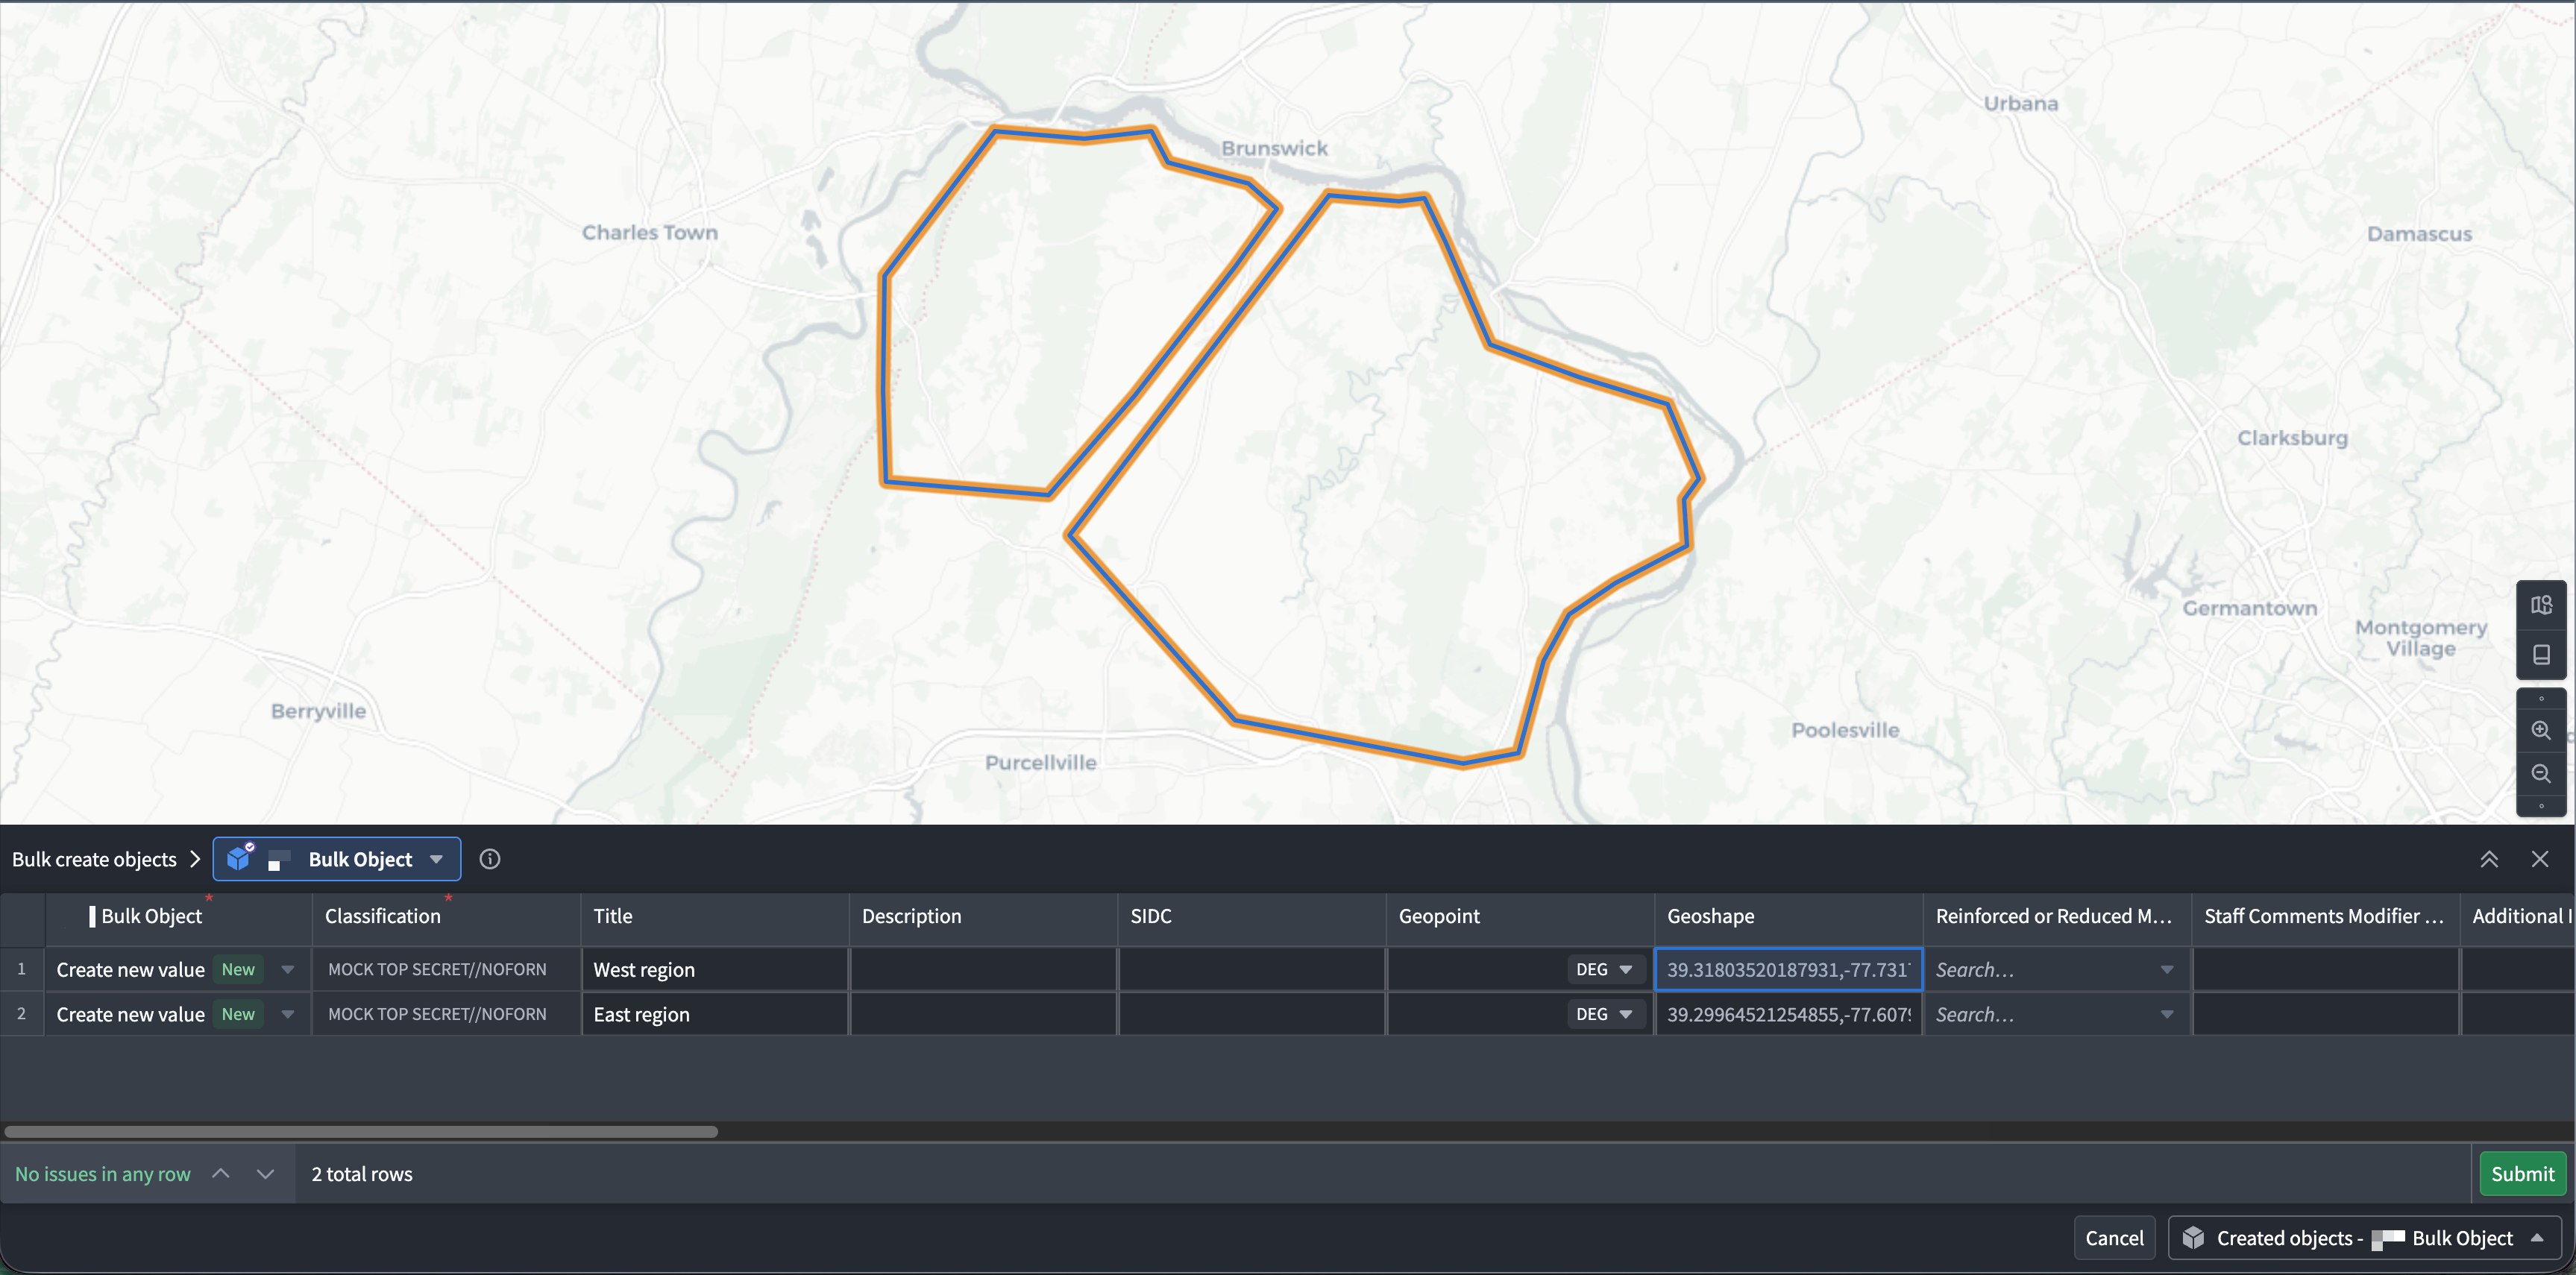
Gaia displays a list of object types that are compatible and incompatible for bulk promotion with a tooltip explaining the reason for incompatibility you can render by hovering over a listed object type. The list is displayed in both the Selection panel and the Bulk create objects table.
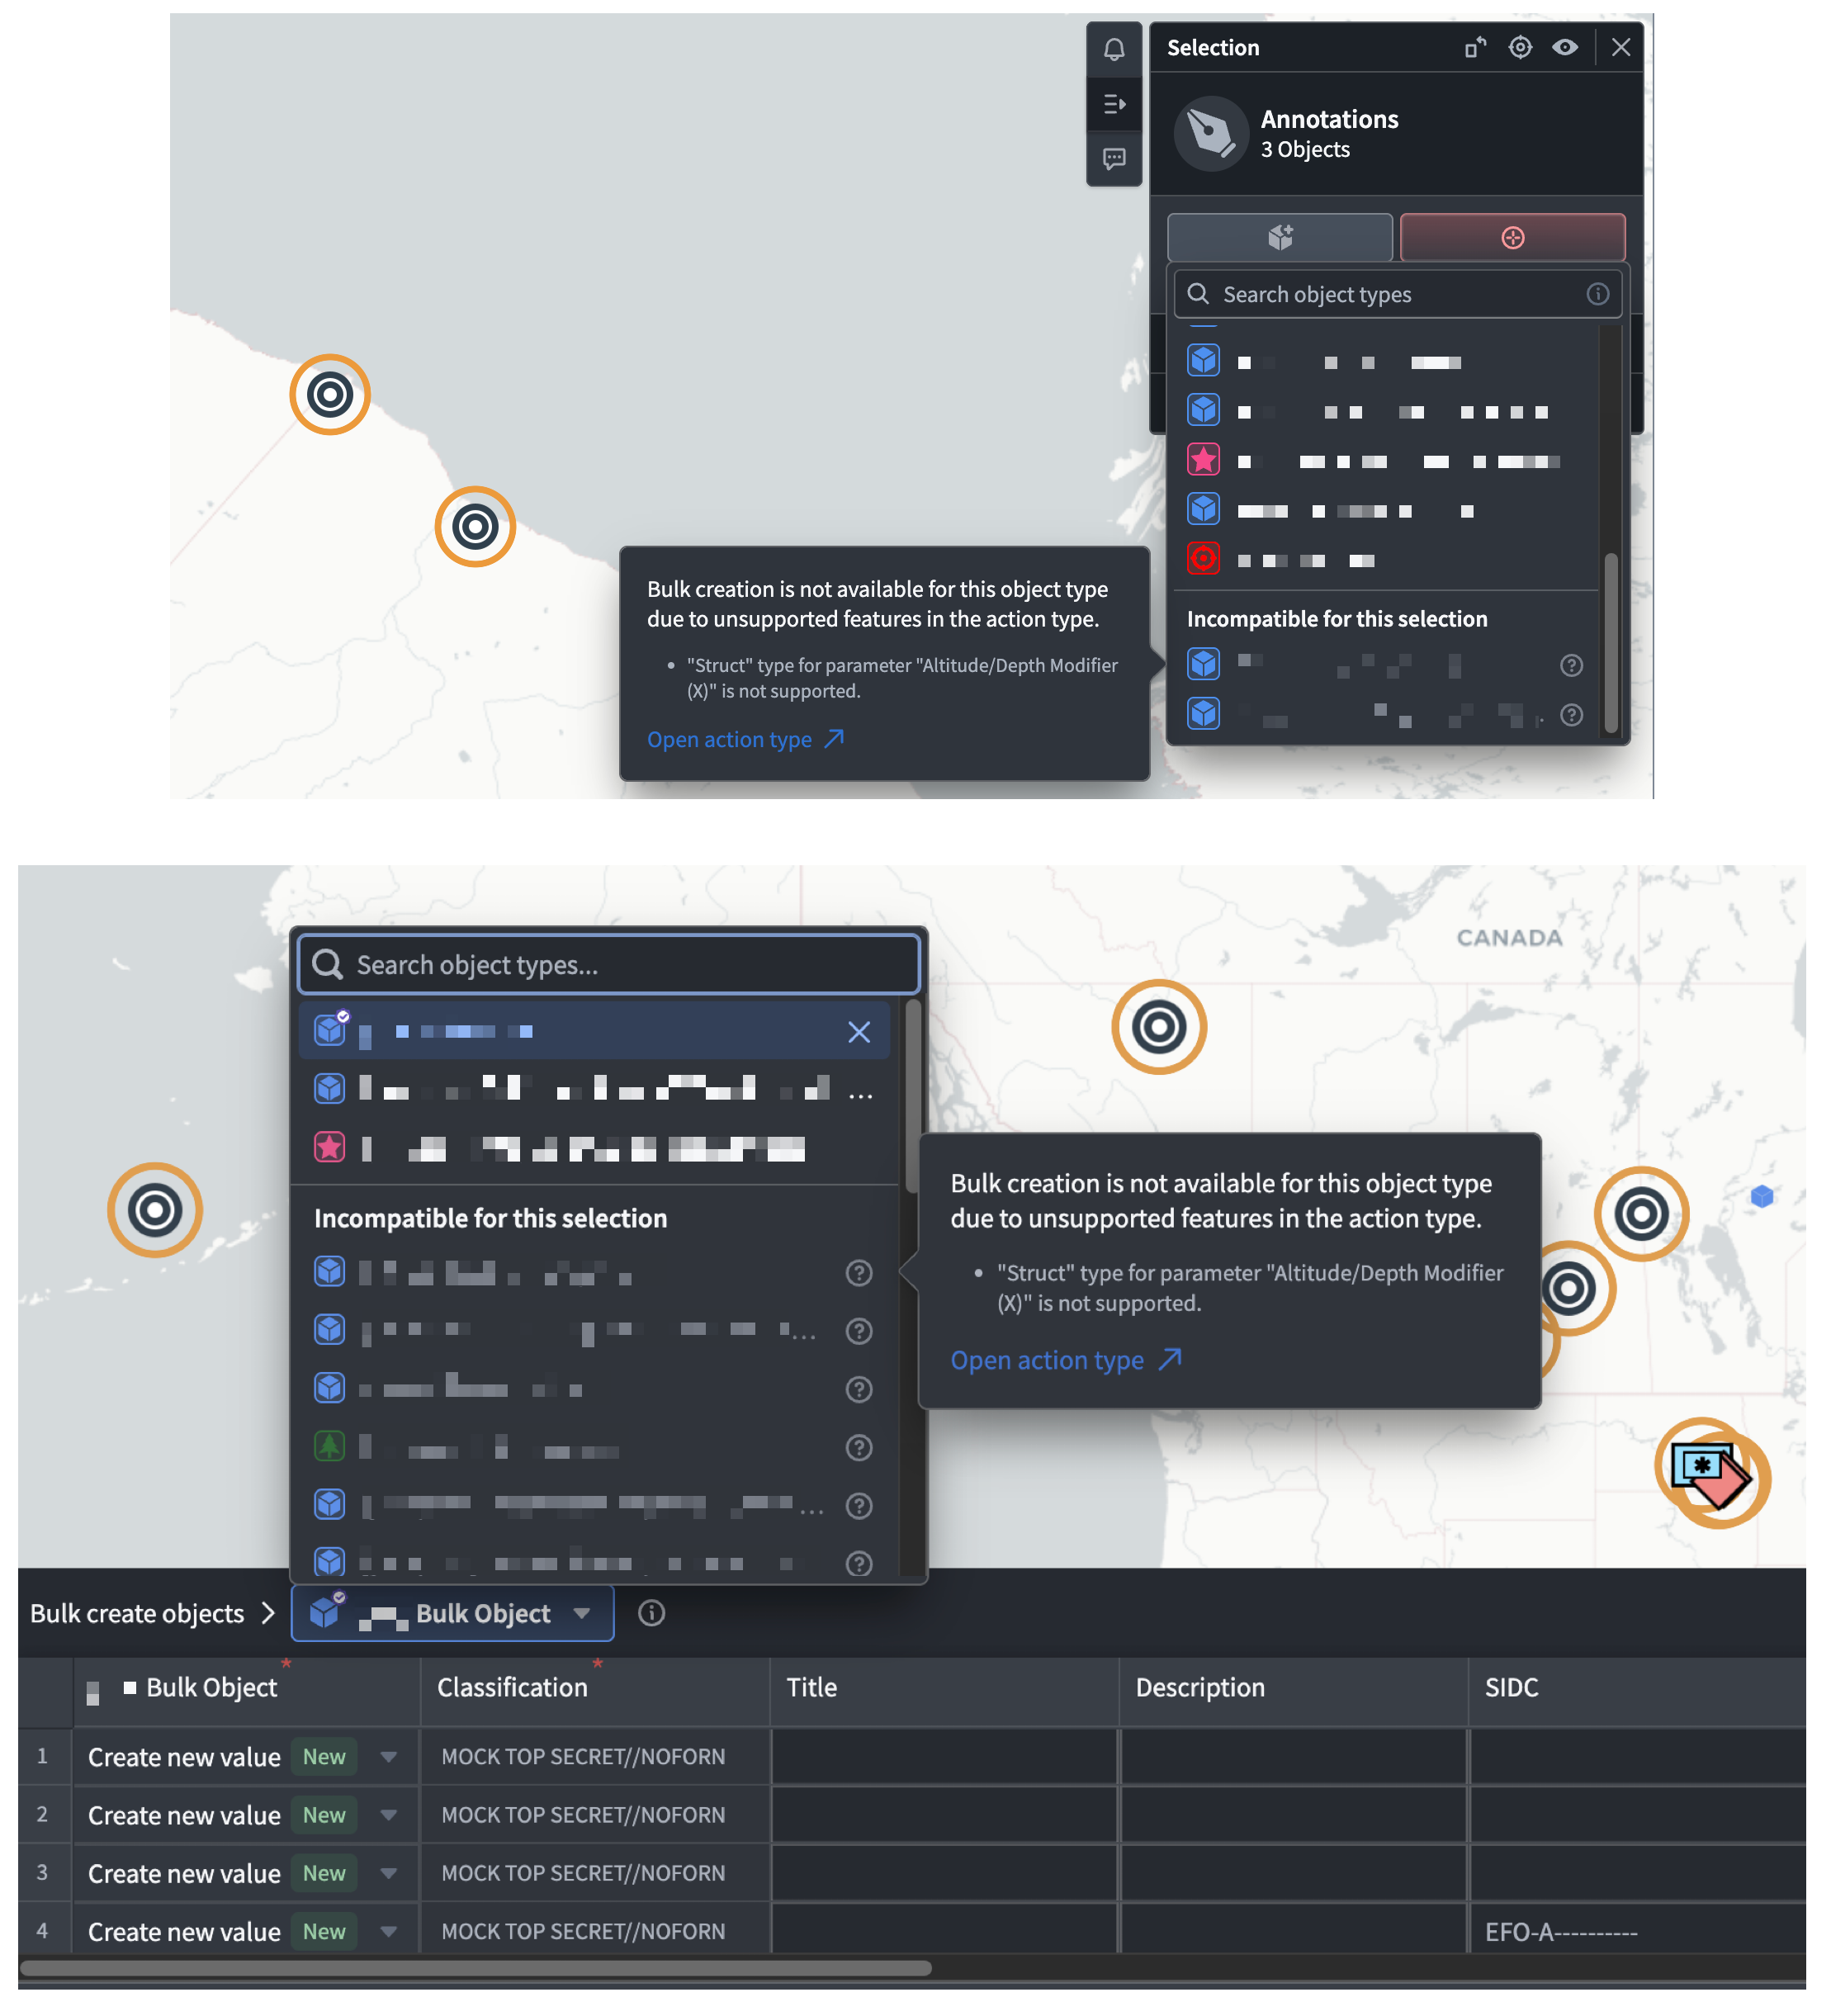
For an object type to appear as a promotion option, its action type must include the parameters from every interface that corresponds to your selection. For example, if your selection includes geopoints, geoshapes, and tactical graphics, your object's action type must contain at least the Geopoint, Geoshape, SIDC, and Symbol Anchor Point parameters from the respective interfaces.
Troubleshoot bulk object creation and promotion
The section below contains tips for troubleshooting errors that you may encounter when creating objects or promoting annotations in bulk.
The Bulk create button does not appear
If the Bulk create button does not appear in the bottom left of the Create shape or Create symbol window, then you should confirm that:
- You are working from Create object as opposed to Draw annotation mode.
- You have
Editpermissions on the map. - The selected object type implements at least one of the
Gaia Geopoint Creatable,Gaia Geoshape Creatable, orMILSTD 2525C Symbolinterfaces. - You have the appropriate permissions necessary to execute the action.
- The action to create the object does not contain a struct parameter. As an example, the
Speed Modifier (Z)andAltitude/Depth Modifierproperties on theMILSTD 2525C Symbolinterface are structs, so they are not supported in the bulk creation table.
If single-object creation is available but bulk creation is not after you verify the checks above, then contact Palantir Support to confirm that bulk object creation is enabled on your enrollment.
The Bulk create objects table reports that the tabular view is unavailable
This can occur if your Create action contains a rule or parameter type that the action table cannot represent. For example, an action with a struct parameter is not supported. Configure a separate Modify or create action that uses supported parameter types.
Gaia does not prefill geometry or symbol values
Verify that the object type's interface properties map to object properties and that the fulfilled action contains parameters for those properties. For tactical graphics, both SIDC and Symbol Anchor Points must belong to the same action. Next, verify the object type and action RIDs are registered in the Gaia admin application or Control Panel extension.
Gaia reports invalid or excess selections
Remove unsupported items from the table, such as folders, fragments, and non-annotation layers. If the selection exceeds 5,000 eligible items, use the provided deselection action or select a smaller group and submit it as a separate batch.
The action submits but the object does not appear on the map
First, confirm that the action created the objects by opening your object type in Insight and searching for one or multiple objects by their name or another property value. Next, check the destination layer on your map that contains objects of that object type before validating the map's and object type's security markings are compatible.
Submission fails without a clear cell error
Actions can enforce constraints that the table does not detect before submission. Check your action's required parameters, coordinate and geometry validity, marking limits, and validate your action permissions.