- Capabilities
- Getting started
- Architecture center
- Platform updates
Configure Code Workspaces compute profiles
Code Workspaces compute profiles let resource administrators standardize and limit the compute (CPU and memory) that code workspaces can use across an enrollment. You configure compute profiles from the Code Workspaces settings in Control Panel.
By default, compute profile management for code workspaces is disabled: when creating or configuring a workspace, a user can select CPU and memory up to the maximum available in the resource queue backing their project. When you turn on Compute profile management for Code Workspaces, the compute available to a workspace is instead determined by the compute profiles imported into its project. Managing profiles helps you standardize compute and control usage costs.
Enable compute profile management
- In Control Panel, select the Code Workspaces settings for your enrollment.
- Turn on Compute profile management for Code Workspaces.
- Choose the Default importable compute profile. Every user in the enrollment can import this profile into their projects when creating or configuring a code workspace. The default
Mediumprofile (up to 2 CPUs and 16 GB of memory) works for most lightweight code execution. - Save your changes.
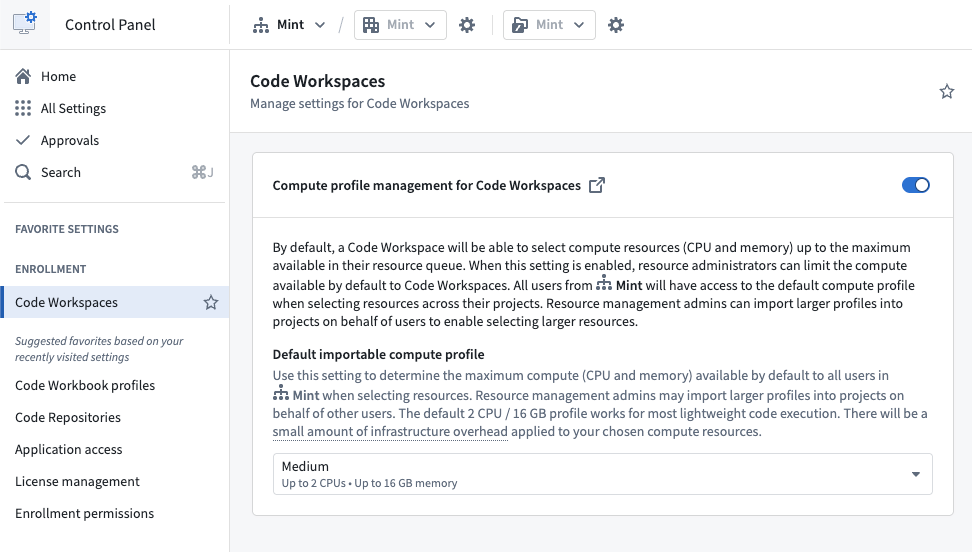
Turn on compute profile management and choose the default importable compute profile for the enrollment.
How compute profiles affect users
In a managed enrollment, users choose compute in two steps in the Advanced configuration section of the Configure and save dialog. The user first selects a compute profile, then allocates compute from within that profile.
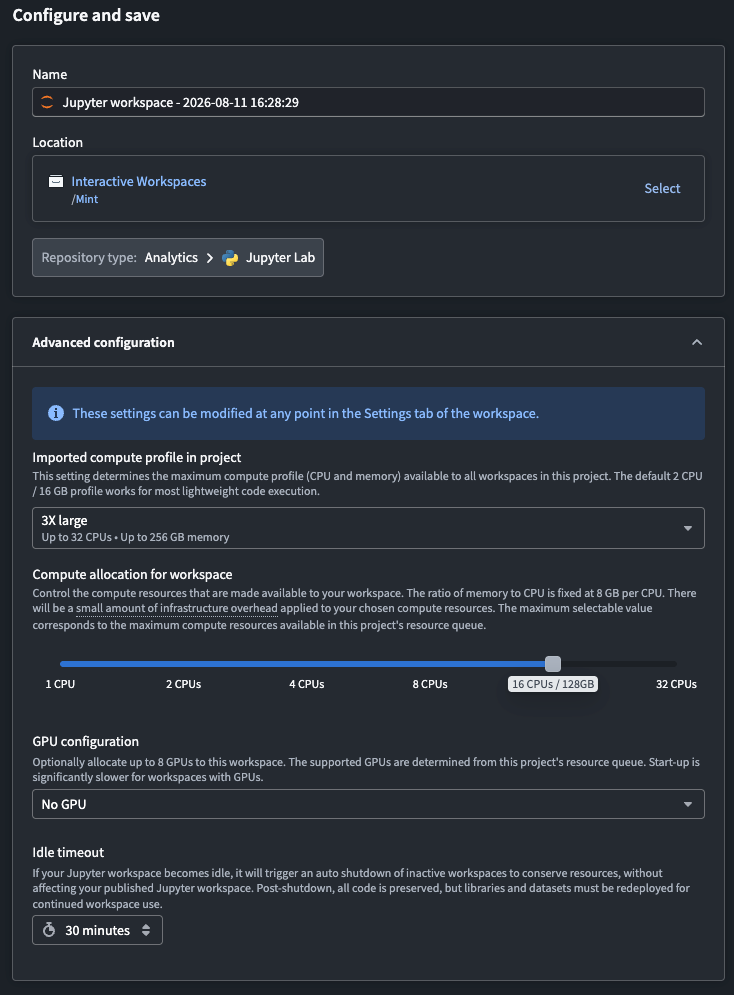
In a managed enrollment, the imported compute profile gates the Compute allocation for workspace slider.
Select a compute profile
The Imported compute profile in project dropdown menu sets the maximum compute available to the workspace. From the dropdown menu, the user can select:
- The largest profile already imported into the project. This profile is always selectable, because every code workspace in the project can use it.
- A larger profile that the user has permission to import. Users who are not resource administrators can import only the Default importable compute profile.
Allocate compute for the workspace
The Compute allocation for workspace slider sits below the dropdown menu and allocates a subset of the selected profile. It cannot exceed the profile chosen above, and compute remains bounded by the maximum available in the project's resource queue.
Grant larger compute for a project
To give a project more compute than the enrollment default, a resource administrator can import a larger profile into that project. Every code workspace in the project can then use compute up to that profile, regardless of who imported it. Review resource queues to understand the maximum compute available to a project.
Remove a compute profile from a project
To stop a project from using an imported profile:
- Open the project's References section, then select External references.
- Select the profile import you want to remove.
- Select Remove reference in the top right corner.
Learn more about project references.
Permissions
Turning on compute profile management, choosing the Default importable compute profile, and importing larger profiles into projects require the Resource management administrator role on the enrollment. See Configure access to learn how enrollment resource-management roles are granted.