Register an LLM using function interfaces
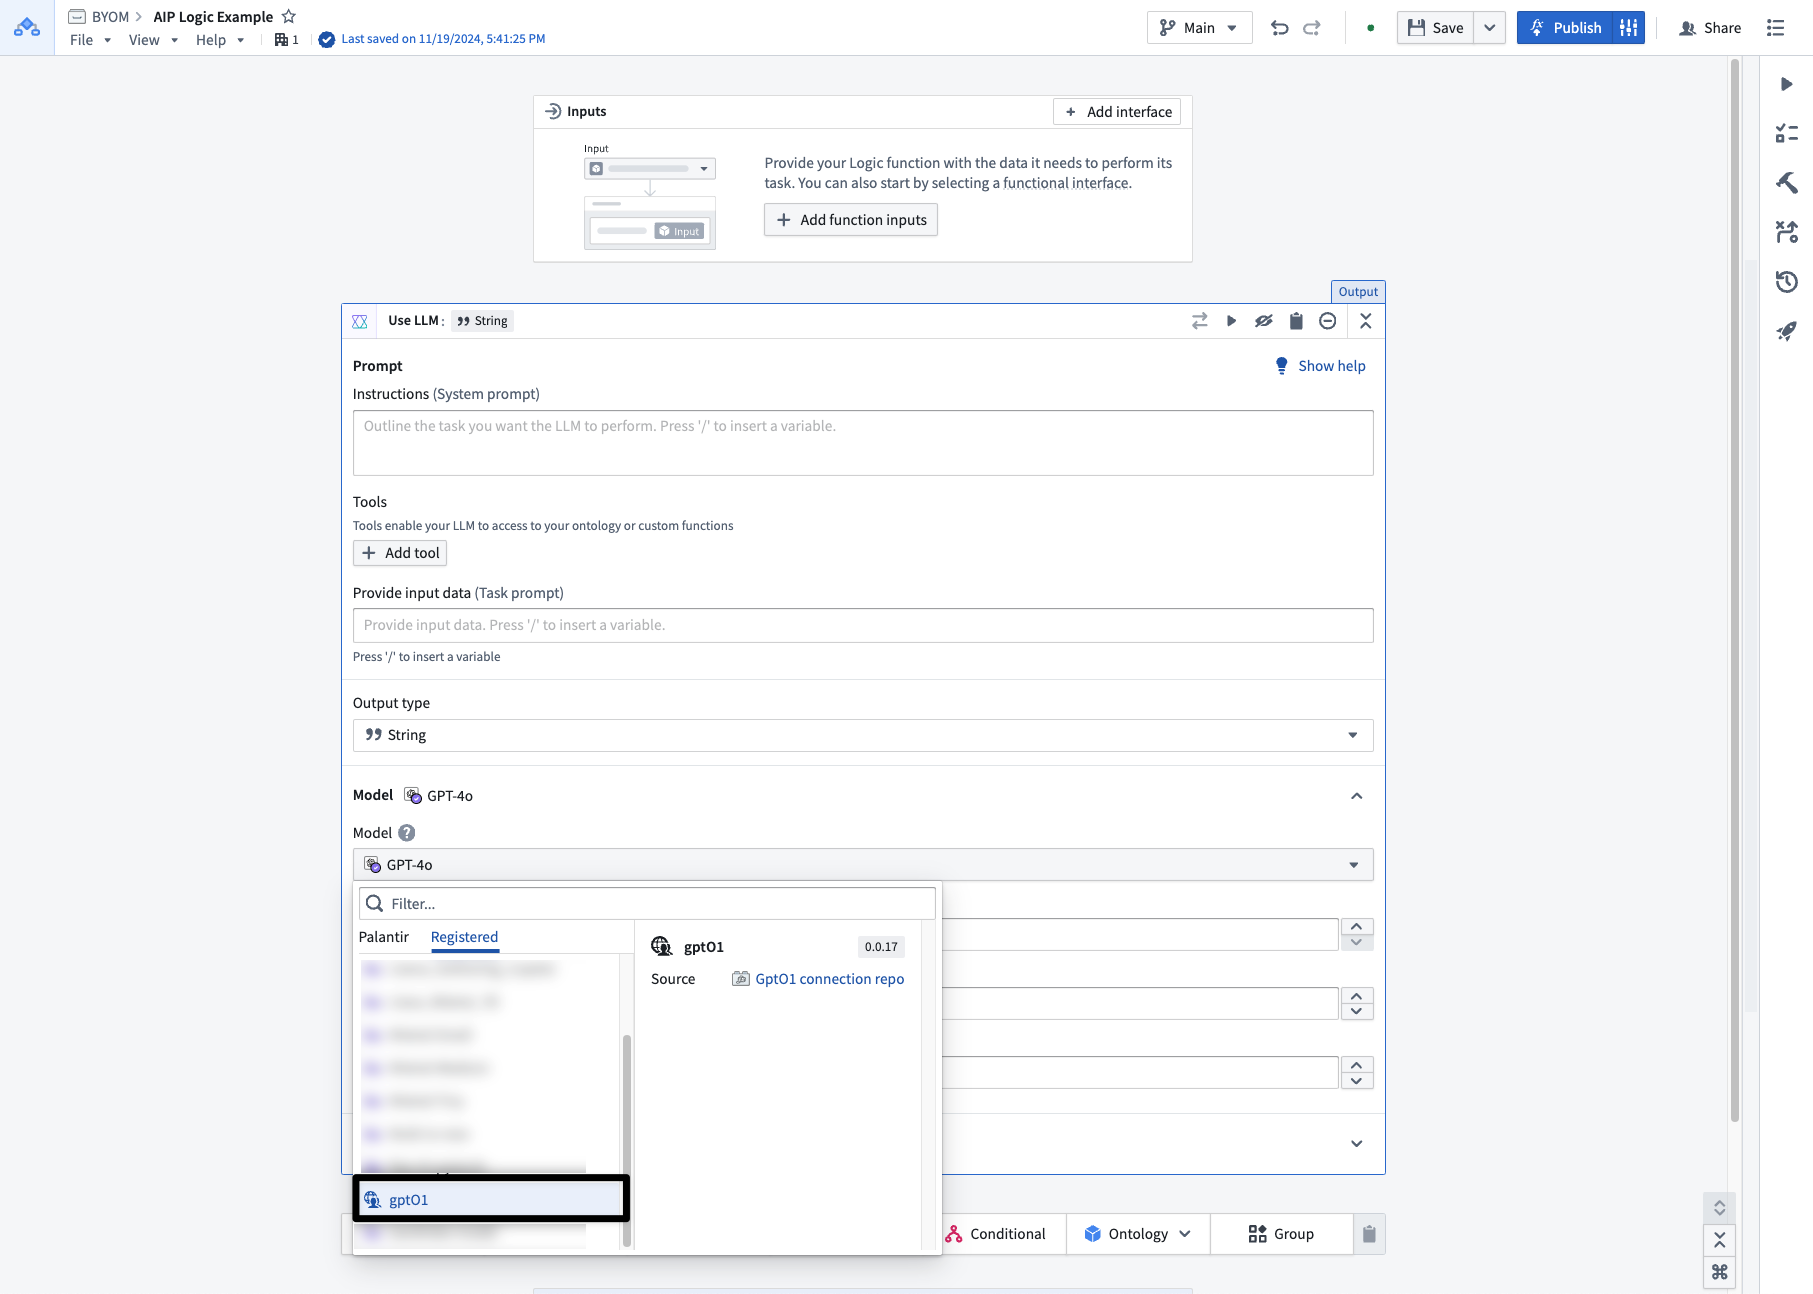
You can use your own LLMs in the Palantir platform using function interfaces. For example, you can bring your own fine-tuned model to use with AIP Logic, enabling more flexibility and choice for users. Function interfaces enable you to register and use LLMs whether they are hosted on-premise, hosted on your own cloud, or fine-tuned on another platform.
There are currently two ways to build a custom connection to OpenAI:
- Webhook: You can create a webhook and call it directly from your TypeScript repository. This tutorial follows this method.
- Direct source: You can create a REST API source in Data Connection and make a fetch call from your TypeScript function.
This tutorial explains how to create a source to define your LLM’s API endpoint, call the model from a TypeScript function using a webhook, and publish the function for use in the Palantir platform (for instance, with AIP Logic or Pipeline Builder).
Prerequisites
- Familiarize yourself with how to set up Data Connection sources and network policies to understand how to connect your specific LLM endpoint to Foundry.
- We recommend understanding at least the basics of writing TypeScript functions in Foundry. You can learn more in the guide to getting started with functions.
Tutorial overview
In this tutorial, you will write a TypeScript function that calls an external OpenAI model via a webhook, implements the ChatCompletion function interface, and registers the model in Foundry. Completing the tutorial will allow you to use the custom LLM API natively in AIP Logic.
- Set up REST source and webhook.
- Implement the
ChatCompletioninterface with a TypeScript function.- Create a TypeScript code repository in which you will author a function that implements the function interface.
- Import the following resources into your repository:
- The OpenAI source and associated webhook
- The
ChatCompletionfunction interface
- Author a TypeScript function that is decorated with the
@ChatCompletionfunction interface and calls out to your source. - Save and publish your function.
- Your function will now enable you to use your registered LLM in AIP Logic.
Set up REST source and webhook
To maintain platform security, you need to register the call to OpenAI as a webhook using the Data Connection application. The steps below describe how to set up a REST API source and webhook with Data Connection.
Learn more about how to create a webhook and use it in a TypeScript function.
Set up source
-
Open the Data Connection application.
-
Select New Source.
-
Search for
REST API. -
Under Protocol sources, select REST API.
-
On the Connect to your data source page, select Foundry worker.
-
Name your source and save the source in a folder. This example uses the source name
MyOpenAI. -
Under Connection details, perform the following steps:
- Set the domain base URL to
https://api.openai.comand set Authentication to Bearer token. Learn more about OpenAI APIs. ↗. - Follow OpenAI's instructions ↗ to create an API key ↗.
- Copy-paste the newly-created API key into the Bearer token field in Data Connection.
- Set the port to
443. - Create an additional secret called
APIKeyand paste the same API key used for the bearer token field. - Add
https://api.openai.comto the allowlist for network egress between Palantir's managed SaaS platform and external domains. You can do this by navigating to Network connectivity and choosing Request and self-approve new policy.- If you do not have permissions for this step, contact your Palantir representative.
- Set the domain base URL to
-
You must enable Export configurations to use this API endpoint in platform applications like AIP Logic and Pipeline Builder. To enable Export configurations, toggle these options:
- AIP Logic: Toggle on Enable exports to this source without markings validations; this will enable you to use your LLM in AIP Logic.
- Pipeline Builder: Toggle on Enable exports to this source; this will enable you to use your LLM in Pipeline Builder. Note that this feature is currently in a beta phase of development and may not be available on your enrollment.
-
You must Enable code imports to use this endpoint in your function.
- Toggle on Allow this source to be imported into code repositories.
- Toggle on Allow this source to be imported into pipelines.
-
Select Continue and Get started to complete your API endpoint and egress setup.
Add webhooks to source
-
On the Source overview page, select Create webhook.
-
Save your webhook with the name
Create Chat Completionand API nameCreateChatCompletion. -
Import the example curl from the OpenAI Create chat completion documentation ↗.
-
Configure the
messagesandmodelinput parameters as in the example below.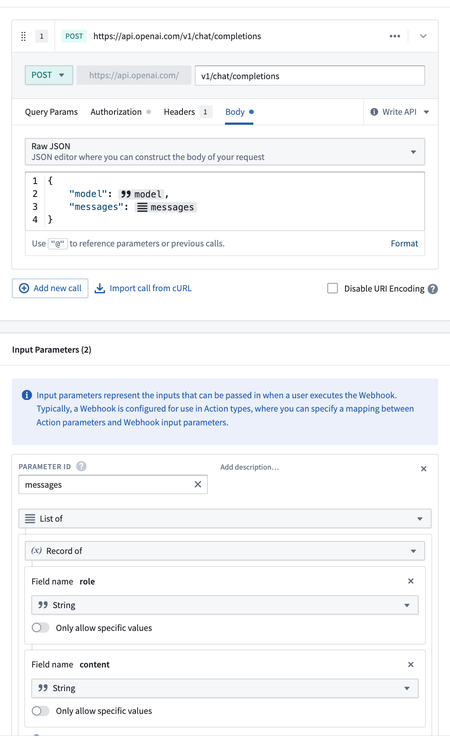
-
Configure the
choicesandusageoutput parameters as in the example below.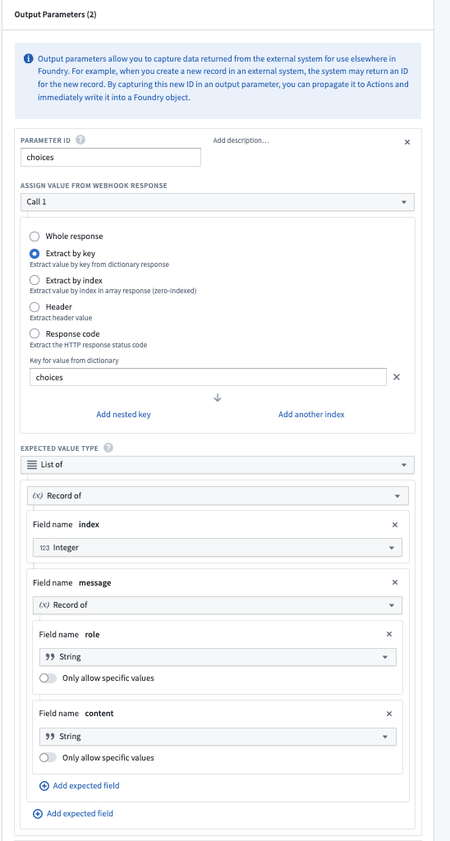
-
Test and save your webhook.
Now you have a REST source and a webhook that you can import into your TypeScript repository.
Implement the ChatCompletion interface with a TypeScript function
After setting up a webhook that retrieves a chat completion from an external LLM, you can create a function that implements the ChatCompletion interface provided by Foundry and calls out to your OpenAI webhook.
AIP Logic searches for all functions which implement the ChatCompletion interface when displaying registered models, so you must declare that your function implements this interface. Additionally, declaring that your function implements this interface enforces at compile-time that the signature matches the expected shape.
You can write your chat completion implementation in TypeScript. To do so, you will need to create a new TypeScript functions repository.
This example function will:
- Make a call to the previously-created OpenAI webhook.
- Implement the chat completion interface.
Import webhook and interface into a TypeScript repository
This tutorial assumes a basic understanding of writing TypeScript functions in Foundry. Review the getting started guide for an introduction to TypeScript functions in Foundry.
To start, you will need to import both the OpenAI webhook and the ChatCompletion function interface into the repository. With the TypeScript functions repository open, select the resource imports icon and import both the chat completion function interface and the OpenAI source which is associated with the webhook you previously created.
-
Use the Add option in the Resource imports side panel to import:
-
The
OpenAIRest API Source that contains theCreateChatCompletionwebhook -
The
ChatCompletionfunction interface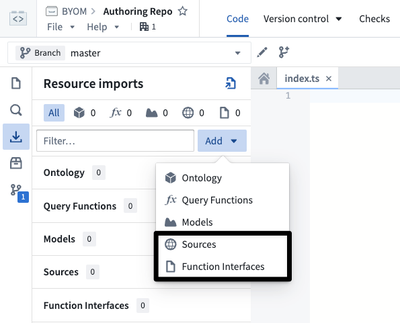
-
-
In the Resource imports panel, search for the
OpenAIsource that contains theCreateChatCompletionwebhook and import it into your TypeScript repository. Learn more about how to import resources into Code Repositories.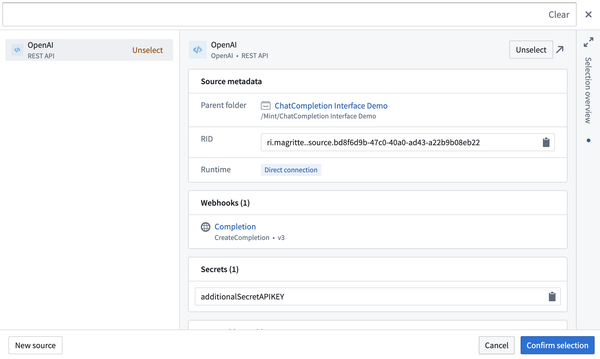
-
In the Resource imports panel, search for the
ChatCompletioninterface and import it into your TypeScript repository.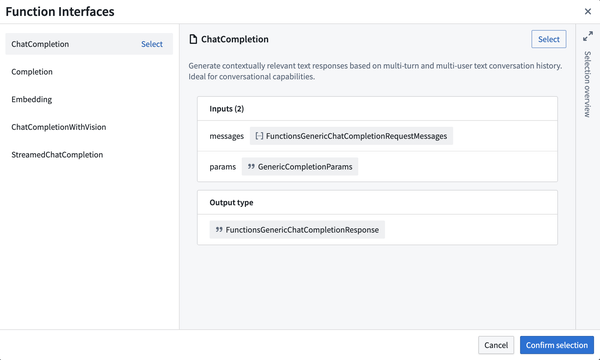
At this point, your Resource imports should include both the OpenAI source and ChatCompletion interface as seen in the following image.
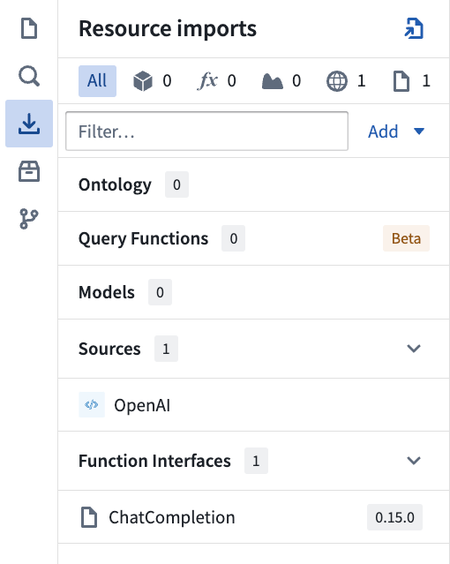
After importing resources, the Task Runner will re-run a localDev task that generates the relevant code bindings. You can check on the progress of this task by opening the Task Runner tab on the ribbon at the bottom of the page.
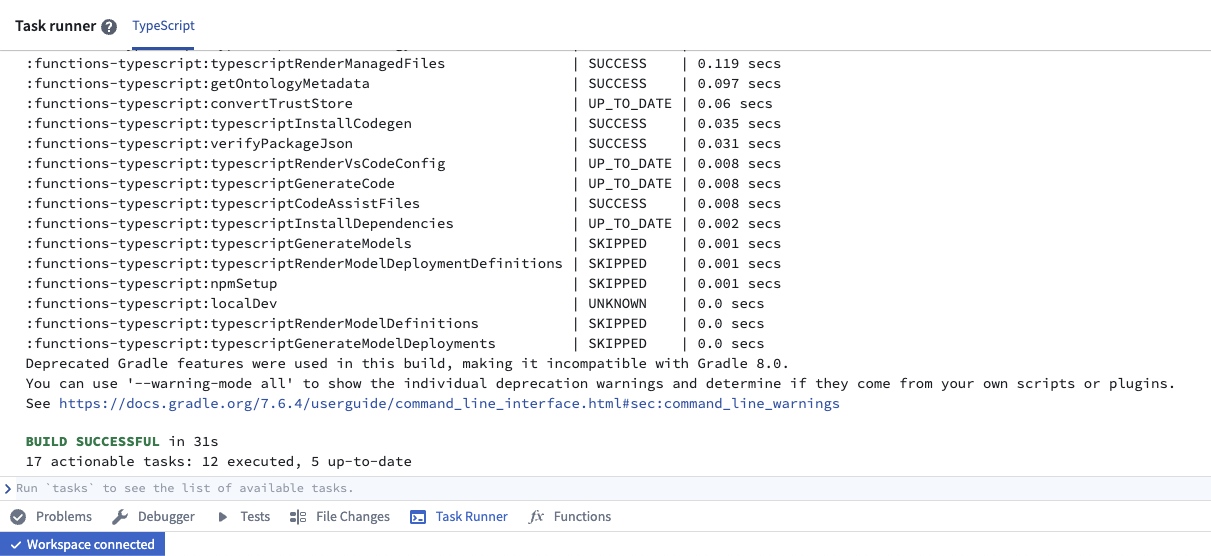
Write a TypeScript function
In this section, you will write a TypeScript function that calls the previously-created OpenAI webhook and implements the chat completion interface.
Implement function scaffolding
Importing both the CreateChatCompletion webhook (via the OpenAI source) and the ChatCompletion function interface will generate code bindings to interact with those resources.
You can find code snippets to set up your function scaffolding by selecting the ChatCompletion function interface in the Resource imports panel.
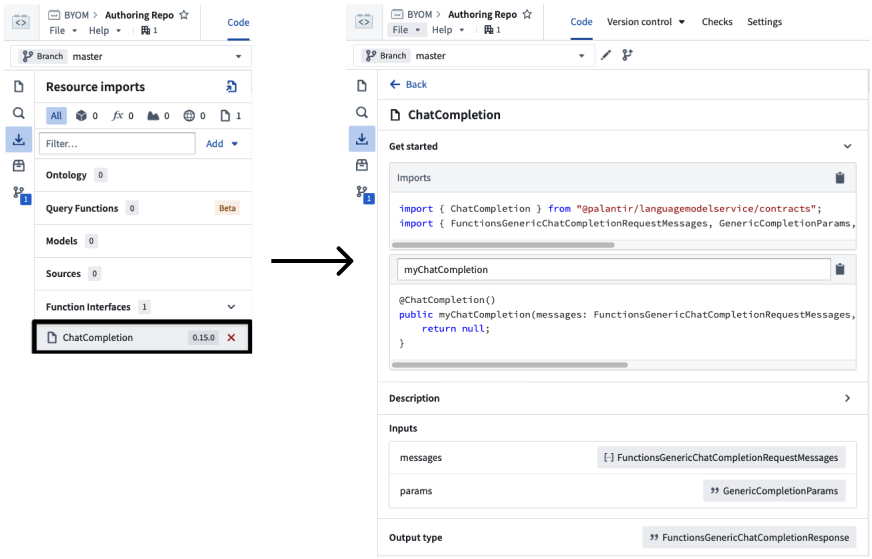
The following is an example of what your code might look like at this point:
Copied!1 2 3 4 5 6 7 8 9 10 11 12 13 14 15 16 17 18// index.ts import { ChatCompletion } from "@palantir/languagemodelservice/contracts"; import { FunctionsGenericChatCompletionRequestMessages, GenericCompletionParams, FunctionsGenericChatCompletionResponse } from "@palantir/languagemodelservice/api"; import { OpenAI } from "@foundry/external-systems/sources"; // This decorator tells the compiler and Foundry that our function is implementing the ChatCompletion interface. // Note that the generic @Function decorator is not required. @ChatCompletion() public myFunction( messages: FunctionsGenericChatCompletionRequestMessages, params: GenericCompletionParams, ): FunctionsGenericChatCompletionResponse { // TODO: Implement the body }
Implement function body
This section contains the simplest implementation of this function that completes the request.
Copied!1 2 3 4 5 6 7 8 9 10 11 12 13 14 15 16 17 18 19 20 21 22 23 24 25 26 27 28 29 30 31 32 33 34 35 36 37 38 39 40 41 42 43 44 45 46 47 48 49 50 51 52 53 54 55 56 57import { isErr, UserFacingError } from "@foundry/functions-api"; import { OpenAI } from "@foundry/external-systems/sources"; import { ChatCompletion } from "@palantir/languagemodelservice/contracts"; import { ChatMessageRole, FunctionsGenericChatCompletionRequestMessages, FunctionsGenericChatCompletionResponse, GenericChatMessage, GenericCompletionParams, } from "@palantir/languagemodelservice/api"; export class MyFunctions { @ChatCompletion() public async myFunction( messages: FunctionsGenericChatCompletionRequestMessages, params: GenericCompletionParams ): Promise<FunctionsGenericChatCompletionResponse> { const res = await OpenAI.webhooks.CreateChatCompletion.call({ model: "gpt-4o", messages: convertToWebhookList(messages), }); if (isErr(res)) { throw new UserFacingError("Error from OpenAI."); } return { completion: res.value.output.choices[0].message.content ?? "No response from OpenAI.", tokenUsage: { promptTokens: res.value.output.usage.prompt_tokens, maxTokens: res.value.output.usage.total_tokens, completionTokens: res.value.output.usage.completion_tokens, }, } } } function convertToWebhookList( messages: FunctionsGenericChatCompletionRequestMessages, ): Array<{ role: string; content: string; }> { return messages.map((genericChatMessage: GenericChatMessage) => { return { role: convertRole(genericChatMessage.role), content: genericChatMessage.content }; }); } function convertRole(role: ChatMessageRole): "system" | "user" | "assistant" { switch (role) { case "SYSTEM": return "system"; case "USER": return "user"; case "ASSISTANT": return "assistant"; default: throw new Error(`Unsupported role: ${role}`); } }
Testing
You can now test your function by selecting the Functions tab from the bottom toolbar, which will open a preview panel. Select Published, choose your function, and select the option for providing your input as JSON.
You can test with a message such as:
Copied!1 2 3 4 5 6 7 8{ "messages": [ { "role": "USER", "content": "hello world" } ] }