- Capabilities
- Getting started
- Architecture center
- Platform updates
Set up a source
A Foundry source represents a connection between Foundry and an external system. Some example Foundry source types include a Postgres database, an S3 bucket, a filesystem on a Linux server, an SAP instance, or a REST API over the Internet.
At a high level, below are the steps required to connect a source to Foundry. Note that Step 1 through Step 3 may require you to change or validate configurations within your existing architecture:
- Ensure there is a valid network connection between the source and Foundry.
- Provision valid credentials for Foundry to authenticate against the source.
- For legacy agent worker sources only: ensure the agent has the appropriate drivers to access the external system.
- Finally, create the source in Data Connection.
Once you have this source connection established, you can configure syncs to bring specific sets of data into Foundry. Syncs can be entirely configured through the Data Connection UI, so the source setup is the final task that may require configurations to be updated in your organization's environment before you can access your data within Foundry.
Configure network access
To connect Foundry to an external system, first validate network paths:
- External systems hosted in the same network as and accepting inbound connections from Foundry requires a single valid network connection from Foundry to the external system. For cloud-hosted instances of Foundry, this is typically the case for cloud-based systems or SaaS services.
- External systems hosted in a separate network from Foundry must use an agent with two valid network paths: (1) from the agent host to the external system and (2) from the agent host to Foundry. For cloud-hosted instances of Foundry, a separate network usually means an on-premise network.
(Optional) Set up an agent and configure agent connectivity
You will need to set up an agent if the external system you are connecting to is hosted on a separate network from Foundry's network.
With Foundry worker and agent proxy policies, the agent is used as a networking proxy only and compute runs in Foundry. Legacy agent worker sources use the agent for both networking and compute; see Foundry worker vs. agent worker.
Ensure there is a connection between an agent set up within your network and the external system. The agent acts as a single point of validated entry to Foundry from your network and will handle the process of reading and sending data on to the Foundry instance. For each new system, you will only need to confirm there is a valid connection between the agent and the new system.
You will not need to establish direct network egress from the external system to Foundry, as traffic only flows from the agent to Foundry and from the agent to the external system. Learn more about the architecture of data connection.
The steps required to establish this connection will vary depending on your organizational network settings. Regardless of your specific setup, the goal is for the agent to have the ability to connect to the external system. This could involve the configuration of egress settings on the agent host, ingress settings on the external system, firewall rules across the network, proxy settings on the agent, adding source system certificates to the agent truststore, and so on.
If you need to configure proxy settings for the agent to reach the external system, you can do this through Data Connection.
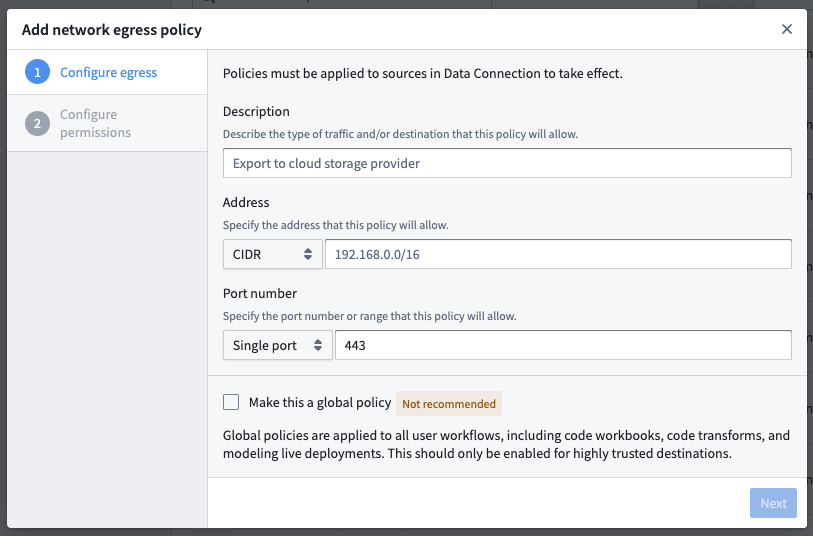
Configure a network policy
You must have the Information security officer role on your enrollment to configure network egress. If you do not have permissions to configure egress, contact your Palantir administrator to request access.
You can find the Information security officer role in the Enrollment permissions section of Control Panel. A user must have the Enrollment administrator role to view this section.
Foundry worker sources additionally require network egress policies to route the traffic.
To configure a network policy, navigate to the Network egress section in Control Panel. Pick a direct connection policy if the external system you are connecting to is hosted in the same network than Foundry. Pick an agent proxy egress policy if the source you are connecting to is in a separate network from Foundry.
If you are unable to view the Network egress section, contact your Palantir administrator to set up the network policy.
Provision credentials
For most cases, Foundry will require authorized credentials (such as a username and password) to access external systems. We recommend using a dedicated service account with credentials scoped specifically for the required access in Foundry.
Provision a service account for the source following any internal guidelines and processes that your organization has for establishing service accounts. Note the credentials before proceeding to the next step.
Create the source in Data Connection
Once the above steps are done, you can proceed with creating the source in Data Connection:
- After logging in, navigate to Data Connection using the sidebar.
- Select the Sources tab.
- Select New source in the top-right.
- Select the source type corresponding to your data source.
- Select Continue in the bottom right. The source is configured to run on a Foundry worker. For existing agent worker sources, see the agent worker configuration reference.
Save the source in a Project
Next, name your source and choose a Project to place it in. We generally recommend creating a new Project for each source, as this provides the most natural way to permission datasets derived from this source.
You can read more about source permission best practices or consult the full guidance for how to structure data pipelines end-to-end in Foundry.
Select Create source and continue in the bottom-right.
Choose your network policy [Foundry worker]
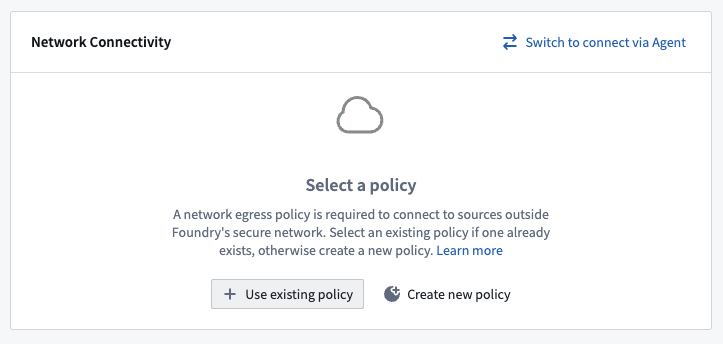
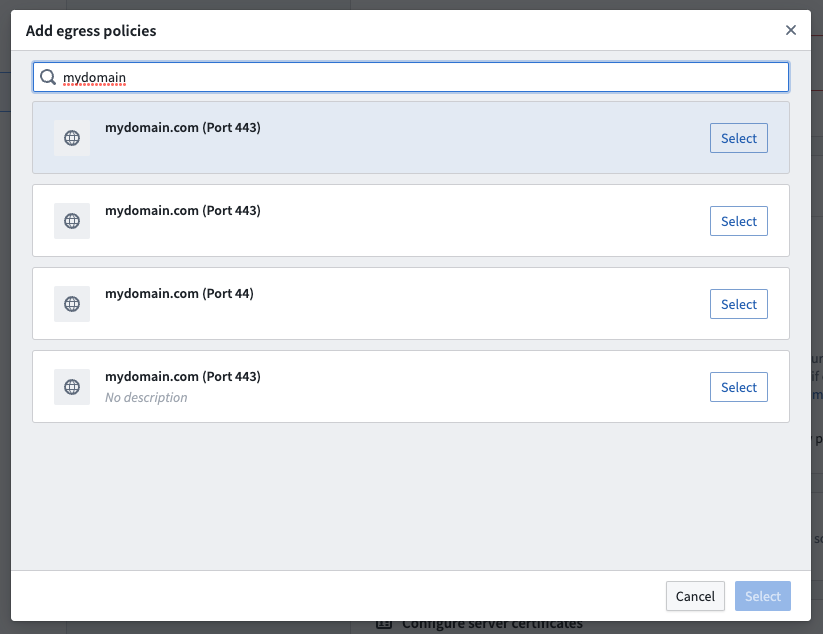
On the next setup page, select the network policy you configured earlier by choosing Use existing policy and searching for the policy name.
Configure source
Add details about how to connect to your source. These will depend on the source type you are using and typically consist of basic credentials such as connection URLs, cloud provider regions, and so on.
(Optional) Add JDBC drivers
JDBC sources may require you to upload JDBC drivers, then specifying which Java class from the driver should be used.
(Optional) Add certificates
External systems might require certificates to ensure the connection can be trusted. This would occur for the following:
- Systems using TLS with self-signed certificates, for which you will need to add server certificates.
- Systems using mTLS which require the Foundry client to prove its identity with a client certificate.
To understand whether to add server or client certificates, see Server and client certificates.
For Foundry worker connections, add certificates on to the source itself using the following steps:
- Expand the Certificates card to view the certificates selected on the source.
- Select Add certificate (or Create new certificate first if you have not configured the certificate).
- Select the client certificates and server certificate bundles to attach to the source.
Review the egress certificate configuration documentation for more information.
Select Configure server certificates (legacy) or Configure client certificates and private key (legacy) at the bottom of the Connection details page under More options to configure sources you have created with legacy certificates.
Add credentials
Add the credentials you provisioned previously to allow the source to connect to your data.
Save and continue
Select Save in the bottom-right to complete setting up your source. Once your source is fully set up, you can proceed to set up a sync to bring data into Foundry.
Troubleshooting
To confirm the connection has been established, select Preview in the right panel of the source page.
If the source does not work as expected, see Troubleshooting for the available debugging tools — including the source terminal and network egress logs — and guidance on connectivity and certificate issues. For sync-specific problems, see the syncs troubleshooting reference; if you are using an agent worker, see the agents troubleshooting reference.