- Capabilities
- Getting started
- Architecture center
- Platform updates
Getting started
Note that this tutorial is intended as an illustrative example. Since the Foundry Ontology is customized to your needs and data, you may not have access to the same ontology resources to complete the tutorial as written.
This tutorial is intended for new Workshop builders and walks through the configuration of a simple Workshop module. Concepts covered below will include creating a new module, configuring widgets like the Object Table, Filter List, and Object View, and enabling writeback through an Action-backed Button Group widget.
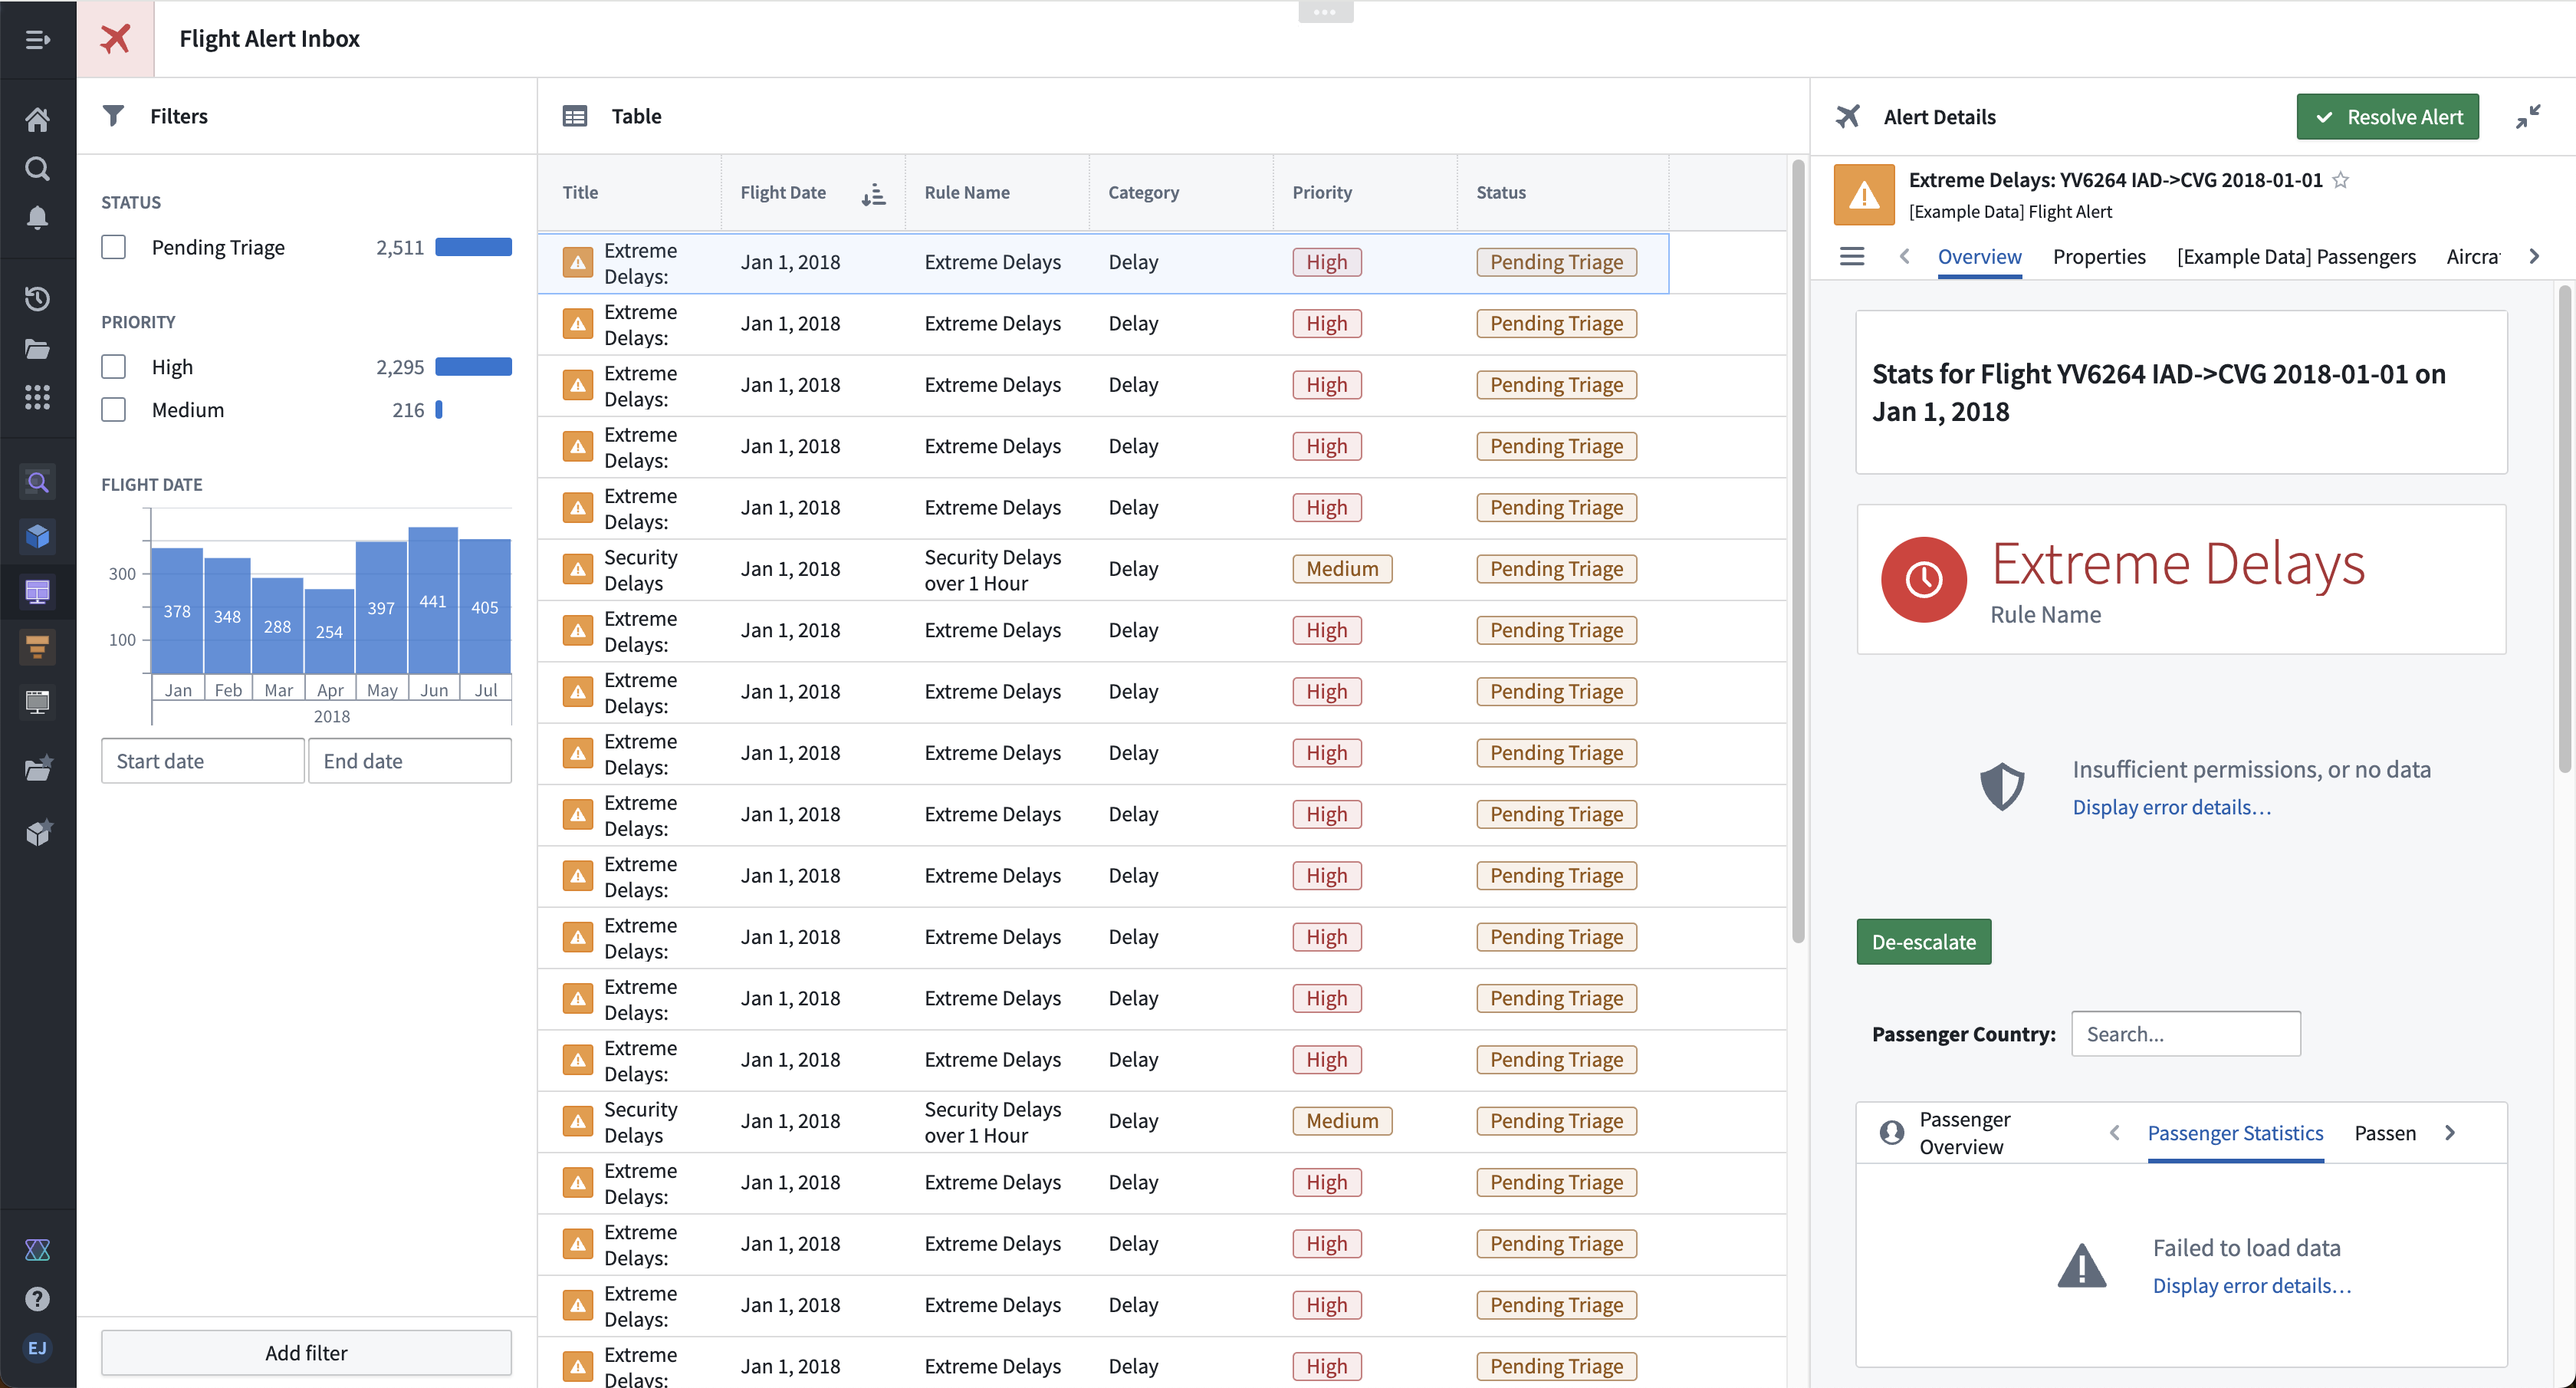
In this example storyline, our aim is to build a “Flight Alert Inbox” that surfaces potential flight delays and cancellations and presents a user with options to easily understand and take action on these alerts. Our target user is an airline supervisor who needs to track these alerts in real time, prioritize which alerts require response next, and resolve alerts quickly.
The image below shows the end result of this tutorial:
Get started and build your first application with the course on learn.palantir.com ↗.
Part I: Initial setup
- To create a new module, open Projects & Files from the left workspace navigation panel, then find your desired Project or folder. Once there, select New > Workshop module in the top right to create a new module within the current Project or folder. The new module will inherit the permission of the Project or folder in which it is created.
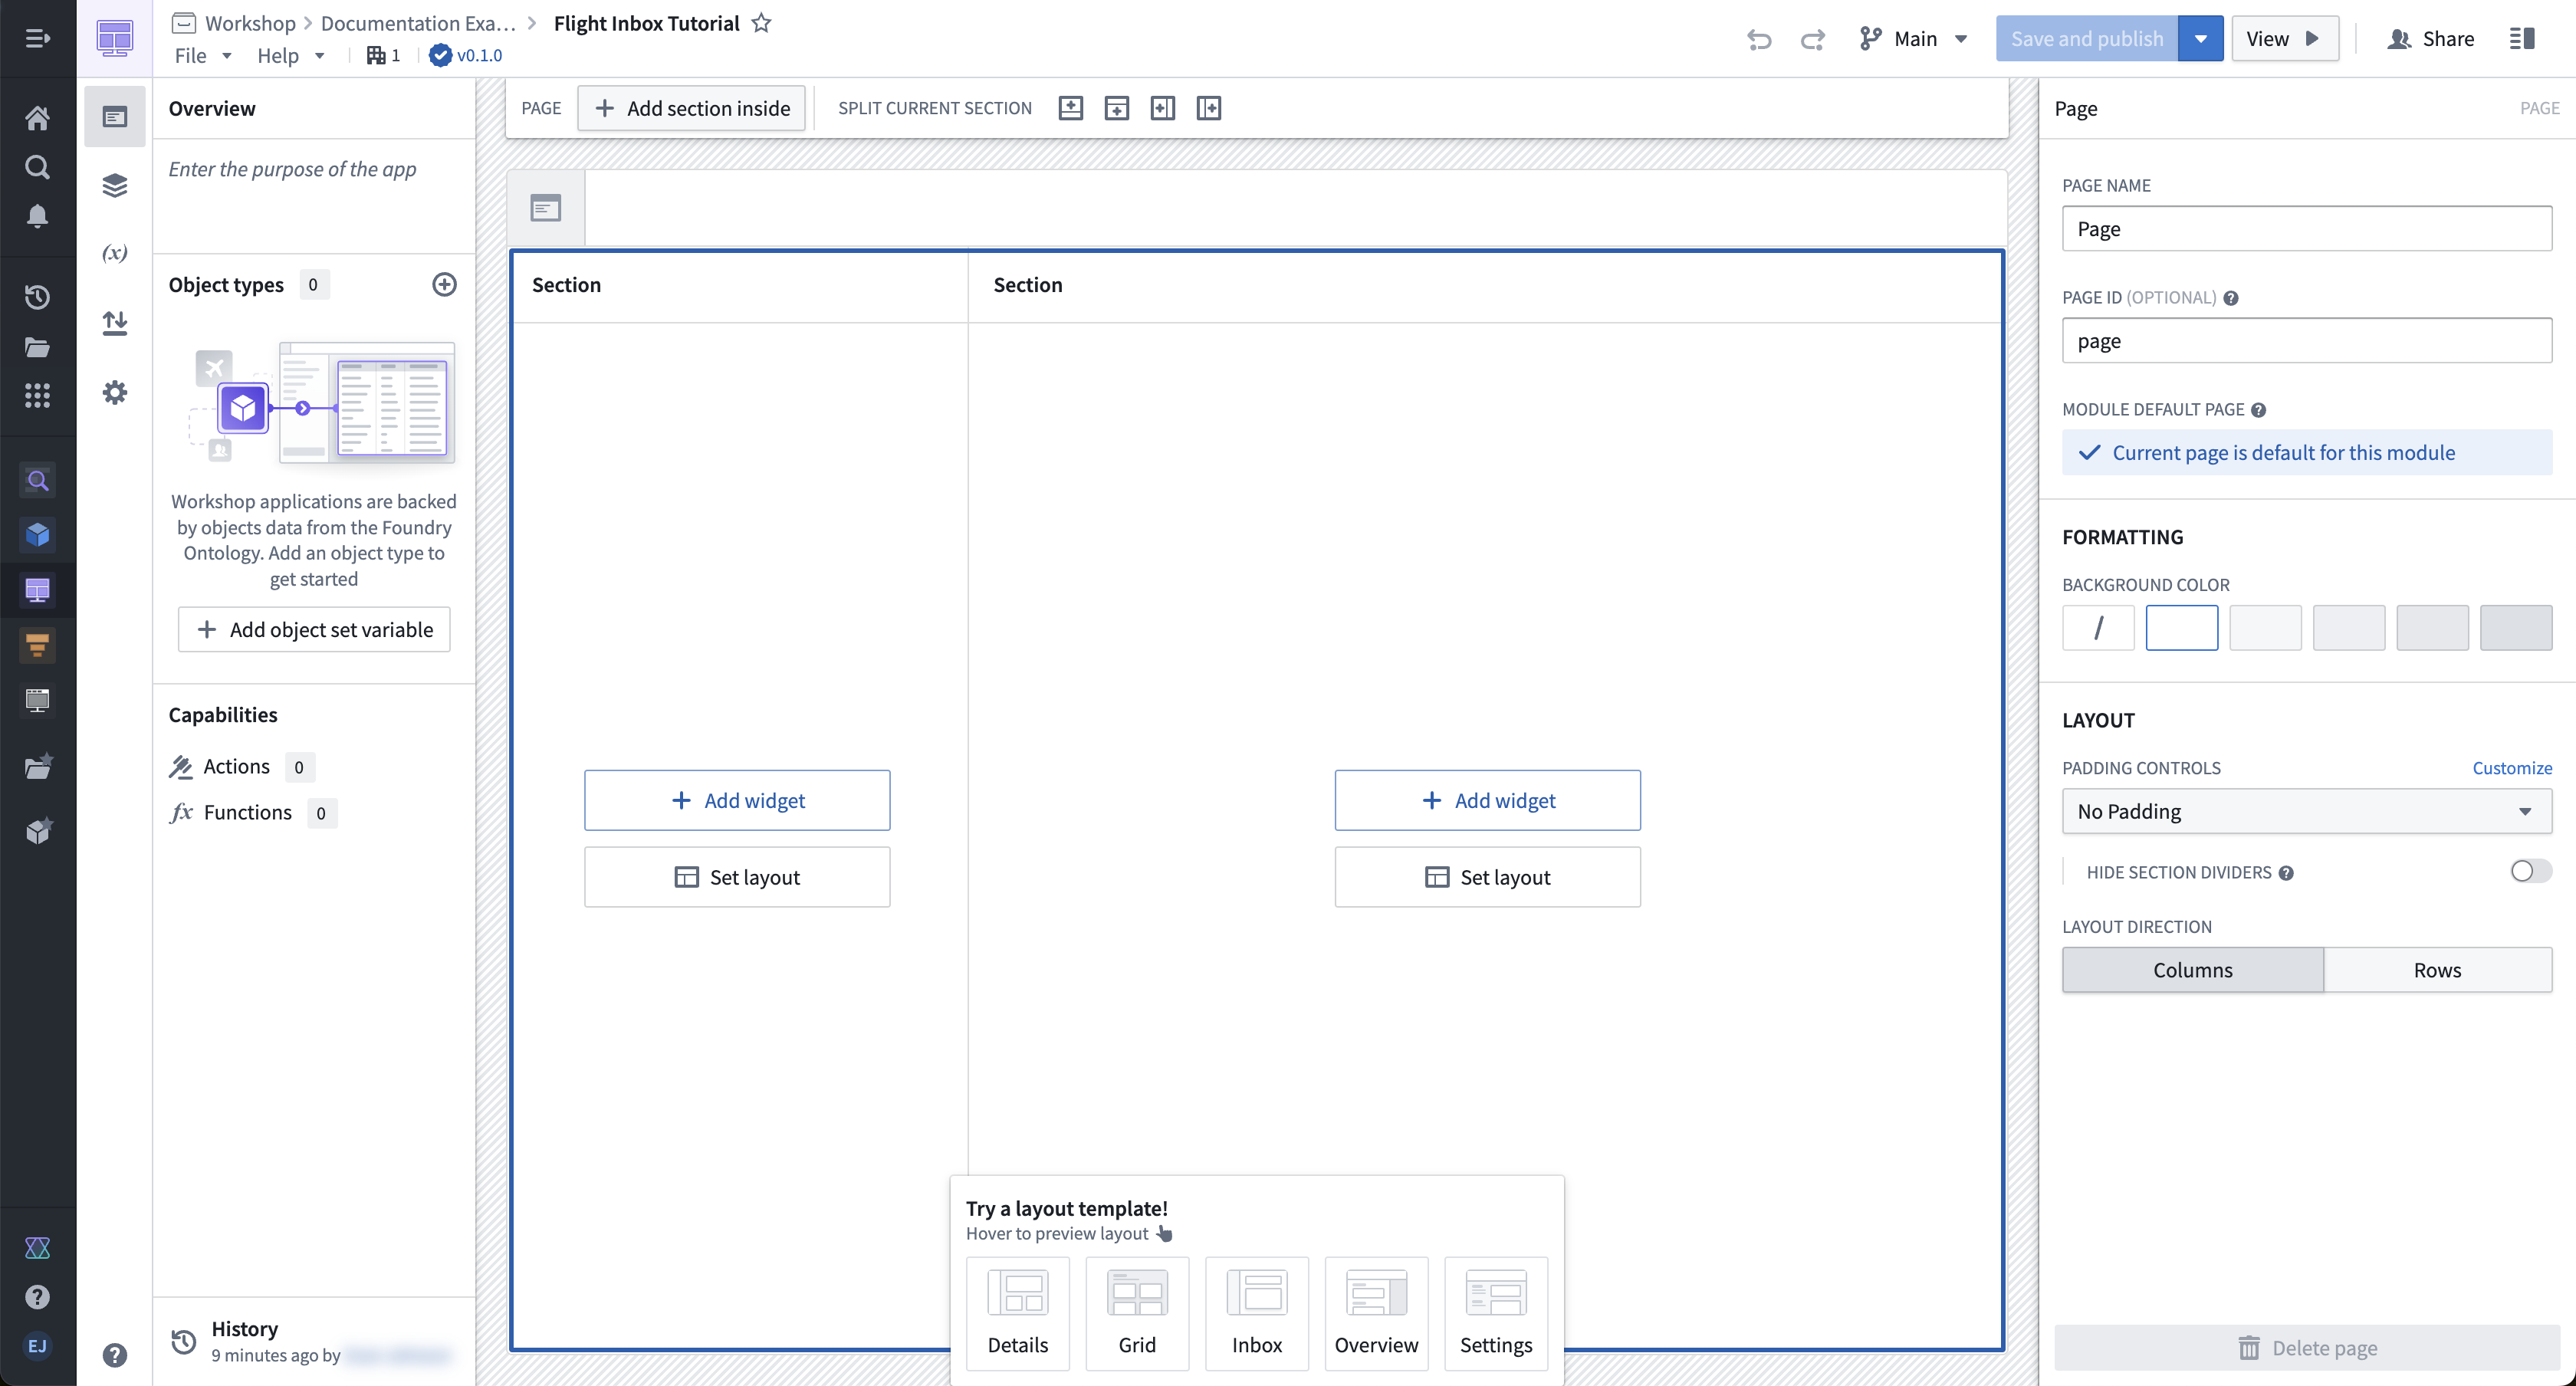
- The module resource name will appear in the top left; by default, the name will have the format “New module (2022-04-08 15:16:23)”. We can select this default to enter a more descriptive and memorable resource name. In this case, we will name the module “Flight Inbox Tutorial.” After this change, our screen should resemble the following:
Part II: Configure your initial view
Let’s add and configure an Object Table widget for the Flight Alert objects:
- On the right side of your module layout, select Add widget, then select the Object table widget from the widget selector that appears.
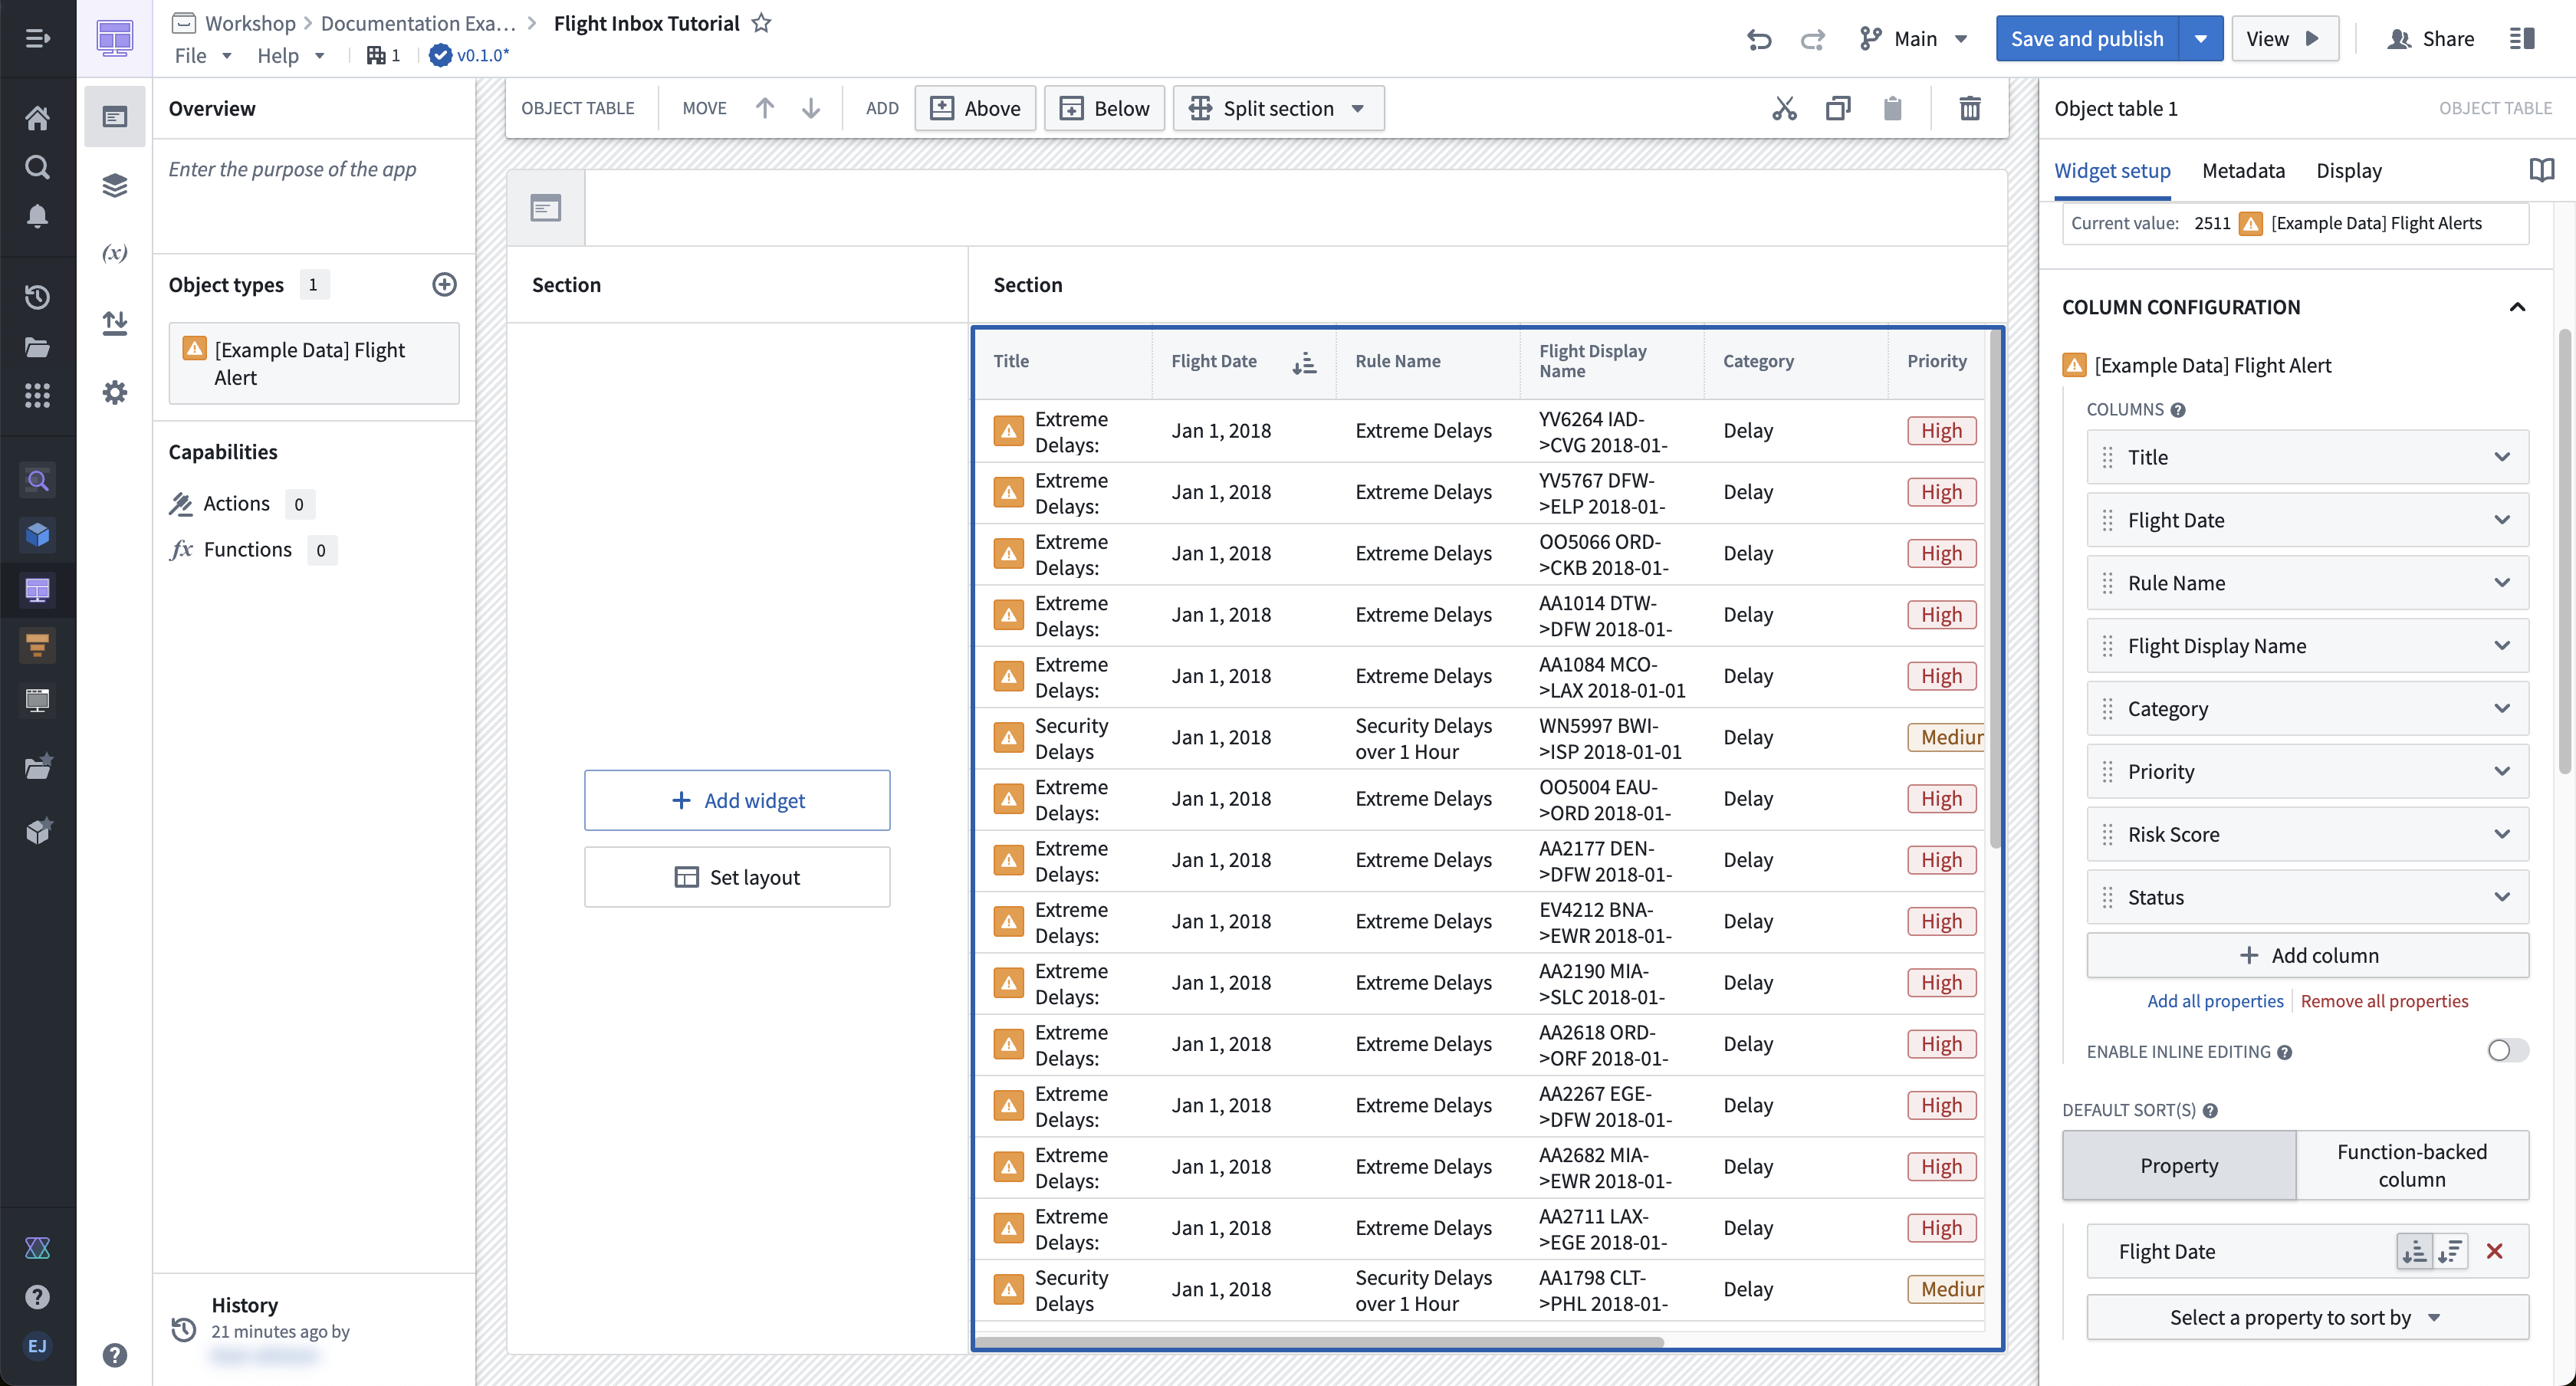
- In the configuration panel for the Object table 1 widget, use the Object set dropdown menu to define the data that will be displayed in this widget. In the dropdown menu, select + New object set variable, and in the variable definition popover that appears, choose the Starting object set dropdown menu and select [Example Data] Flight Alert. If you cannot find [Example Data] Flight Alert, contact Palantir Support.
- Return to the main configuration panel for the Object table 1 widget, and look for the Column Configuration section to select Add all properties. This will populate the Object Table widget with a column for each property of the [Example Data] Flight Alert object type. You can also configure specific columns with the + Add column button if desired.
- Under Columns, adjust the column order as you like and remove any undesired properties. For example, drag the Flight Date column to the top of the list so it displays as the first column after the object title in the object table.
- Scroll down in the configuration panel to the Default sort(s) section, and select the Flight Date property to sort by.
Part III: Configure filtering
To configure filtering, first add and configure a Filter List widget for Flight Alert objects:
-
On the left side of your module layout, select Add widget, then choose the Filter list widget from the selector that appears.
-
In the configuration panel for the Filter list 1 widget, select the Object set dropdown menu to define the data that will be displayed. Again, select + New object set variable, and in the variable definition popover that appears, choose the Starting object set dropdown menu then [Example Data] Flight Alert. You must define a new object set variable to back the Filter List widget so that the filter does not limit the base object set that backs the widget.
-
Return to the main configuration panel for the Filter list 1 widget, and look for the Filters Configuration section to use the + Add filter button to add filters for the following properties: Status, Priority, and Flight Date.
-
In the Filter List configuration, set Layout configuration to vertical to display filters in a stacked list. For a more compact experience, you can instead choose Pills, which displays filters as interactive pills that open a popover for configuration.
-
At the bottom of this configuration panel, switch on the toggle to Allow users to add and remove filters.
Next, modify the Object Table widget to accept the filter criteria output from our Filter List widget:
- Select the Object Table widget to show its configuration panel on the right side of the screen.
- Within the configuration panel, select Object set. In the variable definition popover that appears, choose the Filter... — Using a variable option and select the Filter list 1 Filter output variable.
- Test that filtering works by toggling on a filter in the panel (for example, by filtering to Alert Type of Priority: Medium). You should notice the filter applied to your Object Table.
The Filter list 1 Filter output is an object set filter variable. You can set default filters and, if needed, enable filter value extraction to reuse selected values elsewhere in your module. For more information, see the documentation on object set filter variables.

Part IV: Configure a collapsible panel for the Object View
Let’s add and configure an Object View widget for the active object in the Object Table widget.
-
Select the section surrounding the object title on the right side of the screen and note the Section toolbar that appears at the top of your module. Choose the Add — Right option to add a new section to the right of the Object Table widget.
-
Select the new section that appeared. Within the Section configuration panel on the right, toggle on the options for Section Header and Collapsible. Also, set the column width to an Absolute pixel size of
500. -
Next, select + Add widget within this section, then select the Object View widget from the selector that appears.
-
In the configuration panel, open the Object to display option and choose the Object Table 1 Active Object variable that is an output from the Object Table widget.
-
In the Object View Display & formatting settings, set Form factor to full. Since the section already has a header configured, you can optionally toggle Hide header to avoid displaying both the section header and the widget header. If you choose the Panel form factor instead, set Panel behavior to Object instance so the panel displays the active object from the Object Table.

Part V: Enable writeback with Actions
The below section assumes that the [Example Data] De-escalate Flight Alert action type has already been created. For details on how to create a new action type, see the documentation on how to use Actions in Workshop.
Now, let's add and configure a Resolve Alert button to allow users to write back to the Flight Alert data when they resolve an issue.
- Select the section header above the newly configured Object View header. Choose the plus sign (+) on the right, then select the Button Group widget from the selector that appears.
- Next, configure the title and styling of the button. Under the Button Configuration header, select the first button, named Button 1 by default. Within the button configuration, change Text to
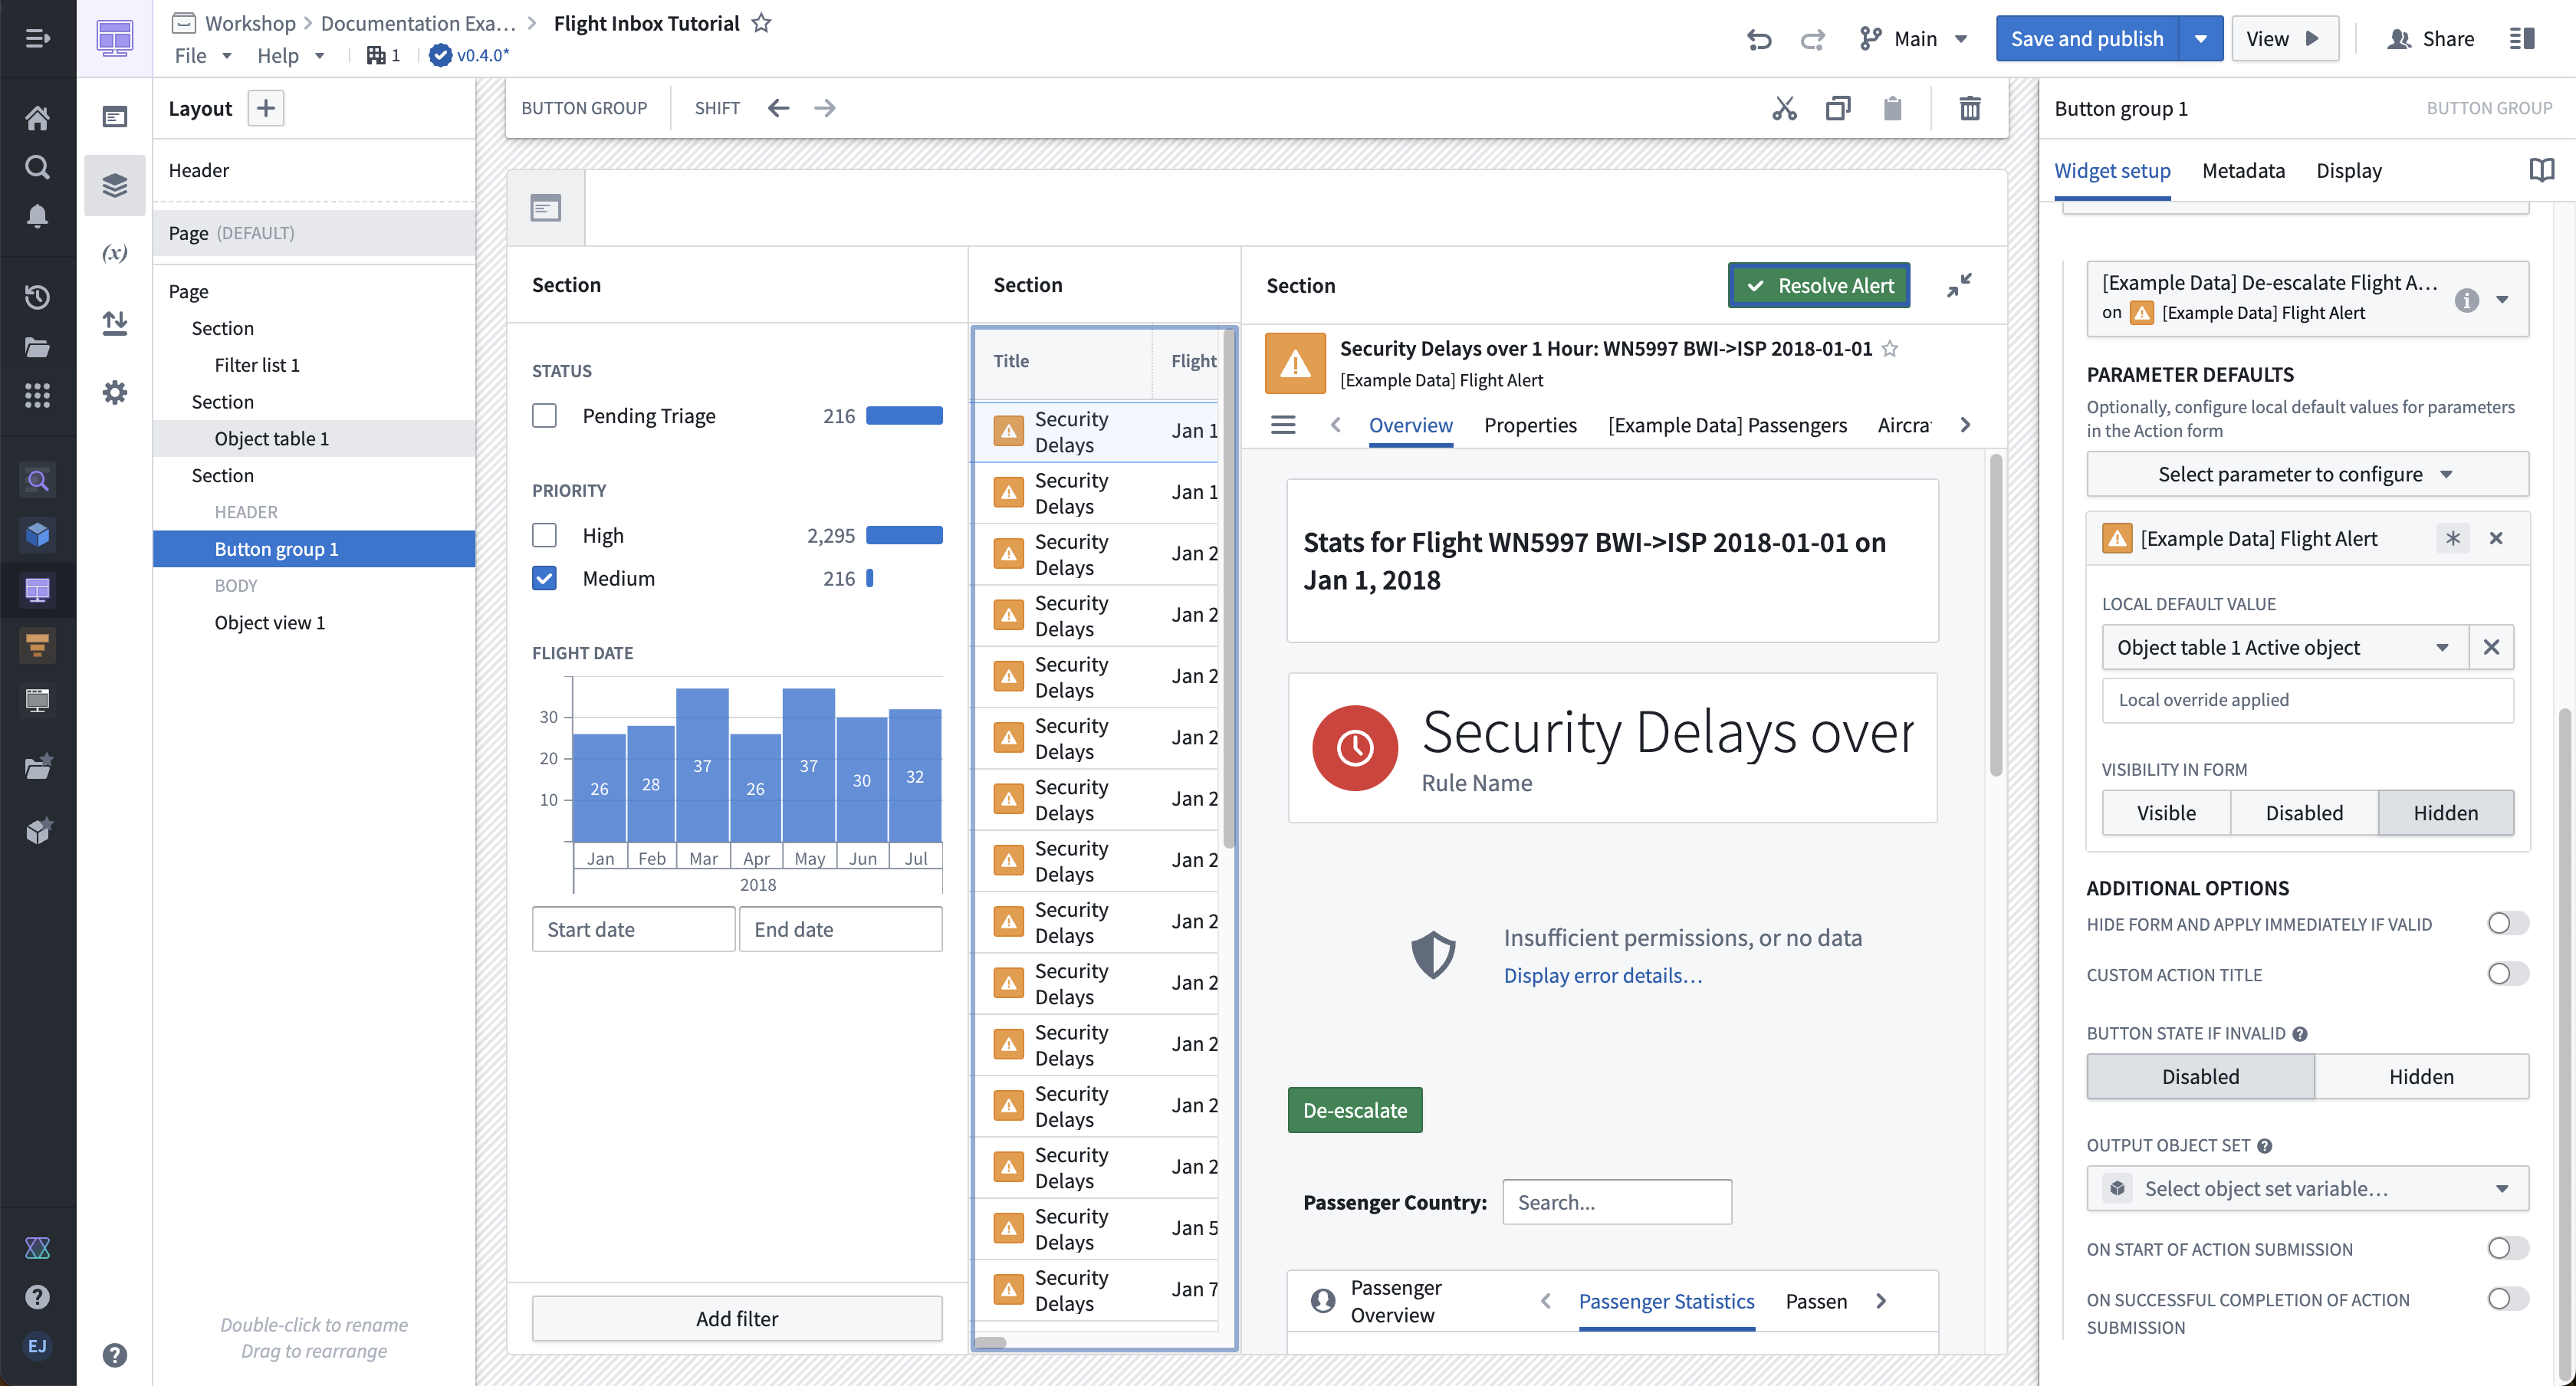
Resolve Alert, change Intent toSuccess, and change Left icon toSmall tick. - We then configure the action type we want to trigger when the button is selected by a user. In the same Item block, change the On click setting to Action, and use the Select an action... dropdown menu to choose the
[Example Data] De-escalate Flight AlertAction. In the Parameter Defaults section that appears, we can configure the default input parameters for this Action. For the [Example Data] Flight Alert parameter, choose the Object table 1 Action object variable that we also use to back the Object View widget. Leave the Comment variable without a default so that a user can manually enter how they resolved this flight alert. - Under the [Example Data] Flight Alert parameter configuration, select Hidden for the Visibility in form value. This will prevent the
Alertobject from appearing in the form that is shown to the user after interacting with theResolve Alertbutton.
Part VI: Polish your inbox and add headers
We can now configure the overall header of our module.
- Select the currently unconfigured header at the top of our module. In the configuration panel that appears on the right, change the Icon to an Airplane with a color of Red 3. In the same configuration panel, set the Title input to
Flight Alert Inbox. - Finally, configure the section headers. To configure the section headers of our filter, object table, and object view sections, select the header of each. Then, use the configuration panel on the right to configure the Title under the Section configuration (such as “Filters”) and choose a Blueprint icon (such as “filter”) to display in each section header. Your end result should look like the inbox seen below and at the top of this tutorial.