- Capabilities
- Getting started
- Architecture center
- Platform updates
Agent worker configuration reference
Agent worker is in the legacy phase of development, and no additional development is expected. Full support remains available. We recommend using Foundry worker connections when building a new source or updating existing workflows.
This page describes the configuration options available when using an agent as a worker and assumes you are already familiar with data connection agents and their generic configuration options.
Set up an agent
You must set up an agent to use the agent worker. When configuring a source, you can select the Agent worker option and choose at least one available agent. Capabilities run over that source connection will be executed as jobs on the agent host.
Capability execution
When using an agent worker, capabilities are executed by running Java code on the agent host directly. These Java processes may pull data from your systems and push data up to Foundry (as with batch syncs), or pull data from Foundry and push to your systems (as with exports), which comes with known limitations.
Memory allocation and usage
Agent memory is one of the key factors determining the performance of capabilities executed using an agent worker.
The primary settings available for agent memory are:
- JVM heap: Configured on the agent settings page, and indicates how much memory the agent should allocate on startup. The allocated memory is reserved from the OS and must not exceed the available memory on the host machine. The default JVM heap value is 1 GB.
- Host memory: Based on the specification of the machine where the agent is installed. We recommend at least 16 GB of memory.
Actual memory usage observed on the host will vary based on the workload currently being executed by the agent worker, including other processes running on the same host.
When observing and monitoring memory usage for an agent used as an agent worker, there are two primary metrics:
- OS physical memory usage: The actual total memory usage on the agent host, including the agent process but also any other processes running on the same host. This may go beyond the allocated JVM heap size for the agent process, and up to the full physical memory available.
- Agent memory usage: The memory usage by the agent, which will always be smaller than the configured JVM heap size.
For information on monitoring memory usage on agents, review agent metrics and health monitoring.
Load balancing
When using an agent worker, multiple agents may be assigned to a single source connection. An agent is assigned jobs to execute specific capabilities configured on assigned source connections. Jobs are executed on one of the available agents at the time when the job is started.
Jobs are assigned randomly to one available agent amongst the assigned agents.
Maximum concurrent syncs defaults to 16, and is configurable under Agent settings. The Maximum concurrent syncs quota is enforced across all capabilities and all assigned sources, meaning that any run of any capability on any source uses up one unit of the available concurrent sync quota. This includes streaming syncs, change data capture syncs, exports, webhooks and legacy data connection tasks. If the assigned agent already has the maximum number of concurrent syncs currently running, then new jobs will be queued until enough running capabilities finish.
In general, we do not recommend using multiple agents as a way to load balance a larger workload than could be successfully run on a single agent. The primary intended use of multiple agents is to allow for agents being taken offline for maintenance. For optimal performance and reliability, we recommend that each agent in a multi-agent setup should be able to handle the full set of capabilities configured on the assigned source connection(s).
Direct vs. data proxy upload strategy
Agent workers support two options to specify how data from batch syncs should be uploaded to the Palantir platform:
Data proxy mode
In data proxy mode, data is uploaded using the public Foundry API using the data proxy service. This leverages the same API gateway that handles Foundry API calls for reading and writing datasets.
Agents configured to use data proxy mode will contain the following in the agent configuration YAML:
Copied!1 2 3 4destinations: foundry: uploadStrategy: type: data-proxy
Direct mode [Sunset]
Direct mode is not available on new agents or on enrollments set up after June 2024. Data proxy mode is the default and only option supported for new agents. Existing agents using direct mode will continue to work as long as the host IP addresses where the agent is installed do not change.
In direct mode, data is uploaded directly to the underlying storage buckets in the Foundry data catalog. While providing performance improvements, this is only possible with custom network configuration by Palantir Support, and is not available on our latest cloud infrastructure.
Agents configured to use direct mode will contain the following in the agent configuration YAML:
Copied!1 2 3 4destinations: foundry: uploadStrategy: type: direct
Custom JDBC drivers
Information on how to add custom JDBC drivers to an agent can be found in the documentation for the JDBC (custom) connector.
Drivers must be signed by Palantir Support and added directly to the agent to work with the agent worker.
Contact Palantir Support for assistance signing custom JDBC drivers.
Credentials
One unique aspect of the agent worker is that in-memory credential decryption happens outside of Foundry. When entering credentials in the Data Connection user interface, rather than Foundry encrypting credentials, they are encrypted with the public key of each agent assigned to the source in the browser before being sent to Foundry. The encrypted credentials are then stored in Foundry and can only be decrypted by the respective agent using its private key when needed.
Note that all data in Foundry, including credentials, is encrypted at rest and in transit. Data is only ever decrypted in-memory where access is required.
This means that the following caveats and restrictions apply to credential configuration when using the agent worker:
- If the set of agents assigned to the source changes, credentials must be re-entered in Data Connection.
- If an agent is reprovisioned using a fresh download link, credentials will not be automatically transferred. Encryption keys from the existing agent must be recovered or else all credentials must be re-entered in Data Connection.
More information on moving agents between directories and hosts is covered in the agent configuration reference documentation, including instructions for retaining encrypted credentials when moving an existing agent directory.
Certificates
Agents communicate with both Foundry and your internal network. This means that agents need to have the correct certificates in their truststores for these connections to be established.
Switch source from agent worker to Foundry worker
Most agent-based sources should be migrated to a Foundry worker, either a direct connection for systems accessible from Foundry, or an agent-proxy connection for sources hosted on separate networks.
Migrating to a Foundry worker provides the following benefits:
- Scalable compute: Foundry worker runs capabilities in Foundry's containerized and scalable job execution environment, improving performance and stability.
- Wider feature support: All sources running on Foundry worker can be used in code, and support capabilities such as virtual tables and virtual media.
- Reduced maintenance: You can continue using your existing agents as network proxies while removing the need to manage compute resources on the agent host.
- Flexible networking: Sources using Foundry worker can connect to directly accessible systems via direct connection egress policies, and to on-premise systems using agent proxy policies.
Migrating from agent worker to Foundry worker is reversible. If you encounter any issues, you have 30 days to revert to your previous connection settings. After 30 days, the previous setup cannot be automatically restored.
Prerequisites
Before starting the migration, ensure the following:
- You have at least one healthy agent assigned to the source that can supply source secrets, certificates, and, if applicable, JDBC drivers.
- You have the required permissions to create egress policies. To create new egress policies, you must have access to the workflow titled
Manage network egress configurationin Control Panel, which is granted to theInformation Security Officerrole.
Migration steps
To perform a migration to a Foundry worker, follow the steps below:
- Navigate to Connection settings > Connection details and select Compute: Agent worker. This opens a dialog where you can select Migrate to Foundry worker.

- Review the migration overview. The walkthrough dialog explains the steps involved and confirms that the process is reversible. Select Continue to proceed.

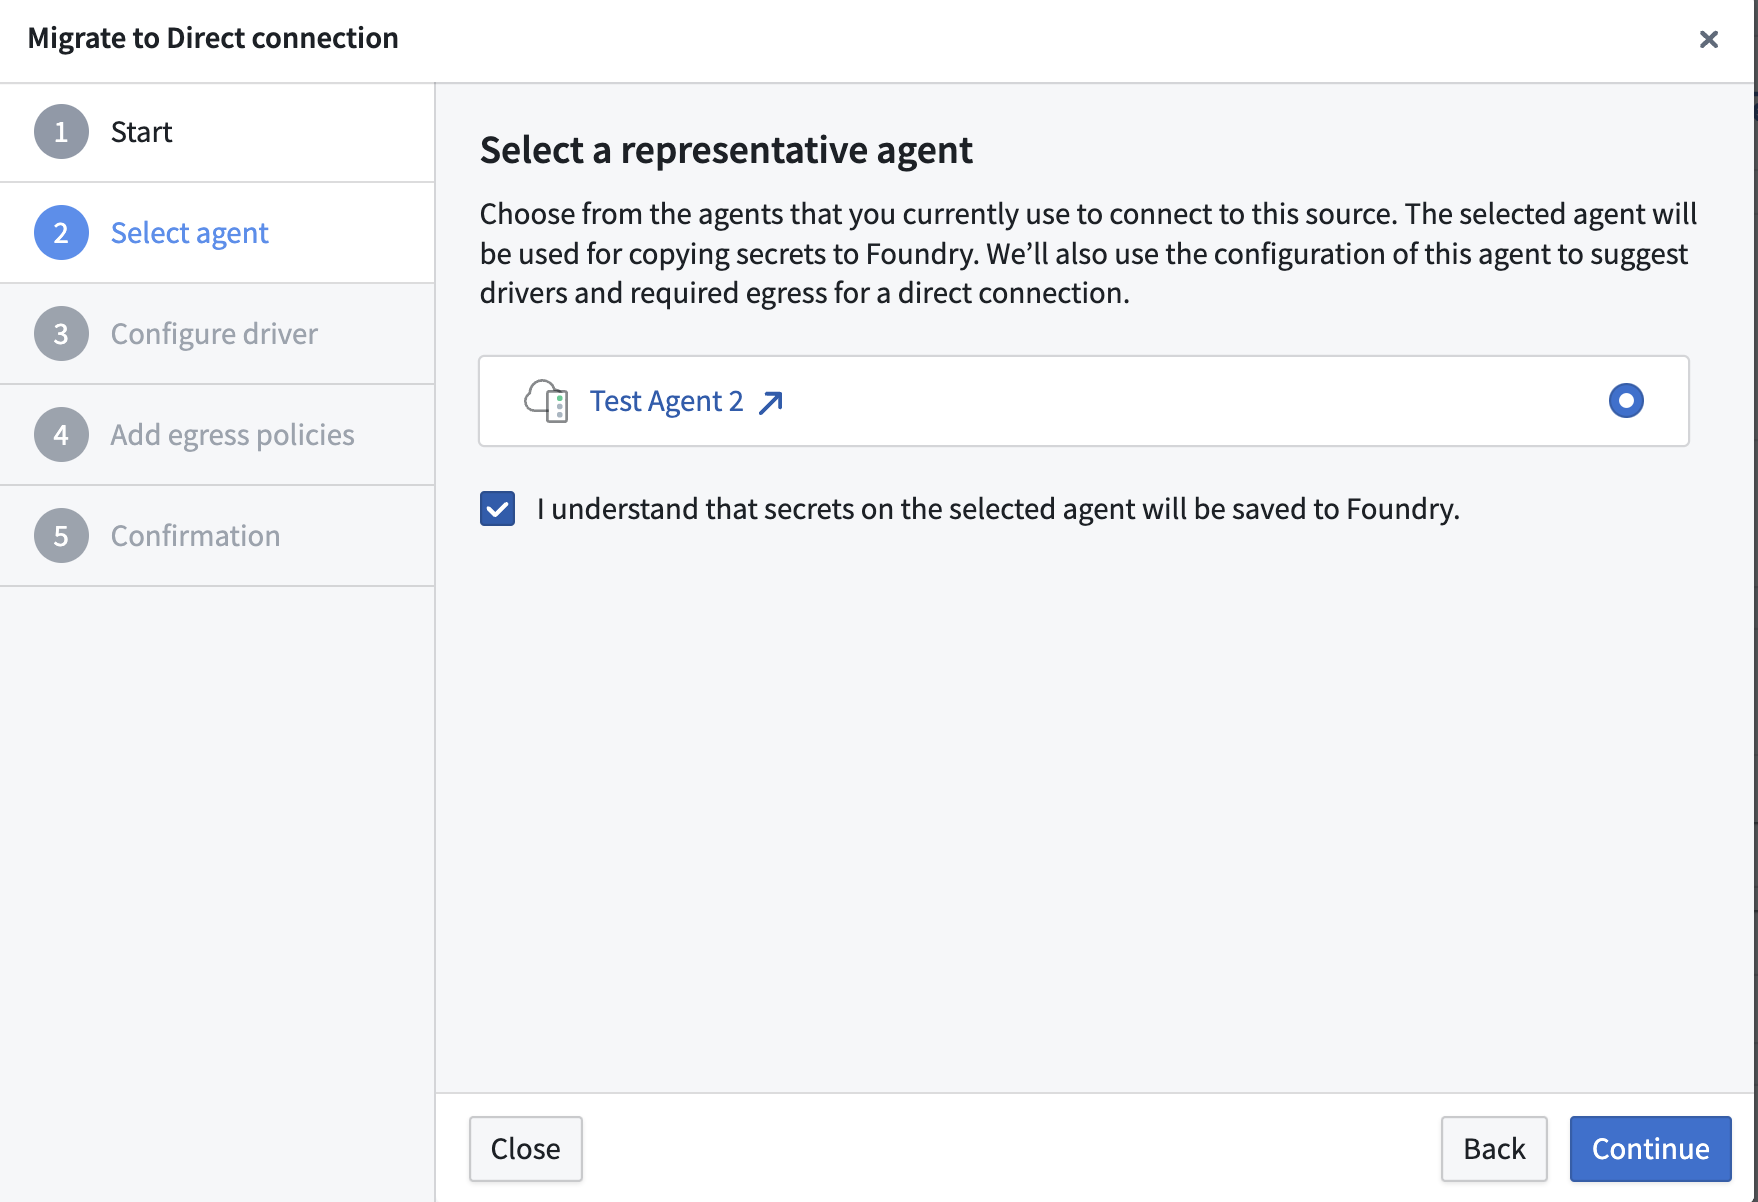
- Choose a representative agent. Select a healthy agent currently assigned to the source. The selected agent is used to copy secrets and certificates to Foundry and to suggest required egress configuration based on the agent's current setup. You must acknowledge that secrets on the selected agent will be saved to Foundry.

- Copy certificates to the source. With Foundry worker, certificates must be applied directly to the source rather than to the agent. Select the certificates from the representative agent that should be transferred to your data source. If no certificates are found on the agent, you can skip this step.
- (Optional) Configure a JDBC driver if required by the source type. Select a driver from the representative agent to use with the Foundry worker.

- Add egress policies. Configure direct connection or agent proxy egress policies to define how the Foundry worker should reach your source systems.

-
Review the confirmation step. Before completing the migration, acknowledge the following:
- All running jobs (syncs, exports, tasks) will be terminated as part of the migration. Scheduled jobs will run in Foundry on the next scheduled run, but unscheduled jobs must be manually restarted.
- You have 30 days to revert to your previous configuration if needed.
Select Migrate to complete the process.

Switch manually
If you prefer not to use the guided migration wizard, you can select Switch to Foundry worker manually from the migration dialog. Note that when switching manually, credentials must be re-entered, as the automated secret transfer from the agent is not performed.
Troubleshooting
This section describes situations that may occur during the migration, as well as suggested resolution steps. As a reminder, the migration is reversible for 30 days.
Could not resolve type id as a subtype of 'com.palantir.magritte.api.Source'
Suggested resolution:
- This happens when a dependency required for the source cannot be found. Ensure that you have configured all required certificates, proxies, and drivers required for a particular source, then retry the migration.
UnknownHostException
Suggested resolution:
- Ensure that correct egress policies are assigned to the source.
- Confirm that Foundry is able to access the endpoint that is throwing the exception.
Driver class not found
Suggested resolution:
- Confirm that the correct driver is uploaded to the JDBC source.
PKIX path building failed
Suggested resolution:
- Ensure that correct certificates are added to the source.
Add a private key
If the system you are connecting to requires mutual TLS (mTLS), you must manually add a private key to the agent.
The default bootstrapper keystore and truststore are regenerated any time the agent is restarted, and any changes made to the default keystore will be overridden on restart. The below instructions explain how to override the default keystore to point at a custom keystore in a different location on the agent host, and how to modify this custom keystore to add your private key.
-
Copy the default bootstrapper keystore and store it in a separate location on the agent host. Run the following commands with the same username that is running the agent on the host. You may choose to name the folder
securityor according to your preferences.Copied!1 2mkdir /home/<username>/security cp <bootvisor_root>/var/data/processes/<bootstrapper_dir>/var/conf/keyStore.jks /home/<username>/security/ -
Import the keys from the customer-provided keystore into the copied agent keystore using the Java
keytoolcommand line tool. If this tool is not already installed, find it in thebindirectory of the JDK that is bundled with the agent.Copied!1 2 3 4$ keytool -importkeystore -srckeystore <CUSTOM_KEYSTORE.jks> -destkeystore /home/<username>/security/keyStore.jks Importing keystore CUSTOM_KEYSTORE.jks to keyStore.jks... Enter destination keystore password: keystore Enter source keystore password:-
You can verify that the key/keys were added to the copied keystore using the
keytool -listcommand:Copied!1 2 3 4 5 6 7 8 9 10 11$ keytool -list -keystore /home/<username>/security/keyStore.jks Enter keystore password: Keystore type: jks Keystore provider: SUN Your keystore contains 2 entries <CUSTOM_KEY>>, 15-Dec-2022, PrivateKeyEntry, Certificate fingerprint (SHA-256): A5:B5:2F:1B:39:D3:DA:47:8B:6E:6A:DA:72:4B:0B:43:C7:2C:89:CD:0D:9D:03:B2:3F:35:7A:D4:7C:D3:3D:51 server, 15-Dec-2022, PrivateKeyEntry, Certificate fingerprint (SHA-256): DB:82:66:E8:09:43:30:9D:EF:0A:41:63:72:0C:2A:8D:F0:8A:C1:25:F7:89:B1:A3:6E:6F:C6:C5:2C:17:CB:B2
-
-
Use the
keytool -keypasswdcommand to update the imported key password. The agent keystore requires that both the key and keystore passwords match.Copied!1 2$ keytool -keypasswd -alias <CUSTOM_KEY> -new keystore -keystore /home/<username>/security/keyStore.jks Enter keystore password: -
In Data Connection, navigate to the agent, then open the Agent settings tab. In the Manage Configuration section, select Advanced, choose the Agent tab, and update the
keyStoreto point to the newly copied keystore. Then, addkeyStorePasswordand set it to the appropriate value (keystore, by default).Copied!1 2 3 4 5security: keyStore: /home/<username>/security/keyStore.jks keyStorePassword: keystore trustStore: var/conf/trustStore.jks ...

-
Finally, choose the Explorer tab and update both the
keyStorePathandkeyStorePassword. Save the new configuration.Copied!1 2 3 4 5security: keyStorePath: /home/<username>/security/keyStore.jks keyStorePassword: keystore trustStorePath: var/conf/trustStore.jks ... -
Restart the agent.
Note that the field is named keyStore when configuring in the Agent tab and keyStorePath in the Explorer tab. No changes are required to the Bootstrapper configuration.
Known limitations
Executing capabilities on the agent host directly comes with some downsides, such as:
- Potential classpath conflicts on the agent: This is particularly relevant for custom JDBC workflows, since custom JARs may conflict with dependencies that ship from Foundry and run on the agent classpath.
- Contention between jobs running on the agent: Jobs may arbitrarily use up to the entire memory and disk space allocated to the agent process and may cause other jobs to never start or crash. This is particularly problematic for webhooks run with an agent worker. In this scenario, we strongly recommend a dedicated agent for webhook executions so long-running syncs do not prevent short-running webhooks from executing.
- Lack of support for some capabilities: Some capabilities, such as use in code, virtual tables, and virtual media, are incompatible with the agent worker, since these require synchronous connections directly from Foundry and cannot run as jobs on the agent.