- Capabilities
- Getting started
- Architecture center
- Platform updates
Iceberg with Jupyter® notebook in Code Workspaces
You can interact with Iceberg tables from a Jupyter® notebook in Code Workspaces using PyIceberg, SQL, or Spark.
For virtual Iceberg tables, SQL does not require you to add the source to the workspace, meaning you do not need to enable code imports on the source. This may be your preferred option if the source should not be used in code.
PyIceberg
Follow the instructions below to read and write Iceberg tables using PyIceberg in a Jupyter® notebook:
- Open a Jupyter® workspace in Code Workspaces.
- Select Add > Read data from the Data panel to add the Iceberg table to your workspace.
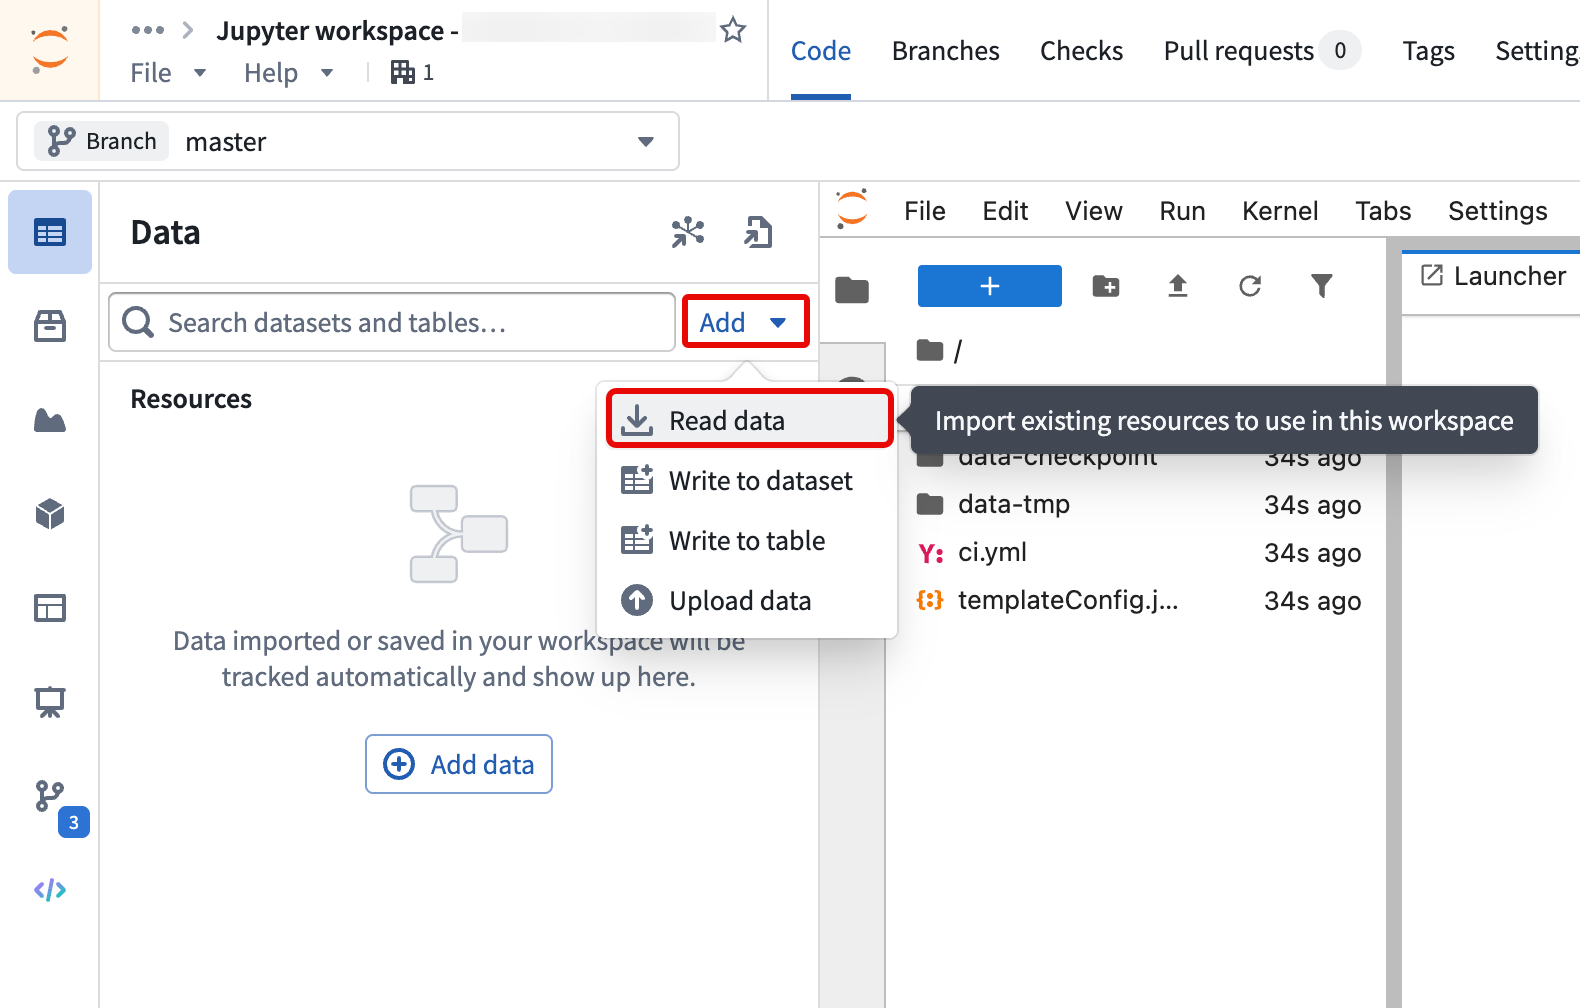
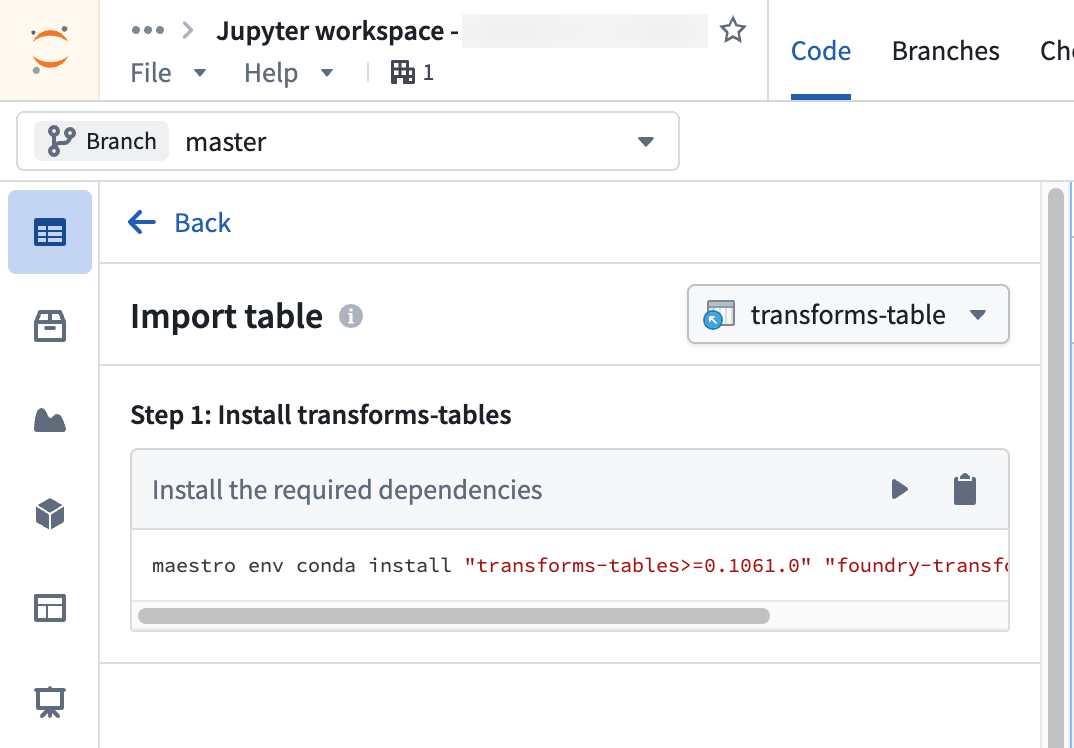
- Follow the steps outlined in the Import table section of the Data panel to install the required client libraries, add an alias for the table, and copy code snippets to interact with your data.
SQL
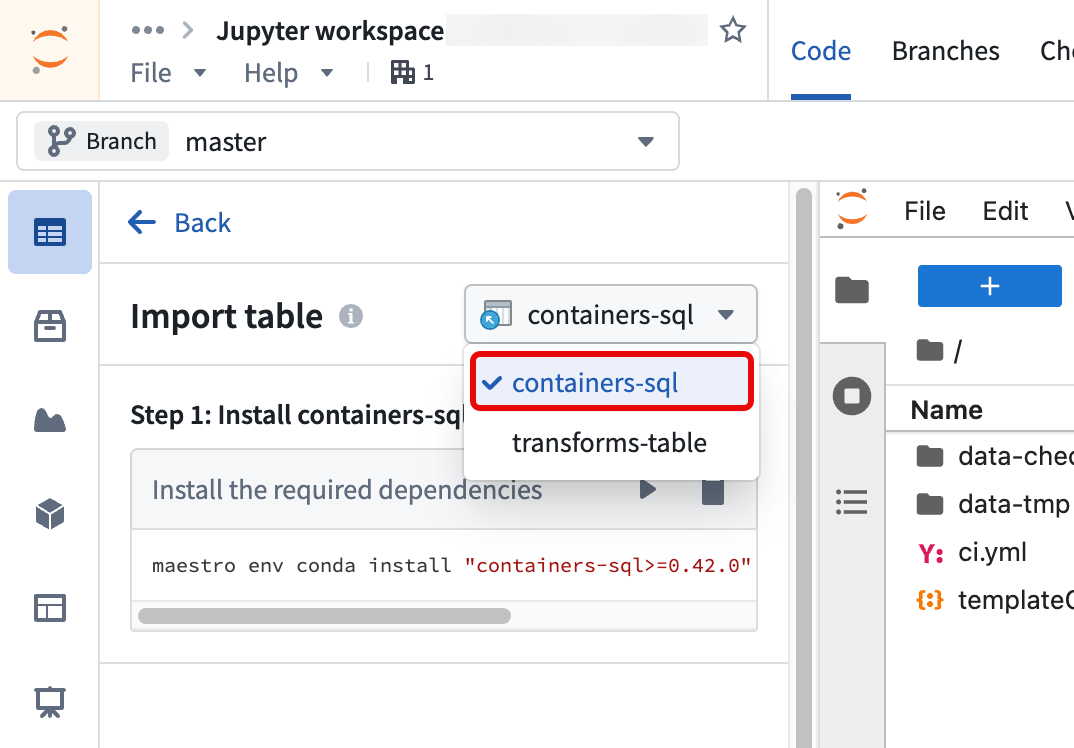
Follow the same steps above to query Iceberg tables using SQL in a Jupyter® notebook. After you select Read data to add the Iceberg table to your workspace, switch the mode to containers-sql instead of transforms-table.
Learn more about how to query tabular datasets with SQL in Code Workspaces.
Spark (advanced usage)
Follow the instructions in the sections below to read and write to Iceberg tables using Spark in a Jupyter® notebook.
Set up Code Workspaces to use Iceberg
- PySpark setup: Set up a code workspace to use PySpark following the instructions in the Code Workspaces FAQ documentation.
- Upload Iceberg JARs: Download the
Spark 3.5 with Scala 2.12andaws-bundleJARs from Iceberg's releases page ↗. Create a new folder called/libs, and upload the JARs into this folder. - Network policy: Import the network policy for your Iceberg storage bucket into your code workspace.
Example Jupyter® notebook code
To begin, create a Spark session. Note that running this code will prompt you to enter a user token, which can be generated in your account settings. See User-generated tokens for a step-by-step guide on creating a token.
Copied!1 2 3 4 5 6 7 8 9 10 11 12 13 14 15 16 17from pyspark.sql import SparkSession from getpass import getpass spark = ( SparkSession.builder .master("local[*]") .appName("foundry") .config("spark.jars", "file:///home/user/repo/libs/iceberg-spark-runtime-3.5_2.12-1.9.1.jar,file:///home/user/repo/libs/iceberg-aws-bundle-1.9.1.jar") .config("spark.sql.extensions", "org.apache.iceberg.spark.extensions.IcebergSparkSessionExtensions") .config("spark.sql.catalog.foundry", "org.apache.iceberg.spark.SparkCatalog") .config("spark.sql.catalog.foundry.type", "rest") .config("spark.sql.catalog.foundry.uri", "https://<your_foundry_url>/iceberg") .config("spark.sql.catalog.foundry.default-namespace", "foundry") .config("spark.sql.catalog.foundry.token", getpass("Foundry token:")) .config("spark.sql.defaultCatalog", "foundry") .getOrCreate() )
Iceberg's documentation ↗ provides more context on the above parameters which are used to establish connectivity to the Iceberg catalog. Remember to update the spark.jars filepaths using the names of the JARs you uploaded in Step 2.
Of these, the Foundry-specific Iceberg catalog parameters ↗ are:
| Parameter | Value | Description |
|---|---|---|
spark.sql.catalog.foundry | org.apache.iceberg.spark.SparkCatalog | Catalog implementation class ↗. |
spark.sql.catalog.foundry.type | rest | Underlying catalog implementation type, i.e. REST |
spark.sql.catalog.foundry.uri | https://<your_foundry_url>/iceberg | URL for the REST catalog |
spark.sql.catalog.foundry.default-namespace | foundry | Default namespace for the catalog |
spark.sql.catalog.foundry.token | getpass("Foundry token:") | Prompts for token access credentials |
If your path contains a whitespace, you must ensure that the space is correctly escaped. With Spark, you can use backticks (`) to escape whitespace, for example `/.../My folder/Iceberg table`. With PyIceberg, you can use URL encoding.
Now you can use your Spark session to read and write from your Iceberg tables. For example, following the Iceberg documentation's quickstart guide ↗, you can create a table and insert rows.
Copied!1 2 3 4 5 6 7 8 9 10 11 12 13 14 15 16 17 18 19 20 21from pyspark.sql.types import DoubleType, FloatType, LongType, StructType, StructField, StringType schema = StructType([ StructField("vendor_id", LongType(), True), StructField("trip_id", LongType(), True), StructField("trip_distance", FloatType(), True), StructField("fare_amount", DoubleType(), True), StructField("store_and_fwd_flag", StringType(), True) ]) df = spark.createDataFrame([], schema) df.writeTo("`/.../taxis`").create() schema = spark.table("`/.../taxis`").schema data = [ (1, 1000371, 1.8, 15.32, "N"), (2, 1000372, 2.5, 22.15, "N"), (2, 1000373, 0.9, 9.01, "N"), (1, 1000374, 8.4, 42.13, "Y") ] df = spark.createDataFrame(data, schema) df.writeTo("`/.../taxis`").append()
Copied!1 2 3 4 5 6 7 8 9 10 11 12 13 14 15 16spark.sql(""" CREATE TABLE `/.../taxis` ( vendor_id bigint, trip_id bigint, trip_distance float, fare_amount double, store_and_fwd_flag string ) PARTITIONED BY (vendor_id); """) spark.sql(""" INSERT INTO `/.../taxis` VALUES (1, 1000371, 1.8, 15.32, 'N'), (2, 1000372, 2.5, 22.15, 'N'), (2, 1000373, 0.9, 9.01, 'N'), (1, 1000374, 8.4, 42.13, 'Y'); """)
Jupyter®, JupyterLab®, and the Jupyter® logos are trademarks or registered trademarks of NumFOCUS.
All third-party trademarks (including logos and icons) referenced remain the property of their respective owners. No affiliation or endorsement is implied.