- Capabilities
- Getting started
- Architecture center
- Platform updates
Add an Ontology output
You can choose to add an Ontology output to guide your pipeline integration towards clean, structured data that defines new elements of your global Ontology. Adding output guidance can help save time on compute checks and help inform the end-to-end creation of your workflow.
Pipeline Builder currently supports creating Ontology objects and links from both batch and streaming datasets. However, it is not possible to enable edits or configure many-to-many links for objects backed by streaming datasets in Pipeline Builder.
Add an object type output
There are two ways to add an object type output. You can create a blank object via the pipeline outputs panel, or create a populated object on the graph connected to a transform node.
With the pipeline outputs panel
Open the Pipeline outputs panel located on the right side of Pipeline Builder, then select Object type > Add to create a blank object template where you can edit the object name, icon, and properties.

Note that the Plural name and Object type ID will auto-populate from Name for convenience.
You can define new objects in Pipeline Builder, but you cannot modify or delete existing objects unless they were created in Pipeline Builder. After the first deploy, the object type ID cannot be modified.
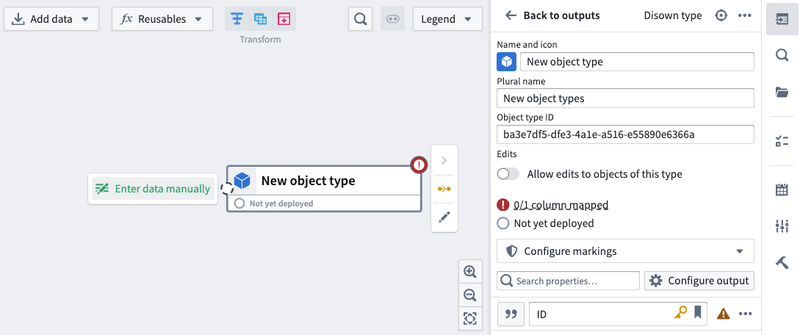
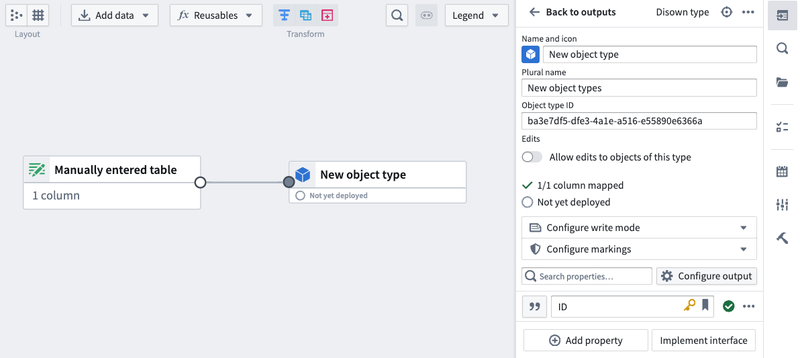
You can now populate your object with data by selecting Enter data manually or by dragging the output of an existing dataset or transform to this node's input.
With the graph
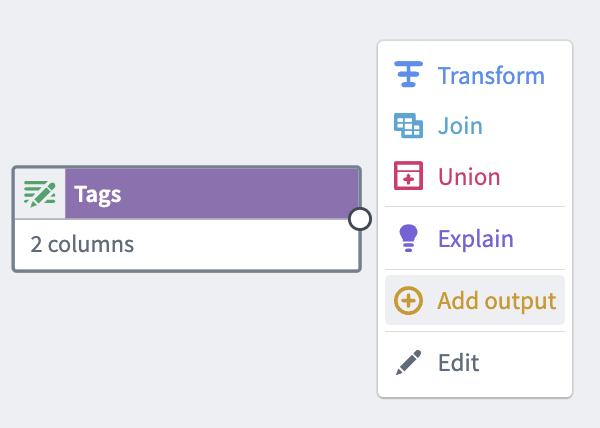
Select the transform node that you want to create the object from, then select Add output > New object type.

If your enrollment has multiple Ontologies, you need to select the Ontology that an object belongs to on object creation. Otherwise, the error message An ontology must be specified to publish ontology type outputs will be displayed. To set the Ontology, select Set ontology in the bottom panel or on the object, as shown below.

Enable edits on object types
You can enable edits on object types in Pipeline Builder or in Ontology Manager if the object was created in Pipeline Builder and is backed by a batch dataset.
Stream backed object types do not currently support edits. See limitations of streaming object types for more details.
To enable edits, hover on the object type in the right panel and select Edit. Toggle Allow edits to objects of this type. Save and deploy your pipeline for this to go into effect.

Add a link type output
Once object type outputs have been added, you can define link type outputs. Similar to object outputs, these can be created in the panel or on the graph.
With the pipeline outputs panel
In the Pipeline outputs panel, select Link type > Add. This opens a form in which you can define the left and right sides of your link type.
Links defined in Pipeline Builder can only use objects created within the same pipeline. Within the Ontology Manager application itself, you can create links between objects created in Pipeline Builder and objects created in Ontology Manager.
After the first deploy, the link type ID or the source and target object types can no longer be modified.

Legend
Link type ID: This is an auto-generated ID that uniquely represents this link.
Choose an object type output: Select an object type from the dropdown menu. If you do not have any object outputs in your pipeline, you will need to configure an object output type first.
Cardinality: Choose the cardinality of each side of the link type. Two types of cardinality are supported: one-to-many and many-to-many. One-to-one link types are currently not supported. In the examples below, assume that there are two object types that are related to each other through a cardinality: an Aircraft object type and a Flight object type.
- One-to-many cardinality: This indicates that one
Aircraftcan be linked to manyFlights. - Many-to-many cardinality: This indicates that one
Aircraftcan be linked to manyFlightsand oneFlightcan be linked to manyAircraft.- Note that when you select a many-to-many cardinality, you will see a prompt to Click and drag the output from a dataset or transform to use as the join table. This table should contain all combinations of links between the primary key of the first object type (
Aircraftin this example) and the second object type (Flightin this example). - Below is an example of many-to-many cardinality, where a
Classobject can be linked to manyStudentobjects and aStudentobject can be linked to manyClassobjects:
- Note that when you select a many-to-many cardinality, you will see a prompt to Click and drag the output from a dataset or transform to use as the join table. This table should contain all combinations of links between the primary key of the first object type (

Primary key/column: Choose which property to use to create the left side of the link.
- In a one-to-many cardinality link type, the primary key will be determined by the object type.
- In a many-to-many cardinality link type, select which columns in the join table map to the primary keys of each of the linked object types.
Foreign key/column: Choose which property to use to create the right side of the link.
- In a one-to-many cardinality link type, the foreign key property of one object type must refer to the primary key property of the other object type.
- In a many-to-many cardinality link type, select which columns in the join table map to the primary keys of each of the linked object types.
Name: Fill in the display name for each side of the link type. A side of the link type represents the link to that object type. The display name for the Aircraft object type describes the link from Flight to Aircraft. In this example, you could choose the display name "Assigned Aircraft" since one Flight has one assigned Aircraft.
Plural display name: For sides of a link type with the cardinality many, you will also be prompted to fill in a plural display name so user applications can display the correct name when displaying the linked objects. In our example, the plural display name for the Flight object type will describe the link from Aircraft to Flight. We might choose the plural display name to be "Scheduled Flights" as one Aircraft has many scheduled Flights.
With the graph
Select the two object outputs that you want to create the link from, then right-click and select New link type. This will create a link with all the object information populated.


Alternatively, select a single object on the graph to create a New link type with one side populated.


Resolve Ontology validation errors
Users may make pipeline changes that result in validation errors in the Ontology. Some examples of errors include:
- Conflicting changes made to the same object type or link type in both Pipeline Builder and Ontology Manager.
- Changing the primary key of an object type that is referenced by a link type outside of the pipeline.
- Making breaking changes to an object type's schema such that a schema migration is required.
Any errors will show up on the right side panel under the Deploy this pipeline section. In the Errors tab, there will be a message describing what type of resolution needs to happen before deployment.
You must resolve these errors before you are able to deploy your pipeline.

When the Resolve button displays an arrow, selecting it will take you to Ontology Manager to resolve validation errors. Otherwise, you will be able to resolve the errors directly in Pipeline Builder.
Resolve merge conflicts in Ontology Manager

Follow the prompts in Ontology Manager to apply the merge conflict resolutions. If your changes affect potential edits, you can decide whether to drop edits or make your edits compatible with the latest version of the object. Otherwise, no additional specifications are needed for the merge conflict to be resolved, and you can select Apply.

Once changes are applied, the Ontology will be updated with the latest changes and you can select Go back to pipeline.

After resolving conflicts, you may occasionally encounter the error Ontology type outputs are out of date with the ontology when returning to your pipeline. This is because the pipeline has yet to pick up changes to your Ontology outputs made through the conflict resolution workflow above.

Selecting Resolve should fix this issue and allow you to deploy your pipeline.
Resolve conflicts in Pipeline Builder
Some Ontology validation errors do not require switching to Ontology Manager. In the example below, a schema migration is required, which happens when an object type schema in Pipeline Builder has been modified from the latest schema on the main branch of the Ontology. Select Resolve to choose the migration strategy directly in Pipeline Builder.

For impacted properties, you can choose whether to Drop edits from property or migrate your edits to make them compatible with the latest version of the property.

Once you have chosen the best approach, select Apply migrations.
Bring object type outputs back into Pipeline Builder
You can bring object types backed by a dataset output from your pipeline into Pipeline Builder following the steps below:
On the right side panel, select the cog icon next to Pipeline outputs.

Select Replace with objects. This will open the Replace datasets with ontology type outputs dialog.

Select the dataset outputs you want to convert back to the corresponding objects in your pipeline and select Import selected outputs.

Save your changes and deploy your pipeline.
Disown Ontology type outputs in Pipeline Builder [Deprecated]
Disowning Ontology type outputs in Pipeline Builder will transfer management of those Ontology types to Ontology Manager. This means that all future modifications to those Ontology types will only be possible in Ontology Manager. To disown Ontology types, select the object types you want to disown. Any link types that reference the selected object types will automatically transfer to Ontology Manager.
Ontology type outputs can only be replaced with dataset outputs if the latest saved version of the main branch was successfully deployed.
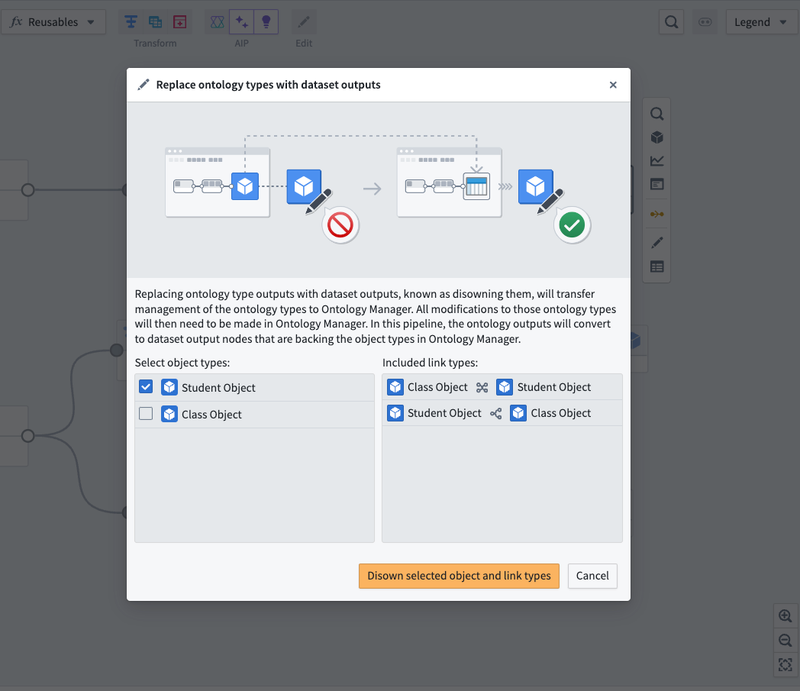
Select Disown selected object and link types.
In this pipeline, the object type output nodes will convert to dataset output nodes that back the object types in Ontology Manager. From the far right panel, navigate to the object type in Ontology Manager by selecting the icon next to the output.
Deploy your pipeline after disowning the selected objects.
Configure granular security permissions
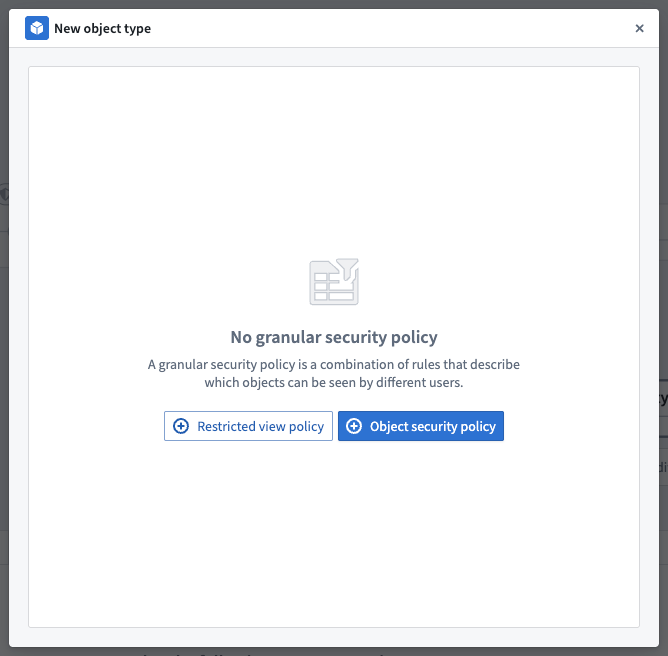
You can configure granular security permissions on objects by using a Restricted view policy or an Object security policy:
- Restricted views (RVs) enable row-level security.
- Object security policies enable both row-level and column-level security.
Object security policies in Pipeline Builder currently support a subset of features when compared with object security policies in Ontology Manager. See below for supported features.
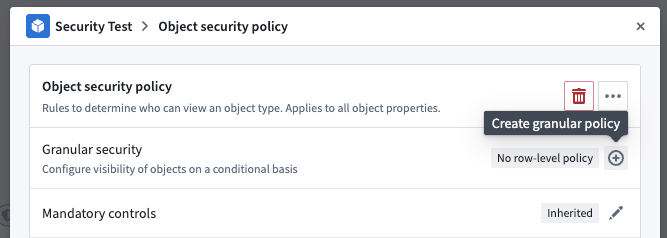
To set up your granular security policies, go to the output object and select Configure granular security.
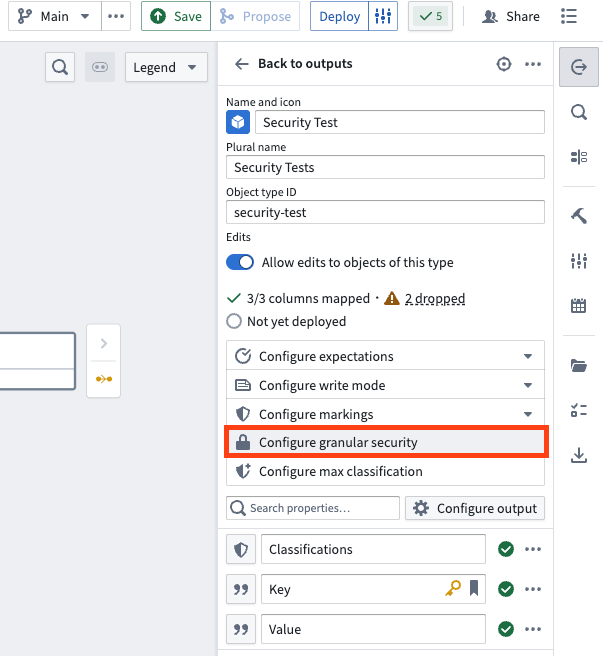
Select either Restricted view policy or Object security policy in the pop-up window.
Object security policy
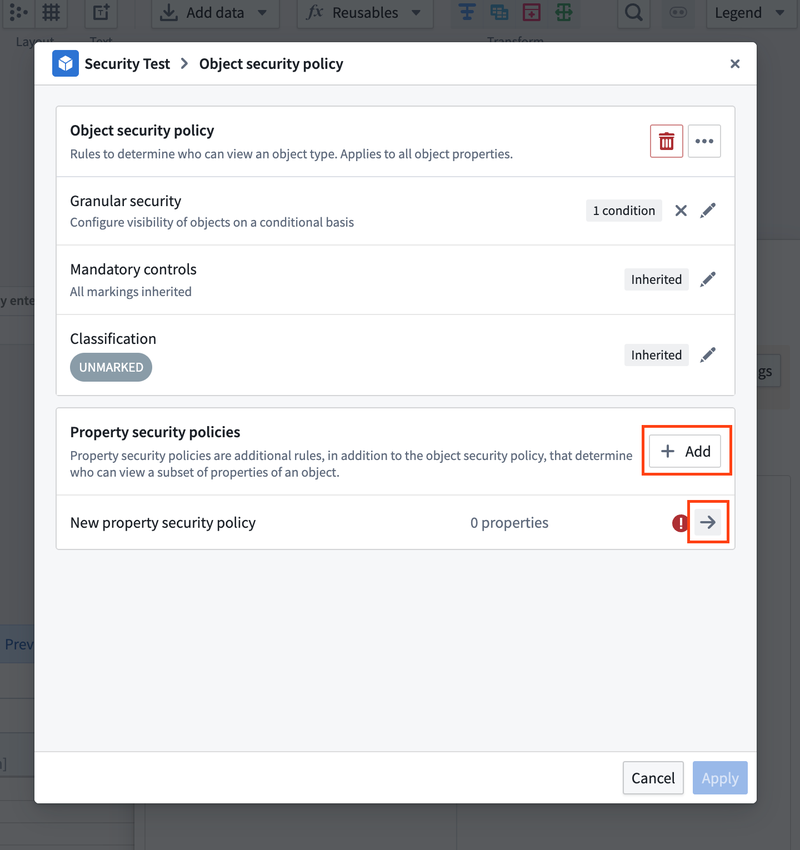
The Object security policy option lets you configure cell level granular security using row level policies, property security policies, marking removal management, and classification changes.
By default, object security policies are applied to all properties. When a property security policy includes a property, the user must pass both the object security policy and the property security policy to view the property value.
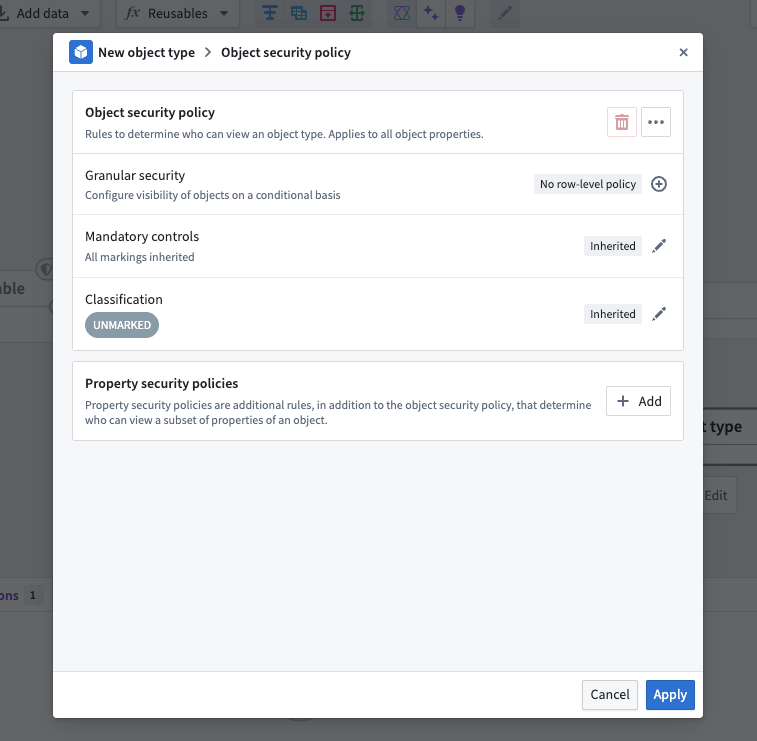
To add a row-level policy, select the plus sign (+) icon next to Granular security.
In the policy editor, you can create rules that compare property values, user properties, or constant values to define your security conditions.
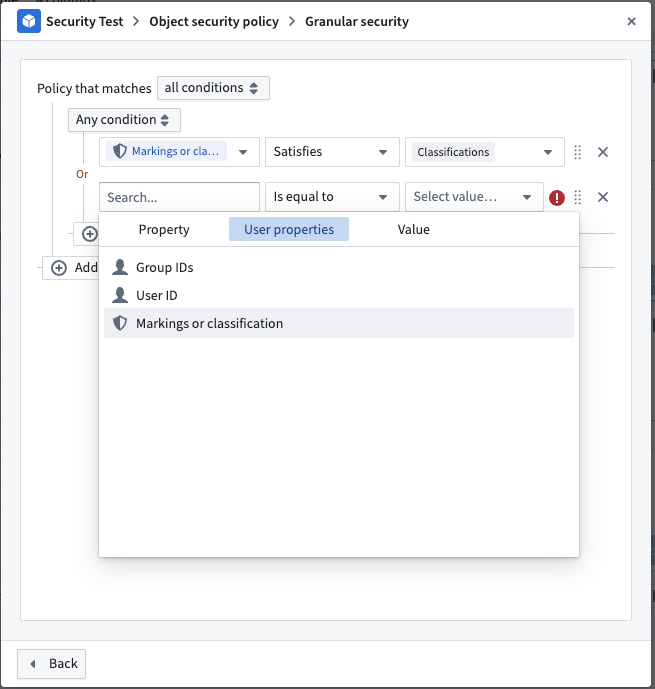
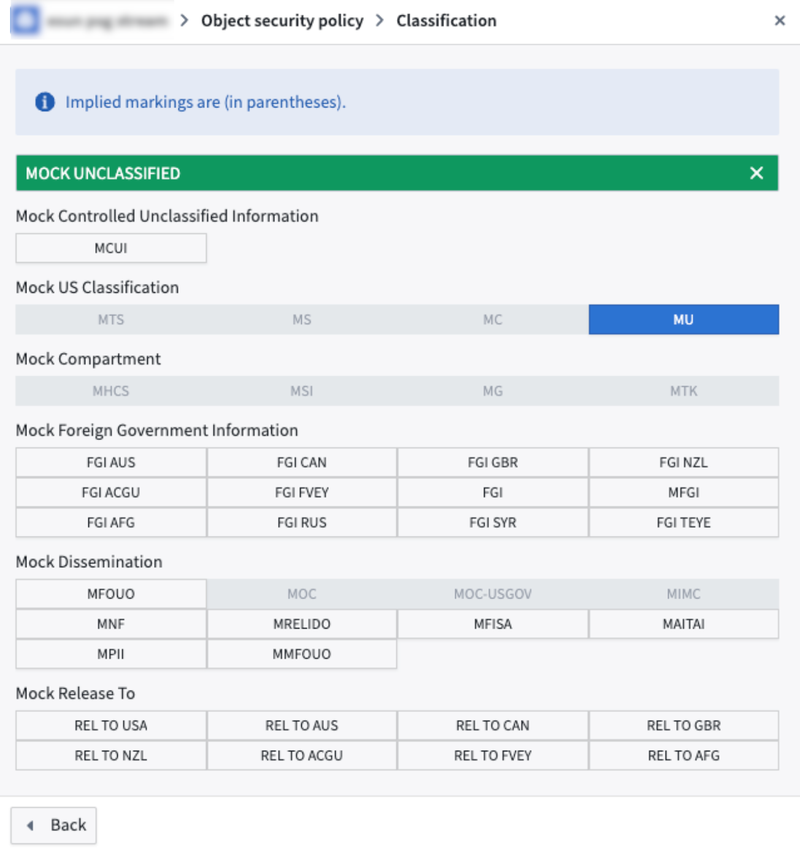
Note that to create a policy based on the Marking or classification user property, ensure that the value types are set to Marking or Classification.
To enforce the correct type, use the Logical Type Cast expression in the transform node.
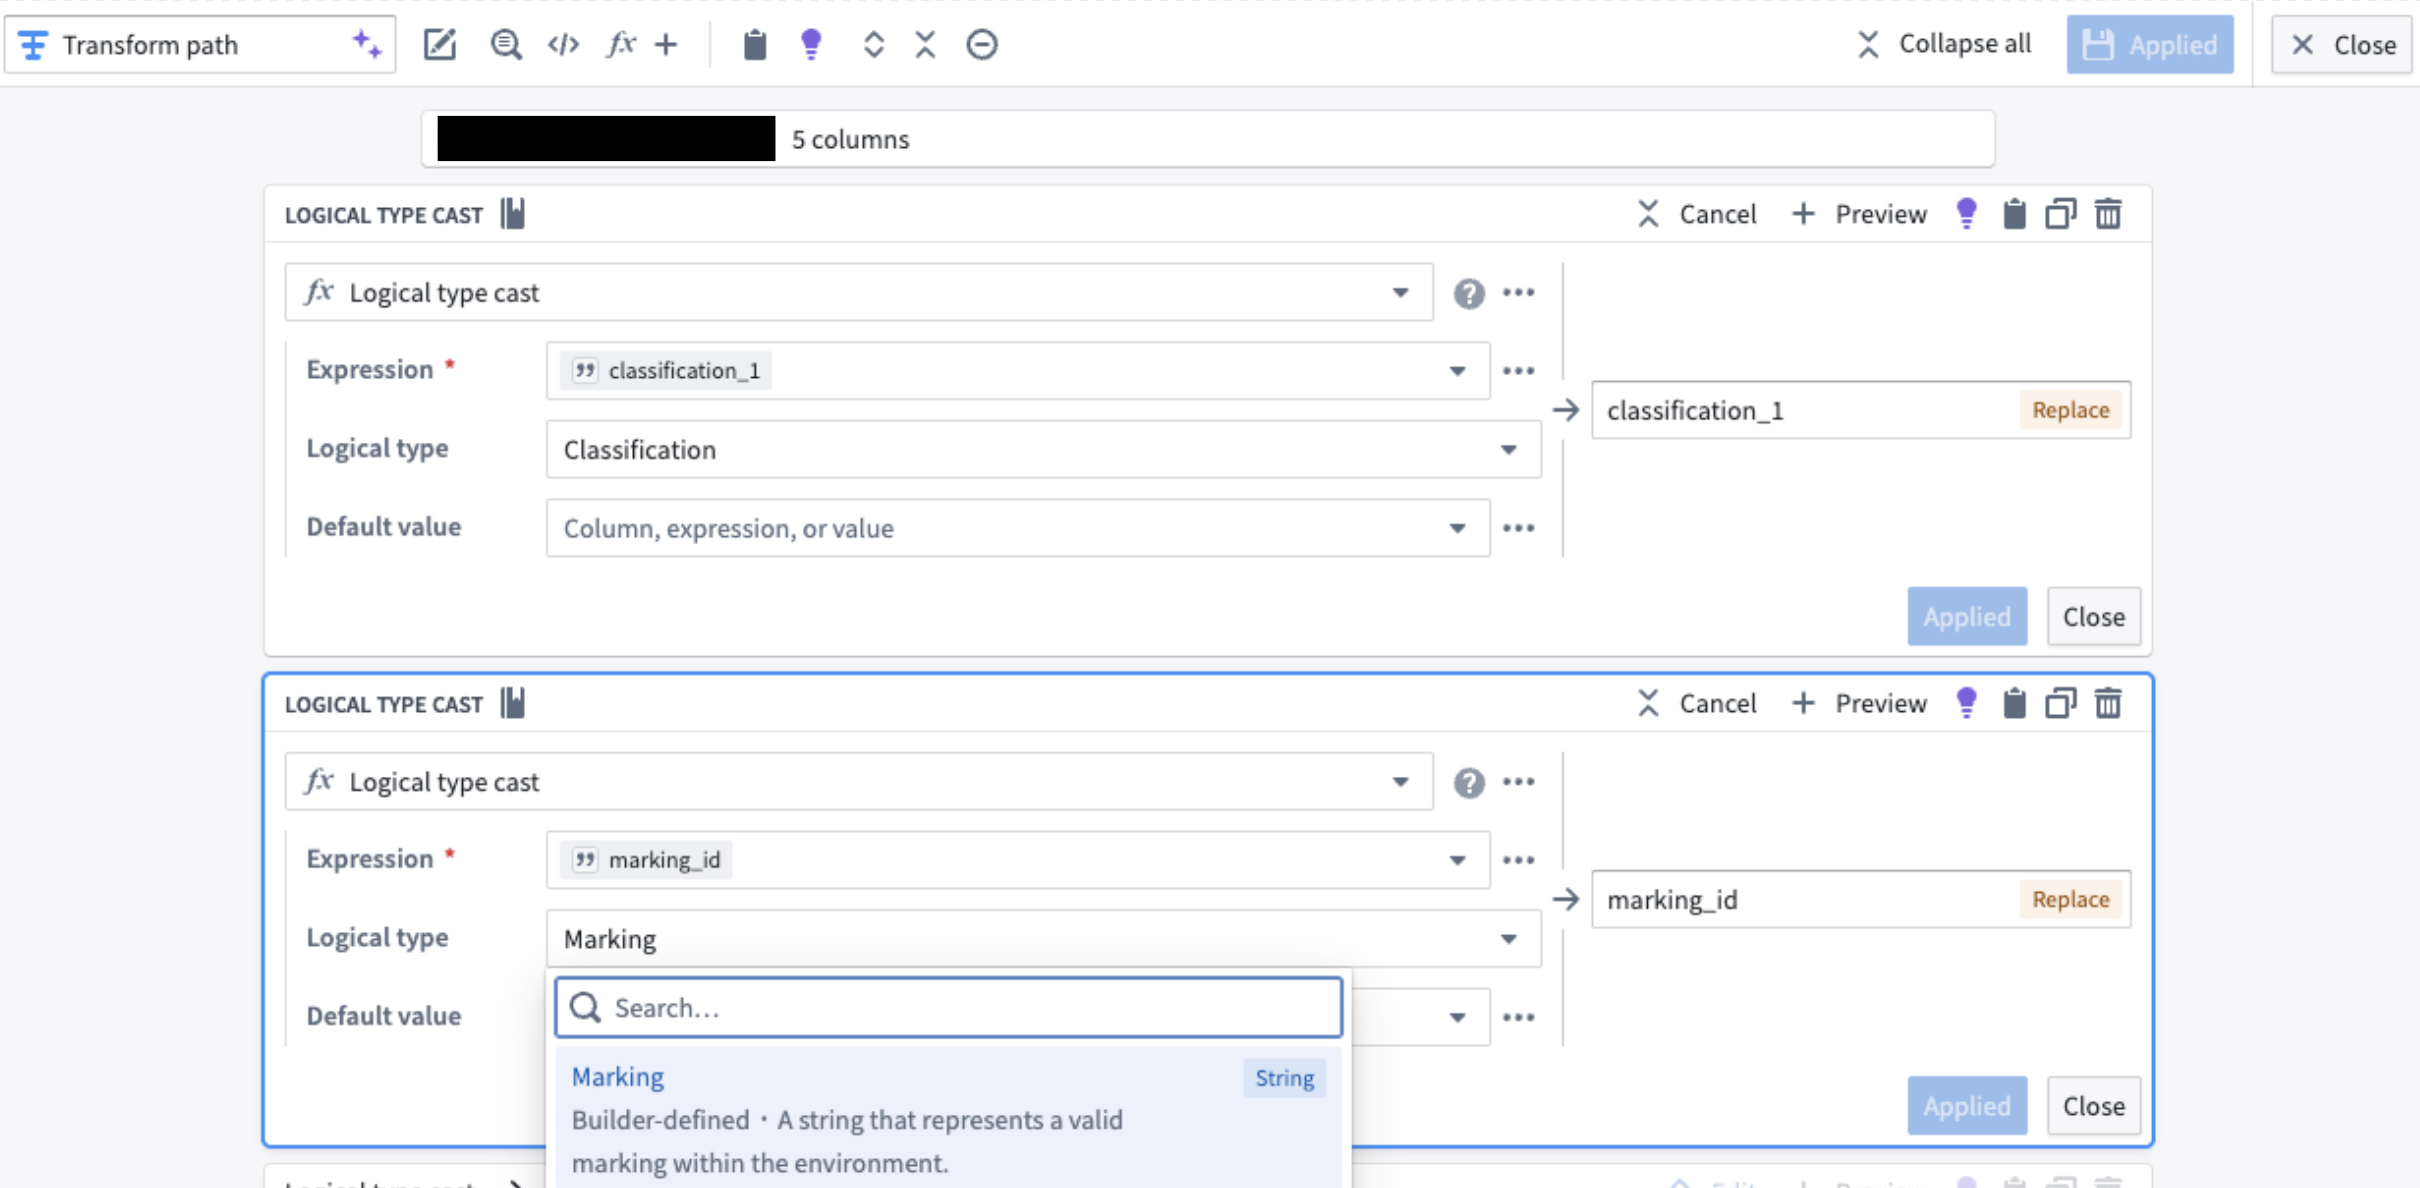
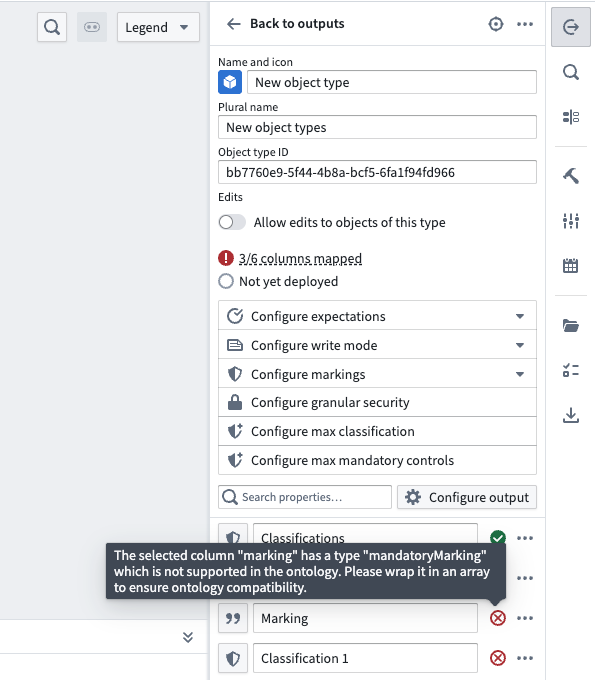
Additionally, markings and classifications must be wrapped in an array for compatibility with the ontology. Mapping a single marking or classification directly to an object property will result in an error.
Markings must use the associated marking ID. Learn more about the expected format of marking IDs.
After configuring your granular security policy, select Back (bottom left) to return to the main configuration window. If no further changes are needed, select Apply to save your policy.
You can go to Mandatory controls to remove any inherited markings or Classification to adjust the classification.
Pipeline Builder does not currently support adjusting classifications for manually entered tables.
Property security policies can be added in a similar way. Select Add in the Property security policies section. This will create a new property security policy. To configure the property security policies, select the arrow on the policy you want to edit.
Under Policy name, you can rename your property security policy. Select one or more columns you want to apply this policy to under Properties affected, and then configure the granular security, mandatory control, or classification in the same way you would do so above.
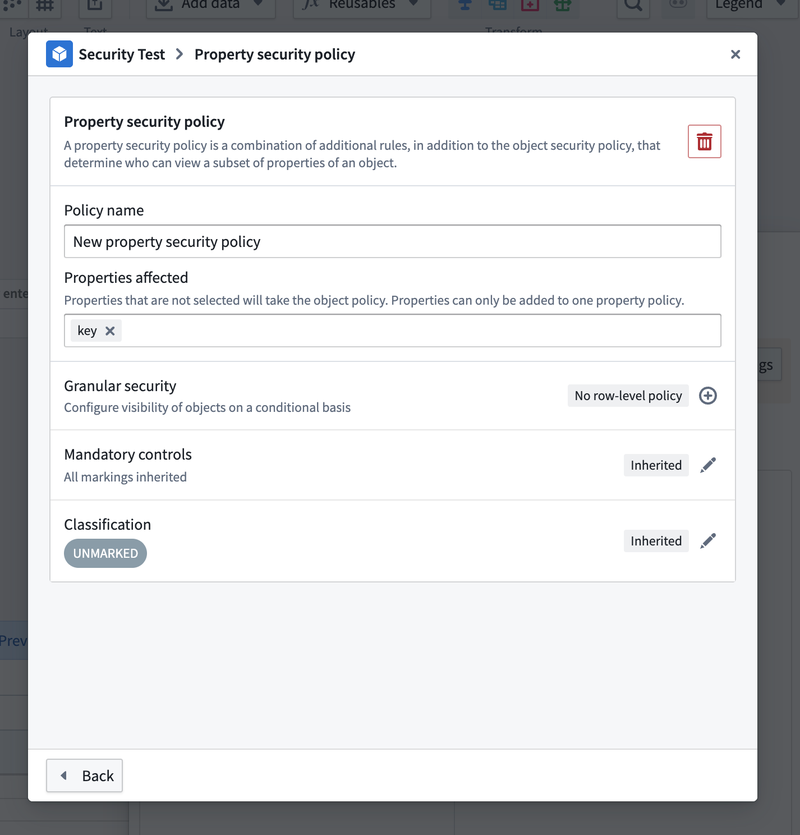
After configuring your property security policy, select Back (bottom left) to return to the main configuration window. Use Apply to save your policy.
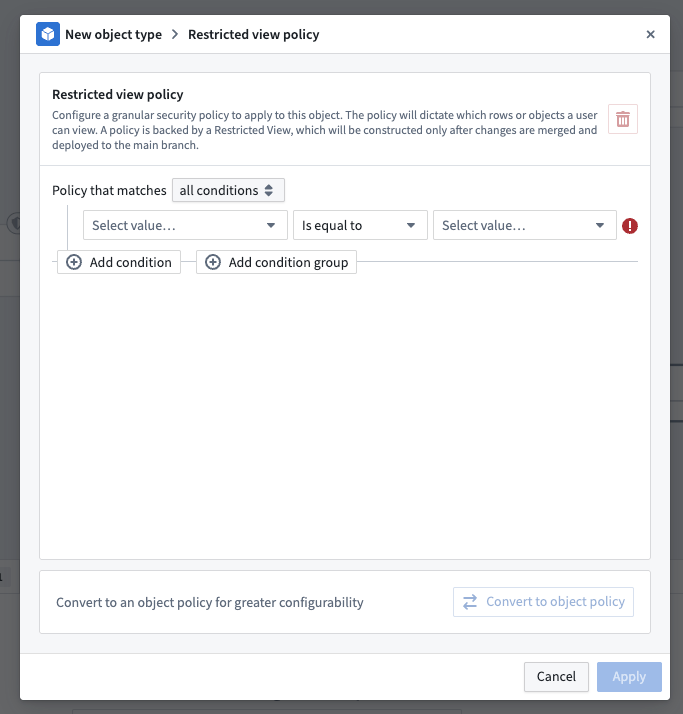
Restricted view policy
To configure which rows a user can view on your output, you can create a restricted view policy to apply to your object. The policy is backed by a Restricted View, which is built after your changes are merged and deployed to main.
You can configure your policy directly in the restricted view policy window. The same rules for markings and classifications apply here as stated above. Learn more about restricted view policies and best practices. You also have the option to convert the restricted view policy into an object policy for greater configurability.
Once you have finished creating your granular security policy, save your pipeline and propose your changes. The backing security policies will only be created and go into effect after you have deployed successfully on the main branch.