- Capabilities
- Getting started
- Architecture center
- Platform updates
Build a to-do application
In this tutorial, we will build a release checklist application with Pilot. It will allow you to organize a list of tasks and track their completion.
Pilot will help you build the release checklist, inspect its proposed Ontology, and test the generated application. The tutorial creates a new object type and actions, so use a project and Ontology where you can create resources.
The generated to-do application lets you add tasks, mark them complete or incomplete, filter the list, and delete tasks. Follow the application walkthrough first, or go to reuse an existing task model or build the checklist as a widget if you would like to jump to specific sections.
Generated layouts and names can vary. Compare the controls and results with the screenshots as you proceed. Orange outlines identify the controls or status indicators used in the adjacent steps.
Create the application
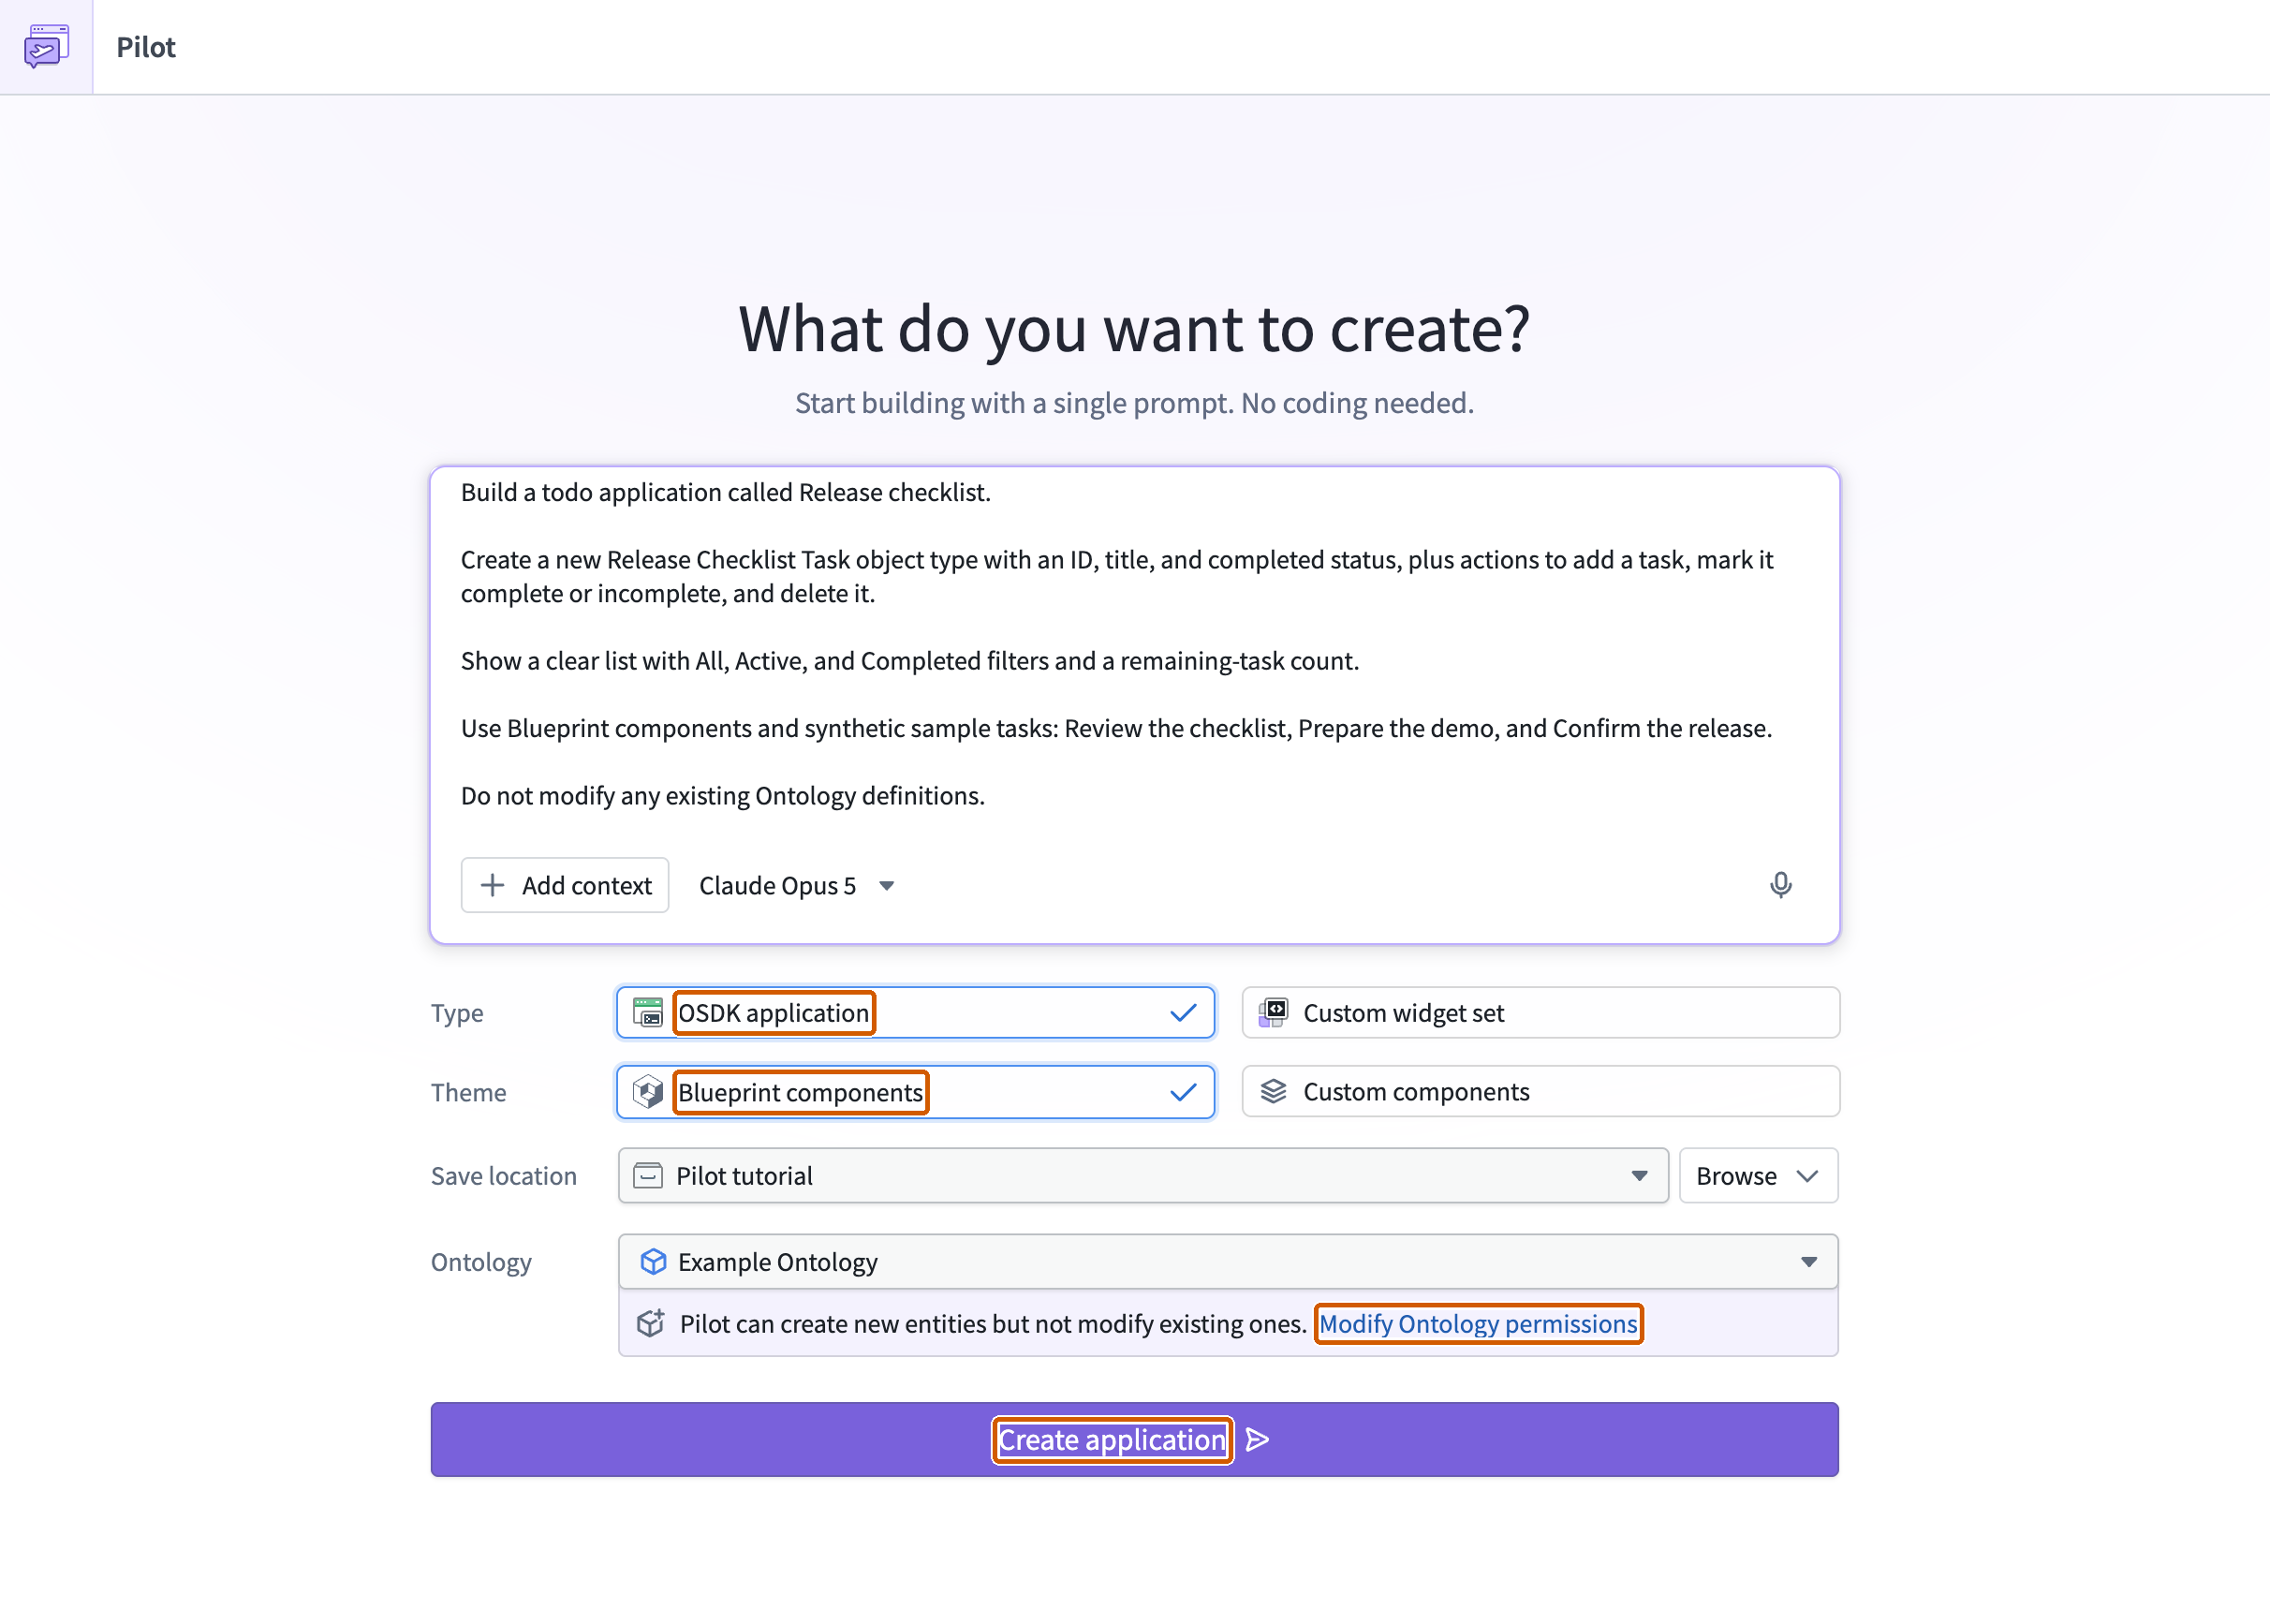
Open Pilot and configure the welcome screen:
- Set Type to OSDK application.
- Set Theme to Blueprint components.
- Select your Save location and Ontology.
- Enter the following prompt in the prompt box:
Copied!1 2 3 4 5 6 7 8 9 10 11 12Build a todo application called Release checklist. Create a new Release Checklist Task object type with an ID, title, and completed status, plus actions to add a task, mark it complete or incomplete, and delete it. Show a clear list with All, Active, and Completed filters and a remaining-task count. Use Blueprint components and synthetic sample tasks: Review the checklist, Prepare the demo, and Confirm the release. Do not modify any existing Ontology definitions.
The completed form should resemble the following. Use your own project and Ontology; Pilot tutorial and Example Ontology are example labels.
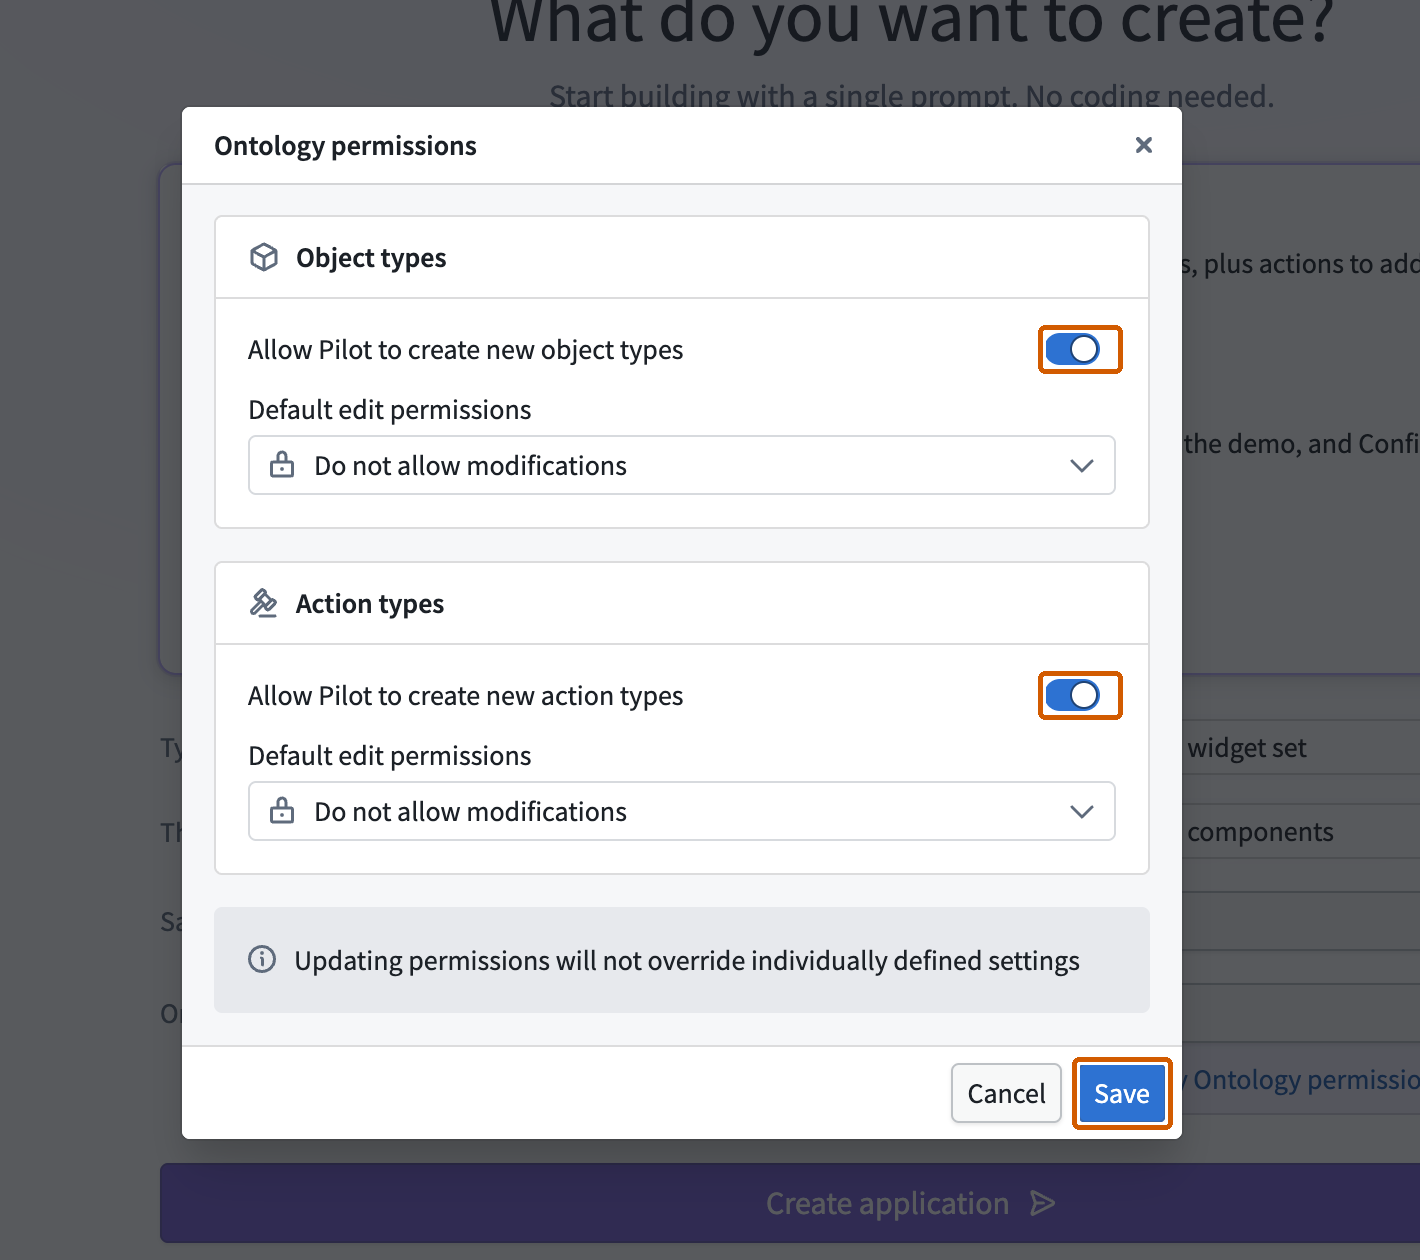
Before creating the application, allow Pilot to propose the new entities:
- Select Modify Ontology permissions, beneath Ontology.
- Enable Allow Pilot to create new object types and Allow Pilot to create new action types.
- Leave both Default edit permissions controls set to Do not allow modifications, then select Save.
Back on the welcome screen, confirm that it says Pilot can create new entities but not modify existing ones. Select Create application and wait for container setup and generation to finish.
Inspect the proposed data model
In the workspace, select Ontology above the application preview. This example needs:
- A
Release Checklist Taskobject type withID,Title, andCompletedproperties - An action to add a task
- An action to set a task's completion status
- An action to delete a task
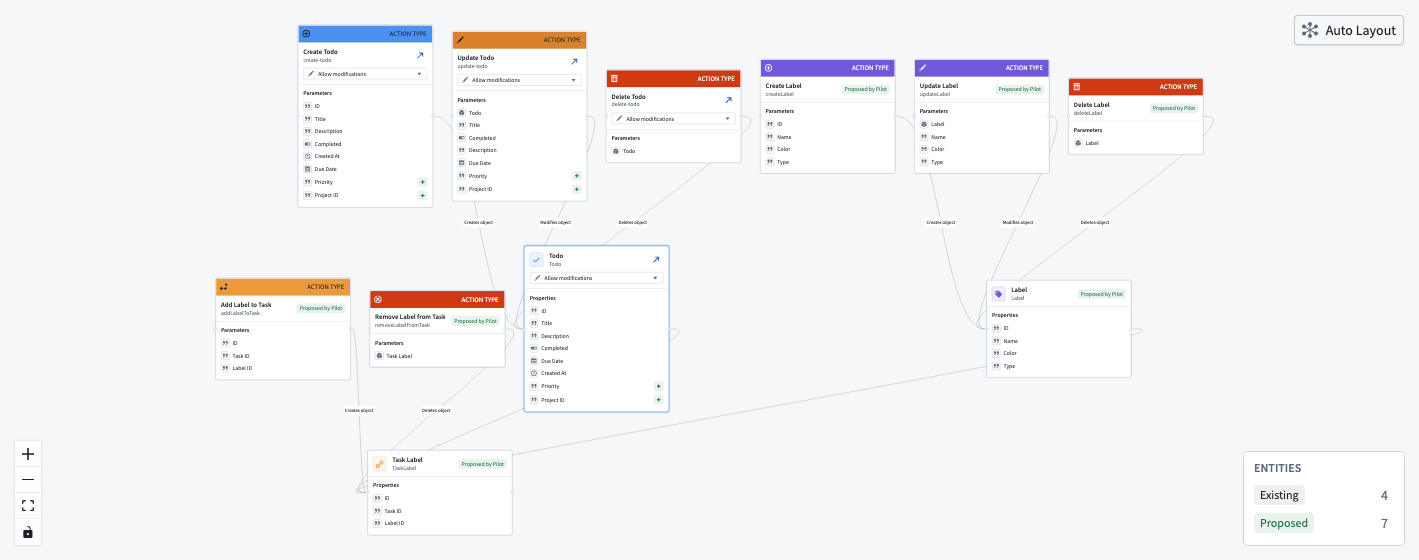
Check that the entities are marked Proposed by Pilot. They still need implementation in Foundry before the application can use them with production data.
Select the task object type to open its data preview. Confirm that the three requested sample tasks are present. If Pilot reused existing entities or generated a different model, describe the discrepancy in the chat and inspect the result again before deployment.
Test with seed data
Select Preview and confirm that Notional data is selected. The screenshot shows where to find the data-source control, task input, and filters.
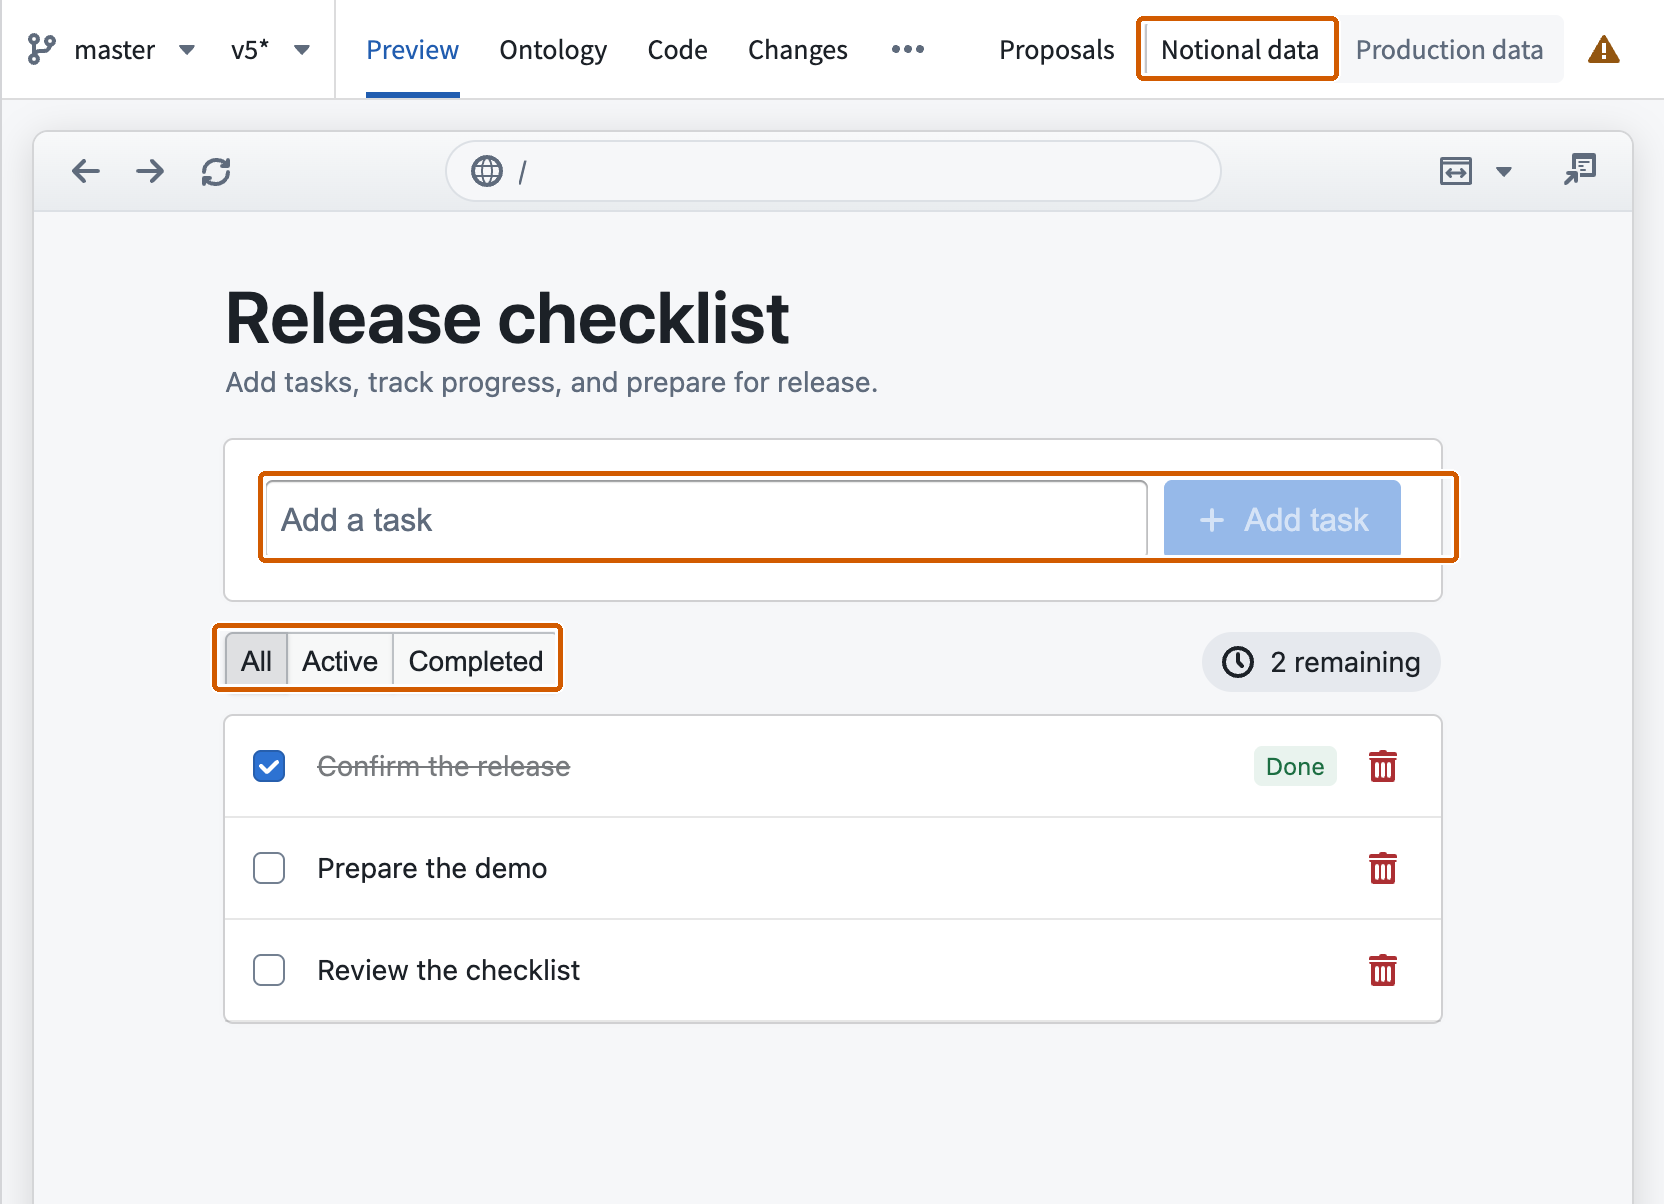
Test the generated controls:
- Enter
Verify the published checklistand select Add task. Confirm that the task appears and the remaining count increases by one. - Mark the task complete. Confirm that its checkbox is selected and the remaining count decreases by one.
- Select Completed. Confirm that the completed task appears.
- Select Active. Confirm that the completed task is absent.
- Return to All and reload the preview. Confirm that the task and its completed state remain.
- Mark the task incomplete. Confirm that the remaining count increases.
- Delete this test task. Confirm that it disappears and the original sample tasks remain.
If a control fails, describe the actual behavior and expected result to Pilot, then repeat the check after the fix. These checks validate local preview behavior; production permissions and the proposed Ontology definitions still need validation.
Implement the Ontology on a branch
Select Deploy in the upper-right corner of Pilot. This opens the deployment checklist on the left of the preview. The example below shows a configured application; your checklist will reflect your progress.
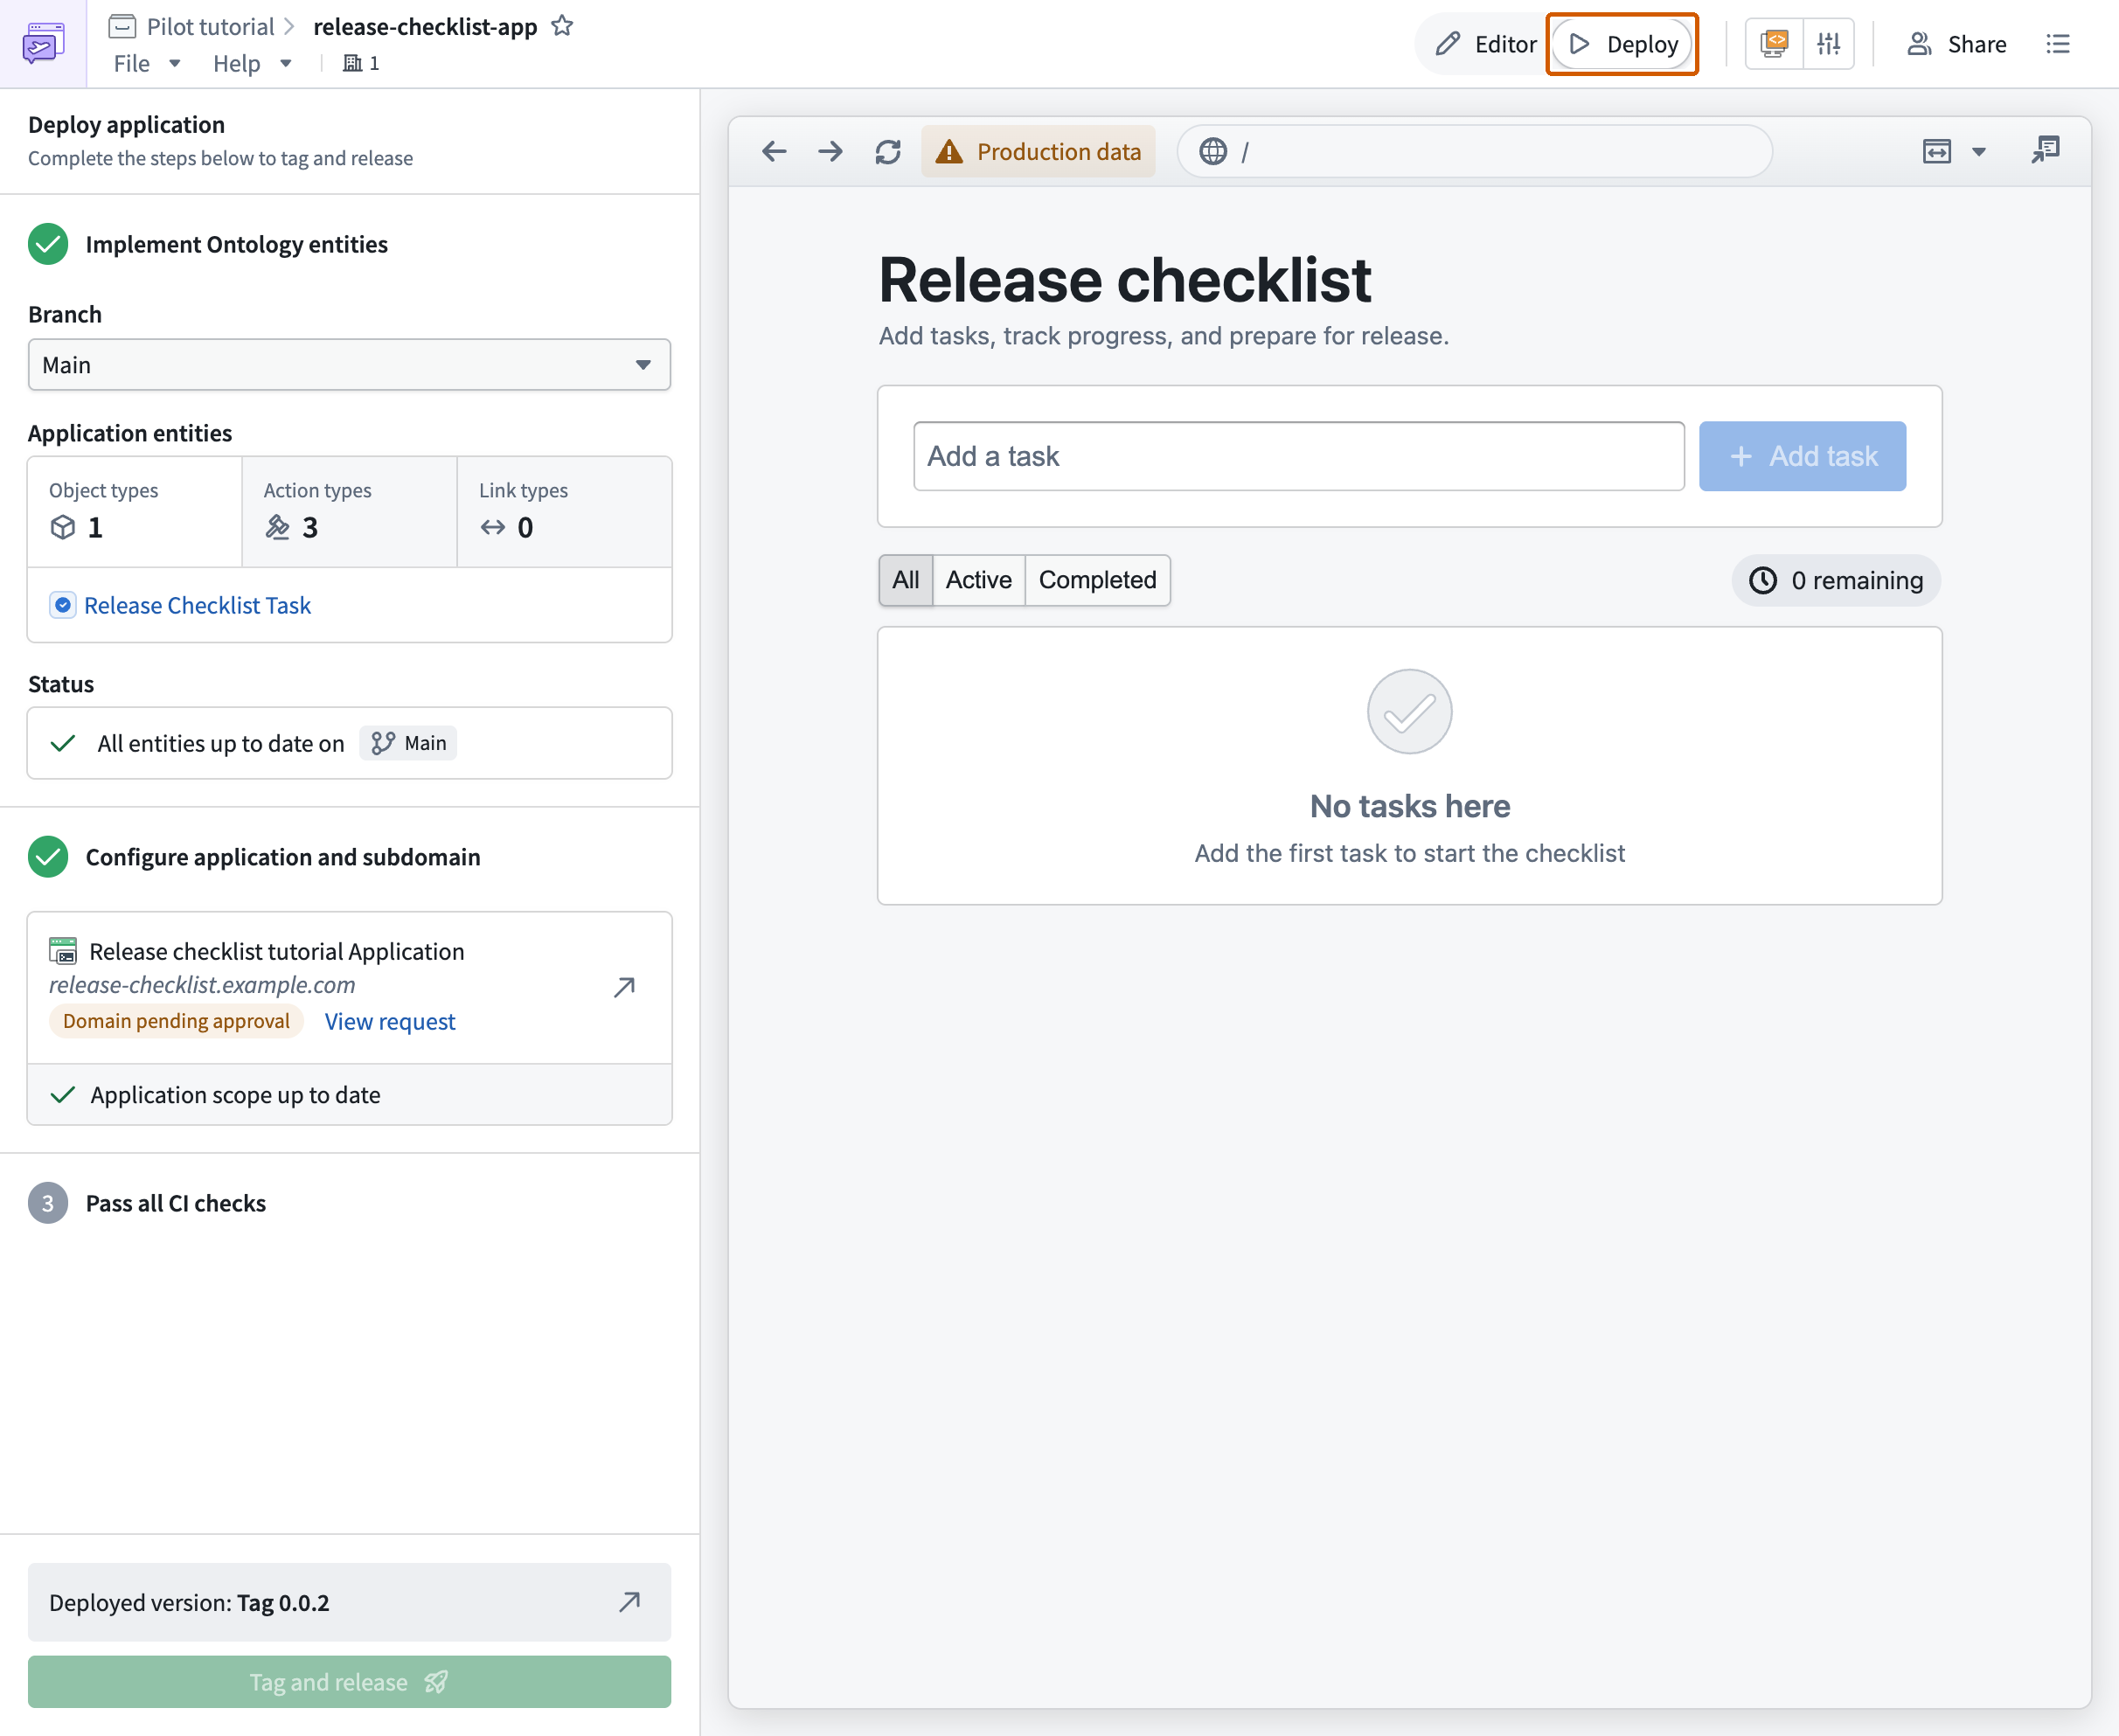
Under Implement Ontology entities, new definitions can appear as Not found on Main. Create a deployment branch for them:
- Select Create branch. Pilot may open the Create deployment branch dialog when you first enter Deploy.
- Enter a branch name such as
Release checklist tutorial. - Check the Location and Application entities. This example proposes one object type and three action types.
- When the form is ready, select Create branch.
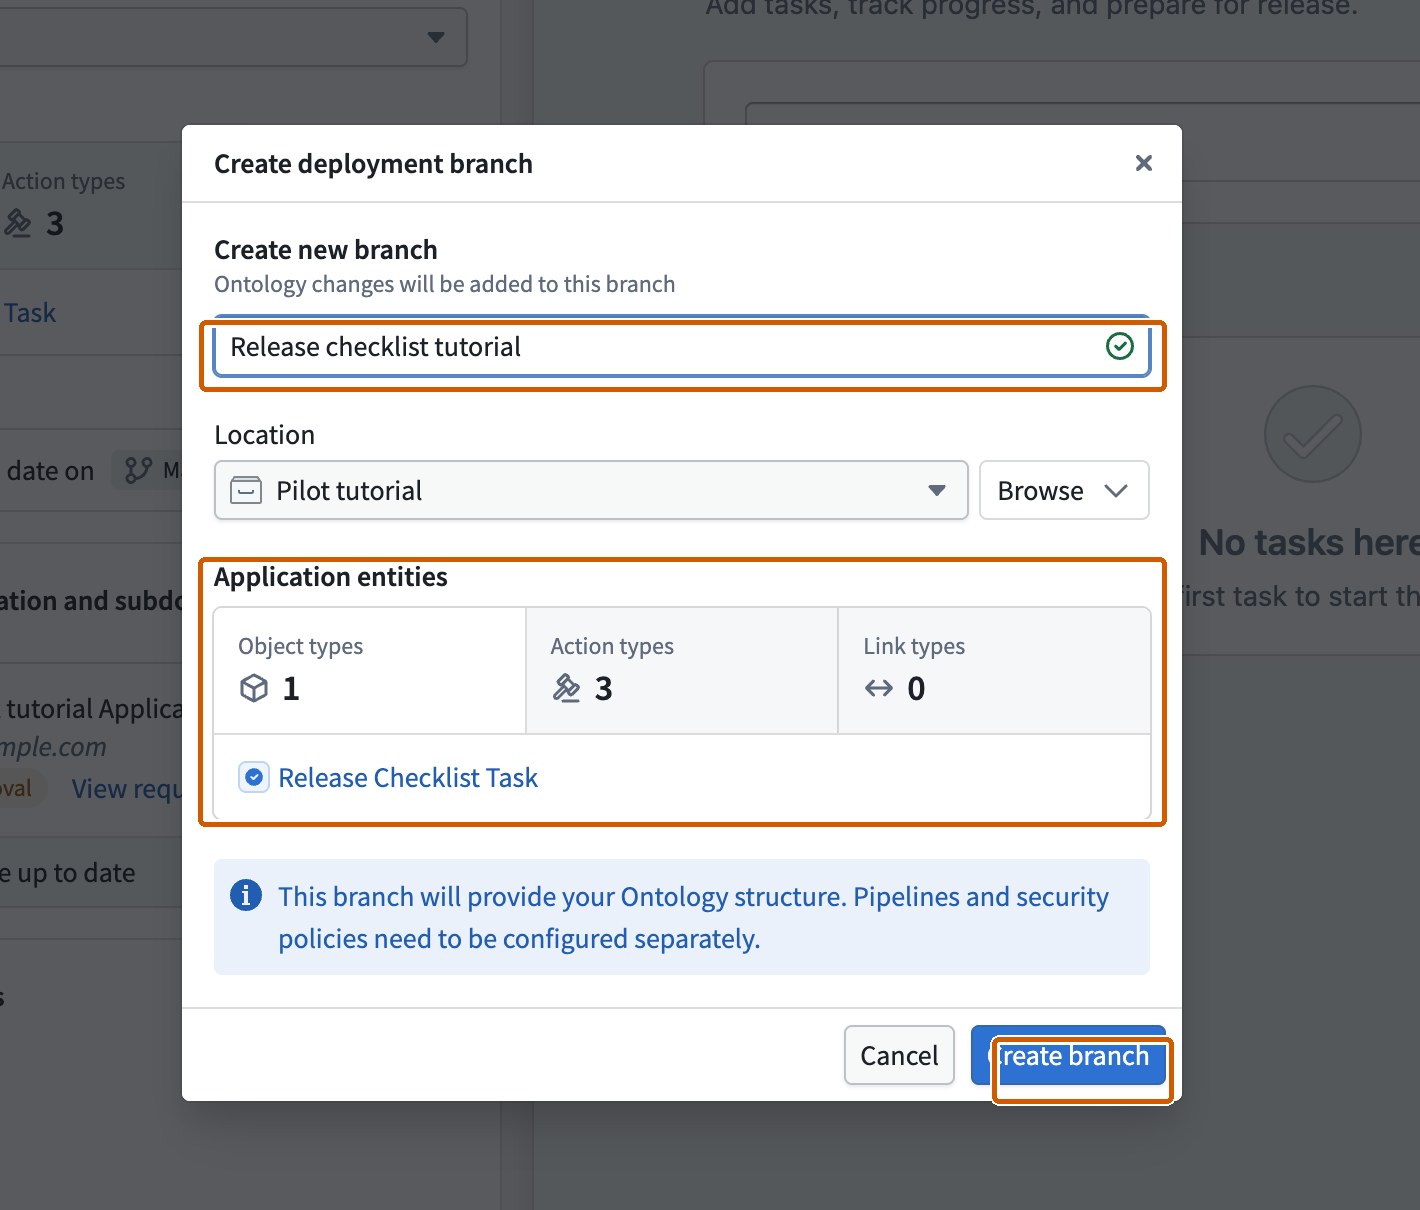
Wait for implementation and object indexing. While indexing is in progress, actions can fail and data can be missing. If branch creation is unavailable, inspect the explanation; Global Branching must be enabled.
After implementation, check the selected Branch on the left and Production data on branch above the preview.
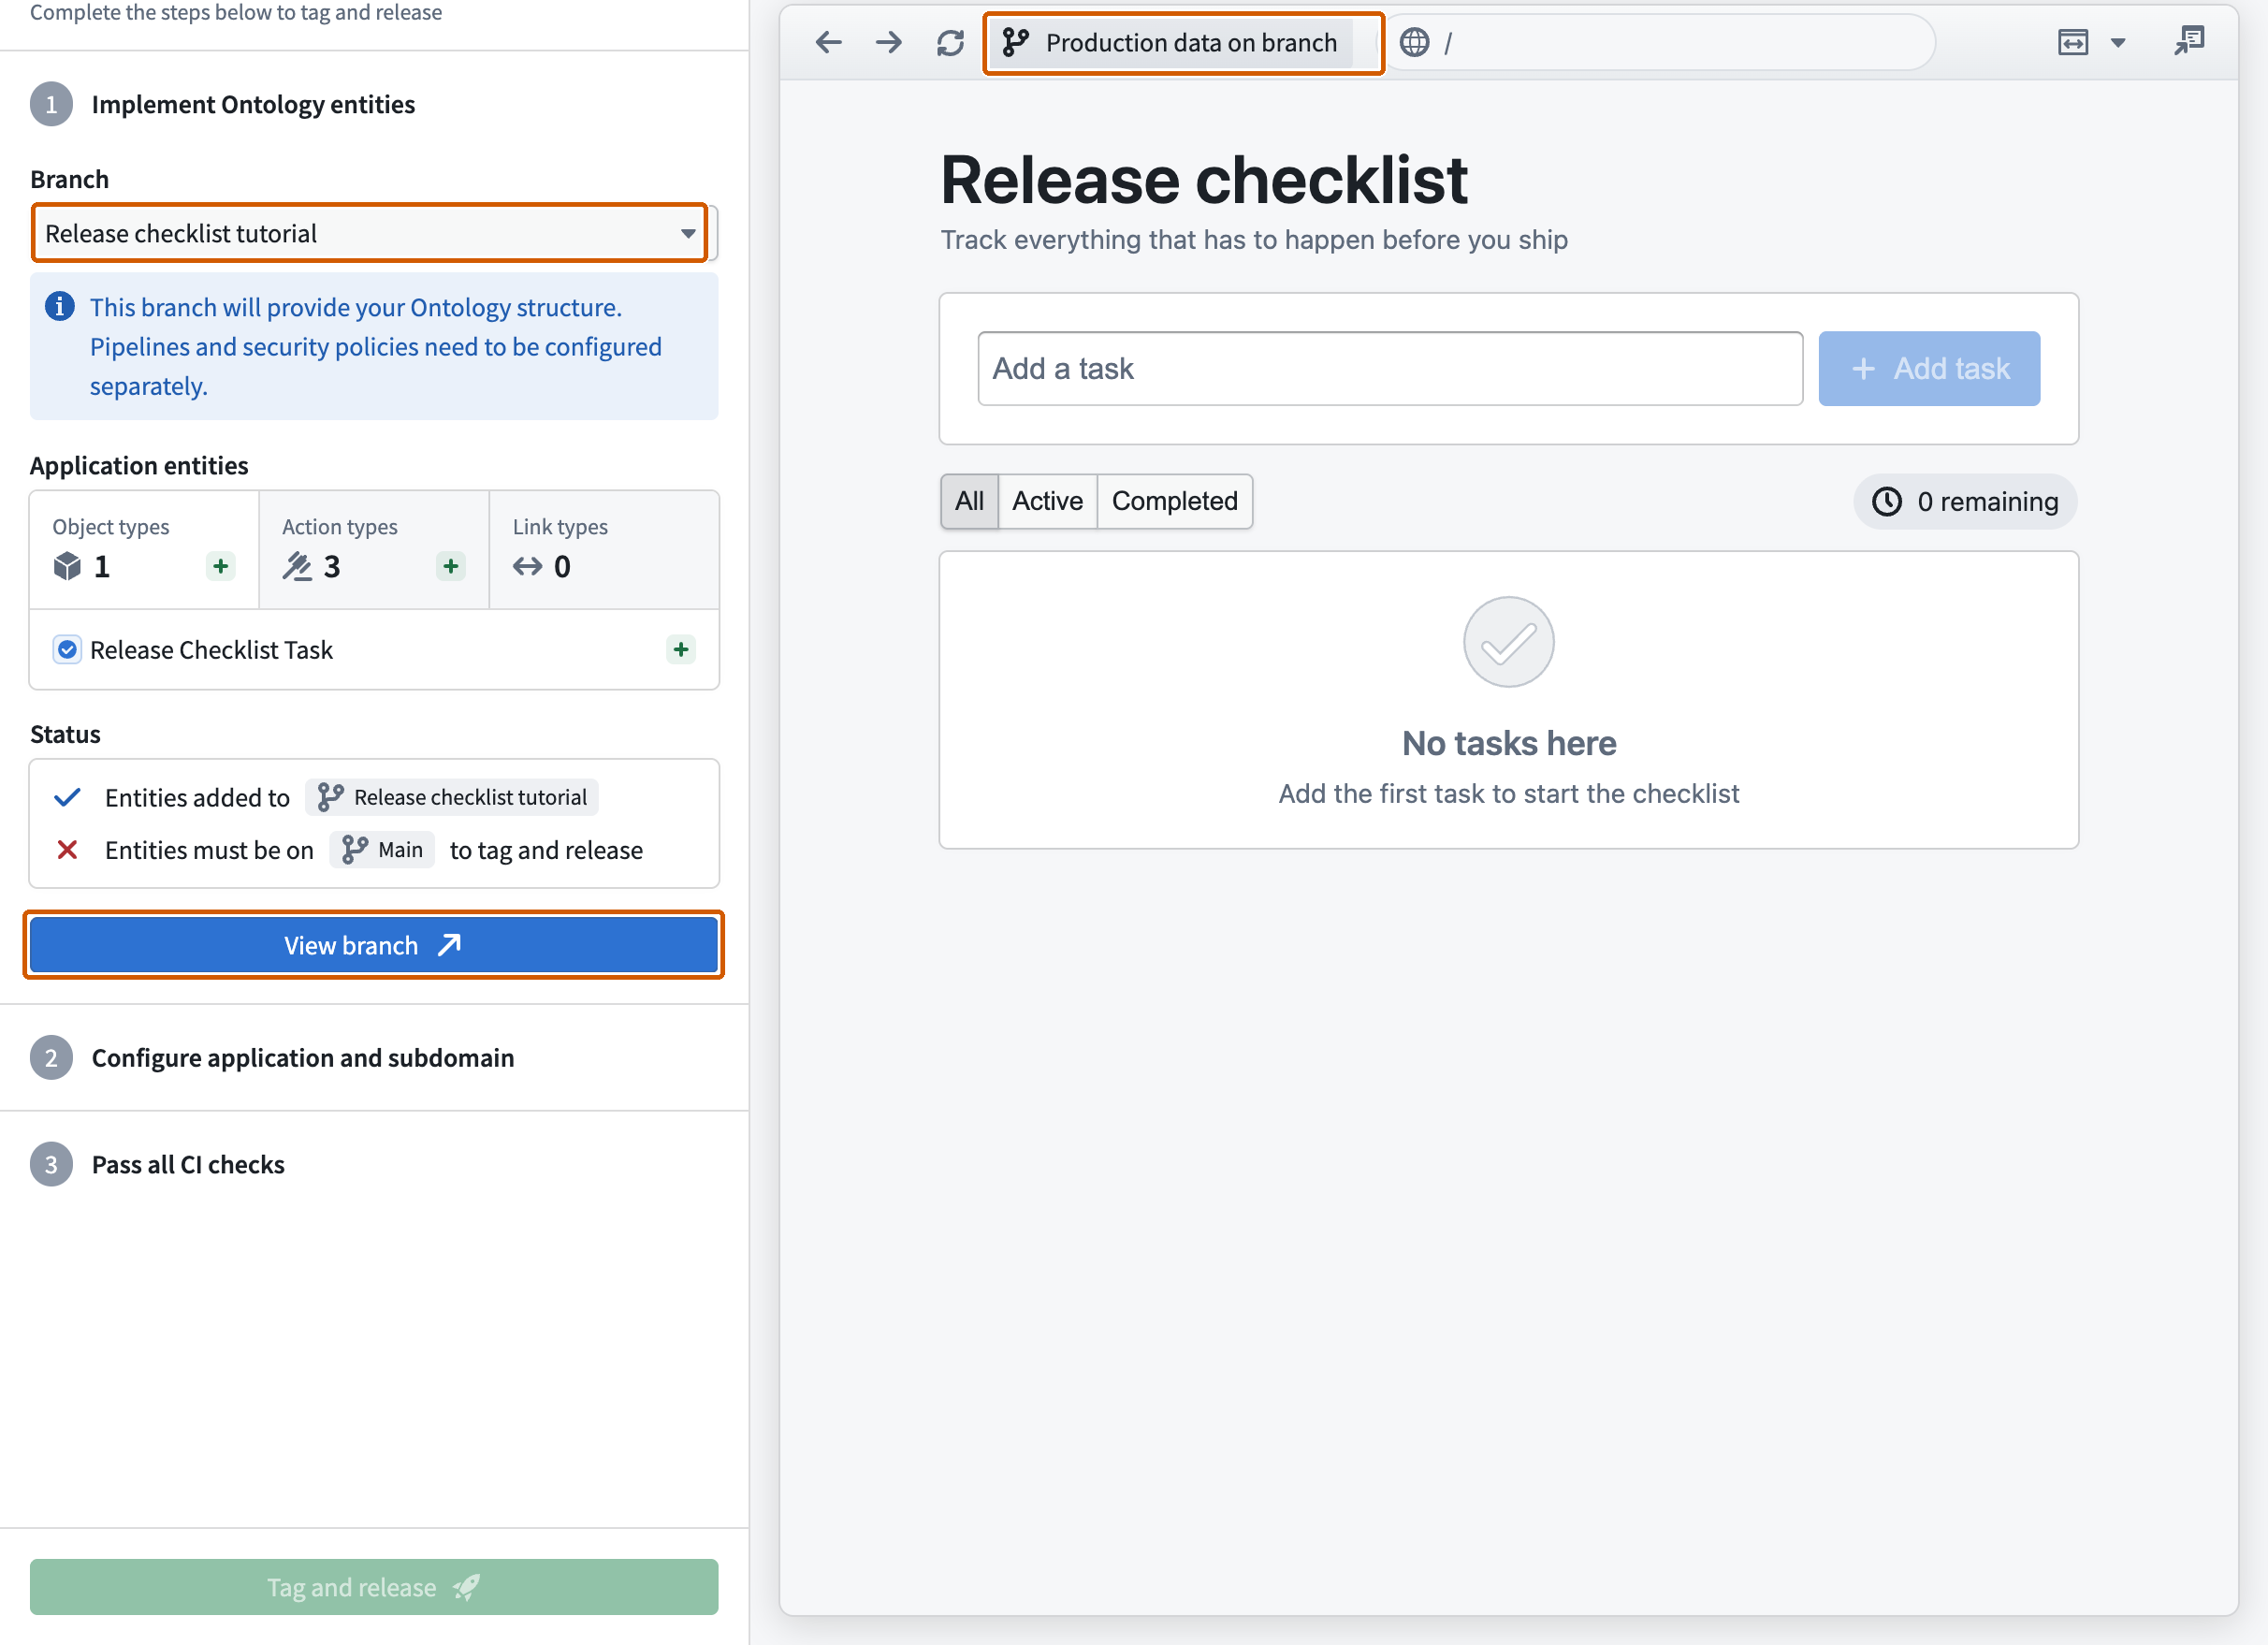
The branch preview uses records on the selected Foundry branch. The local seed tasks are separate, so the new task object type can initially have no records.
To validate the application, add a release task such as Validate the deployment branch, repeat the completion, filter, reload, and delete checks, and remove the test task when finished. Then select View branch to open Global Branching.
Review and merge the Ontology proposal
In Global Branching:
- Confirm that the branch contains the task object type and three actions.
- Select Create proposal in the upper-right corner.
- Enter a Proposal name and Proposal description, then select Create.
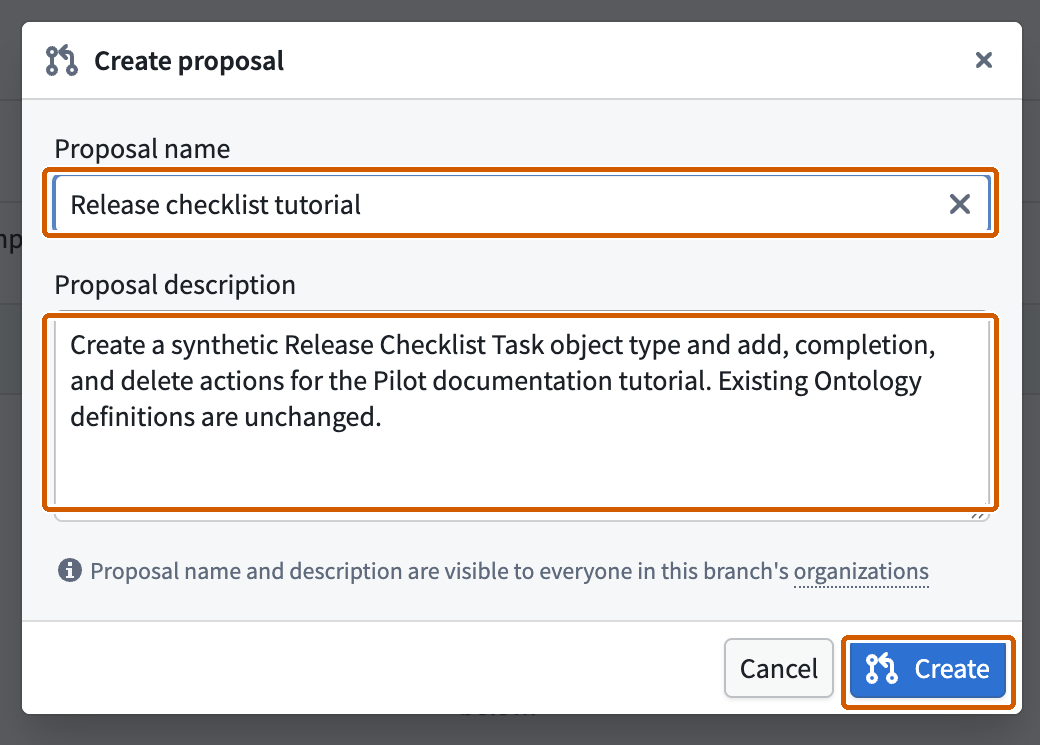
Wait for the task object type to finish indexing, then review the proposal before merging:
- Open Changes and confirm that the proposal creates the intended task object type and actions without modifying unrelated definitions.
- Return to Overview to inspect the resource checks and required approvals. The example below shows four resources with passed checks and automatic approvals; your policies can differ.
- Select Merge proposal, review the confirmation, and confirm Merge proposal. Wait for the proposal to show Merged.
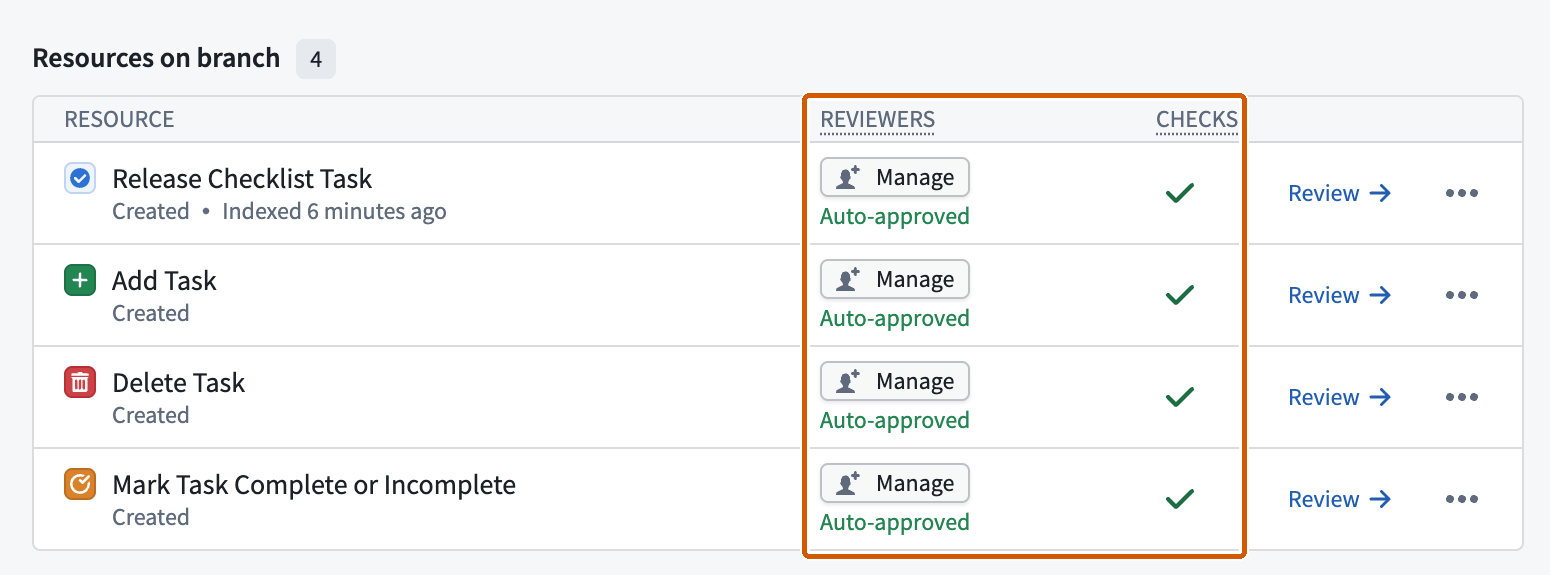
Return to Pilot and select Switch to Main. Confirm that Implement Ontology entities reports All entities up to date on Main.
Review the generated actions' submission criteria before sharing the application. The default criteria allow only the user who created the action with Pilot to submit it. Configure the intended access in Ontology Manager.
Configure the application and run checks
In the deployment checklist, open Configure application and subdomain and select Configure application.
- Enter a Developer Console application name, such as
Release checklist tutorial. - Select the Organization. The Subdomain field appears after this selection.
- Enter an available subdomain. Wait for the availability check, then select Create application.
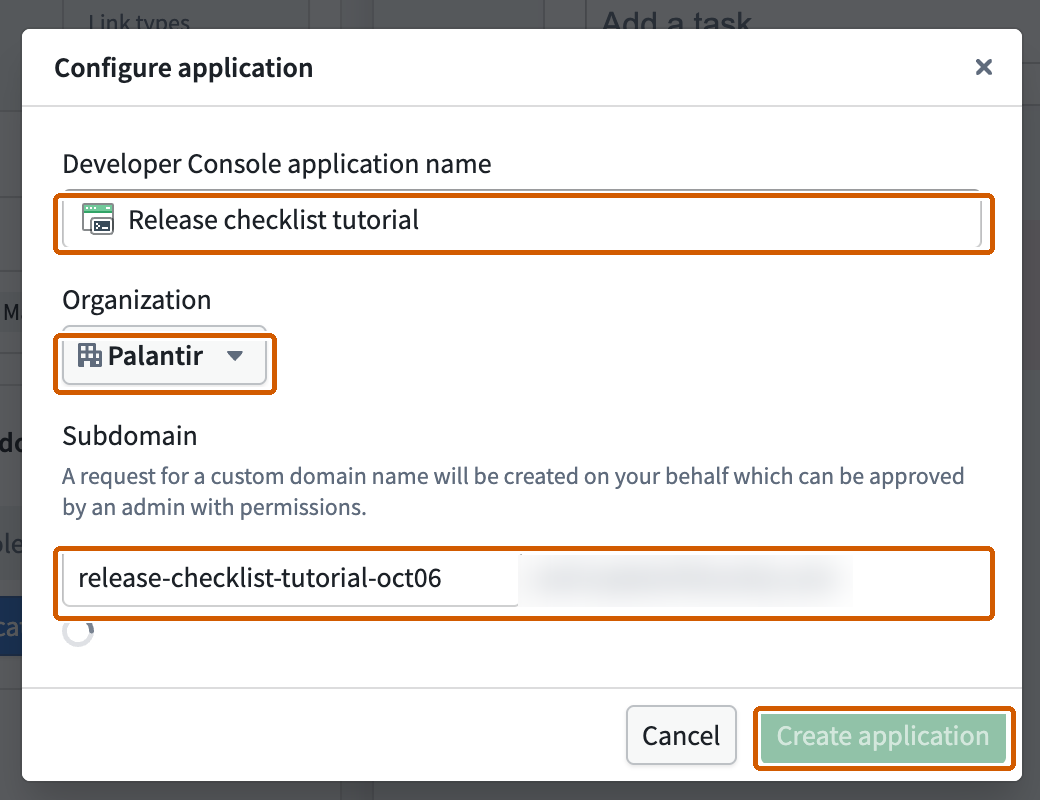
Confirm that the application card appears and reports Application scope up to date. If it displays Domain pending approval, contact your enrollment administrator to approve the request before hosting the website. See Approve the subdomain request.
Next, open Pass all CI checks.
- Select Generate deployment files to enable checks when prompted, or Update files if the deployment files are outdated.
- Wait for SUCCEEDED on the commit you intend to release.
- If a check fails, open its build output, ask Pilot to fix the reported problem, and wait for checks on the updated commit to pass.
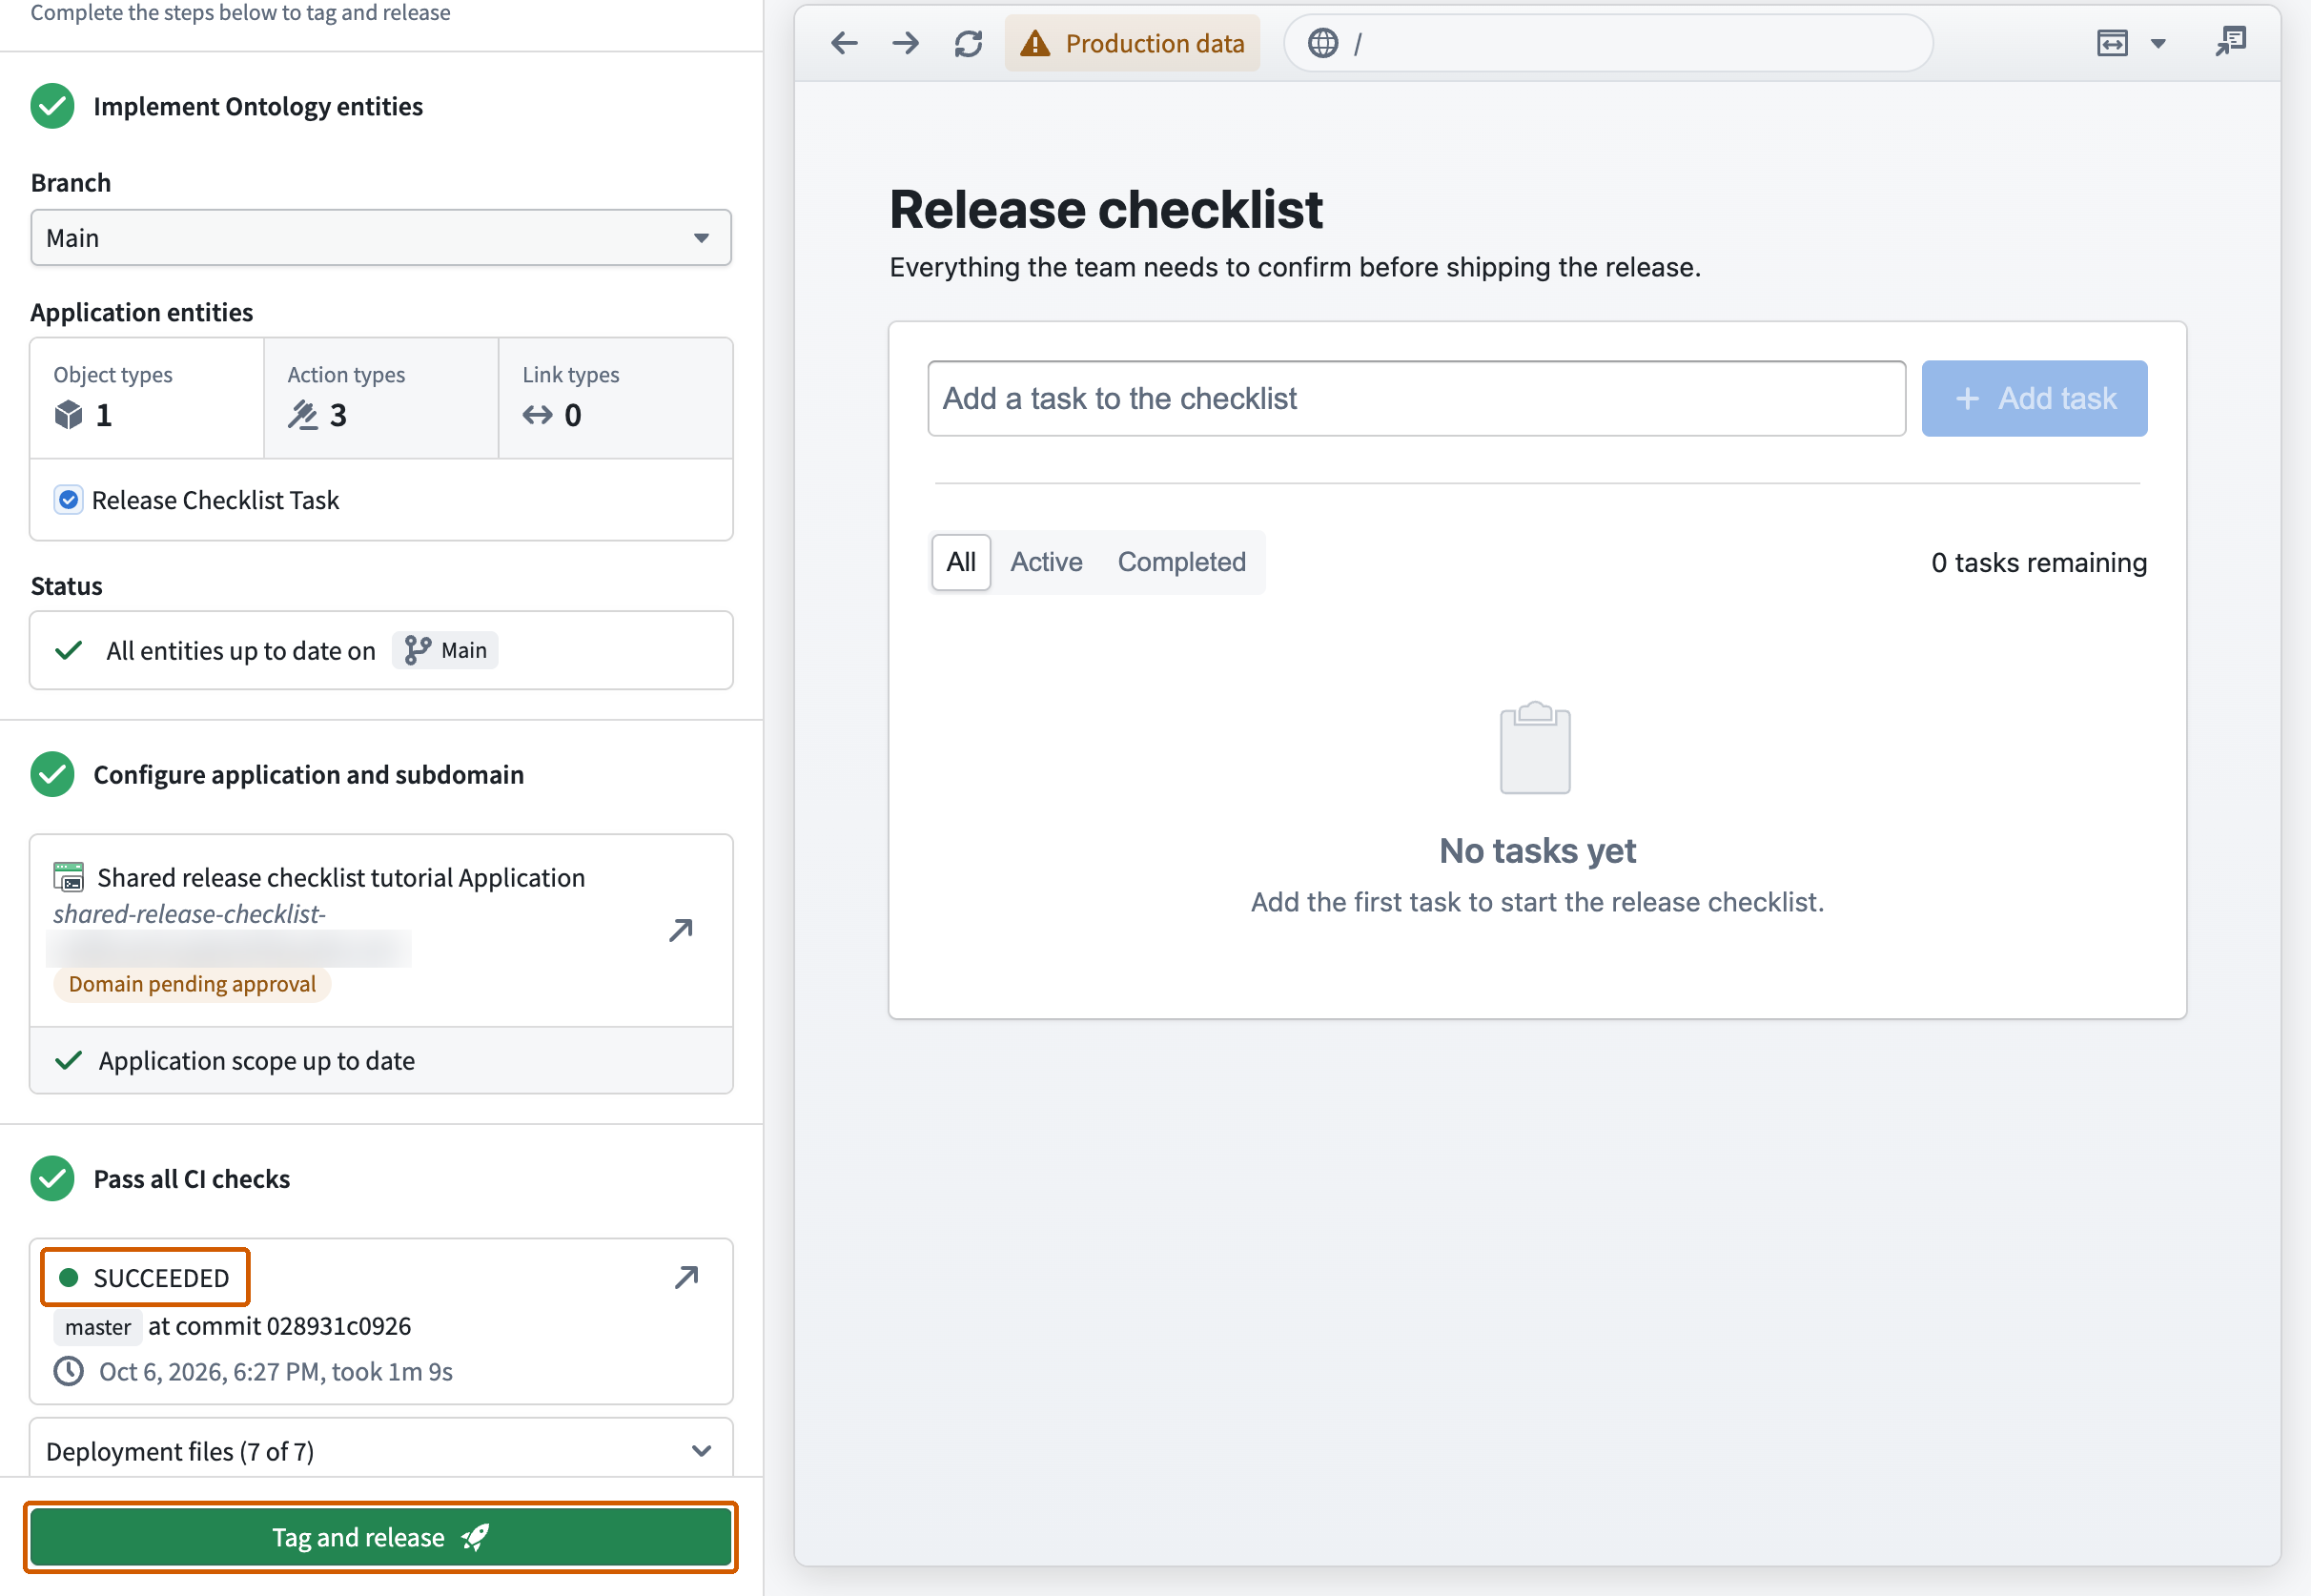
Release and verify the hosted application
After successful checks, select Tag and release at the bottom of the deployment checklist:
- Review the selected branch or commit and the latest released tag.
- Choose Patch, Minor, Major, or Custom.
- Check Releasing at the bottom of the dialog, then confirm Tag and release. The example selects patch version
0.0.2; your version numbers can differ.
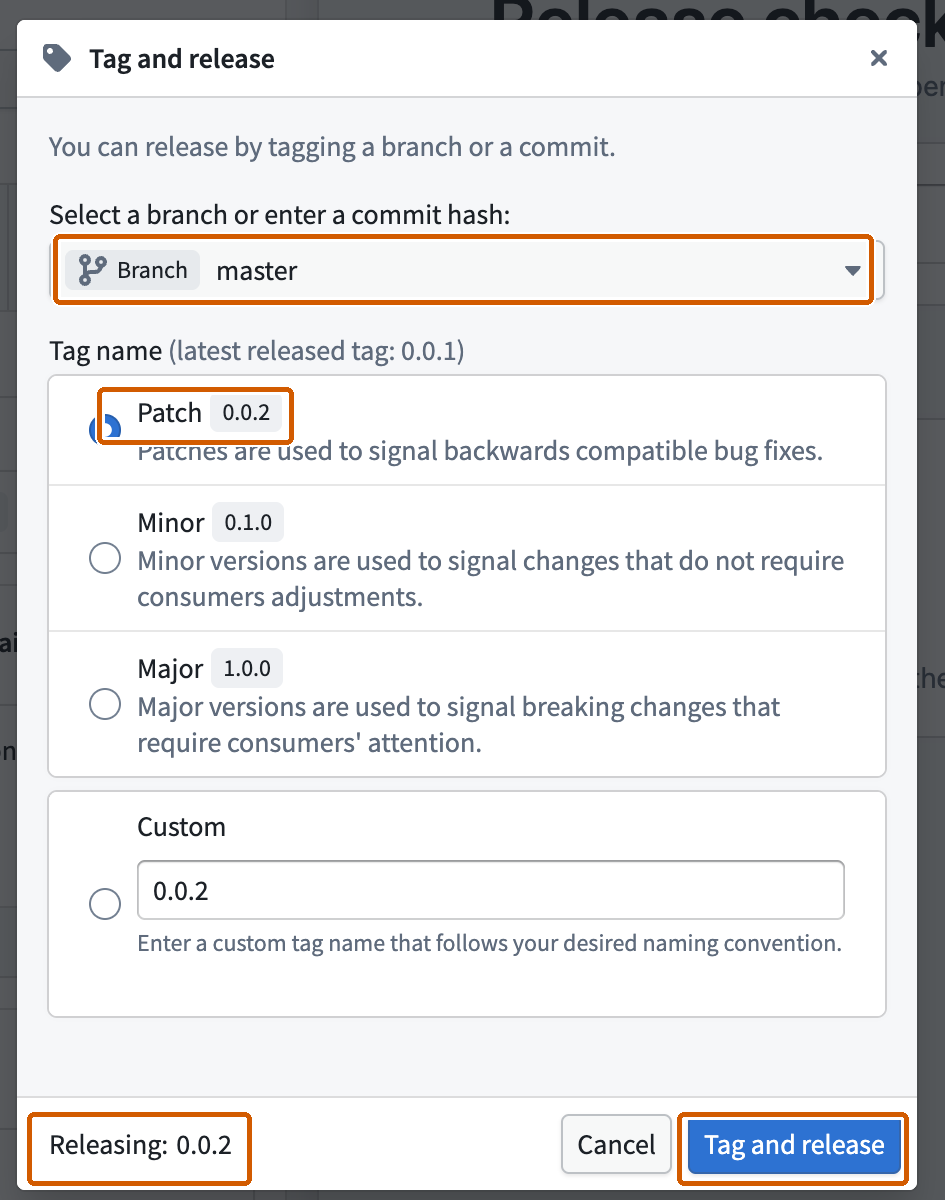
Wait for the release build to succeed. Creating a tag does not approve the domain or confirm that the website is available.
Complete domain approval and follow the application release steps. Open the hosted application after deployment succeeds and repeat the seven task checks against a synthetic test task. Verify the data source and your permissions before executing actions against real records.
Reuse an existing task model
To build against existing definitions, open the Pilot welcome screen:
- Set Type to OSDK application and choose your theme, save location, and Ontology.
- Select Add context > Add object types, search for your task object type, and open its details. Choose Select, then Confirm selection.
- Select Add context > Add action types. Filter by the affected task object type, select its add, completion, and delete actions, then choose Confirm selection.
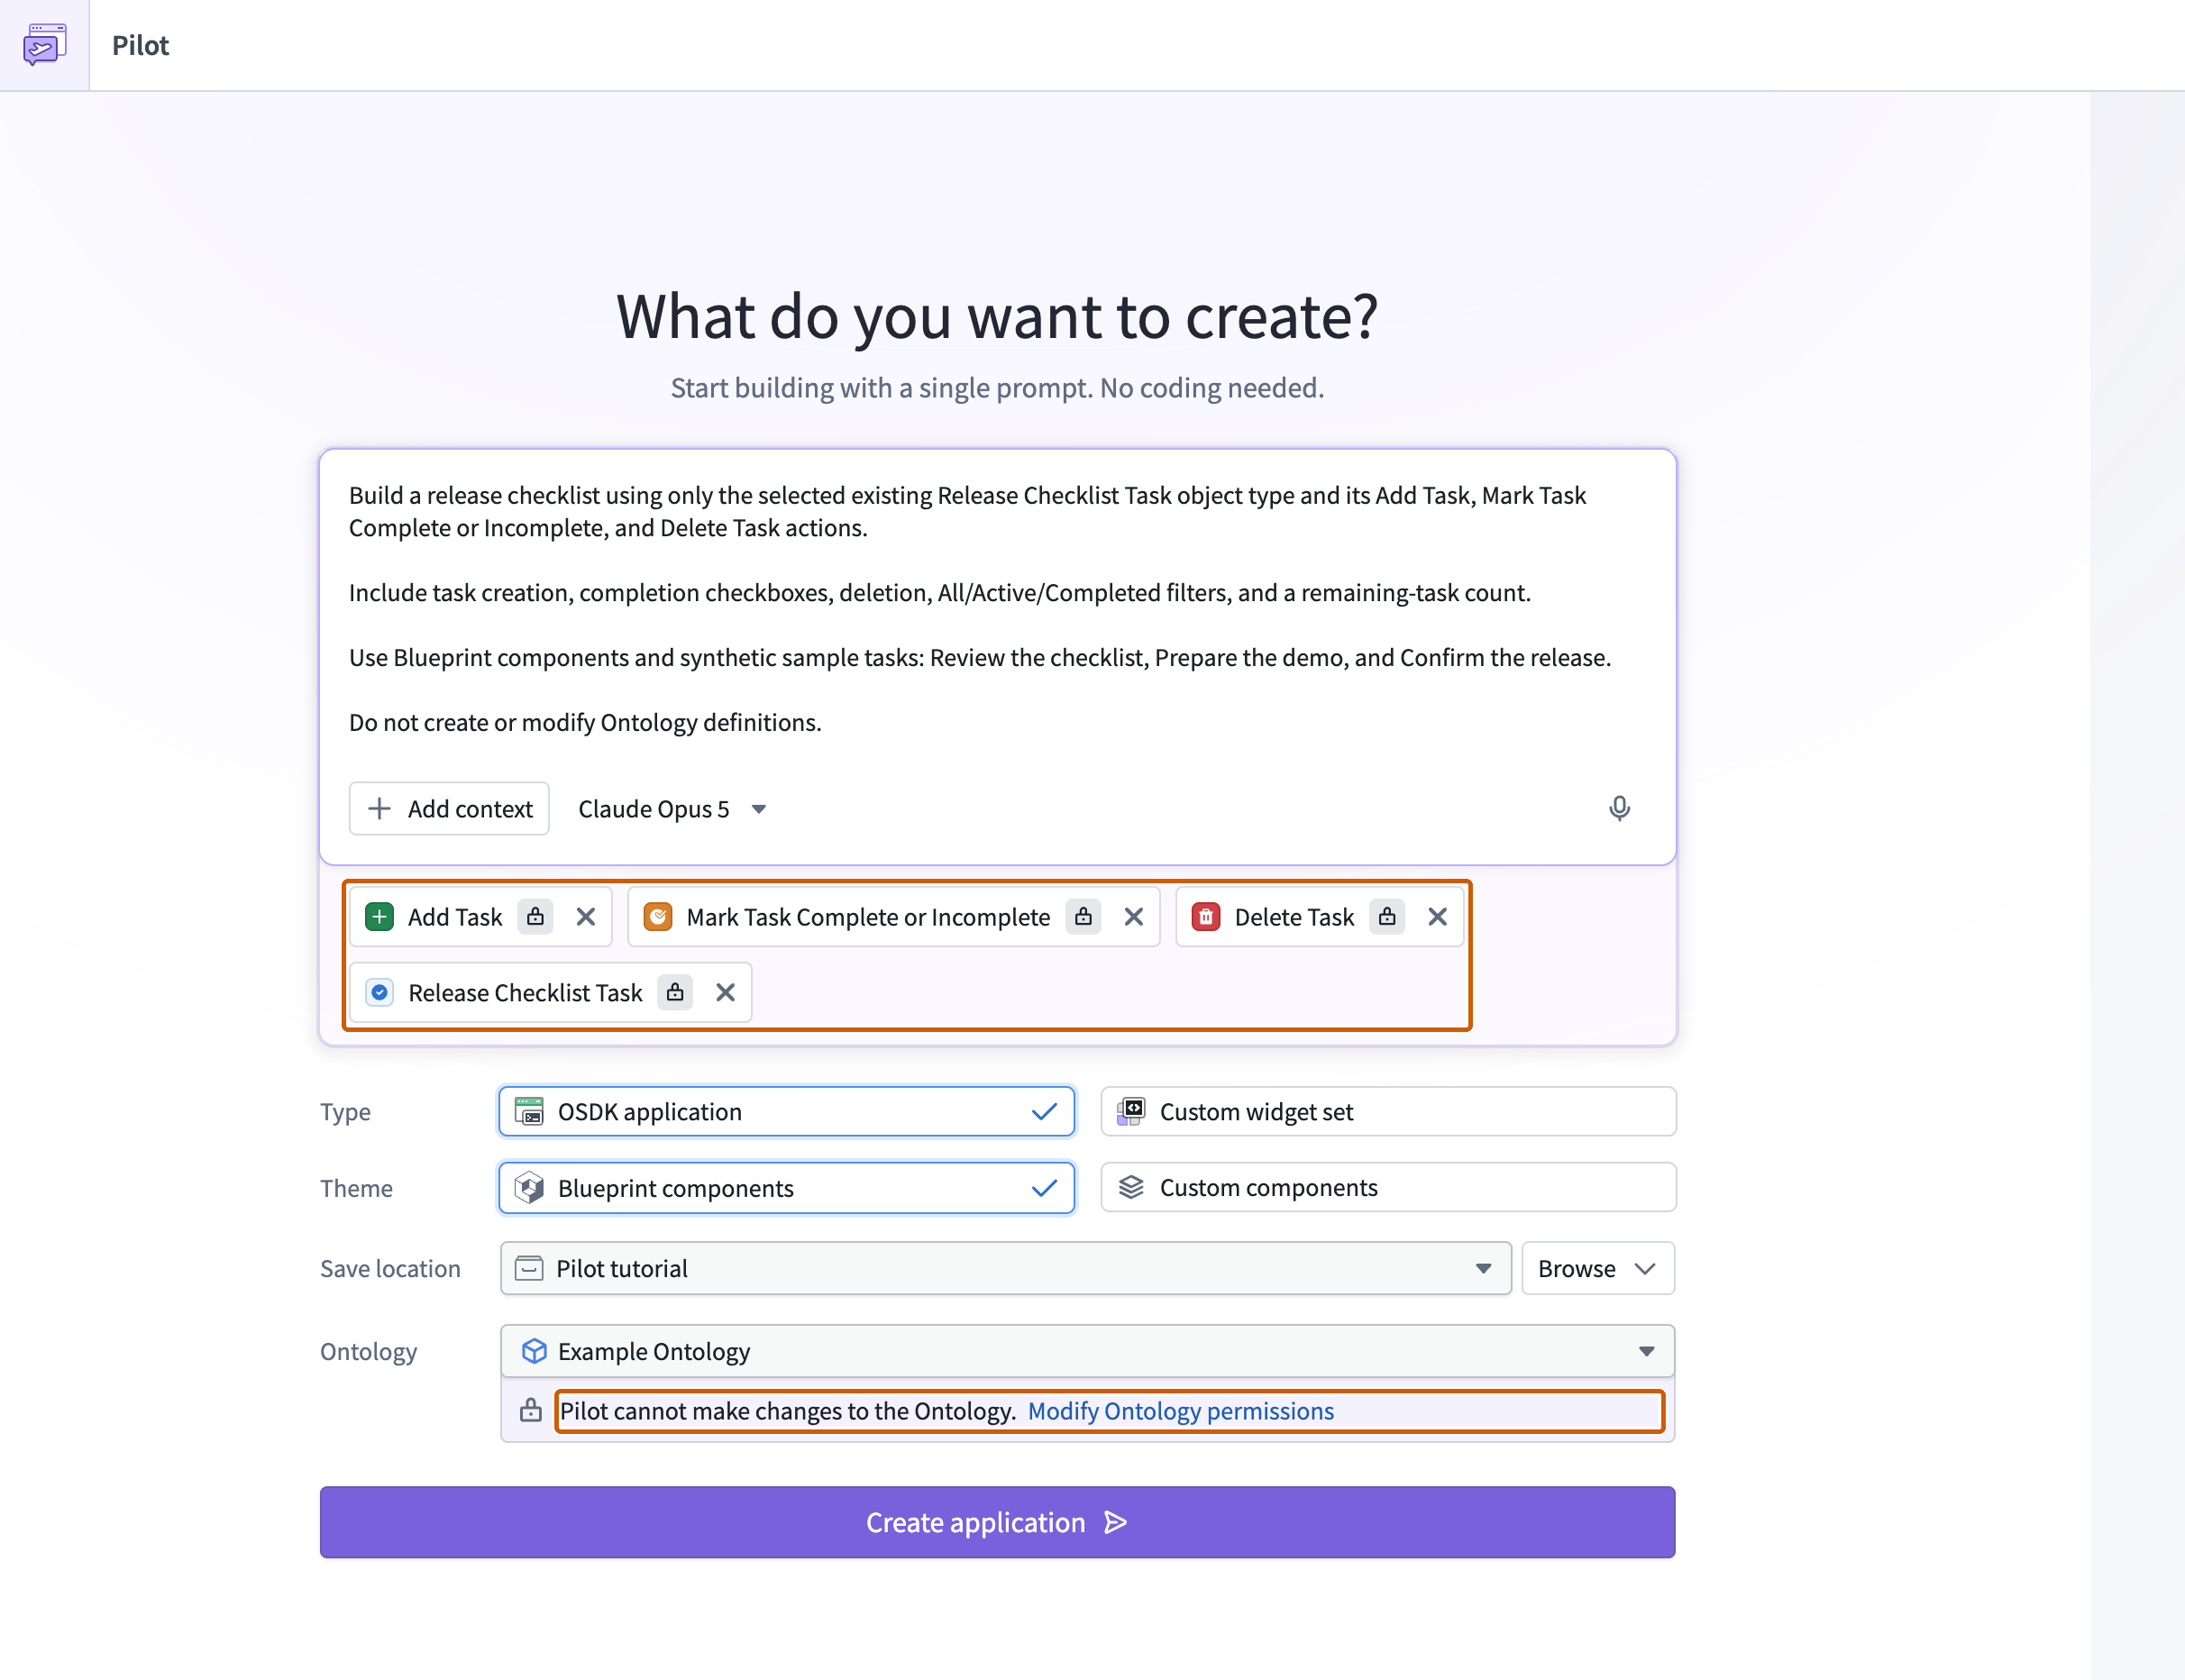
- In Modify Ontology permissions, keep creation and modification prohibited.
- Describe the checklist interactions and explicitly ask Pilot to use only the selected existing definitions.
Before selecting Create application, check the four attachment tags beneath the prompt and the message Pilot cannot make changes to the Ontology.
After generation, inspect Ontology. This example should show Existing 4 and Proposed 0, with Do not allow modifications on the object type and all three actions.
Repeat the seed-data checks. Then select Production data, wait for the preview to reload, and test the deployed actions using a synthetic task. Verify completion, filters, and persistence after reloading, then delete the test task. The production list is separate from the seed records.
Select Deploy. If the existing definitions are unchanged, confirm All entities up to date on Main. If Create deployment branch opens even though those definitions are up to date, select Cancel.
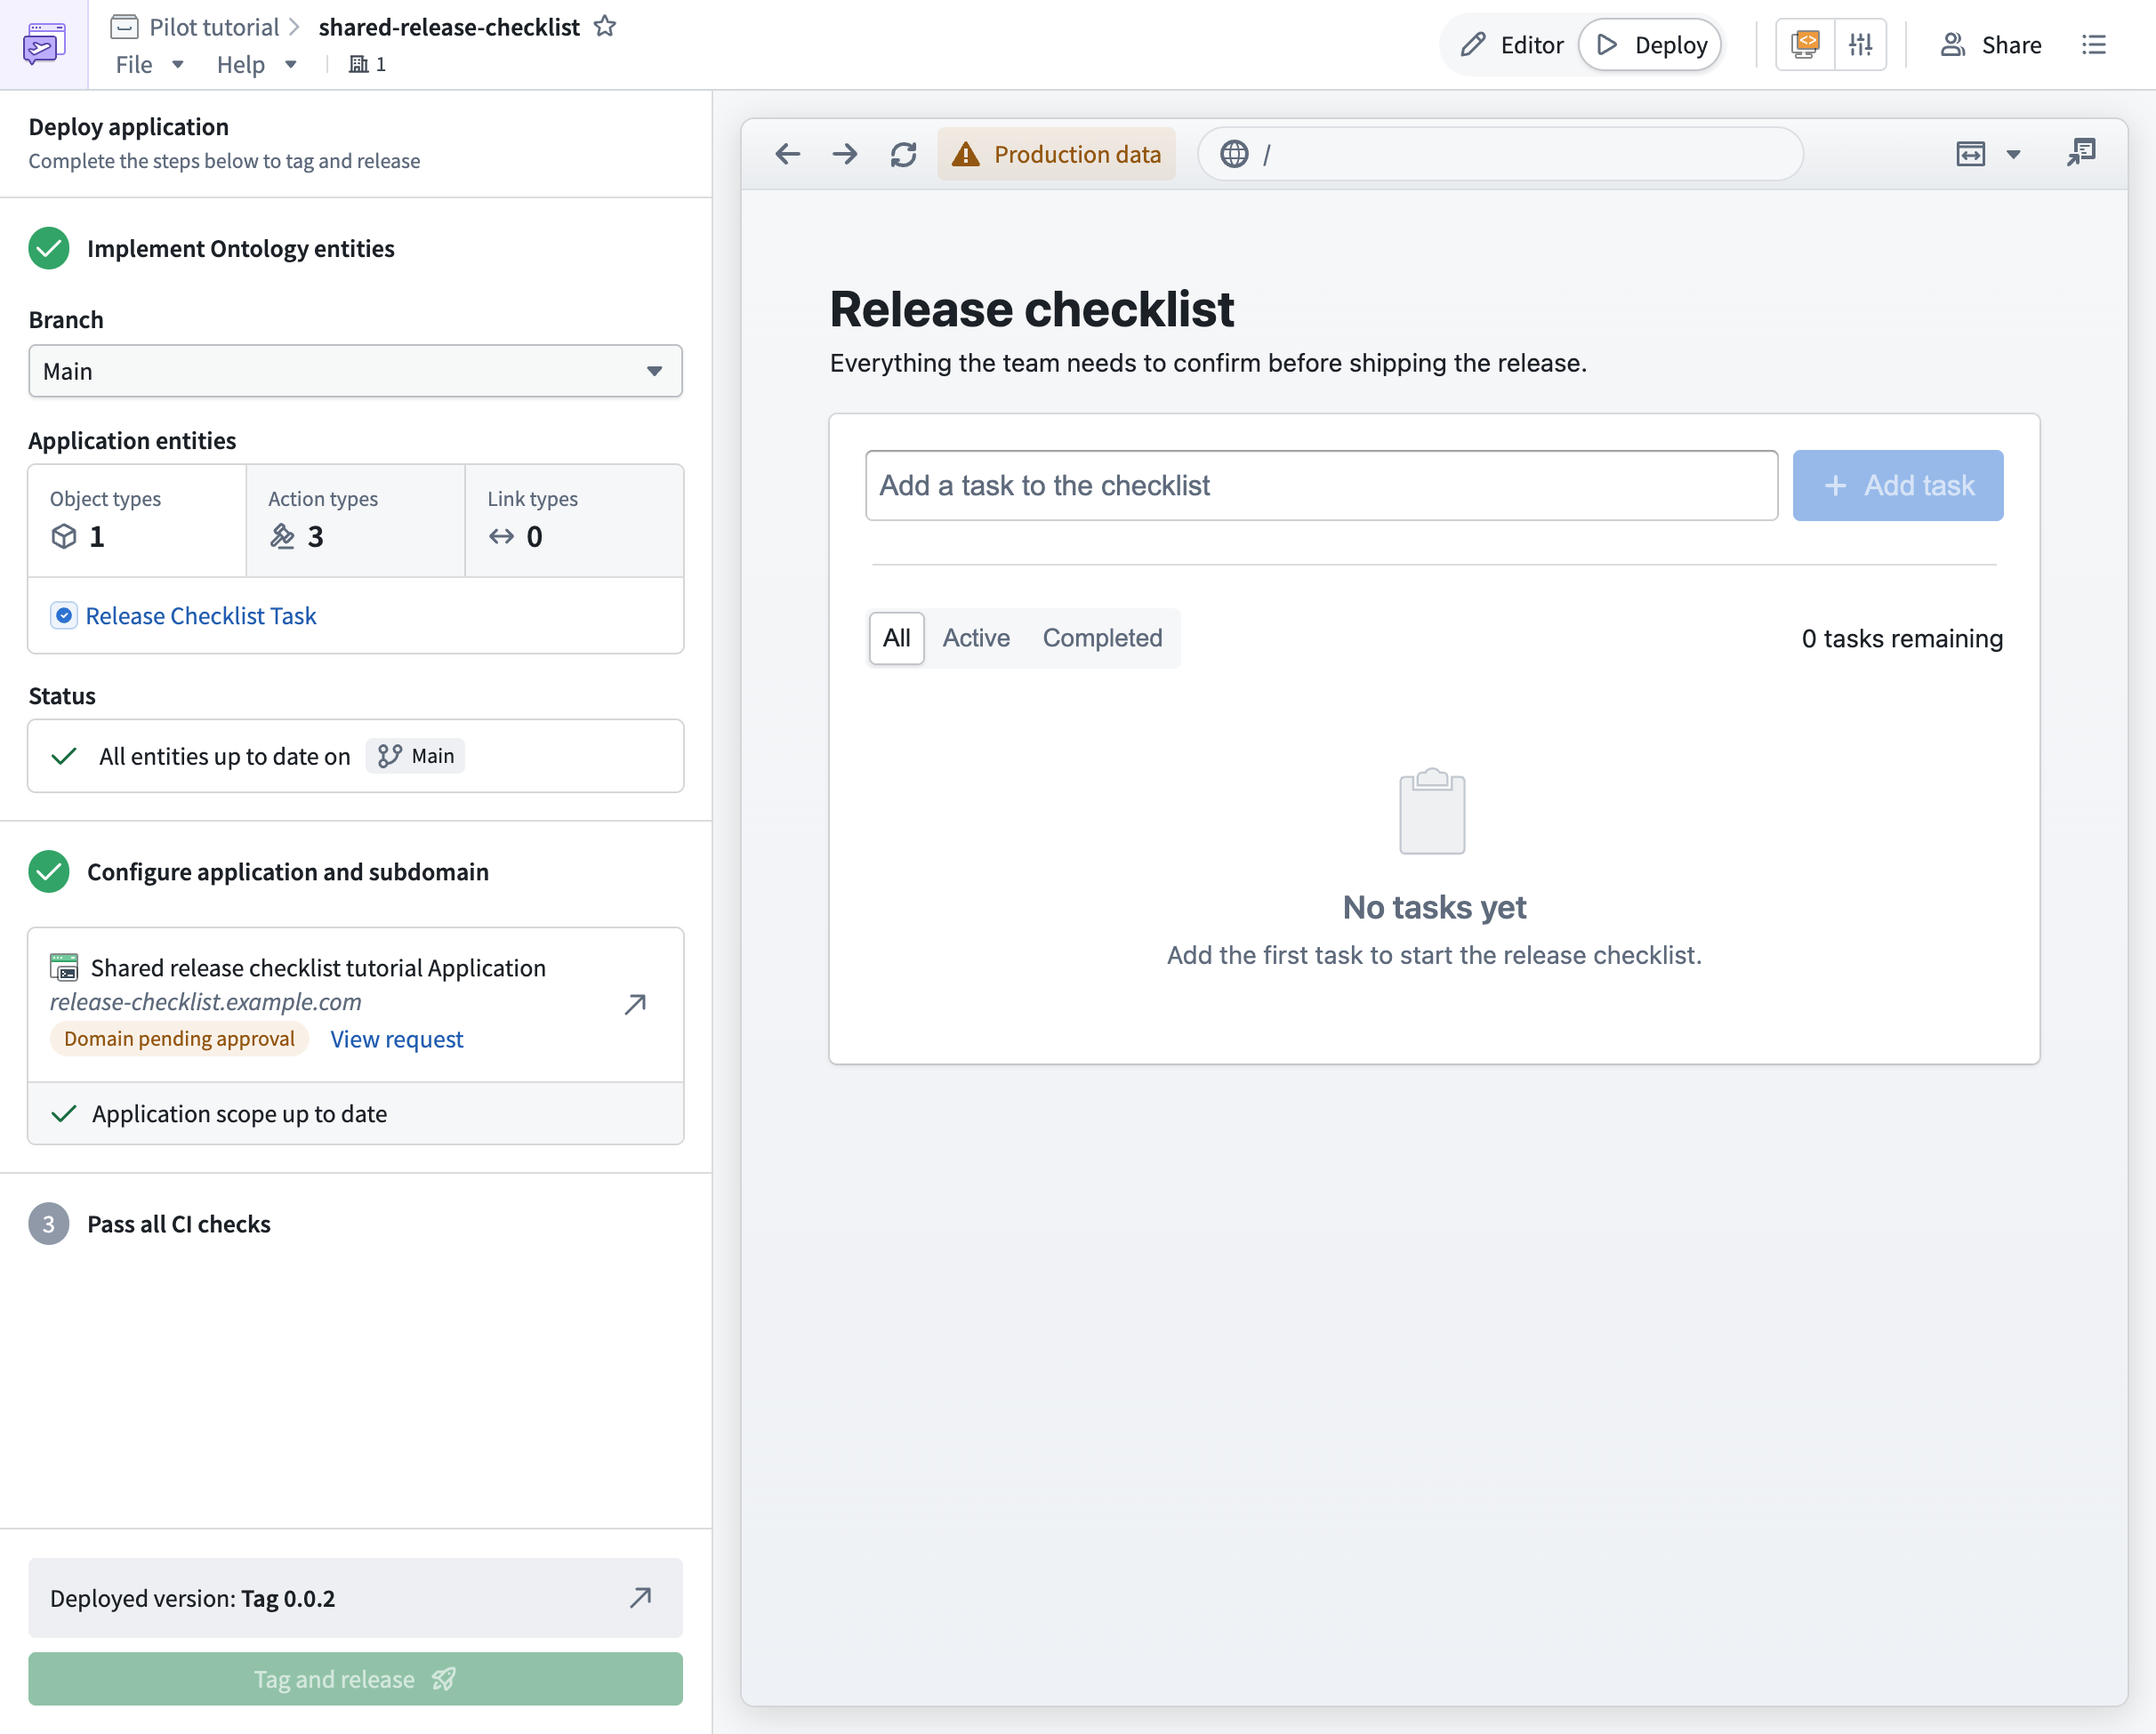
Continue with application configuration, CI, and release as described above.
Build the checklist as a widget
To reuse the task model in Workshop:
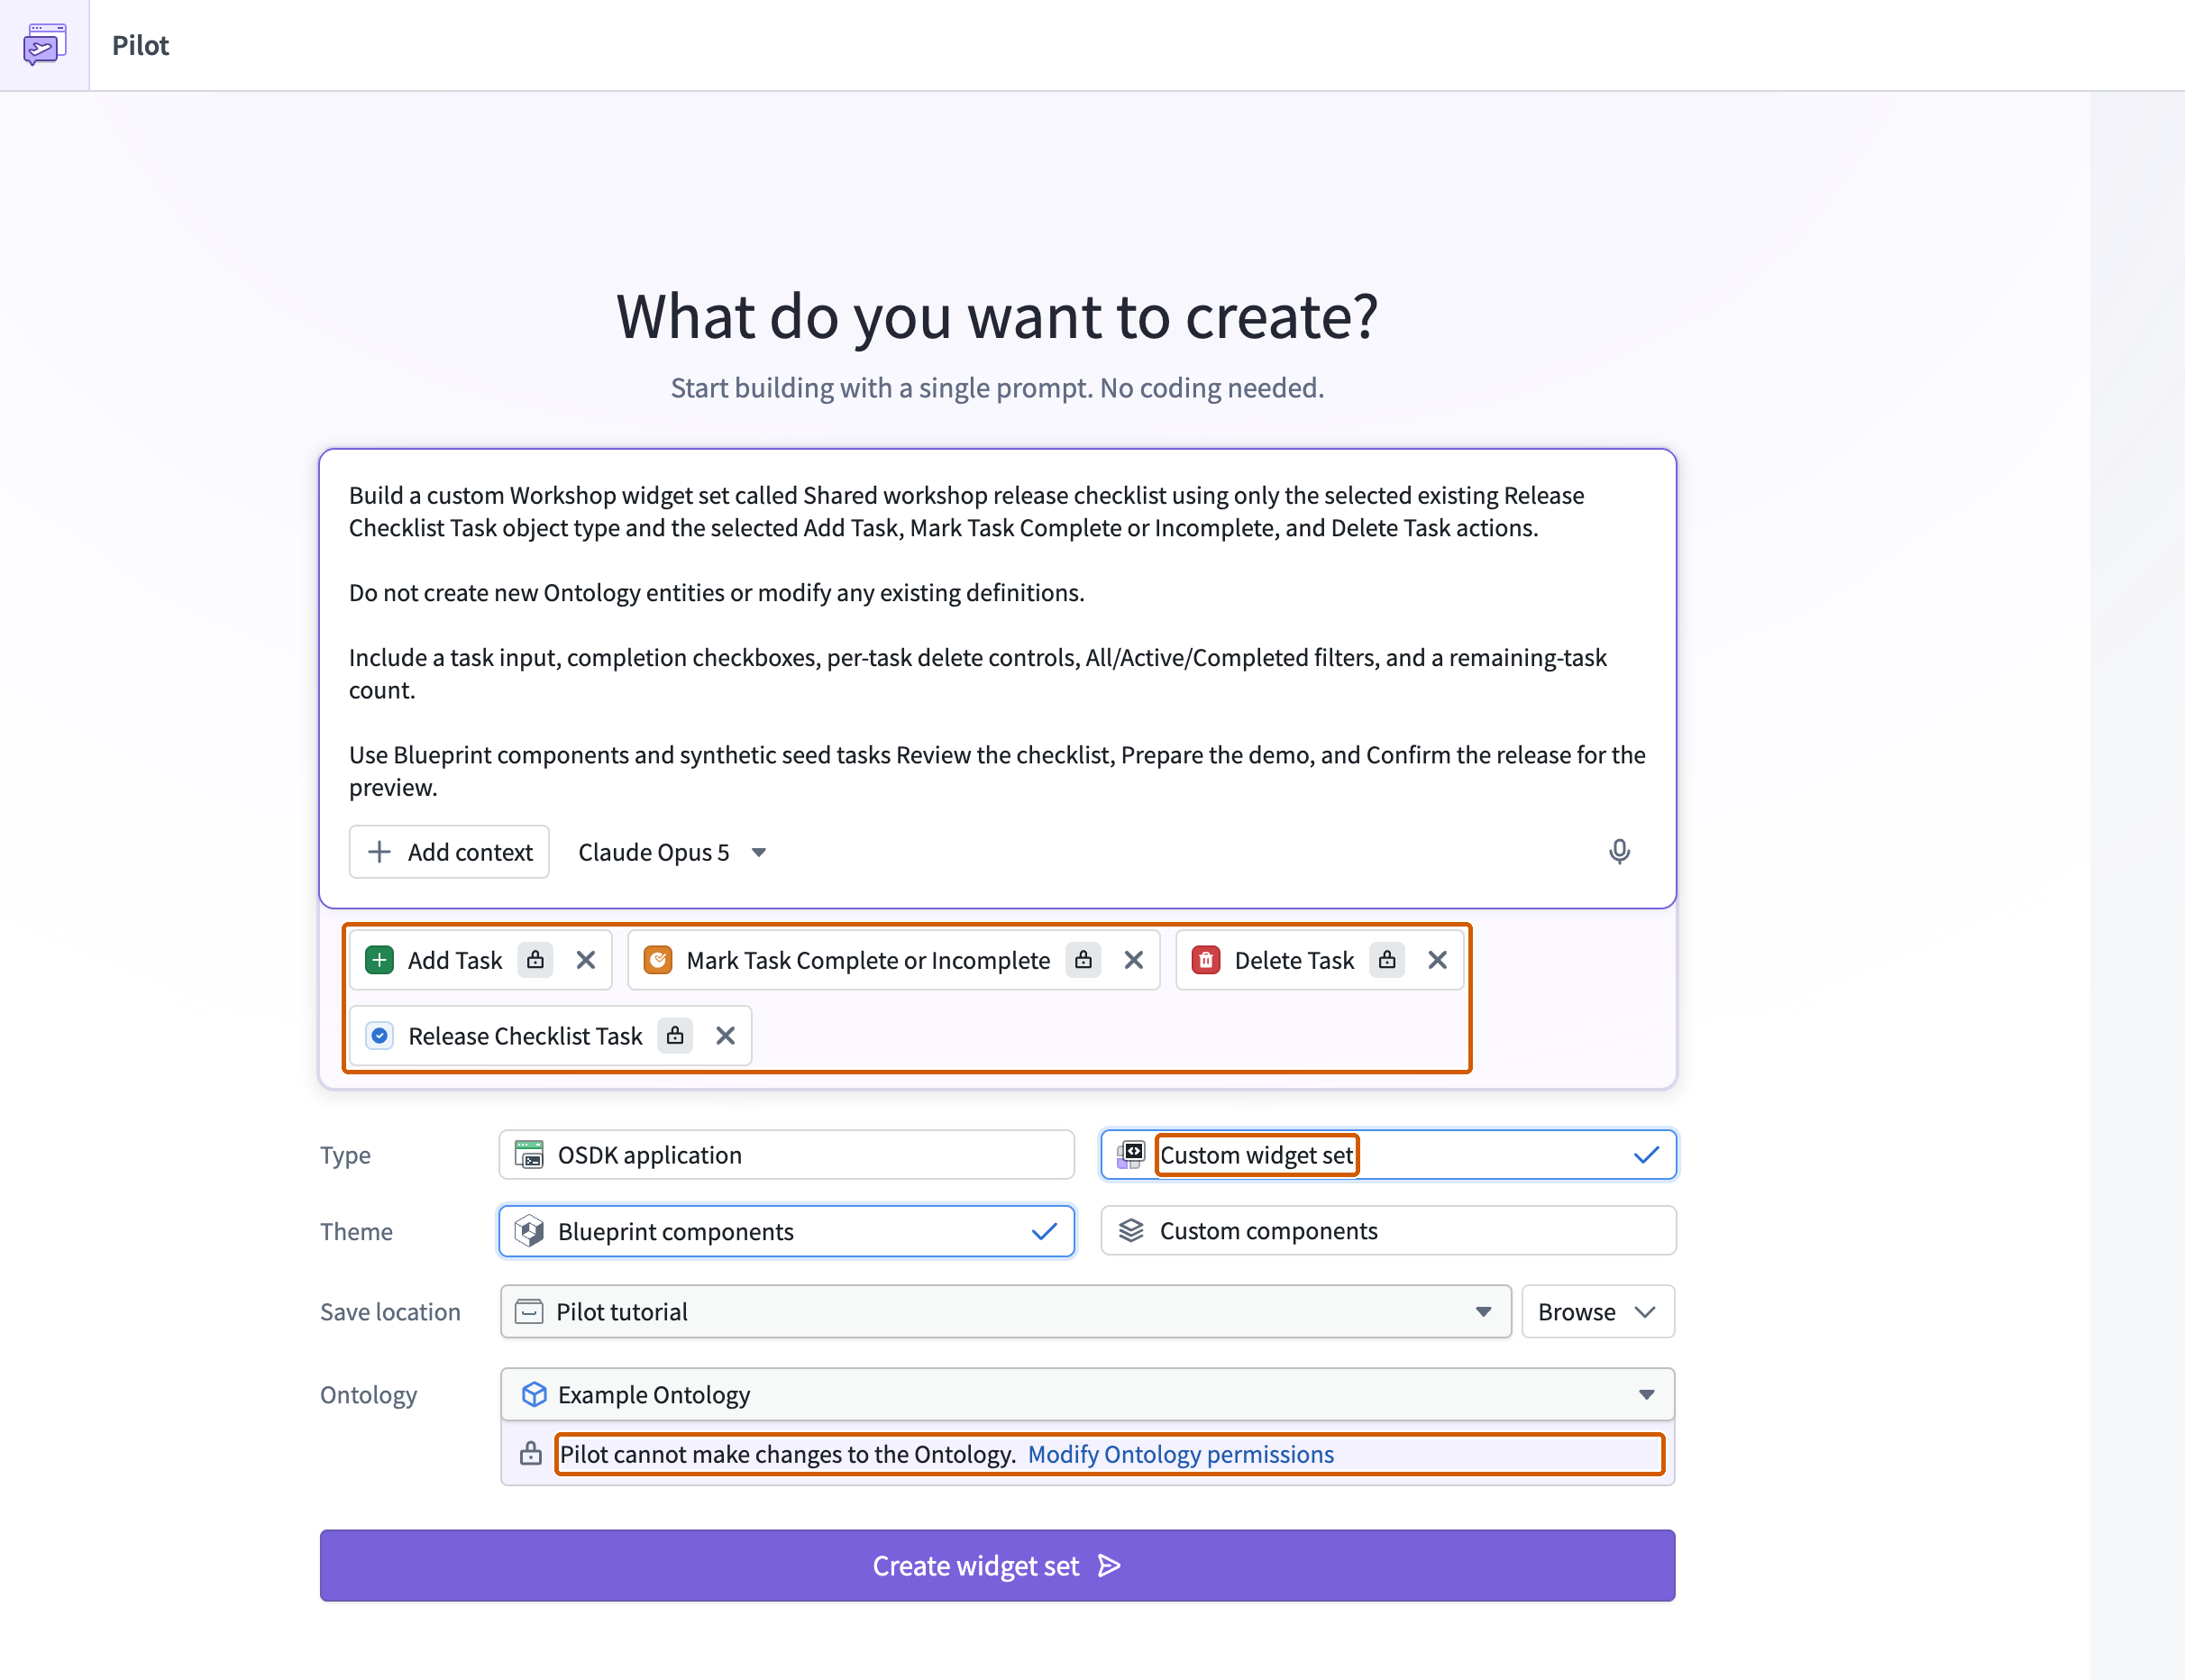
- Choose Custom widget set on the Pilot welcome screen.
- Attach the same task object type and three actions through Add context.
- Keep Ontology creation and modification prohibited.
- Enter this prompt:
Copied!1 2 3 4 5 6 7 8 9 10 11Build a custom Workshop widget set called Shared workshop release checklist using only the selected existing Release Checklist Task object type and the selected Add Task, Mark Task Complete or Incomplete, and Delete Task actions. Do not create new Ontology entities or modify any existing definitions. Include a task input, completion checkboxes, per-task delete controls, All/Active/Completed filters, and a remaining-task count. Use Blueprint components and synthetic seed tasks Review the checklist, Prepare the demo, and Confirm the release for the preview.
Compare the selected type and attachments with the following form, then select Create widget set.
After generation, select the widget in Preview and confirm that Notional data is selected.
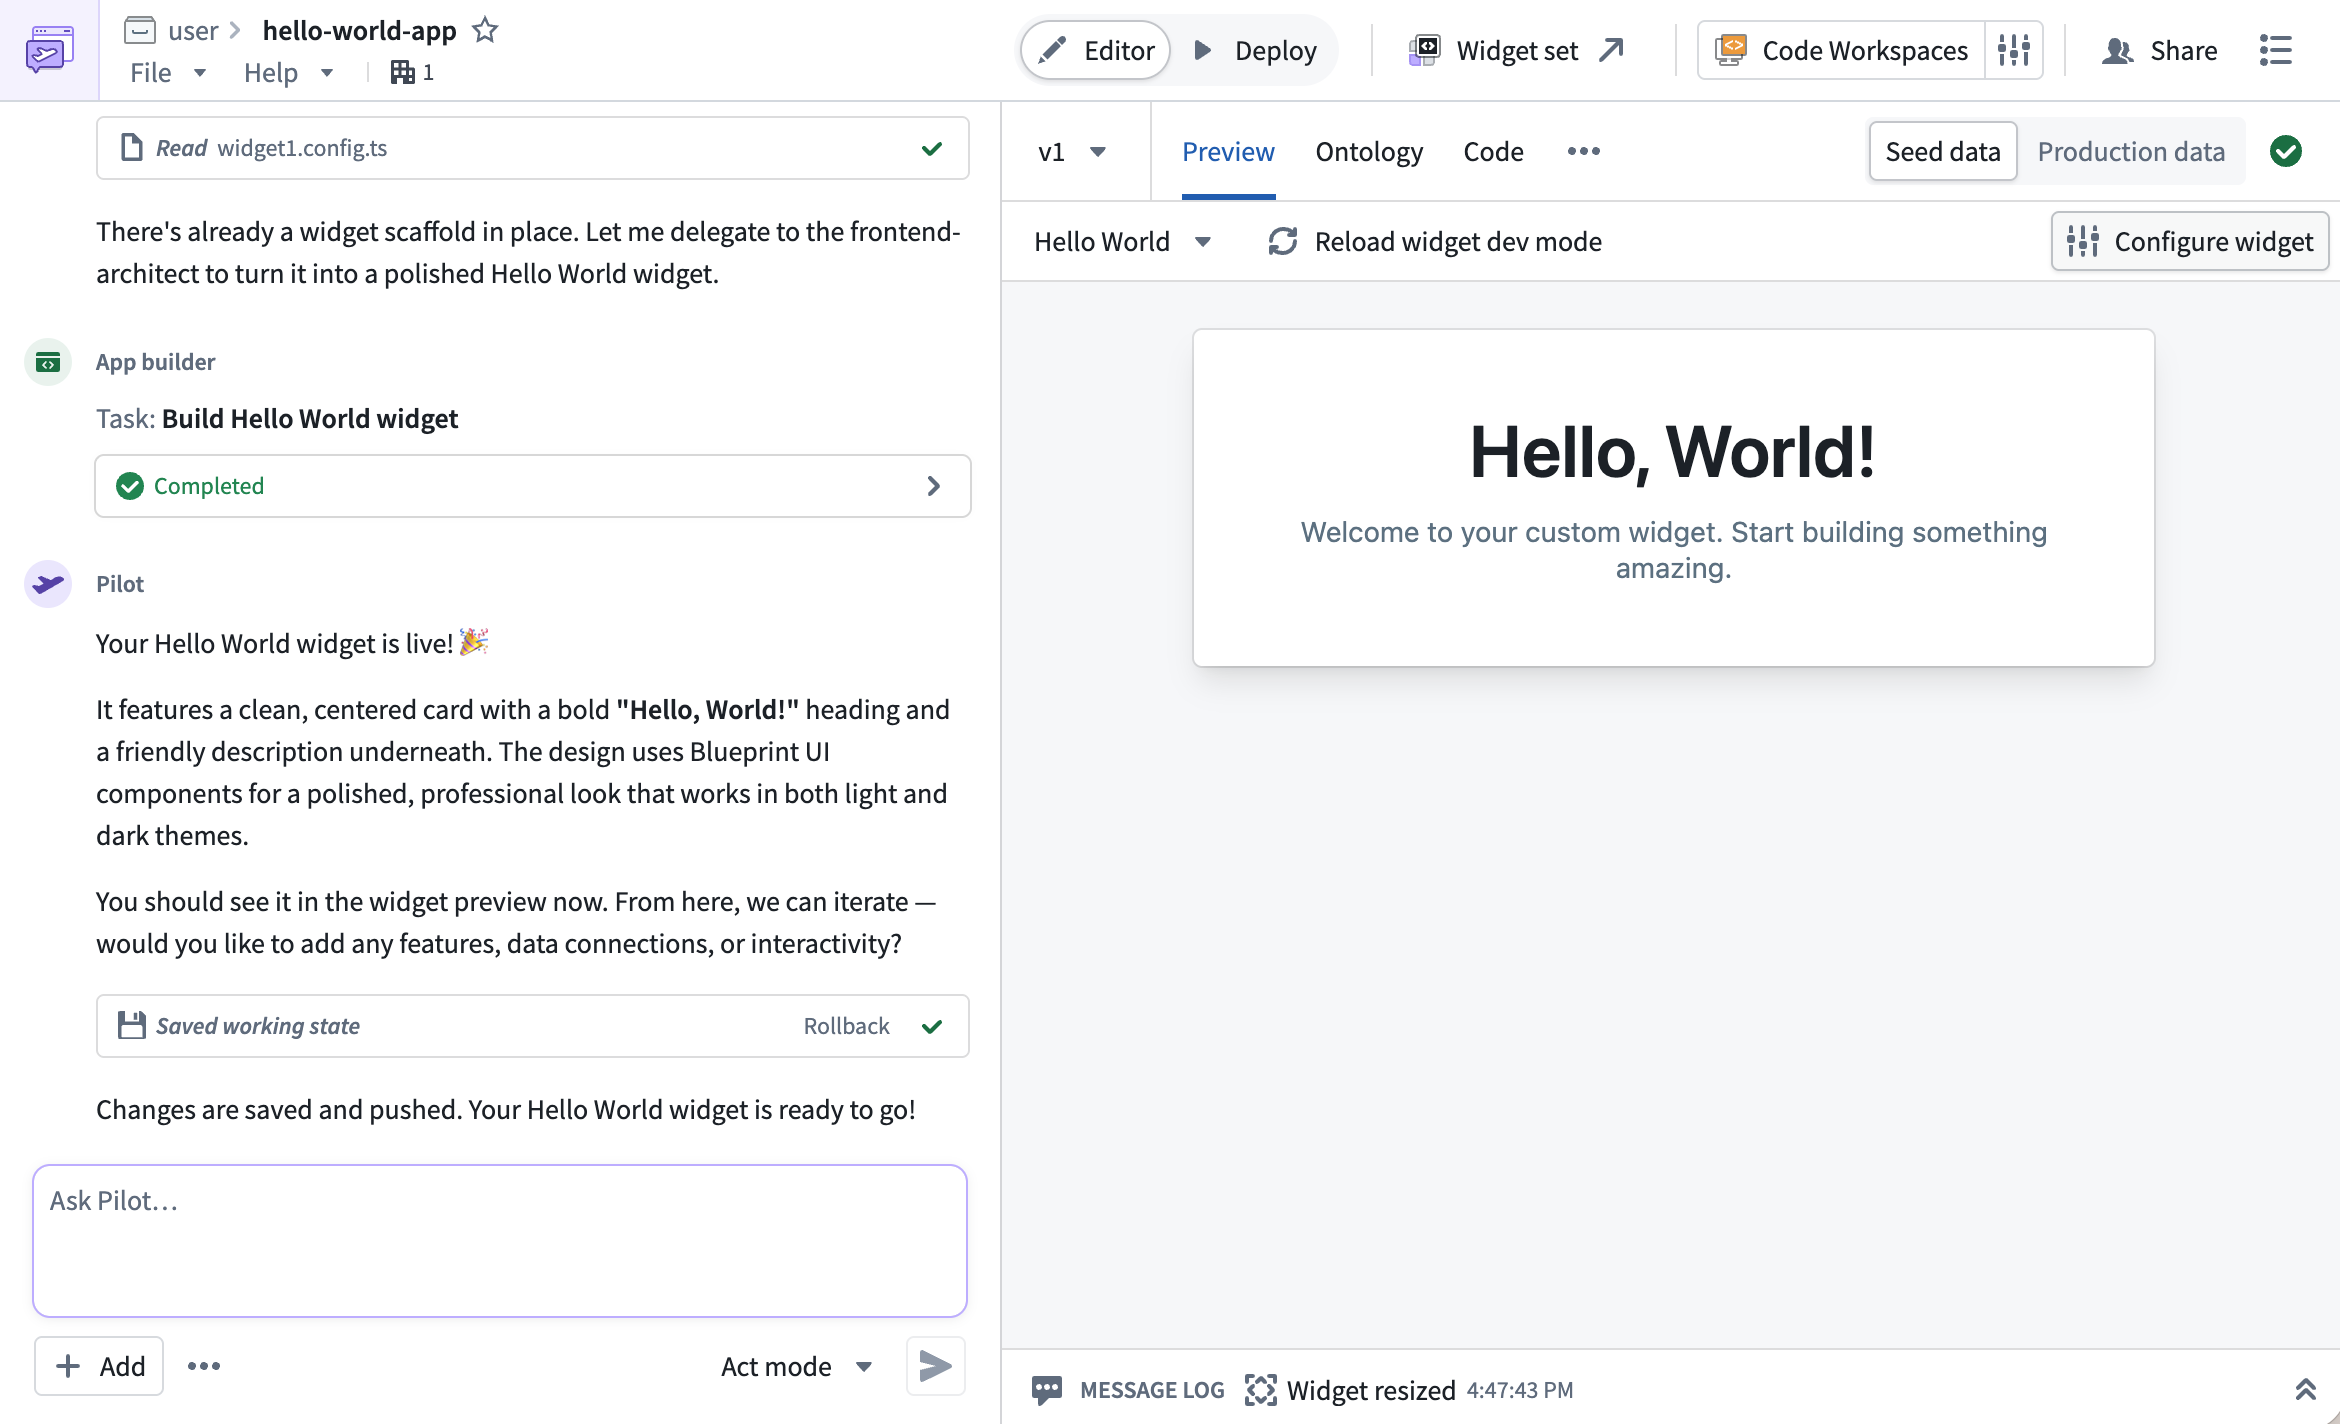
Repeat the seven interaction checks inside the widget sandbox. Also test submitting a task with Enter. If form submission is blocked, ask Pilot to use explicit button and keyboard handlers, then retest both input methods.
Confirm that sample tasks are registered as seed data rather than created automatically by submitting actions when the widget opens. Switch to Production data and test a synthetic task separately. Delete it after checking completion, filters, and persistence.
Select Deploy. If the existing definitions are unchanged, confirm All entities up to date on Main. Cancel an automatically opened deployment-branch dialog when no Ontology changes are required.
Under Generate SDK, select Update SDK if needed. Wait for Widget SDK generated, Widget SDK installed, and On latest. Use Install or Upgrade to latest if prompted.
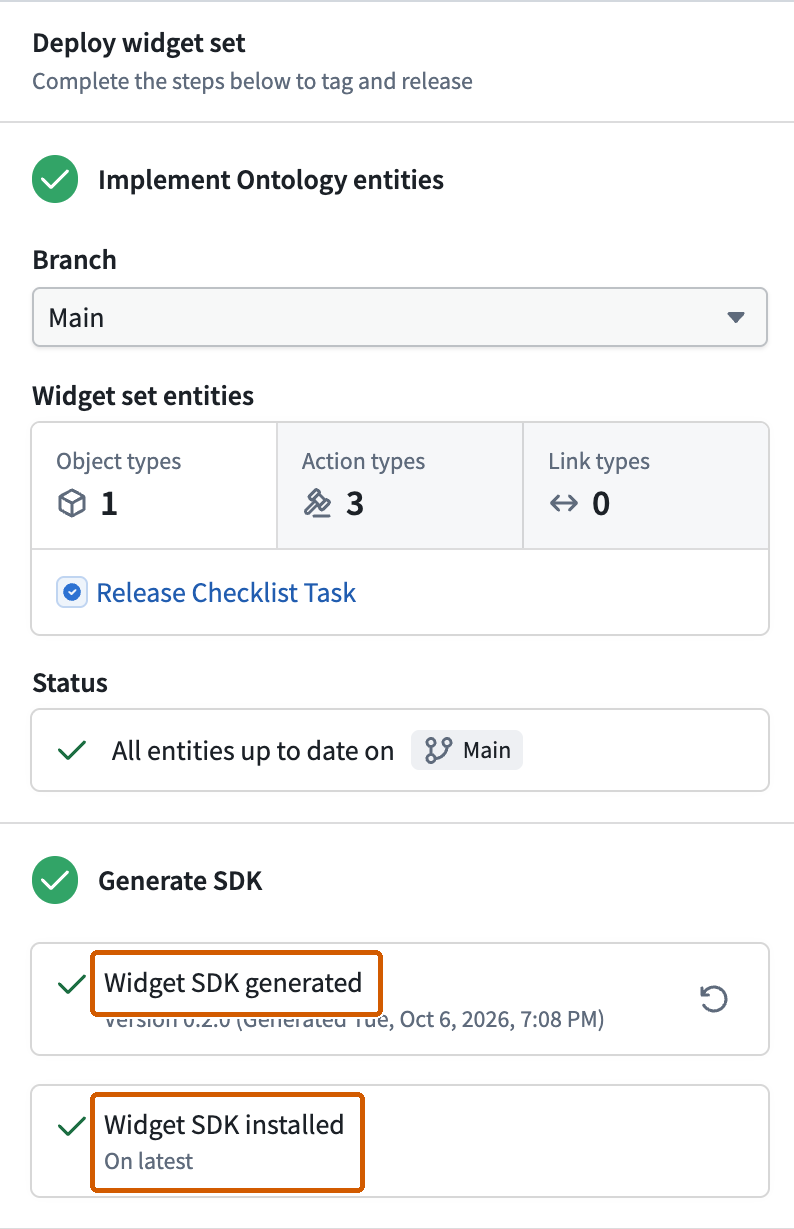
Wait for widget CI to succeed, then select Tag and release. Confirm the release in the dialog and wait for the new tag to appear as the Deployed version. Continue with widget deployment if any checklist step is incomplete.
Embed and test the released widget
Create a Workshop module in your project. See Getting started with Workshop if this is your first module.
In the Workshop editor, select Add widget. In the widget picker, choose Foundry & custom apps, then Custom widget.
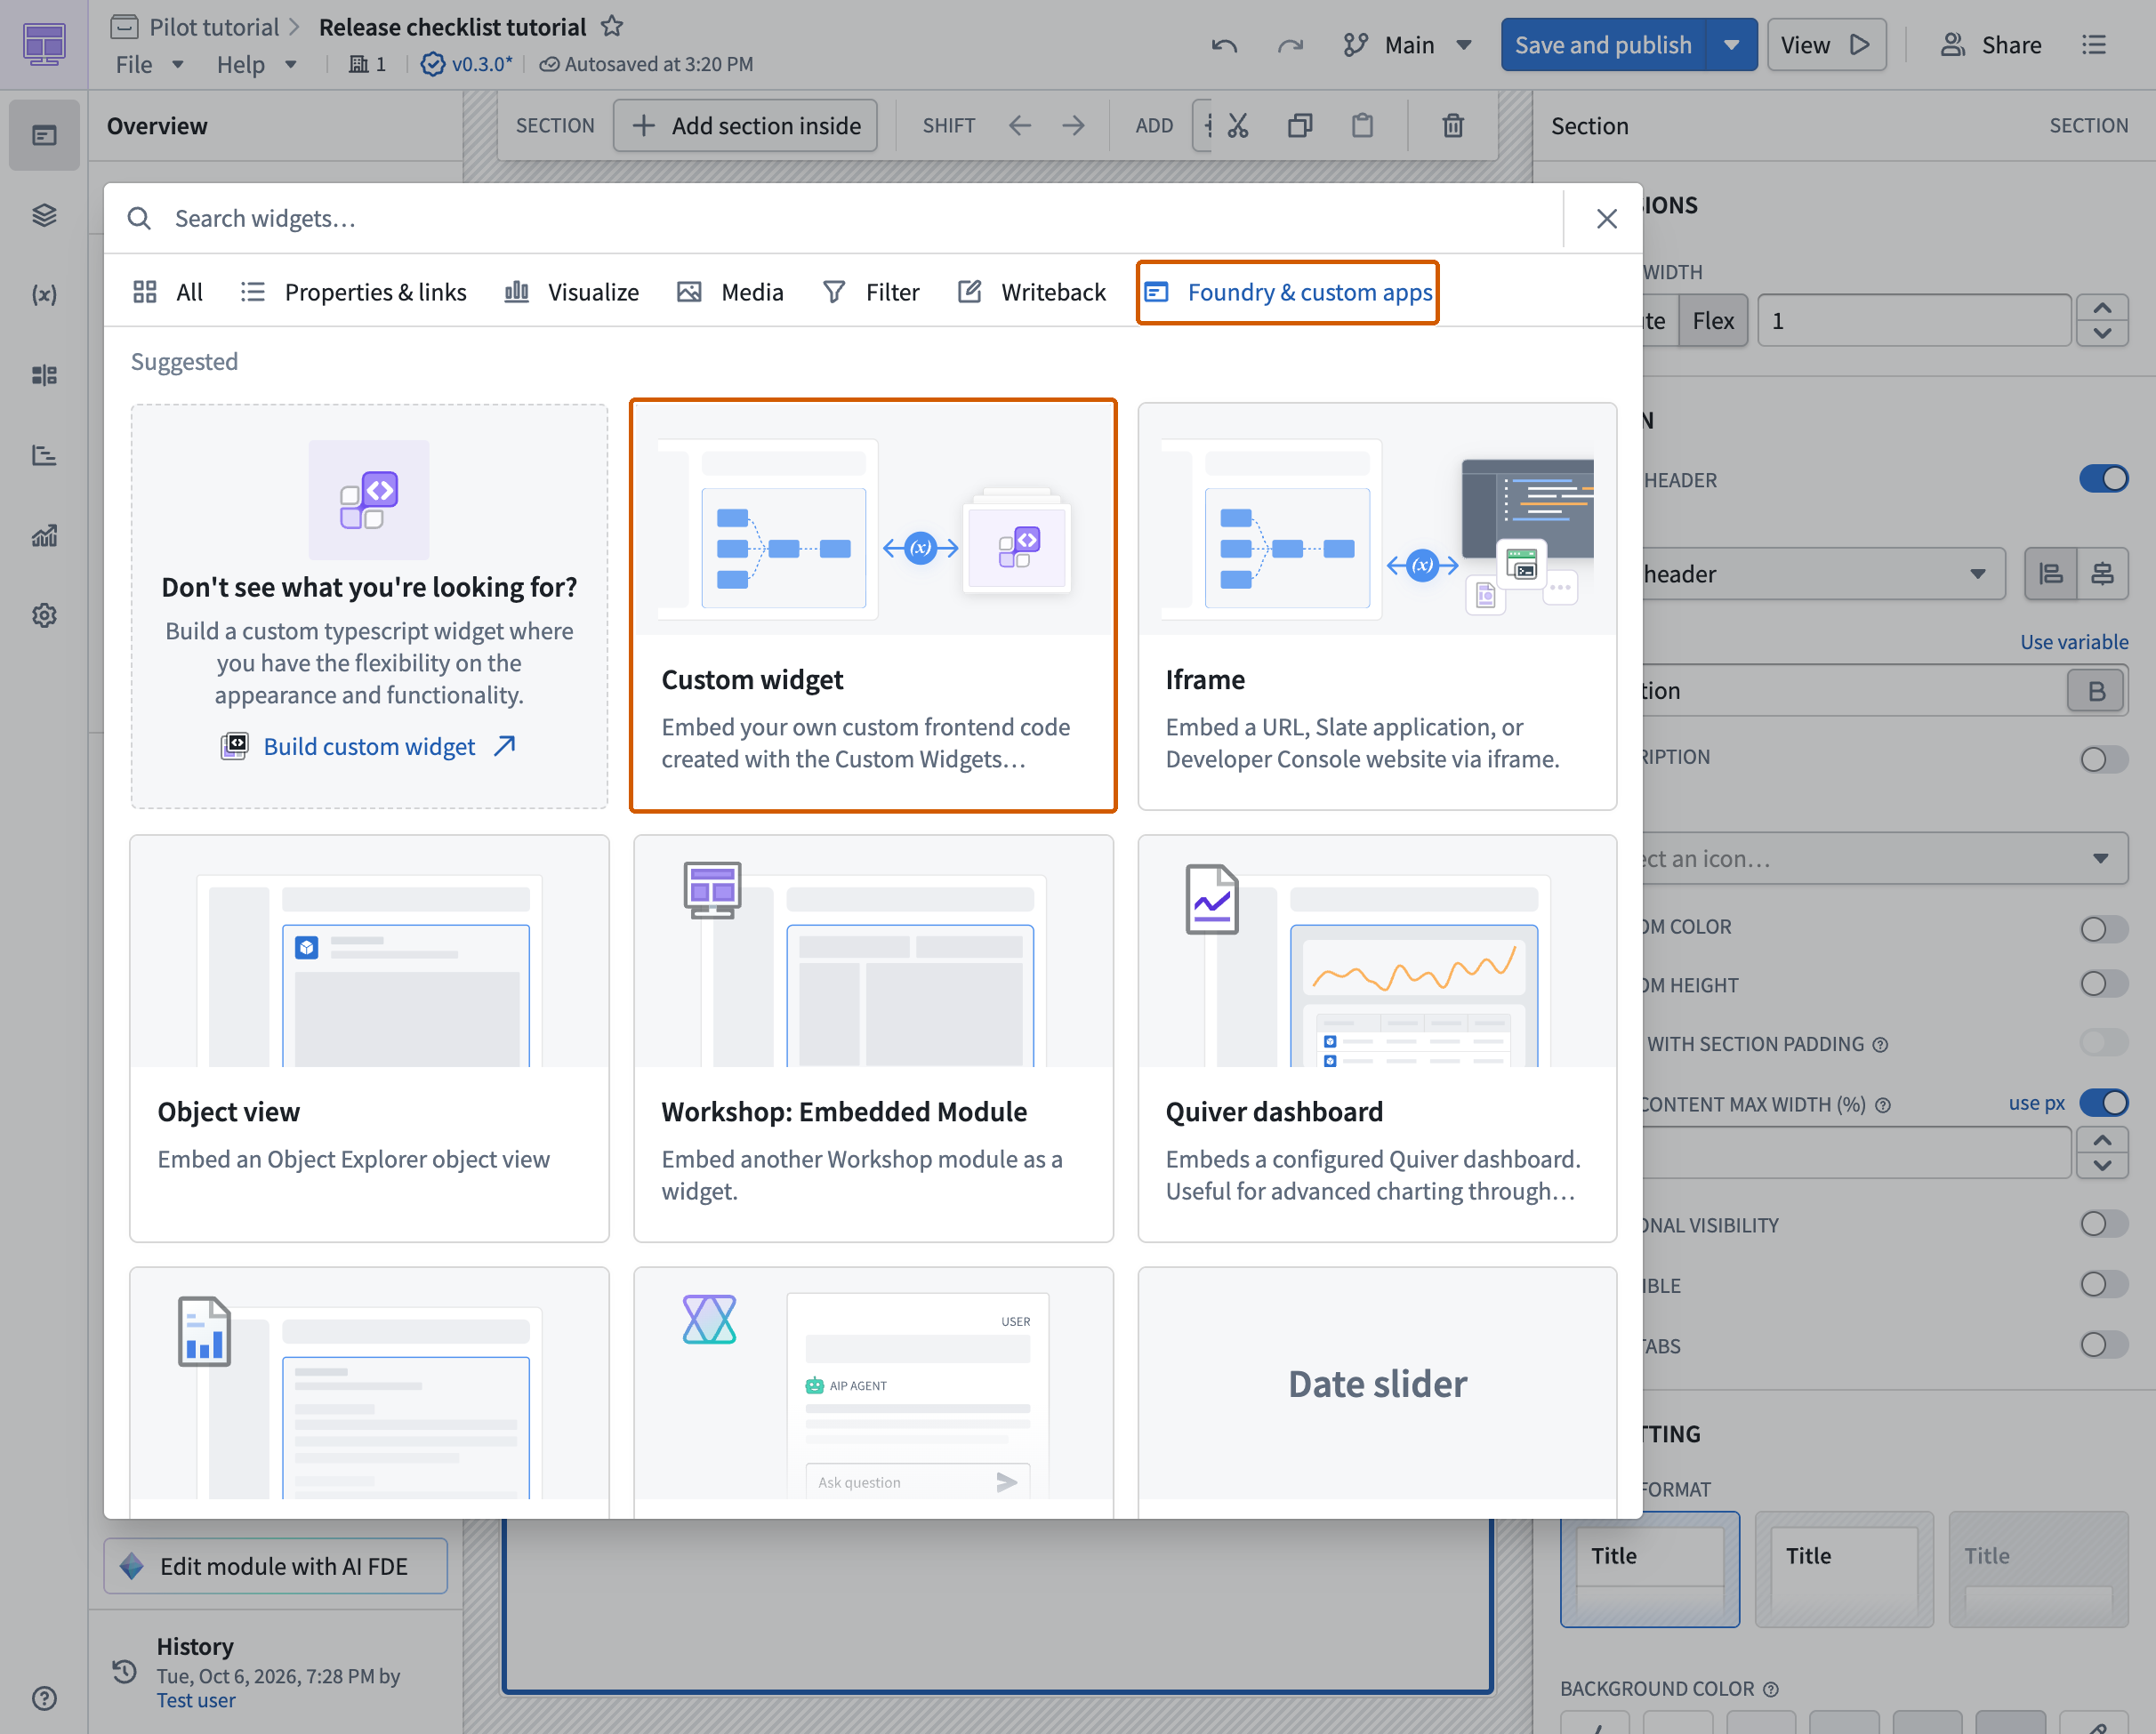
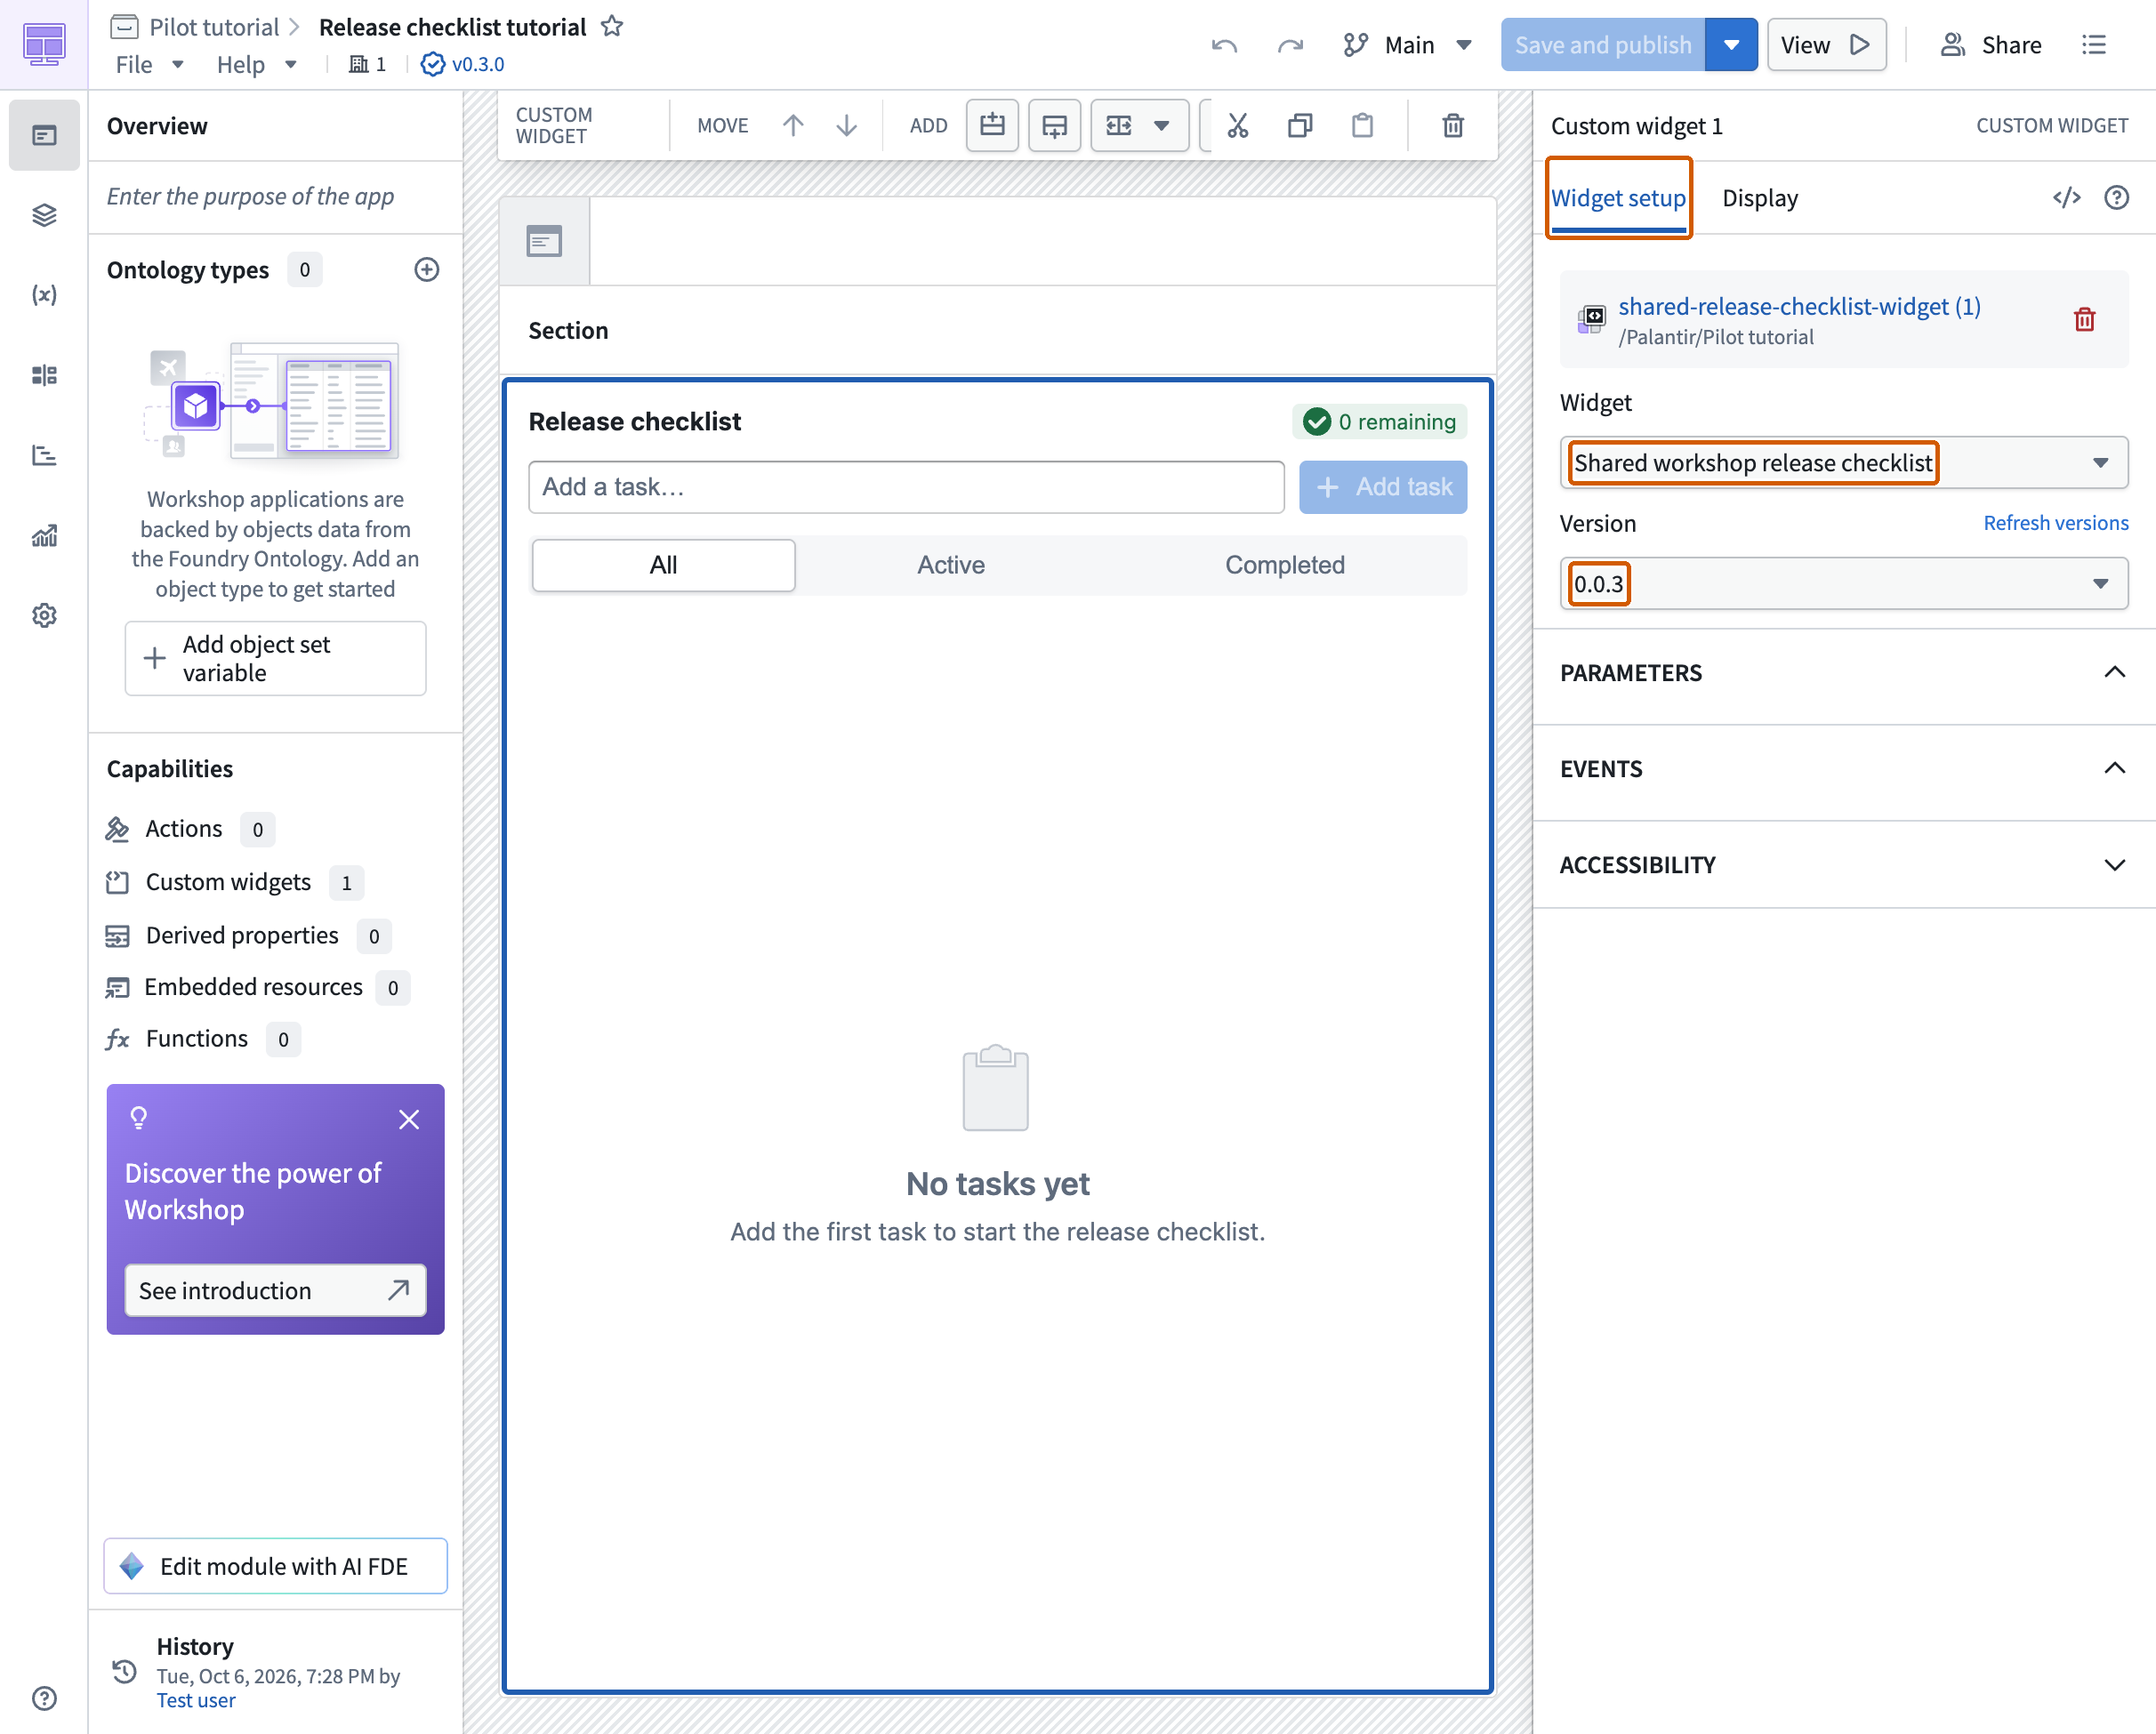
Configure the widget in the right-hand panel:
- Under Widget setup, choose Select, find your published widget set, and confirm the selection.
- Choose the checklist under Widget.
- Select its published Version. This example uses
0.0.3.
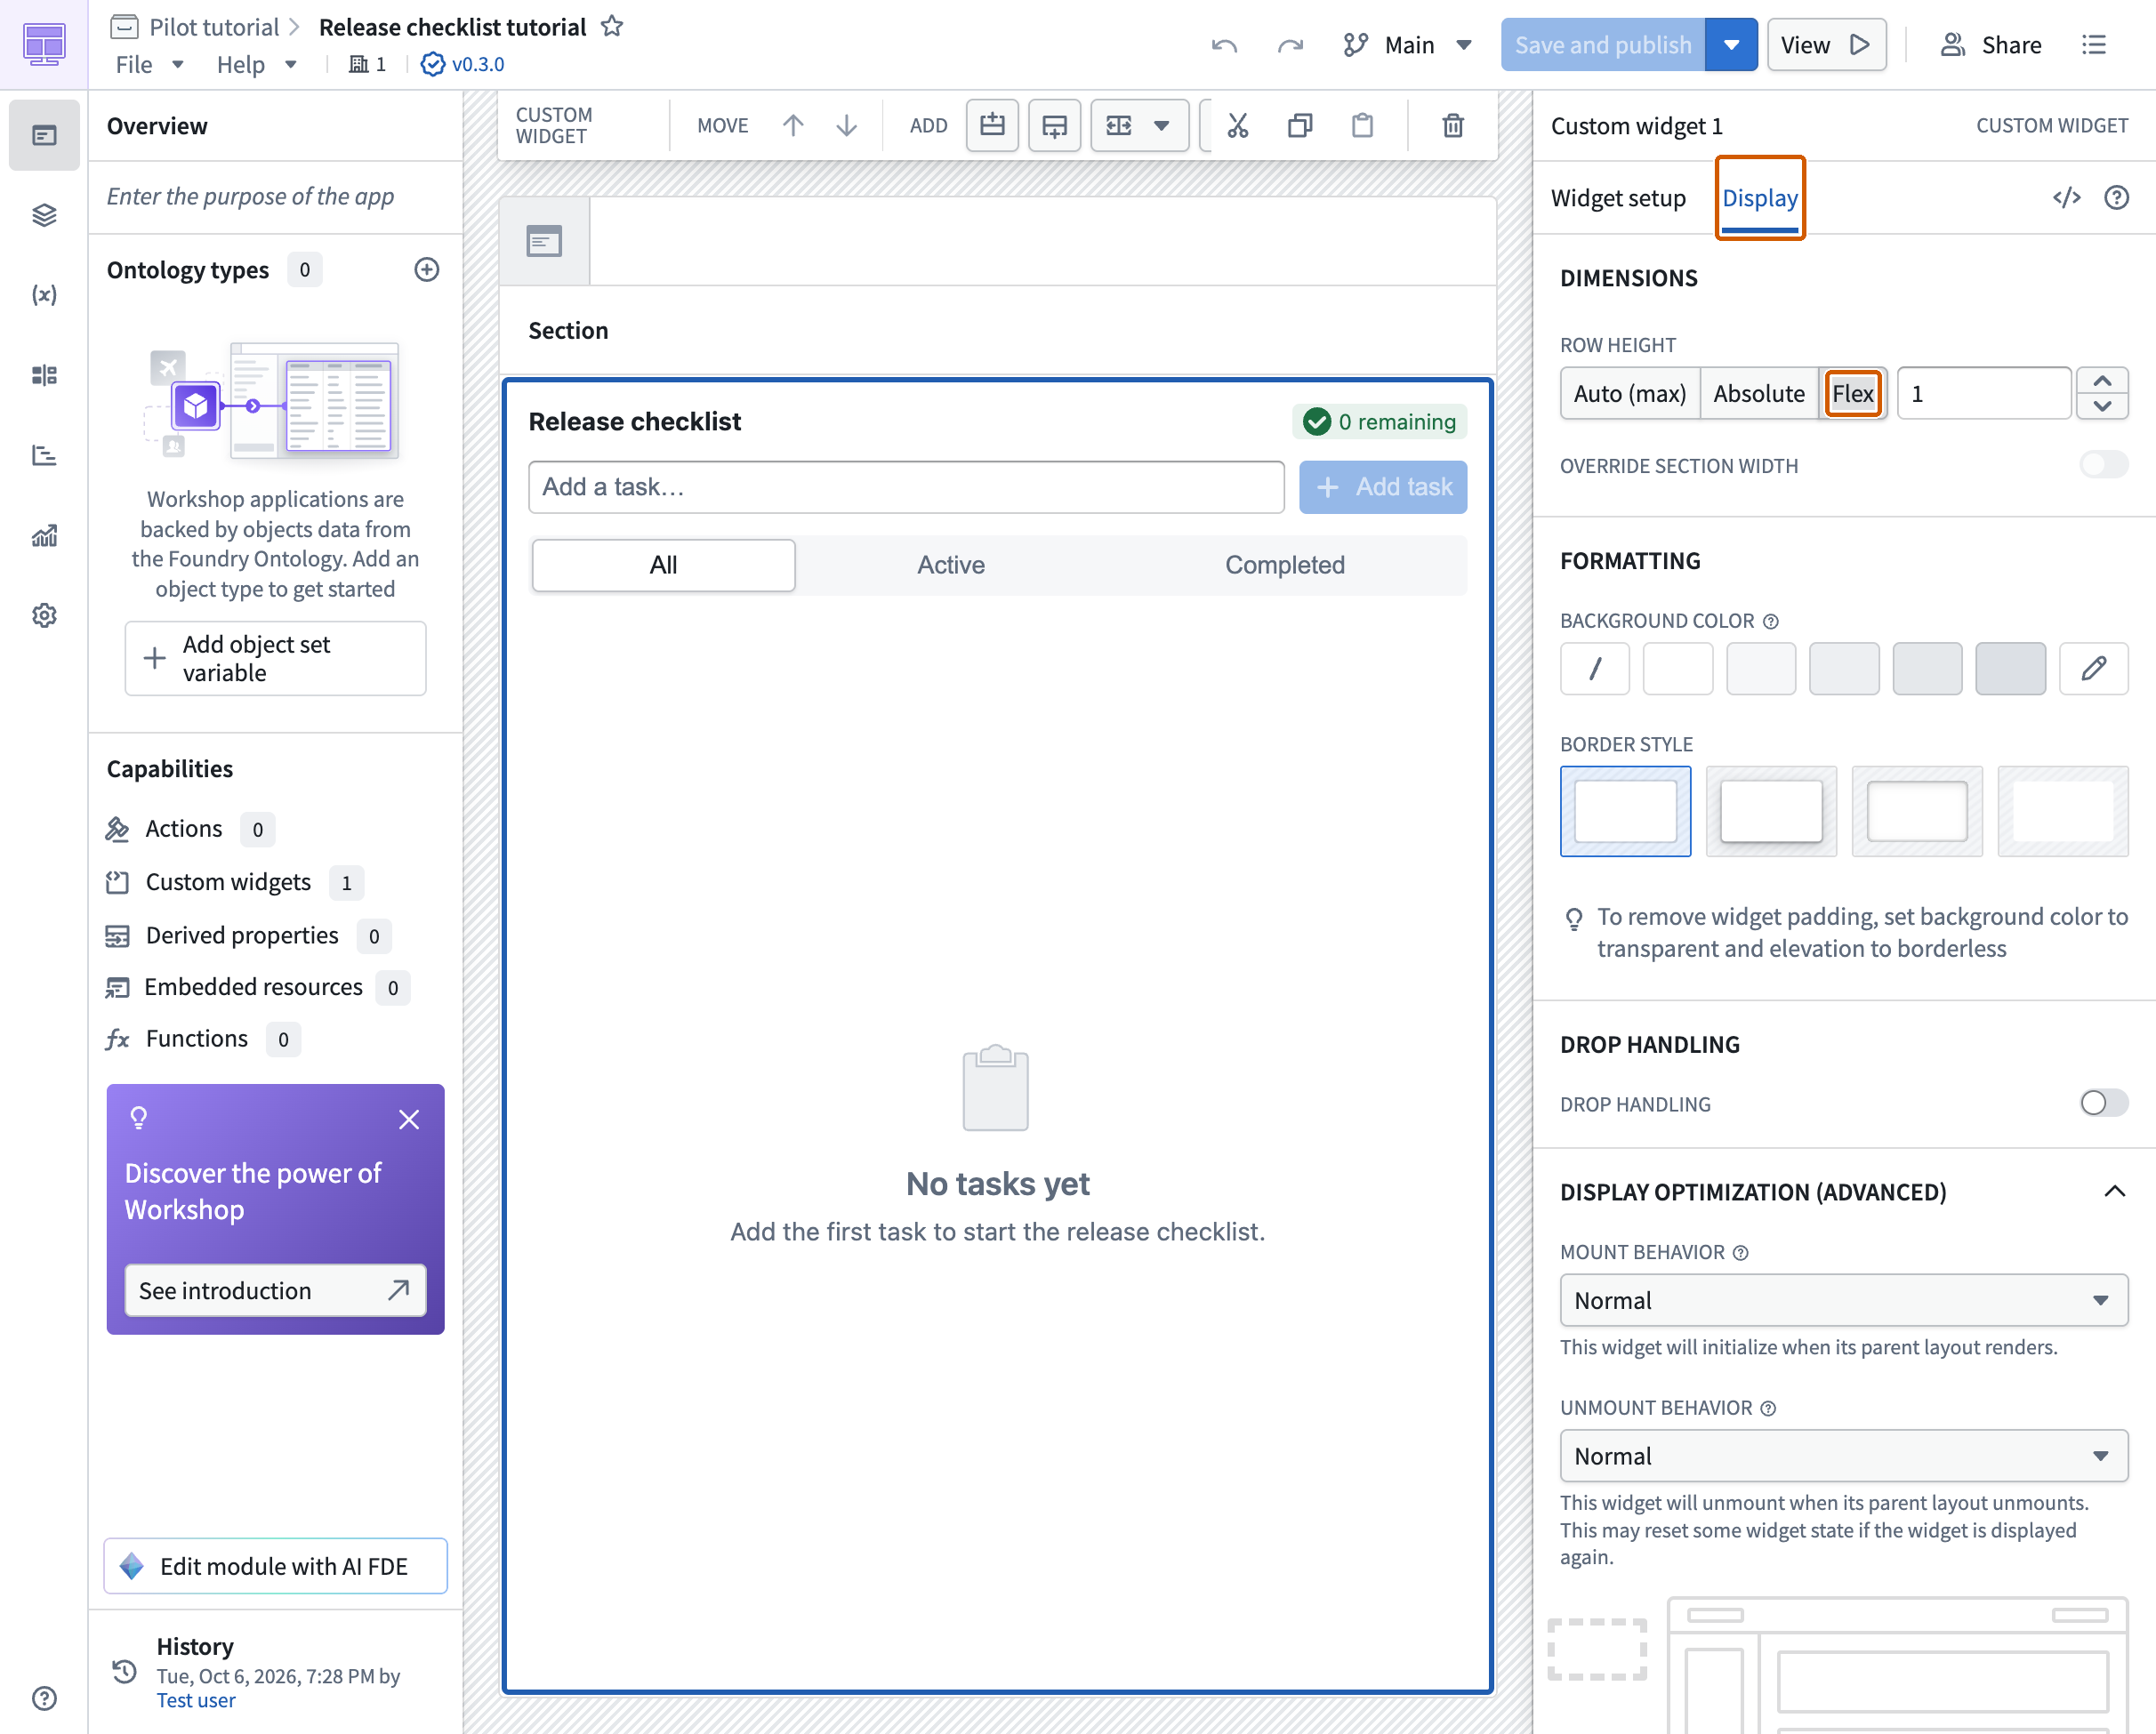
Next, check the layout:
- Open Display and set Row height to Flex for this example. The generated widget fills its container; Auto (max) gave it zero height.
- Arrange the surrounding sections. This example uses one section with Column width set to Flex.
- Confirm that the checklist and its controls are visible. See Auto sizing if your widget uses a different layout.
Select Save and publish, then View. If widget Dev mode is active, select Pause before testing the release, or Stop to end development mode. Selecting a published version alone does not disable your personal development override.
Repeat the seven task checks in the published Workshop module, including a full-page reload. Delete the synthetic task when finished. This example defines no parameters or events; if you add them, configure and test their Workshop bindings separately.
Create a new task model for a widget
To build the widget with new definitions, choose Custom widget set on the welcome screen. Enable creation of object and action types in Modify Ontology permissions, as shown in the application setup, and leave modifications to existing definitions prohibited.
Enter this prompt, then select Create widget set.
Copied!1 2 3 4 5 6 7 8 9 10 11 12Build a custom Workshop widget set called Workshop release checklist. Create a new Widget Checklist Task object type with an ID, title, and completed status, plus actions to add a task, mark it complete or incomplete, and delete it. Show a clear task list with All, Active, and Completed filters and a remaining-task count. Use Blueprint components and synthetic sample tasks: Review the checklist, Prepare the demo, and Confirm the release. Do not modify any existing Ontology definitions.
Inspect Ontology after generation. The expected result is four proposed entities: one task object type and three actions. If Pilot reused existing definitions, ask it to create distinct new API names and update the widget, then inspect the graph again.
Repeat the seed-data checks, including task submission with Enter. Follow the Ontology deployment steps, using Branched data for the widget's branch preview. Test and delete a synthetic task, review and merge the Ontology proposal, then return to Main.
After merging, update the SDK to include the new definitions. Confirm that the installed SDK is On latest and CI reports SUCCEEDED before selecting Tag and release.
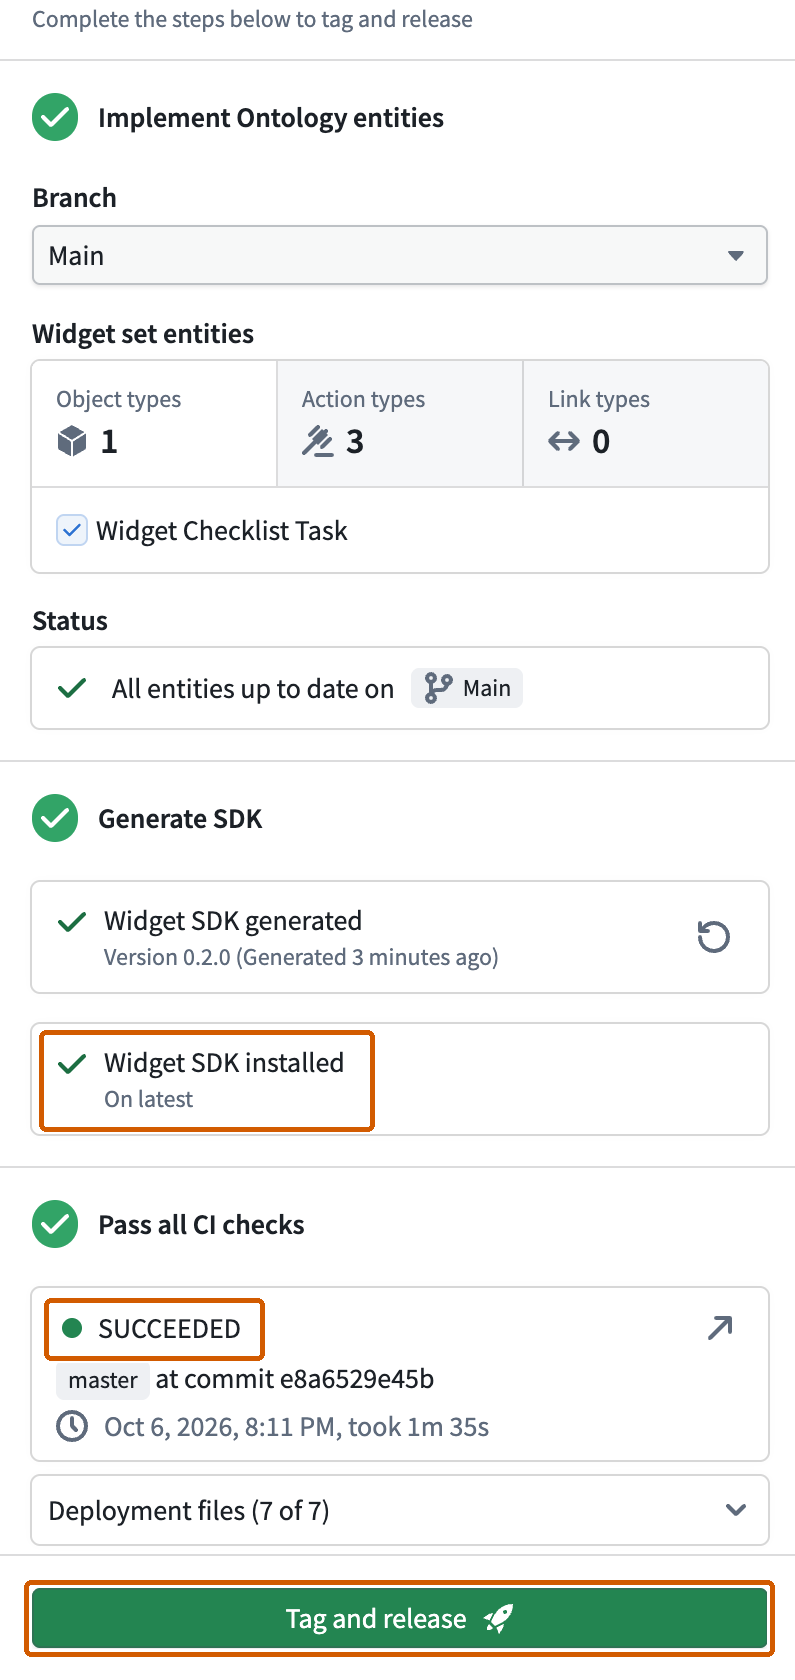
If the preview times out or CI cannot find the new entities, see Custom widget preview does not load and Generate and install the SDK.
Configure a heading in Workshop
The new-entity widget generated for this example includes a string parameter named Heading. Your generated widget may expose different parameters; inspect its configuration first.
In the Workshop module, select the released widget:
- Under Widget setup > Parameters > Heading, choose Select string variable.
- Choose New string variable > Static, then open the created variable.
- Set Default value to
Workshop release tasksand name the variableChecklist heading. - Confirm that the widget displays the configured heading.
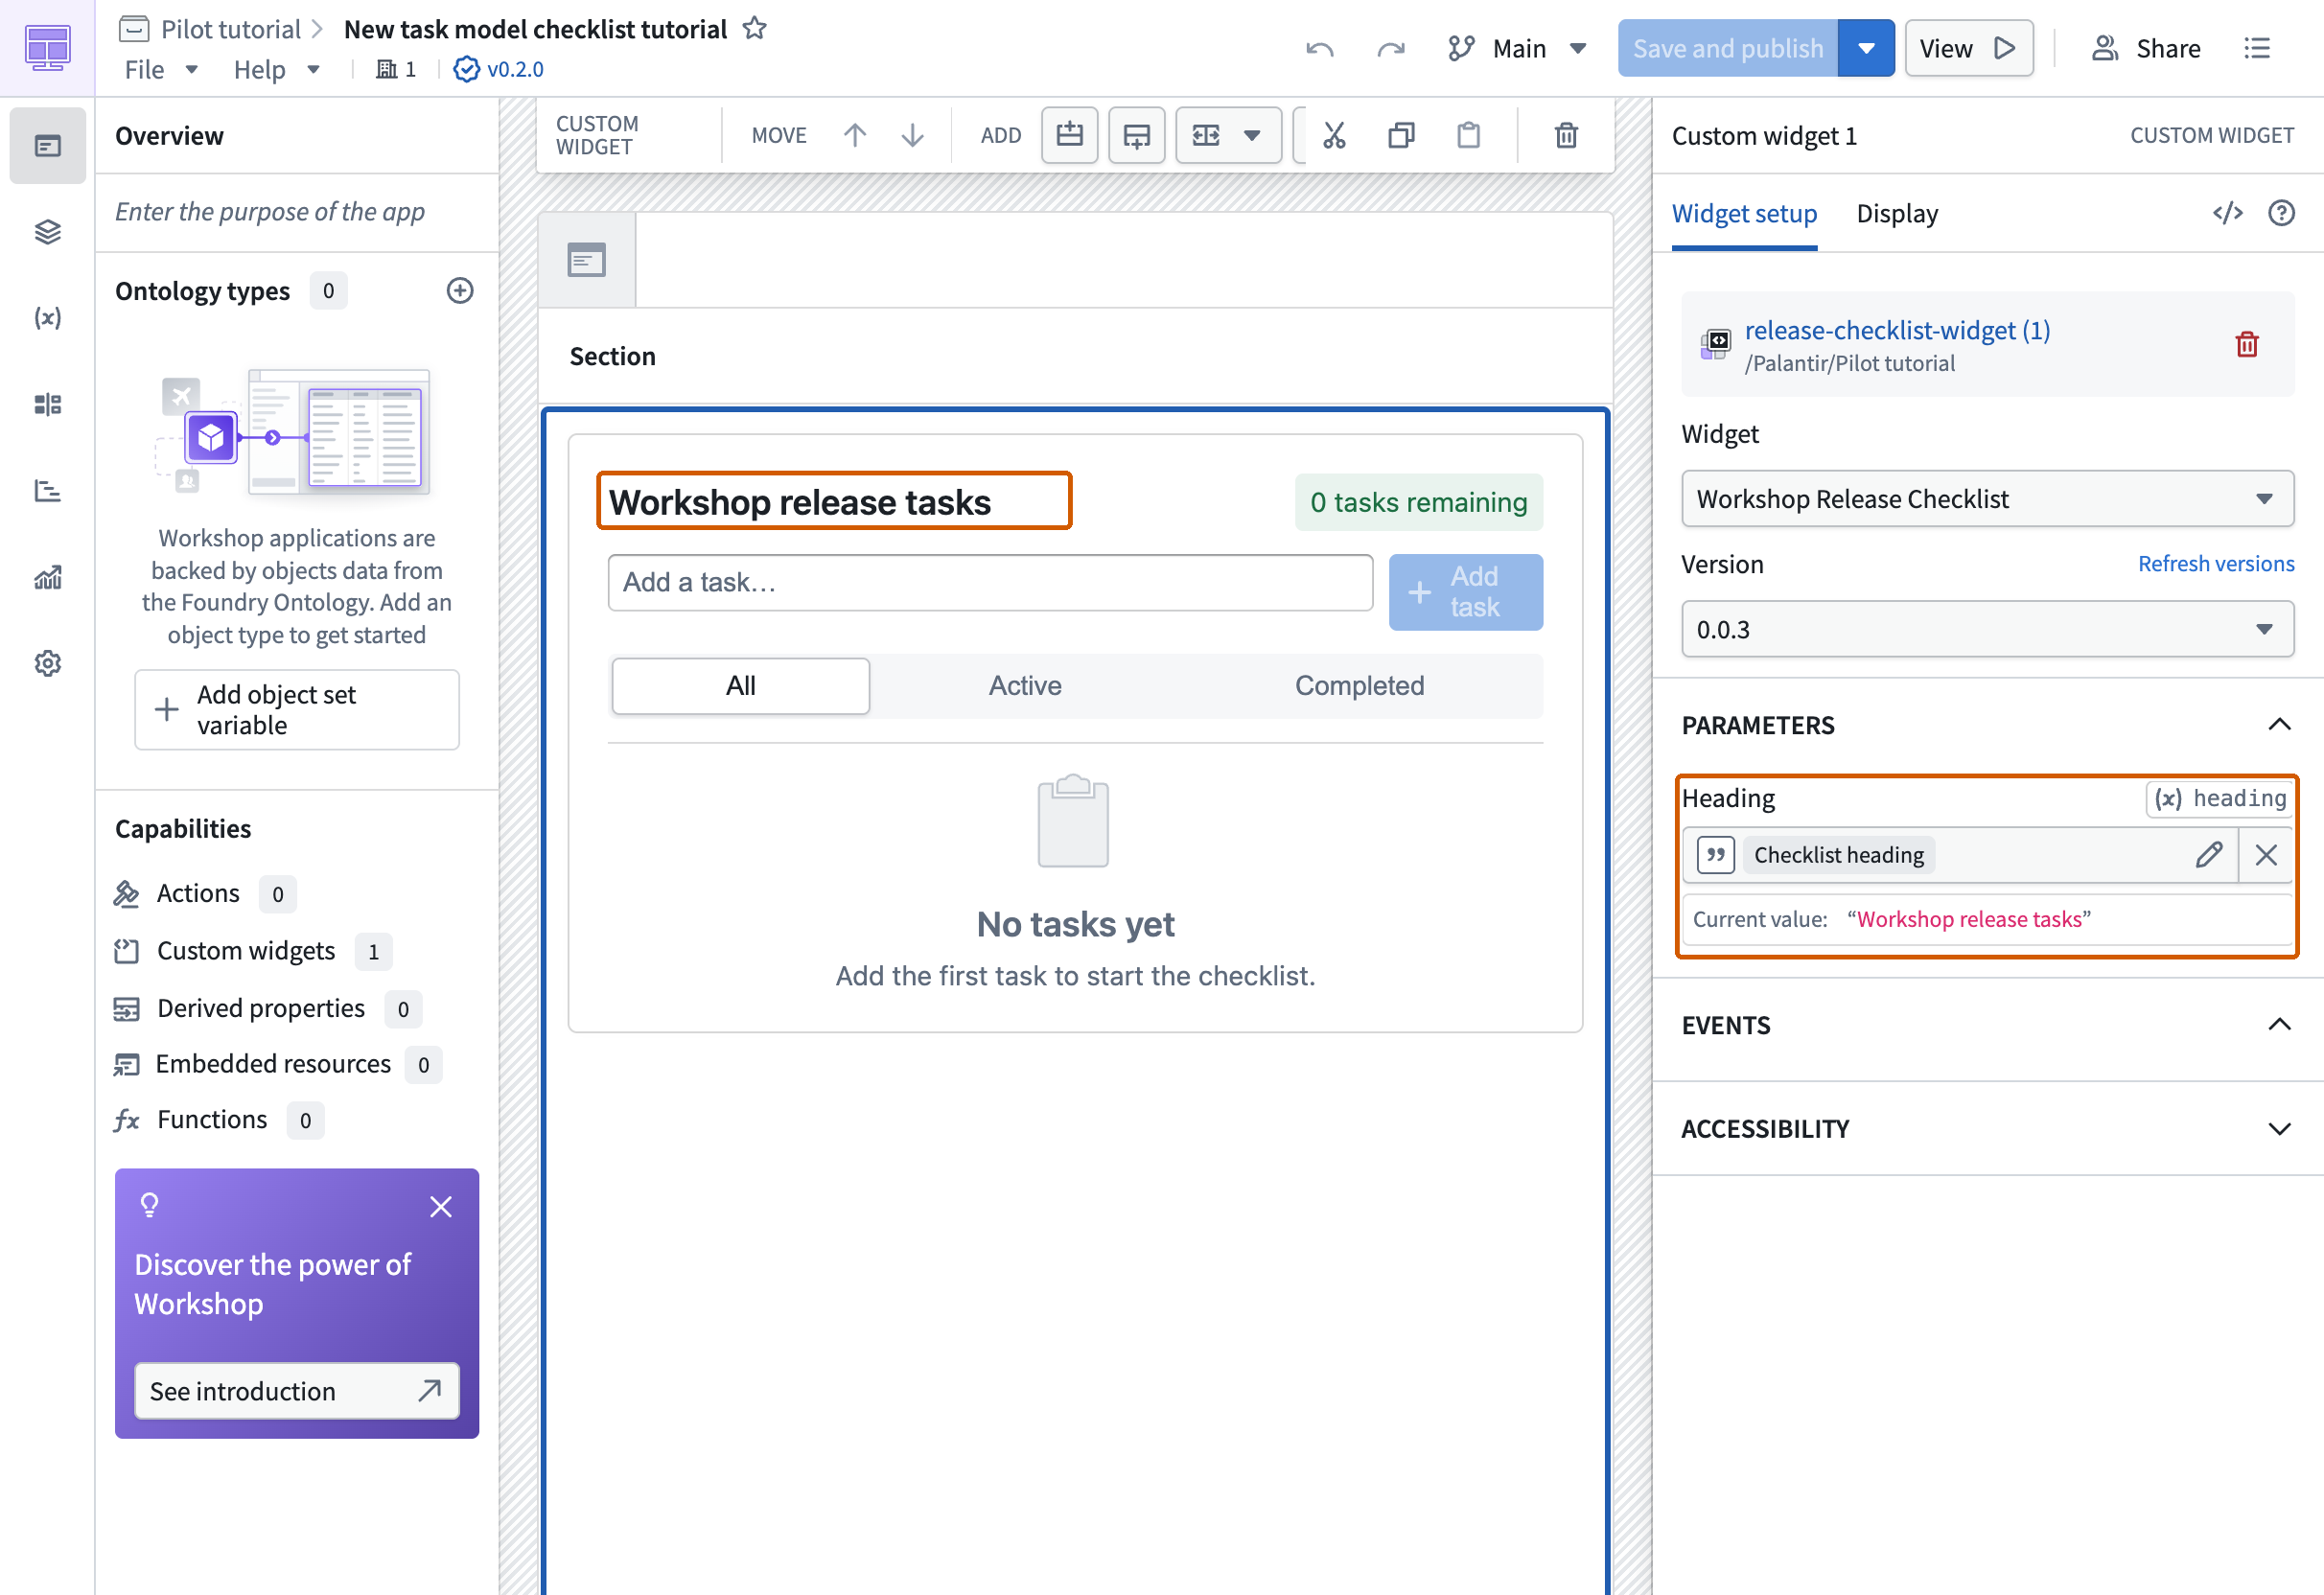
Set the widget and section dimensions as described above. Select Save and publish, then View, and pause Dev mode if it is active.
Repeat all seven task checks. Confirm that both the heading and task completion persist after a full-page reload, then delete the synthetic task. This widget defines no events; event bindings require separate configuration and testing.